• HOME
  • {A}’s Chipmunk Training Archives

 Homepage

  • The Homestead
    • Home Projects
    • Home Improvement
    • Home Decor
      • Seasonal Home decor
        • FALL Home Decor
        • WINTER Home Decor
        • SPRING Crafts and Creations
        • SUMMER Crafts and Creations
    • Our Chickens
    • Gardening
    • Organization
    • Re-Purposing
    • Furniture Refinishing
    • Budget
  • Crafts & Creations
    • Seasonal Home decor
      • FALL Crafts and Creations
      • WINTER Crafts and Creations
      • SPRING Crafts and Creations
      • SUMMER Crafts and Creations
    • DIY (Do-It-Yourself) Project
    • Kids Arts and Crafts
    • Homemade/Handmade Gift Ideas
    • Holiday Crafts
    • Fan Pulls
    • Free Printable/Downloadable
    • Sewing Projects
    • Giveaways
    • Business Features
  • Recipes/FoodFun
    • Breakfast
    • Lunch
    • Main Dish
    • Sandwiches
    • Appetizers
    • Slow Cooker
    • On The Grill
    • Side Dishes
      • Soups
      • Salads
    • Baking
      • Breads, Rolls and Muffins
    • Snacks
    • Treats
    • Desserts
    • Drinks
  • Homeschooling
    • Elementary Homeschooling
      • Elementary Homeschooling READING
      • Elementary Homeschooling MATH
      • Elementary Homeschooling LANGUAGE ARTS
      • Elementary Homeschooling SCIENCE
      • Elementary Homeschooling HOME ECONOMICS
      • Kids Arts and Crafts
    • Middle School Homeschooling
      • Middle School Homeschooling SCIENCE
      • Middle School Homeschooling HOME ECONOMICS
    • Language Arts
    • Math
    • History / Social Studies
    • Geography
    • Foreign Language
    • Field Trips
    • Games
    • Nature Study
  • The Big Picture
    • Life In General
    • Celebrations
    • Faith
      • Into the Light; The Series
    • Giveaways
    • Reviews & Sponsors
  • Photography & Lettering
    • Photography
    • truck lettering
    • vehicle graphics
    • Newborns
    • Kids
    • Engagement
    • High School Senior Pictures
    • High School Senior Pictures Sneak Peeks

Call Us Copy Cats! | Crayon Wall Art

September 13, 2011 By Laura 16 Comments

crayon-wall-art-tutorial-20


This crayon art thing that is happening….You know, the one that’s sweeping the nation?  It’s been pinned to death, and it’s invaded Blogland, like there is tomorrow.  And although I am hardly ever one to copy someone else’s ideas, or follow trends for the sake of everybody else doing it, I KNEW I was going to do this art-craft with my kids, the very-first-time I saw it.

Even at the risk, of being called ‘Copy Cats’.


crayon-wall-art-tutorial  So I picked up a 16″ x 20″ white canvas. I knew I was going to love this piece when it was done so I wanted it as big as I thought we could manage, without buying every store in town out of Crayolas.  Oh yes! It has to be Crayola Crayons for me. IS there another brand? Huh. Not in my world. I’ve been a Crayon-Brat since I could….well, color! It’s Crayola, or bust.

So we started with a box of 64, and two boxes of 24. And then…..we got a 3rd box of 24 after that.  Naturally, we couldn’t use ALL of the crayons in every box.  Every color we did use, we needed 4 or more of, to make it across the canvas.  Some colors were just not going to work.  And some, I just didn’t like.


crayon-wall-art-tutorial-1  We laid our colors in the exact order we wanted, along the top of the canvas on the table.  Then we got ready to glue them.


crayon-wall-art-tutorial-2 Our initial plan, was to hot glue the crayons down.  But we quickly decided that wasn’t working for us.  The hot glue cooled and hardened too quickly.   So we broke out the ‘Amazing E-6000’.


crayon-wall-art-tutorial-3 Amazing, is right.  I love the stuff!  It’s the Mac-Daddy of all super glues, in my crafting world.
It really stinks though. I recommend ventilation, because the fumes can’t be good for anyone.


crayon-wall-art-tutorial-4 We just put a couple of lines of glue for a few inches at a time, and the kids helped lay down the crayons in order, as we went.   Alexis helped make sure the tops of the crayons, were as even as possible, aligned with the top of the canvas.

I wanted to just get to melting them right away.  But Alexis, often my handy voice of reason, convinced me that it really would be best, to let the glue crayons set overnight, if we were going to apply high heat to them.

I knew she was right. So I stomped away, and pretty much pouted the rest of the day.


crayon-wall-art-tutorial-5 The next day, it was all set for sure! Those crayons weren’t budging.   So we stood the canvas up on the bench, and leaned it against the table.   We put large sheets of paper underneath the canvas, because we knew we were about to make a hot mess. (Like usual, but literally this time.)  I highly advise a drop cloth or paper of some sort! The wax is bound to get dripping.


crayon-wall-art-tutorial-6 Finally, we could start melting the crayons!  (Yyyipeeee!!)   I can tell you, we tried a hair dryer, for about….ohhh, a milli-second. I knew there was no way I’d have that kind of patience. If it ever got the crayons melting at all, the hair dryer would probably be over-heating by then. So we plugged in my heat gun, I have used for embossing powder, over the years. I KNEW that would work.

crayon-wall-art-tutorial-7 And boy did it ever.  We learned immediately that it could really blow some hot wax around!  Oops!


crayon-wall-art-tutorial-8 Very slowly, we worked our way across, watching what was happening as it was, and adjusting our distance and angle of the blowing hot air, as we did. I really didn’t want the colors blowing sideways!  But….more ‘control’ therapy for me.  Sometimes, one cannot control the way the wind blows, completely. (I’ve tried, on many-a-photo-shoot.) Furthermore, I wanted this to be more the kid’s masterpiece, than mine.


crayon-wall-art-tutorial-9 We were directing the heat onto the lower end of the crayons, and waving it around as needed.  The trick, is really to avoid getting too close to the top of the crayons, which we did not want to melt, and to not heat the middle either, as to have a crayon tip blob just fall out.  Sometimes, we started to see smoke, from the paper heating so much, so you want to be careful of that too.

We all took turns, while we all tried to verbally direct each other too. lol

crayon-wall-art-tutorial-10 WARNING though:   This is really NOT  a craft for a young child to do alone.  The heat gun is hot, and the melting wax is really hot too.  But, it’s a fun craft to do with your littles.


crayon-wall-art-tutorial-11 I really kept trying to go back, to try and perfect this, or fill in that, and the kids were like, “Mama, just leave it!!  It looks good. Don’t ruin it!”.   Excellent therapy for me, to just embrace the art that happened.   Because I have ALWAYS been the kind of technically sound type artist.  The kind that brings to life something I see, exactly as I see it in my head, down to the last detail.   My ‘let-loose’ therapy started in art school, the day I had to draw a nude model on paper, with a stick that had been dipped in ink, with my mouth. Talk about lack of control!  I think that exercise actually set me back a few years. lol


crayon-wall-art-tutorial-12 We all took a step back to take a good look at out artwork, and agreed to call it DONE.

Then we waited for Daddy to come home to see it. And of course, hang it up for us.  Somewhere.

But where?  That was the question.  I wanted it in every room I thought of!  It’s colorful, and happy!  And the kids and I made it together.   It had to be in a good place.


crayon-wall-art-tutorial-13
We decided on the wall over the stairwell in the kitchen, down to the lower levels, was a good place for awhile.


crayon-wall-art-tutorial-14  It was on the way down to what will at some point be the kids’ Rec Room.

It’s also on the way down to the Laundry Room.  And you all know, we ALL could use a smile, on the way to the Laundry Room!

crayon-wall-art-tutorial-13
Being over the stairwell there, it can be seen from about half the house on that level.  The kitchen, the school room, and the living room.


crayon-wall-art-tutorial-17 I have always said, “Colors make me happy.”  They really do.


crayon-wall-art-tutorial-18
Oh, the texture!
I wonder what the Crayola Corporation thinks about this craze.  Surely they’ve caught wind of it by now.  Probably not being able to keep their crayons in stock at stores, and all. I’d have to guess they should be pleased, with what must be a sudden and dramatic increase in sales. We helped with that!!


crayon-wall-art-tutorial-19 But again, it was not my idea.  I wish it was.  And although copying the latest craft happening will never be my style, I do not regret this once, for a minute.
I do want that thank, though, whoever did come up with this idea. Because we had so much fun doing it!

Have you, given this idea a try yet?  And if not, don’t you want to now?

******


Save

Filed Under: Crafts & Creations, DIY (Do-It-Yourself) Project, Kids Arts and Crafts, Tutorial Tagged With: arts and crafts, crafts, Crayola-crayons, crayon-art, crayon-wall-art, DIY-art, E-6000, melting crayons

My First Annie Sloan Chalk Paint Project / Before & After

August 31, 2011 By Laura 21 Comments

annie-sloan-chalk-paint-project-7

I have been SO ridiculously excited about this post. And you all know what happens when I get excited! I babble! But I’m going to make great effort in not doing that, this time. (Deep breath. I can do it! I know I can!).  I’ve just had to focus on getting our current $100 Gift Card Give Away together (located in The Big Picture ; ).

So, we’re talking Annie Sloan Chalk Paint.  If you visit many creative-type blogs, surely you have heard of it by now. It’s ‘all the rage’ right now, as they say. And frankly, I was believing it.  So we ordered 5 cans of paint, and both the clear and dark waxes.   Now, I’m not going to get into exactly what colors we ordered right now because, we have a very long list of refinishing projects we plan on doing with this paint, and I feel like each one will be more of an exciting surprise for you all as we blog those ‘Before and After’ projects, if you don’t even know the colors we have to work with.  Am I right? I even went so far, as to digitally cover the paint colors, the day our order came in, and I was so excited I had to share a photo on our Facebook Page.  I know.  The lengths that I will go to.

But anyhoo, that’s the preliminary chat!

annie-sloan-chalk-paint-project-5

I have never worked with chalk paint before, or waxes.  So because I expected this to be a whole new experience than any I’d had before when painting, I wanted to start with a small project.  You know, something fun, but o.k. to experiment with, so I could get a real feel for how this paint worked, and practice waxing, etc.  I know that sounds wise.  ; )  But in other words, I was scared to just jump in with this stuff, and re-do some important family furniture piece for our home when, frankly, I wasn’t sure I’d know exactly what the heck I was doing.

Now, as a little related side-story, there is an elderly couple who are very dear friends of ours, and almost a couple of months ago, {A} helped their daughter move them to a more suitable and helpful place for folks their age. Not a rest home. It’s a lovely community. But in the process of packing up one place to move to the next, they were down-sizing and getting rid of a whole  lot of great stuff.  They were bringing it all to a consignment place, but before they did, they gave us dibs to go through it all, and take whatever we wanted.  We didn’t take a whole lot, but what we did take is pretty cool stuff.

One of those things, was this bird house.

The daughter believed it was really an indoor home-decor piece. But I told her, “That’s o.k. I’m still putting it outside.” Because I new just where I wanted to put it. Under the apple tree, near our gardens.  And I have to tell you, every time I have caught glance of it over there, it has made me smile, and bubbles up joy inside me. I just love to see it standing there. It’s charming, isn’t it?

0011

0021

But I also new, it was the perfect kind of piece, to take the wrath of my experimental Annie Sloan endeavors. I couldn’t imagine I could possibly ruin it, really.  Could I?  My challenge was, what color should I paint it? Because  I actually really liked the color it was, already. And I knew A.S. (Annie Sloan) had a color called Versailles, that is like a tannish-green, of sorts? Pretty similar to this. But if I was going to paint it, I wanted it to be look different enough in the end, to be worth the work!  So as much as I loved the color it was, I was going to veer in another direction.

0031
I can’t tell you how pleased I was to learn, that every little piece of window framework, and even the door, came off!  Gosh, how could I possibly screw this up, right? The way I saw it, I’d hardly even need any brush control, now.  This was going to be a breeze.


0041
Because I had intentions of seriously sanding and distressing the piece when I was done, to make it look somewhat old and weathered,  I felt like I needed to paint a new color, under the top new color. So I painted the entire house Paris Grey first.

0051
As well as the entire stand.

Then it was time, to really get down to the fun parts.  And because of that, I completely got lost in my own world. Completely. If you know me, you know, that once I get into my creative projects, I’m in a zone of my own. Time FA-LIES.  I feel so much joy inside as I work, being creative, and frankly, I’m oblivious to much else going on around me, or what else I should be doing.

Like….taking photos as I go.  I mean, the project was over the course of a few days, because I have lots of responsibilities and priorities, with my family, that need tending to. But I was right back to my project, every-chance-I-got.  Like…”Let me back at it!”.  I was also pretty much a mess while I was doing it too, so touching my camera was really not in the forefront of my mind. Still, I will tell you all about my process to the final piece.

Ready to see a little transformation?

0061

For the body of the house, I went with the Annie Sloan paint color Province, which I think is so beautiful. Even in the can. I was a little concerned that it would clash with the greens of the outdoors. And yet, I wanted it to stand out too. In the the end, I was just dying to paint with this color. So it’s what I went with.  All of the window trims, house trim, and roof, was painted in Annie’s Old White.  As was the stand.  I did use 2 coats, because I knew I’d be sanding like the dickens, and I really wanted some contrast there. So once it was all painted and dry (it dries super fast, which is a good thing for impatient me), I waxed the whole thing with the Clear Wax, doing the little pieces individually, and put it all back together. The wax took some getting used to, to work with. There’s a ‘good time’ to wipe it down, after applying, when it’s no longer wet, and not too dry either. But just touching it, I got a feel for it quickly. After the clear wax coating, I sanded the dickens out of it with 100 grit sandpaper, really attacking the edges of pieces, and even the downward strokes on the roof and house walls.

Then, I applied the dark wax, and when ready, rubbed it in or off where I wanted. The dark wax is messy stuff. But FUN!!

Waxing and sanding, is not a glamorous job. I was a HOT MESS, while working at this point. It was hot and humid out anyway, so I was sweating, putting out such physical labors. The sanding of this piece was a messy job, that I decided needed to be done on the deck, from the paint dust.  The wax has a wicked strong odor too, as some mediums do, but I did that in my sunroom where the whole project was, with all of the (surround) windows open.  So imagine me: trickling sweat, hair stuck to my head, paint dust stuck to me everywhere, hands and nails a wreck with paint and wax, and possibly stinkin’.  But having the freakin’ time of my life!!

0071 This is what I love, about creativity.  It’s contagious!!  Just look at the hot mess on this table, that looked just like this for days. But I’m NOT the only one who made it!!  The ‘other’ kids helped! Once one in our family starts getting creative doing one thing or another, someone else gets a hankering to do something of their own too, and so another does, and so on. We had coloring, painting, and even wood burning going on here in this room! Thank goodness we have other places to eat dinner together in the house. Because this was the sight in this one for a good 3 days.

But the birdhouse was not done. Did you notice the pink paint around in a couple of photos up?  ; )  All along, if I was going to paint my house Province, I envisioned tiny painted pink roses, and little green vines and leaves on it. I’d use acrylic paints for this part. Not Annie Sloan.  The problem was, I had never painted little flowers in this kind of paint before. I’ve been more of a watercolorist.

But….there is always my very best friend to turn to:  GOOGLE!  I was sure I could search up some quick how-to videos and get myself a quick lesson or 2. And so I did.  Then I squirted some pinks, greens and white plops of paint on a coated paper plate, got out some brushes, practiced a few roses on the plate, and then just winged it!!   With a pencil, I lightly traced the door and attic window on the house (for placement) and then removed them (to put back on after painting the roses & vinery), and then….I went ahead and painted the roses and vinery right on the house.  (This is huge for me, People! I don’t spontaneously wing things like this, with no real experience. Because I’m a serious perfectionist! Normally, I would want 100% confidence first because, this wasn’t going to come off the chalk paint!  But, because I am also working on this need-for-perfectionism-part of me, I challenged myself to do it anyway. Fearing….I came so far with loving my birdhouse, only to possible ruin it in a moment. Yikes! But that’s the assignment, you know? Looking fear dead in the eyes, and saying,

“You won’t take me down!! I won’t LET you!”

annie-sloan-chalk-paint-project

And there she was.  All done.
I felt like I won.

Once the acrylic dried, I did rub some clear wax over the flowers and vines, just for protection.

annie-sloan-chalk-paint-project-1

I really, really, really loved the original door. Especially that rusty nail door knob!  So I really did not want to mess with it much. All I did with it, was give it an Old White wash (part water), let it dry, clear waxed it, distressed it good, and then used some dark wax on it too.

In the end, I distessed it so much that in parts, I went right down to the original wood.  So again, the whole process was:

1) Undercoat of paint. 2) Painting of top coat. 3) Clear wax application and rubbing in or off. 4) Distressing. 5) Dark wax.

And for this project, the added steps of the acrylic floral painting and clear waxing.

annie-sloan-chalk-paint-project-2
I could not wait, to put her outside, back under the apple tree.


annie-sloan-chalk-paint-project-3
I love the whole piece. But the door is still my favorite feature.

Do you forget what it used to look like?

With any kind of refinishing projects, I personally just love to see the side-by-side “Before & Afters”, so I’ve got one for you, with this project….

annie-sloan-chalk-paint-project-6

I loved it before. And thankfully, I still love it.

What do YOU think?  Would you have left it alone? Or do you like my refinish?  I’d love to know your preference. You won’t hurt my feelings much. ; )

The important thing is two-fold:

1) I got a really good feel for this paint, and waxes, and a certain new (healthy!) addiction.

annie-sloan-chalk-paint-project-4

And 2) I have to tell you, every time I have caught glance of it over there, it has still made me smile, and bubble up joy inside me.

I just love to see it standing there. It’s charming, isn’t it?

I’m telling you. If some little birds don’t move in to this sweet little pad, I just might!

******

Filed Under: Crafts & Creations, Home Decor, Re-Purposing, Refinishing, The Homestead Tagged With: annie-sloan-chalk-paint, annie-sloan-chalk-paint-projects, before-and-after-refinishes, before-nd-after-Annie-Sloan-projects, bird-house-make-over, bird-houses, home-and-garden, refinishes, refinishing, refinishing-bird-houses

Playing to WIN! / $ Give-Away! $

August 29, 2011 By Laura 124 Comments

sports_text1


Yes. Here I am talking about Basketball and such already and the new season has not even begun yet! But honestly, you DO want to bear with me. Today there’s a whole new spin to the perspectives and purpose of this post. I’d love for you all to give it a read, and then join in with your thoughts & experiences, regarding your kid’s sports. In the end, you and I can both win. ; )


Growing up as a kid, I was never really involved in any kind of organized sports. Neither was my husband, in his childhood.  Sometimes as a kid, in my free time, I played tennis against the school wall down the street, or my brothers and I played basketball in the drive way.  It was more of the ‘Around the World’ type of basketball, rather than any real 1-on-1. The only ones who took a beating, were the Hosta plants that lined the single lane driveway! I have memories of my Dad pitching a wiffle ball to me too, because I really loved to hit, and I wasn’t half bad! He’d even go get the ball, only to pitch it to me again, over and over.  But that was the extent of my sports. I was really more of the artist type. I spent most of my time drawing, painting, and (closet) singing, right through high school.  Going to art school was my plan right from Kindergarten, and when I graduated from high school, that’s just what I did.

So no one was more surprised than I was, to find I was going to be ‘one of those sports moms’. You know the kind.  The ones who are always on the sidelines, really into the game, screaming her head off the whole time? That would be me.

I remember the day I realized it too. Things had just begun in that little school gym, where I had brought my daughter {A}, and I immediately found myself out of my seat, hootin’, hollarin’, cheering, and shouting out instructional tips. I was all hyped up with excitement and adrenaline, and apparently making a little scene, because the coaches and all of the kids, kept looking at me with an amused expression.  Maybe, because it was just the first practice of this basketball season, for my first child’s, first practice, and first sport, ever.  I was the one and only spectator there, as all of the other parents had dropped their kids off.

1_2006_

(2006)

That was six years ago, when {A} was just 8 years old.  It was the beginning of a whole new experience, for all of us, as a family. The first reward we found in sports, was that it was another activity we enjoyed together. She really loved playing, and you could always find the other 5 of the 6 of us in the bleachers, cheering her and her team on. Her little siblings were a cheer section of their own!  Her Dad commentated quietly, often explaining to me what he thought just happened. And then there was me; the loudest of us all.

2_2007_

(2007)

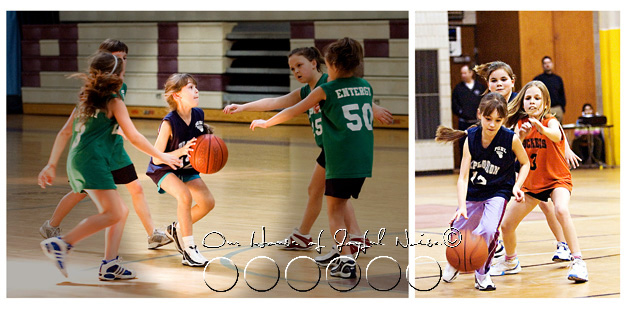
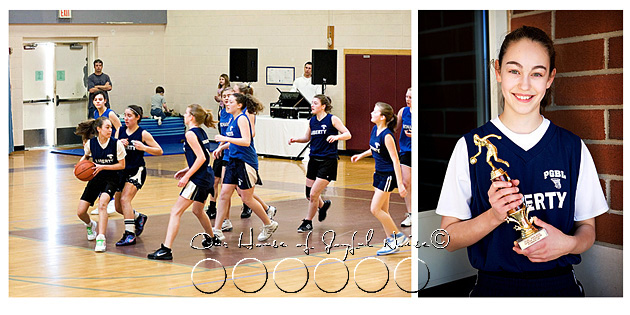
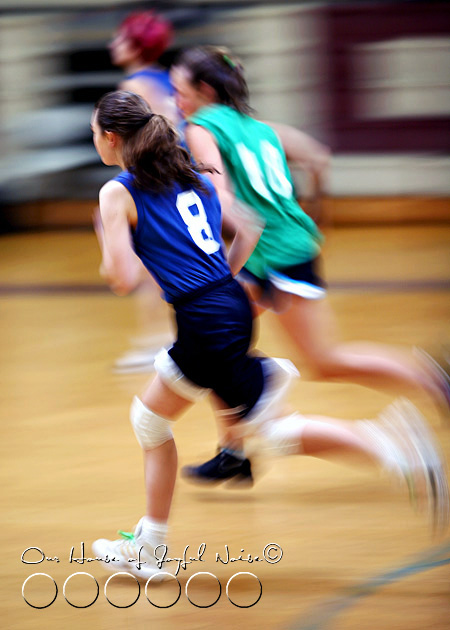
We never doubted {A} would have a good time playing on a team.  She was always that kind of kid, who had fun no matter what she was doing.  She was a ‘people person’, who approached and befriended others easily. You know, very SOCIAL, even though she was a home schooled kid.  😉 To this day, people ask us if she is ever not smiling. But I’d always taught her, it was important to do her best, no matter what. I never followed the line of thinking with sports, that ‘as long as we have fun, that’s what matters.’ No!! We’re here to WIN!! Aren’t we? It’s great to enjoy it, but her team was counting on her to give it all she had, and so was I. She was probably an average player to start, being new not only to the game, but a year late into it, as opposed to her other girls who played the year prior. But, she was well-liked, and committed to her team.  Her biggest downfall was her heart on the court; she felt bad taking the ball away from even a player on the opposing team. ; ) We had a few chats about that, but otherwise, it was a great first and second season for her, as she learned the rules, in and outs of the game, through weekly practices and games. We all learned along with her, listening to instruction, and those ear-piercing whistle blows.

She was still working on refining all of her skills. Especially with her new physical self; she had grown 5 inches in the past year!

2_2009

3_2009_

(2009)

As she got a little older, we saw things start to change in her a little bit.  She was getting on the other side of that awkward growth spurt. She was all knees and elbows, for a bit there. She had learned a lot more about the game, and so did we. Basketball had become a regular part of our lives, every cold season, as we got her to her practices, and watched more intently than ever, at her games.  She was practicing off the court more, her focus was better, her determination was stronger, and all of the skills she had acquired were starting to come together. I was enjoying seeing her thrive, and had become more maniacal than ever, at her games.  For perspective, I often leave a game with a throat that is torn up, and a new hair-do. ; )

She was still her happy-go-lucky self.  But she was more serious about every game.  We started having post-game talks on the way home, about the great plays, or ones she could have done better or differently.

4_2010_

(2010)

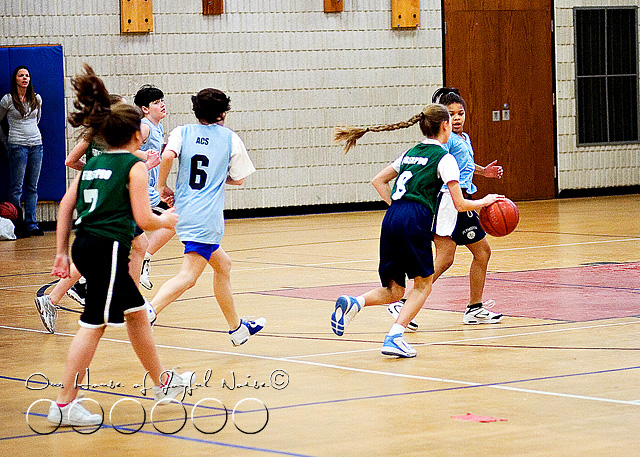
Then we hit a real milestone.  One might call it a ‘game changer’.  As more serious as she was about the game, she was still used to being on friendly terms with every coach she had had. One they all could joke with, and have fun.  But this new coach this one year, was alllll business. He wasn’t there to make friends, or waste his time. She didn’t like how he didn’t have a light-humored side.  She didn’t like how he demanded the girls do things a very certain and different way.  His way, as she saw it. She didn’t like that he was yelling angrily out onto the court at the girls, by name. (including his own daughter.)  She didn’t like a lot of things about this year. He drove the girls, hard. And he rubbed her sunny-disposition, the wrong way.

But I thought this coach this particular year, was a great thing, and I told her why:  Because it was a perfect lesson on LIFE. She was going to get a job someday, and not necessarily like how her boss does things. Or even her BOSS, for that matter. But she’d still need to do her job, follow instructions, be a team player, and respect the authority. Yes, when the time was right, she could re-evaluate things, and choose to seek a new job, more to her liking. But she had to complete the project she was committed to, just as she had to stay on this team and play the year out, just as she had committed to. It was going to be good for her, to work with someone she found very difficult.  It would help develop her character; teaching her the skills of tolerance, patience, obedience, and strength. She’d need to adjust. It would be a rough road for her, and I had every intention of being there for her, with some tough love. But she had to push herself through it.

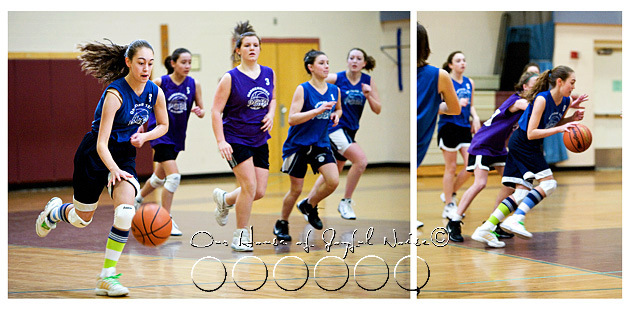
She stuck the year out. Not always happily, especially in the beginning. But she learned to deal with it all quickly. She learned to relate to the coach, on his terms.  And I was right.  By year’s end, she was a new player. She had grown so much, as a person, had new found skills, and had developed in so many ways, more than she ever had, more a than any other year. Through the difficult year, both physically and mentally, she had changed a lot.  By leaps and bounds. She had gained stamina, and a more mature perspective. She found her drive.  She had found her aggression, in a big way, on the court!  She was going for that ball, no matter who on the opposing team had it, and she would fight to hold onto it to the floor.  She wasn’t one to mess with, anymore.

She had become a real athlete.

And when the last game that year had just been played, she was the only girl who went up to her coach, and said, “Thank you, for coaching me all year. I learned a lot from you.”

6_2010 
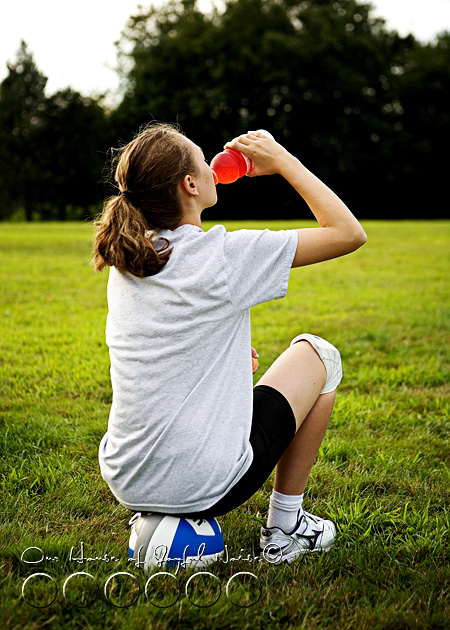
As a sports mom, I had become concerned about more than just getting her here and there, or where ever she needed to be.  I had learned how to give her all she needed, as an athlete.  I wanted to be sure she always had the energy and hydration, come practice or game time. That meant making sure she always ate right, and ate the right things, at the right times. And to keep the fluids going down. I wanted to make sure I kept her strong, and healthy!  An injury was the last thing I wanted for her.

5_

Basketball was the sport she’d always been involved with.  But she’d learned to throw a mean football, at 5 years old.  It was something she and her Daddy did a lot in the yard. Of course the older and bigger she got, the better she became.  On the court, old basketball coaches could not even believe how tall she had gotten. There was a 2 year span where she had grown a total of 8 1/2 inches!  That was really helping her game.  But she was also growing more and more interested in football.  She loved watching the games on tv, and was intent on playing Flag Football.  One clinic with Coach Greg, and she was hooked.

7_2011_1b

(2011)

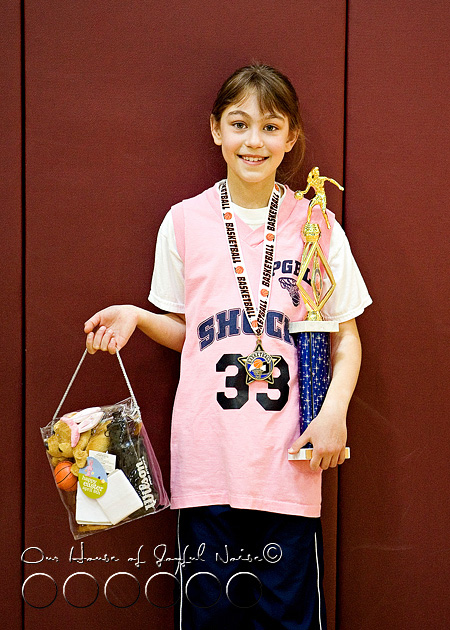
Her last year on the town’s team, was an incredible one for her.

8_2011_2b

(2011)

She was so sad to have outgrown the league, but she went out with a bang!

She had come a long, long way, in the 6 years she had played. She worked hard with the basketball, even off the court, developing skills you don’t often see in a player that age. Never mind a girl. She had learned to dribble with her knees!  She was passionate about basketball, and it showed.  Especially to those who noticed these things.

She was encouraged by current and former coaches, to go for the public South High School team. She wanted to play for them, badly.  And so I had every intention of being sure she had that chance to play for them, even though she was home schooled. I understood she’d have to pass try-outs. But I had heard making the team, or actually playing, could be…challenging, for home schoolers.  I’d cross that bridge when I got to it, if it ever proved to be a problem.

9_basketball

But that time was not here yet.  She had her heart set on making it onto the town’s spring Flag Football league, before she grew out of the age range.

Of course, she had to make the team, first. And that she did. Her former coach (Greg) knew her the second she walked into the try-outs, and her place on a team was practically automatic. ALL of the coaches were there to observe, taking notes for drafting the players they wanted.  The most unlikeliest of coaches drafted her first, based on observing the reaction of Coach Greg when she walked in, and then watching her tryout.

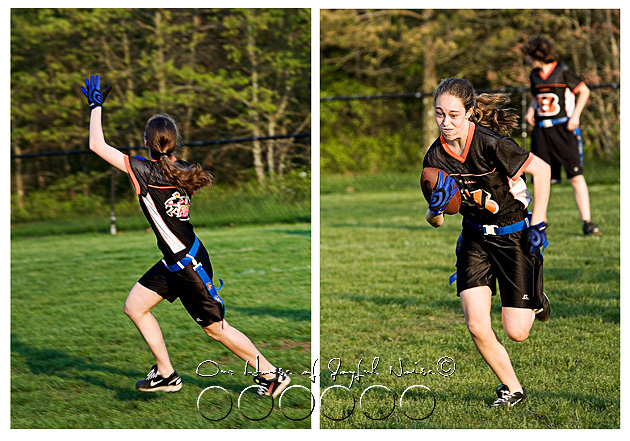
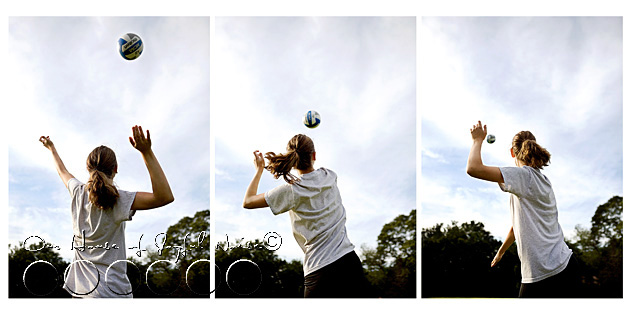
She played, and was the only girl in the whole league!  She wasn’t treated any differently than the boys.  And she didn’t play any differently, either. She was an unexpected force to be reckoned with.  She was passionate about Flag Football now, too. She just loved playing the game. And it showed.

11_2011_2ff

(2011)

Just as with Basketball, we were on the sidenlines, making some noise, for her and her team!  As if my big long camera lens didn’t draw enough attention to myself, screaming my head off half the time did!  I just couldn’t help myself. Michael and I had a game, to see how long I could be quiet.  The excitement and anticipation at times, was more than I could contain. We found sports to be a rush like no other.  I had felt my own competitive streak come alive that very first practice she had, at 8 years old, and it was clearly in her blood too. She helped take her Flag Football team all the way to the Superbowl, where they lost by 1-single-point!  It was a hard pill to swallow.  It was a fluke, actually!  But we were busy digging up the grace we needed, to be good sports about it. ; )

12_018

(2011)

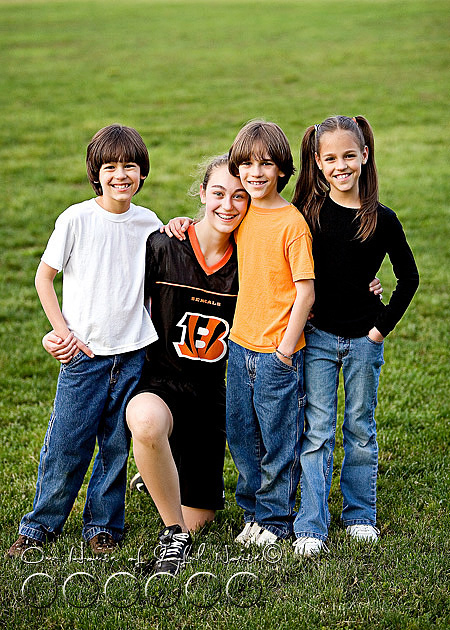
After all, she had to be a good example, to her biggest little triplet fans, who were so very inspired by their big sister.

She was a STAR, in their eyes, and about to try making a mark of their own, in sports.

13_serve_sb3

(2011)

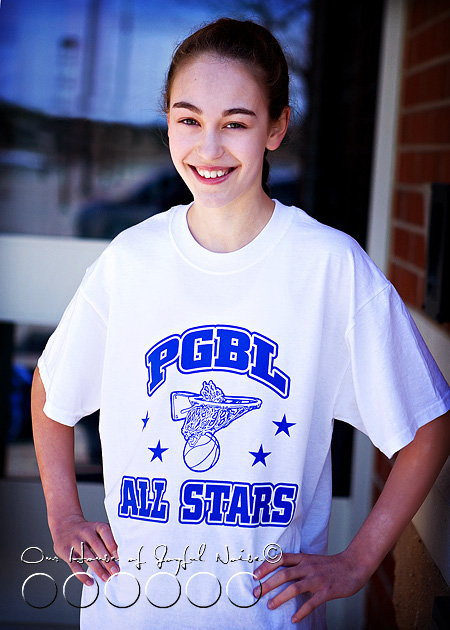
High School Basketball is a few months away yet, but I had started making contact with the powers that be, real early, and she found herself at a Volleyball clinic twice a week, at the public South High School. She quickly fell in love with this sport too, and they quickly took notice of her.  It was nothing short of boot camp.  But she kept going back, and they were impressed she did, and were happy to see her. Her potential coach said to us, “The biggest sign of a true athlete, is not just skills, but being tough. And she IS. She’s got that.”

Try-outs for the public South High School Volleyball team are coming up, and she’ll be there ready to show her stuff.  She’s been training on her own. I can say it’s looking promising, and a very busy year, with 3 kids in sports anyway. Maybe 4.

14_hydrating_

(2011)

{A} has her dreams and goals, short & long term,  and she’ll always work hard to reach them. She has high standards for herself, anyway.

But even if she didn’t, she always has me to push her. ; ) 

To me, being so involved in sports, and having such passions for it, has proved to be full of benefits, skills, and gifts, and a truly effective way to pave the way, to play the game of life!  If sports doesn’t literally take {A} where she wants to go, it will certainly have given her all she needs on the inside, to get there on her own.

She’s the picture of young athletes all over the world, just like her. If you’re a parent of an athlete-in-the-making, or one who is already, this is your lucky day. I’m giving away a:

$100.00 Dick’s Sporting Goods Gift Card!!
(We’re sorry -This Giveaway has now ended.)

dicks-300x157

One way you can have a chance to win, is to tell me:

In what ways do you see your kids playing sports, as preparing them for the game of life?

****

Rules:

No duplicate comments.

You may receive (2) total entries by selecting from the following entry
methods:

a) Leave a comment in response to my sweepstakes prompt question on this post

b) Tweet about this promotion and leave the URL to that tweet in a comment
on this post

c) Blog about this promotion and leave the URL to that post in a comment on
this post

d) For those with no Twitter or blog, read the official rules to learn about
an alternate form of entry.

And if that’s not enough, there are additional ways to win a gift card to Dick’s Sporting Good here: Promotions & Prizes section

This giveaway is open to US Residents age 18 or older.

Winners will be selected via random draw, and will be notified by e-mail.

(I will also announce the winner via our Facebook Page and our Twitter.)

The Sweepstakes Dates are:  8/29 – 9/30 (Now ended.)

You have 72 hours to get back to me, otherwise a new winner will be selected.

The Official Rules are available here: Visit the Official Rules.

GOOD LUCK TO EVERYONE!

Save

Save

Filed Under: Giveaways, Life In General, Parenting, Reviews & Sponsors, The Big Picture Tagged With: Gatorade, giveaways, Parenting, youth-athletics, youth-sports

Striped Cucumber Salad | Recipe

August 26, 2011 By Laura 4 Comments

cucumber-salad-recipe-4

It’s a wonder, that our children have not turned into cucumbers, this summer. They love them, and our gardens have been so generous with them, that the kids have happily eaten them many days for lunch, dinner, and sometimes even as a snack.  They’ve had them as spears, sliced the long way and added to their tomato sandwiches, chopped up in a garden salad, and as this Cucumber Salad, which we are sharing with you today.

We know. It’s not the most inventive recipe, if we can even call it that. The ‘recipe’ is actually more about the dressing it’s in.  It’s one that I imagine has been around a long time, as my mother used to make it while I was growing up.  Recently we were at our friend’s house, getting our families together, and they made us the most de-li-cious dinner.  Part of that meal was a simple romaine salad with sliced fresh strawberries, and a dressing very similar to this one. So as you take note of this dressing, keep in mind the various or creative ways you can use it for, too.  This dressing, and this salad, is a perfect summer-side, to a light meal.

Striped Cucumber Salad


cucumber-salad-recipe Our Cucumber Salad begins with a fresh organic cucumber, from our own gardens.


cucumber-salad-recipe-1 I have always, peeled cucumbers in stripes.  But there have been 2 separate reasons I have done so.

In the off-season, I have peeled the grocery-store bought cucumbers this way because, as we all know, the majority of the vitamins & minerals are in the skin, and I want to get all I can into my kids/family. But also, before we ate organic, the cucumbers from the store were usually waxed.  Man I hated that! I couldn’t stand the feel of it trying to wash them, (the wax never came off), and the funny feeling it left on my hands too. Also, we just weren’t partial to eating wax. You?  😕 So, peeling the skin in stripes, was a compromise, of sorts.

But even when the cucumbers are organically right from our gardens, I think the stripes just make them fancy & pretty.  So I chop off the ends, and stripe peel them.

cucumber-salad-recipe-2 And then I slice it.


cucumber-salad-recipe-3  

And maybe I’ll have fun taking photos of it. It’s a cucumber caterpillar!!

So much for not playing with my food.

Now I know this is silly, but, I didn’t take photos of making the dressing.  It would have been boring, and unnecessary.  It’s so simple though, and there isn’t actually ‘correct’ amounts of any one ingredient. It just matters more of how thick you want the dressing, and how much you like this or that ingredient.  All to your preferred taste.  But this is generally my winged recipe, I mix in a bowl well, with a fork.


Cucumber/(Salad) Dressing

  • 1/2 c. mayonnaise (Hellman’s Real, for us)
  • 1/4 c. white sugar
  • 4 tsp. distilled vinegar

dashes of:

  • dill weed
  • seasoned salt
  • black pepper

Of course….all of these amounts will vary with how many cucumbers you cut up.  I like it to just coat the cucumbers. My mother made enough, that it was more of a soup, that the cucumbers sat in.  She made a lot! LOL


cucumber-salad-recipe-5 In my antique blue Pyrex dish (missing the handle), that was once my grandmothers, I arrange all of the cucumber slices, and drizzle the dressing right over it.  Then I throw another dash of dillweed on top. This dish is light, tangy, sweet, with a tad of salty.  All at once.  More importantly, it’s FRESH, light, delicious, easy, and well……COOL!  It’s a perfect side for summer grilled dinners, etc.

I’ll warn you, with the same wise words my mother-in-law once warned me with, and of which I shared with my kids recently, and they have found absolutely hysterical, and love to say it now every time they have cucumbers:

“Be careful now. Cucumbers tend to repeat on you, later.”

From what I can tell, no one minds repeating around here, except me.  ; )


Save

Save

Filed Under: Recipes, Salads, Side Dishes Tagged With: cucumber-recipes, cucumber-salad, dressing-recipes, light-dressing, light-salad-dressing, light-salads, light-side-dishes, recipes, summer-salads

Frozen Banana Bites – Such a treat! | Recipe

August 22, 2011 By Laura 2 Comments

frozen-banana-bites-recipe-4

I don’t remember exactly the last time I had a frozen chocolate covered banana, but I do know that I had one or 2 when I was a kid, and I loved them.  I thought of making them many times since I’ve had kids of my own, but never quite got to that.  So when a reader linked us up with this simple recipe for ‘Frozen Banana Bites’, I knew we had to try them.  Not exactly the same as frozen chocolate covered bananas, but close enough.  They were absolutely delectable!

*The actual recipe called for peanut butter, but with one of our kids having a severe peanut allergy, we substitute everything that calls for peanut butter, with Sunbutter.

frozen-banana-bites-recipe Participating Ingredients: Bananas, Hershey’s Semi-Sweet Chocolate Chips, & Peanut Butter or *Sunbutter

Naturally, you can make as many Frozen Banana Bites as you would like. But for the sake of giving you a recipe to follow, just use the following measurements per 2 bananas, and then make as many batches as you would like. We made 2 batches, 1 at a time, considering not wanting the slices bananas to brown, or the sauce to cool too much as we worked.

  • 2 bananas
  • 1/4 Hershey’s Chocolate Chips
  • 1/4 Peanut Butter or Sunbutter

frozen-banana-bites-recipe-1 Cover a cookie sheet with some waxed or parchment paper.

Slice the bananas into bite sized pieces.

We have big mouths.   😀

Put the measured chocolate chips and Sunbutter in a microwave safe bowl, and microwave for 20 seconds or so, mix, and keep putting back in for 10-15 second interval until it’s all melted, combined & smooth.

Tip:  I stir with a wooden spoon handle, and I stir rapidly, just as you would tempering chocolate.

frozen-banana-bites-recipe-2
With your sauce all warmed and ready, take each chunk of banana, and dip the top of it into the sauce.  Let it drip off as much as possible.


frozen-banana-bites-recipe-3 Place on the cookie sheet, sauce side up.

Optional: If desired, you also can roll the chocolatey side in chopped nuts as well, and then place on sheet.

Repeat until they are all done.

~ It’s a bit of a messy process, and there isn’t much way around it. ~

Place the sheet of Banana Bites into the freezer, and let freeze completely.

Note:  Freezing time varies, depending on how many times you your kids open the freezer door, to see if they are frozen enough to eat, yet. : )

frozen-banana-bites-recipe-5 Once our first sheet was frozen, the kids and I just took them out, and had at them right away. 😛

  frozen-banana-bites-recipe-6

frozen-banana-bites-recipe-7

These guys’ expressions and sound effects are always so animated, when it comes to food.

Especially treats.

Any frozen leftovers, can be thrown in a ziplock-style freezer bag, for later enjoyment.

Hope you find them worth the small mess. ; )  We did!

***


Save

Save

Filed Under: Fun Food, Recipes, Treats Tagged With: banana-recipes, banana-treats, frozen treats, frozen-banana-bites, recipes

  • « Previous Page
  • 1
  • …
  • 31
  • 32
  • 33
  • 34
  • 35
  • …
  • 100
  • Next Page »

We are wicked happy to have you here! We hope you find much inspiration, help, humor and enjoyment here.


Archives


POPULAR POSTS

* * * * * *

SUBSCRIBE to House of Joyful Noise blog! Every new post, delivered right to your email box!


Privacy Policy

Amazon Affiliates

Never at any additional cost to you, we may earn a small commission for our endorsement, recommendation, testimonial, and/or link to any products from our website. Your purchase through our links helps support our family, while sharing with you the products we authentically use and recommend, for various ideas, and letting you know where you can purchase them. Thank you for your support!

[footer_backtotop]

Copyright © 2026 HouseOfJoyfulNoise.com · Genesis Framework by StudioPress