• HOME
  • {A}’s Chipmunk Training Archives

 Homepage

  • The Homestead
    • Home Projects
    • Home Improvement
    • Home Decor
      • Seasonal Home decor
        • FALL Home Decor
        • WINTER Home Decor
        • SPRING Crafts and Creations
        • SUMMER Crafts and Creations
    • Our Chickens
    • Gardening
    • Organization
    • Re-Purposing
    • Furniture Refinishing
    • Budget
  • Crafts & Creations
    • Seasonal Home decor
      • FALL Crafts and Creations
      • WINTER Crafts and Creations
      • SPRING Crafts and Creations
      • SUMMER Crafts and Creations
    • DIY (Do-It-Yourself) Project
    • Kids Arts and Crafts
    • Homemade/Handmade Gift Ideas
    • Holiday Crafts
    • Fan Pulls
    • Free Printable/Downloadable
    • Sewing Projects
    • Giveaways
    • Business Features
  • Recipes/FoodFun
    • Breakfast
    • Lunch
    • Main Dish
    • Sandwiches
    • Appetizers
    • Slow Cooker
    • On The Grill
    • Side Dishes
      • Soups
      • Salads
    • Baking
      • Breads, Rolls and Muffins
    • Snacks
    • Treats
    • Desserts
    • Drinks
  • Homeschooling
    • Elementary Homeschooling
      • Elementary Homeschooling READING
      • Elementary Homeschooling MATH
      • Elementary Homeschooling LANGUAGE ARTS
      • Elementary Homeschooling SCIENCE
      • Elementary Homeschooling HOME ECONOMICS
      • Kids Arts and Crafts
    • Middle School Homeschooling
      • Middle School Homeschooling SCIENCE
      • Middle School Homeschooling HOME ECONOMICS
    • Language Arts
    • Math
    • History / Social Studies
    • Geography
    • Foreign Language
    • Field Trips
    • Games
    • Nature Study
  • The Big Picture
    • Life In General
    • Celebrations
    • Faith
      • Into the Light; The Series
    • Giveaways
    • Reviews & Sponsors
  • Photography & Lettering
    • Photography
    • truck lettering
    • vehicle graphics
    • Newborns
    • Kids
    • Engagement
    • High School Senior Pictures
    • High School Senior Pictures Sneak Peeks

My Custom Built Farmhouse Home Office Desk

August 25, 2012 By Laura 33 Comments

custom-built-farmhouse-home-office-desk-5

 I know many of you have been waiting for this, with all of my teasing about it! And I have been dying to show you (show off…whatever) my custom-built farmhouse home office desk, that that my husband made for me!  For this first post, I am simply sharing with you the build itself, and some of the story behind it.  In upcoming posts, I will show you my work-space all set up and pretty. (When I get that far.)

So first, to put my appreciation and excitement in context here, you should know how I have been working.

In this large amoire in the photos below, is our TV, which we rarely use at all. But behind it was my work cubby.  It was always amusing when someone who had been to our house a few times before, before they realized there was a work space behind there.  They’d always react with such surprise and intrigue.  So come around the amoire (following the numbered photos), and see my little space I have had . . . . .

001_old-office-cubby-space It certainly was a workable idea for the past few years, in that it gave me a little privacy for editing client portrait work. It is rather organized and cleaned up here, but that is not how it has always appeared or felt. (I had already started cleaning out here, to empty this whole cubby.) To start, I hated the desk. The photo is deceiving I think, because this desk was mammoth, and yet not efficient at all; with shelves I couldn’t easily get to (dusting nightmare), and virtually no storage or room to work.  With a modern design, fake wood laminate and black accents-ugh! I wanted it GONE.  And what a dust magnet this cubby has been!

Anyway, imagine on the desk-top, on either side, a tall pile of papers, notebooks and dozens of folders.  And not just here. When I worked on my laptop for school and blogging, I’d sit on the couch, where beside the couch was small table with another 2 piles of papers, notebooks and folders.  Then there is the school room, where I’ve kept all of my teacher books.  I can’t stand clutter or disorganization, so having everything everywhere has tended to make me cranky, and yelling when I couldn’t find something!

 Between homeschooling my 4 kids, their work needing correcting or keeping, educational planning stuff, their activity schedules, forms needing to be filled out, home and life maintenance with mail, bills and records and the like that needs to be kept up with, and my work paraphernalia for the blog and it’s website, it has felt like unorganized madness to me! Like….losing my mind. I can’t manage and work my best like that.

What I needed and wanted was one organized management center to work from, with a style that said me, and reflected our farmhouse home decor.  A Pottery Barn home office knock-off, of sorts.  Yes please, Honey!

Whenever a new school year is about to turn over in the next 2-3 months, I always get into this nesting mode frenzy, wanting to get super organized and ready for the next year. So my chatter about my dream custom-built farmer’s table home office desk had picked up speed as of late!  I completely cleaned out that cubby, moved the amoire, and just gave away that huge desk to a very grateful girl, who really needed it.  It was going to be an all new space, that I could manage everything from.  Open, bright, stylish and cheery.

As always, Michael and I first got some initial drawings down on paper, which Michael threw out by accident! ; ( , and a few revisions later, Michael got to making it a reality for me.

002_carpenter-tools My design idea was simple;  the base of a plain old farmer’s table, with cubbies and shelving for storage. But it needed to be BIG. The full length of the wall opposite the large window, to accommodate and organize all areas of my life and family I need to manage, as well the larger equipment I need to do it, such as my 2 computers, hard-drives, copier, etc.

So if you haven’t scrolled down and peeked already (uh-huh), the reveal is next. But I have to say, this was SO HARD to photograph with the lenses I have, as this desk is 7 feet long!  But every inch was custom designed with a purpose for it’s space. Take a look . . . . . .

custom-built-farmhouse-home-office-desk Is it not GORGEOUS?!
I can answer that.

custom-built-farmhouse-home-office-desk-1
While there were no initial plans for drawers at all, the craziest things happen to us, and we ended up with some beautiful ones! I’ll get to that story-bit in a minute, but as you can see, the general structure of the desk is very much a farmer’s table design.

Let’s talk about some of the details:

custom-built-farmhouse-home-office-desk-2
Simple table legs support the desk.

Now let me tell you about the drawers, which really have added such beauty to the piece as a whole.  In the beginning, I had just planned on using lots of cubbies and little containers, for all of the little things, all built upon a farmers table, much like the one we eat at in our sunroom. But the craziest blessings happen to us all of the time, and this amazing happenstance is no different:

custom-built-farmhouse-home-office-desk-3 About the time the table was pretty much built, and yet still bare wood and unfinished (as seen above, minus the drawers), Michael had a job to go re-letter the back of one of his client account’s large moving trailer. While he was there on the job site, he went to throw some things in the dumpster. There, in the container, were 3 of these beautiful drawers and some big desk all broken apart! I can only imagine how beautiful the desk must have been, because the drawers are to me, breath-taking.  Crazier, the slim design and depth of the drawers would fit and work perfectly within the table side of the desk he was building for me. So he grabbed the drawers, and all of the attachment trackings for them, and  brought them home.  I was astonished. I immediately fell in love with them, and he installed them.

custom-built-farmhouse-home-office-desk-4 Just look at the hardware!

custom-built-farmhouse-home-office-desk-6 Even the keyhole makes me gasp and smile inside.

custom-built-farmhouse-home-office-desk-7 They silently and smoothly just roll out, like butt-ah!

And the inside of the large drawer had me flipping out with joy . . . . . .

custom-built-farmhouse-home-office-desk-8 Talk about great quality. HOW, could anyone throw these drawers away?  And what a blessing just meant to be, that Michael was there at that site on this particular day, and looked in that waste container, right when we were building this project!  The waste removal company was coming to empty that container the very next morning! The drawers would have been gone forever.

011 These two smaller drawers were installed side by side, on the opposite end of the large one.   Take note of the bare wood before finishing.  Aside from the drawers, the table-top is made of cabinet grade plywood, while the rest is plain pine and bead board.  A very light color wood.

Now, how I was going to finish this desk, was such a torn-dilemma! I even did various techniques experiments on several scraps of wood, trying to decide:  Did I want to just paint it white and then sand it down to worn in various places?  Crackle it? Use some dark wax or antiqued glaze?

Honestly, it feels like such a big an important decision, that it kind of paralyzed me.  So I kept it simple for now, and will likely continue to alter the finish more when I decide on one, or all of the ways I am contemplating. But at least then it will be a thought-out decision. For now here’s all I did:

0121 I sanded it to a worn state in specific places, such as corners, edges, and raised areas.

But because the wood underneath was so light, I went a step further using a possibly odd technique and medium, to bring the distress work out more . . . . . .

013 I mixed clear glaze and straight burnt umber watercolor paint.  I painted just over the areas where it was sanded to wood, let it sit a minute, and wiped off with a clean dry rag.  It stained the exposed under-wood just enough, to have a more distinct worn look.  As I said, I still may do some crackle work in areas, and/or antique it more with wax or glaze.  But I also expect it will get wear and age naturally, simply from me using it a lot, and owning it for a very long time to come. But for now, I am loving it as it is.  It may stay like this forever.

custom-built-farmhouse-home-office-desk-9
I am still ‘moving in’ to this large piece of furniture that is quickly organizing my whole world, and there will be a follow up post to show you how I arranged everything I needed in this space.  But as I said, parts of the desk were very specifically designed for certain things.  To give you one example today; that top left cubby you see, will hold my 4 external hard-drives, most of which are about to dumped of all client work. They are already mostly free space even still,  so I will be using them for a good many years to come, for external storage space for all of my other personal photo storage and designs.

custom-built-farmhouse-home-office-desk-10 As I am sure many of you know and will agree, it’s the accessorizing that is the most fun!  It’s the pretty little things, that really make a space yours, and I have always felt it’s important to surround yourself in your home and work space, with the things that make you feel those little leaps of joy inside. (Or that’s what happens to me, anyway. ; ) So I hope to share with you all just how I’ll be utilizing the space of my new custom-built workspace, the ways in which it’s organizing my life, and all of the little things I love that make me smile, and maybe will make you smile too. Or give you some ideas of your own.

Another crazy blessing story-bit:  I had told Michael I would probably just use one of our regular white farm chairs at the desk, rather than a black computer chair.  But that some day, I would love to find a nice white office chair on wheels, much like the Pottery Barn chairs, that we could never afford.
Well guess what he found and brought home with the drawers? . . . . . .

016_white-desk-chair
Again, for free. When Michael was chatting one of the moving company employees at the job site where he pulled the drawers out of the waste container, and told him all about this desk he built, the guy said, “I have a chair inside that went with the desk we got rid of, if you want to see it.” And this is what he brings out!  Oh, you know I’ll distress this some too, and get some pretty shabby-chic cushions for it.  But what a high-quality chair!  It not only is on wheels and swivels, but it rocks! I’m a rocker, still. Between my first baby-girl that loved to nurse forever, and then my triplets, Mama-rocking is a just part of my natural movement now. This is a big chair though. It definitely needs the cushions. I feel like a kid in it right now.  Michael was more excited about getting the chair for me, than the drawers. But the drawers were actually the biggest pleasant surprise for me.  Honestly, the chair is massive! Like, too wide and heavy for me. I may just keep using my computer chair for now.

custom-built-farmhouse-home-office-desk-11 So there it is! I know I am ridiculously blessed to have a husband whose skilled hands can create these things for me.  This desk would cost thousands of dollars, bought. And it wouldn’t be custom-built, for me and my specific needs. Or made with love! He’s built so many things for me, big and small.  This one is certainly very special to me, as it will really help me manage the most important aspects of my life; primarily teaching my children, and managing our family details, and lastly, doing what I can to help my husband provide for us, through blogging, which I love to do anyway.

I do apologize for the length of this post and number of photos, but there was a lot to share with you, and I’ve been SO excited to!
Wouldn’t you be?
Tell me what you think of it! Do you have a special space in your home, that helps keep you organized and everything managed? Please tell us about it, and leave any ideas you may have for us as well.  Thanks so much for coming by and looking!

Save


Save

Filed Under: Furniture Refinishing, Furniture Refinishing, Home Decor, Homeschooling, Re-Purposing, Refinishing, The Homestead Tagged With: Catholic-blogs, Catholic-families, custom-built-desks, custom-built-farmhouse-home-office-desks, custom-furniture, dream-home-office-desk, farmhouse-desks, furniture-refinishing, office-home-desk, pottery-barn-home-office-desk-knock-off

Adorable Stretch Jewelry for Little Girls | Craft Tutorial

August 15, 2012 By Laura 12 Comments

little-girls-stretch-jewelry-craft-tutorial

My little girl, ‘O’, is always in a crafty mood. Her name is Olivia, but we call her ‘O’ almost as much.  She gets excited about any craft or project going on, and always (always) wants to help.  So she and I were chatting one day, and had come up with the plan to make her some cute stretch jewelry, possibly using buttons of some sort.  The next time we were in the craft store for other projects, we picked up the supplies for her jewelry too.  It’s a simple project, with adorable results, and practical for little active girls, too.

little-girls-stretch-jewelry-craft-tutorial-1 We found a whole section of all kinds of cute element buttons.  I would have had a hard time choosing, but ‘O’ is a pretty decisive girl, and decided the flowers with the rhinestone centers, and the flip flops, were what she wanted.  Interestingly, while they were all labeled buttons on their packaging, some did not have any hole or loop on the backs, to thread in any way! Such was the case with the flowers.  The flip-flops however, did have a loop on the backs.  No worries though. I was sure my Amazing E-6000 would do the trick. We also picked up stretchy elastic string.  I wanted to show you these supplies in their packaging (these bought at Michael’s Arts and Crafts), so that you would know what to look for, if you wanted to do this project yourself.

little-girls-stretch-jewelry-craft-tutorial-2
The string we got, as you can see, is all one long piece that changes colors.  So you can just choose an area of color you want, and cut it to the length you need.  Really fun matching up up with the buttons.  Aren’t they so cute?

So we had a plan to make some bracelets, anklets, and toe rings.

0031

Depending on if your piece will be for the wrist, ankle, or toe, just take a quick measurement using the string around that body part, and than add an adequate amount more, for tying.  Now buttons with a hole or loop to thread of course will just slide right onto your string.  But the flowers we needed to glue.  So after cutting the string to length, we found the center of the string by using a ruler we had nearby. But you can estimate by folding the string in half or whatever.  In the center, we put a dab of glue, and then set the flower on and held it for a second.  We were working on a piece of paper, to protect our table from the glue. But being that the glue dribbles right over the string, we didn’t want the string adhering to the paper. So when it was set enough . . . . . .

0041
. . . . . .we just taped them to the table’s edge, and let them hang, to completely dry.

little-girls-stretch-jewelry-craft-tutorial-3 ‘O’ really had fun, choosing different elements, and then choosing what colors of string to go with it.  We especially liked how this one came out. We chose to use three pieces of string, and knot each of them on their own, instead of all together. It really alters the look!  The E-6000 really works amazing.  After knotting the jewelry on for the proper fit, you can then trim any excess string end with scissors. You just want to be sure they are tied to be snug, but not tight or uncomfortable, cutting off circulation or leaves band marks.

TIP: You may also want to dab the string ends with some kind of nail polish top coat, just so they don’t unravel or get fuzzier. I did, and I also put a dab on the knots, for extra security.

little-girls-stretch-jewelry-craft-tutorial-4 Aside from these accessories just looking adorable and so age appropriate, they really are great for every day play wear, being that they are fitting, and not the kind that will get caught on anything. They are not likely to break in any way, or get lost.  But even if they did, none of it is valuable in any way, and they can so easily be made again.

little-girls-stretch-jewelry-craft-tutorial-5
So little girls can just HAVE FUN, as they should, and not worry about their *bling*.

little-girls-stretch-jewelry-craft-tutorial-6
So perfect, for a little pretty style at the beach.

little-girls-stretch-jewelry-craft-tutorial-7 And they can even get wet, without a problem.

little-girls-stretch-jewelry-craft-tutorial-8
The options really are endless, and I can already see us ending up with a larger collection.  Because how cute would it be to make holiday accessories?  We can find button elements like this for Christmas . . . . . .Halloween . . . . . .Easter . . . . . . and it would also look lovely with any kind of clothing, including dressy-dresses.

If you are hoping to make homemade gifts this year, this is a great inexpensive and quick idea, for any little girls on your list.  If you aren’t sure of their sizes, just leave them untied, and when you give jewelry to them, you can just tie it off on them, and trim the excess.  Just as we did it making these for ‘O’.

little-girls-stretch-jewelry-craft-tutorial-9 We did not make any choker style necklaces, or pony-tail holders, but those are a couple more ideas.

012
‘O’ is the kind of girl who enjoys fashion.
She likes shopping for clothes, and enjoys putting her outfits together every day, including any accessories for her hair or as jewelry.

little-girls-stretch-jewelry-craft-tutorial-10 Love it? Say it. Pin it! Share it. Make it!


Save

Filed Under: Crafts & Creations, Kids Arts and Crafts Tagged With: crafts, kids-anklets, kids-bracelets, kids-stretch-jewelry, kids-toe-rings, little-girl-crafts, little-girl-handmade-accessories, little-girls-home-made-jewelry, safe-stretch-jewelry-for-girls

Cherry Tomato and Cucumber Summer Salad | Recipe

August 12, 2012 By Laura 2 Comments

000_salad-fork

 When it is summertime, I want meals that are as simple and quick to make as possible. If we don’t have a tight schedule that day, then we’ve spent the day involved in some project or other. Especially on weekends, when Michael is home too. Usually it’s been it’s blazing hot out all day too, being summertime and all. And let’s face it, the heat and humidity really has a way of draining anyone’s energy and ambition that much more.

That’s exactly how I happened to come up with this simplest of salads. Dinner was not even planned, never mind started!  Michael threw some steaks on the grill, and I just grabbed the vegetables we brought in from the garden that day, off of the counter, and threw together a cold side dish. I was not going for anything grand.  And anyway, my kids pop cherry tomatoes in their mouth off of the vine, and they love cucumber spears, with or without a dash of pepper.

The big surprise was that it was far more delicious than I had even begun to anticipate, and it was the talk of dinnertime too.

Long term, it’s a fabulous dish for the whole family to love this much for another reason:
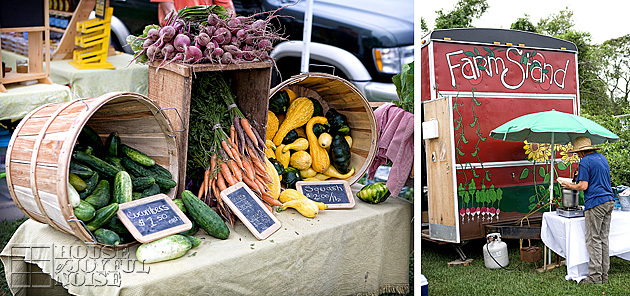
We need to have a variety of options, to use the abundance of certain vegetables we get out of our garden almost daily, in the summertime.

001_garden-tomatoes-in-skirt  
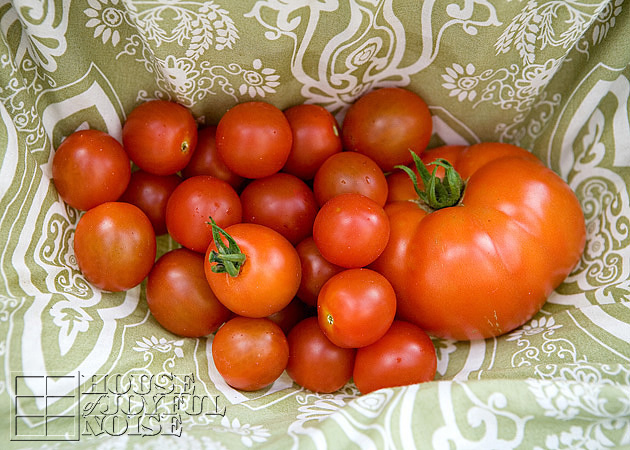
Here’s one day’s picking, carried in my skirt.

It’s likely that the next day will harvest about same amount, ready for picking, again.
Especially given that Olivia has her own garden this year, too, and is also growing cherry tomatoes.

002_chopped-cucumber  She’s growing the cucumbers alone, but she shares with her siblings at lunch sometimes, or for a snack, and she’s happy to offer one for our dinner anytime, as well.

Those 2 vegetables, were the simple main staples for this recipe:

Quartered Cherry Tomatoes.
Cucumber, quartered the long way, and then chopped.

TIP: I always stripe my cucumbers with the peeler. It makes them a littler fancier looking, and even more enjoyable.

simple-summer-salad-recipe 
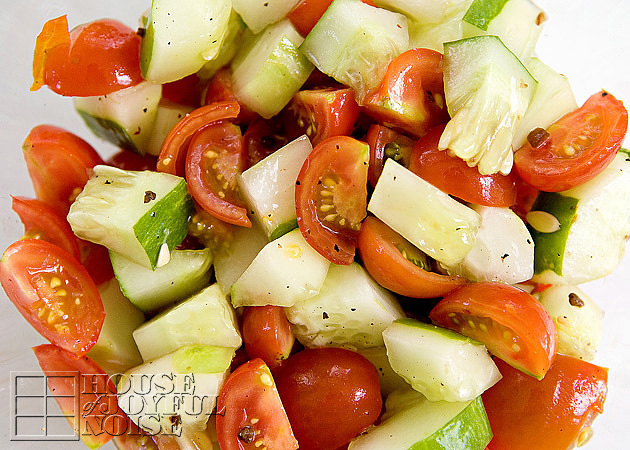
Throw in a dash of kosher salt, and drizzle all over with Balsamic Vinegar Salad Dressing.  We also add black pepper, because we love it, and put it on just about everything. The dressing, as opposed to straight up balsamic vinegar, has all kinds of little bits of seasoning goodness already in it.  Give it a quick toss.  I like to let it marinate just like that for a few minutes.

simple-summer-salad-recipe-1 
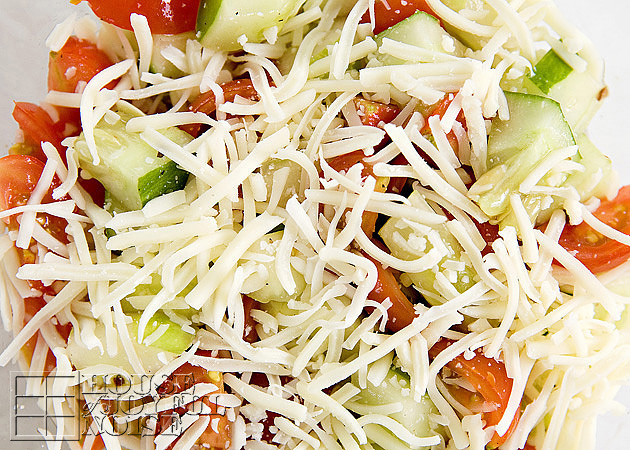
When it’s time for dinner, I throw some shredded mozzarella cheese on top.

It’s done.  Does it sound plain, to you? Well I’ll tell you what . . . . . .

simple-summer-salad-recipe-3 
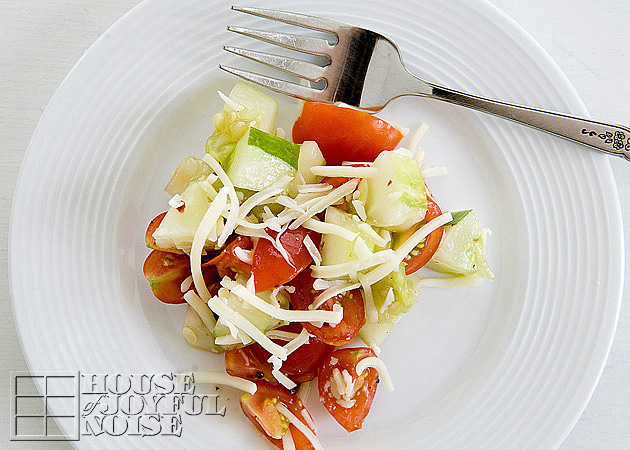
It’s simple all right, but it’s sure not plain tasting!  The tang of the Balsamic Vinegar Dressing, really brings out the sweetness of the cherry tomatoes.  The combination of the two compliments each other so well. The fresh cucumber, and the soft and subtle flavor of the cheese adds a new texture, and another surprise taste.

We have also used this salad, rolled up in a tortilla, with grilled chopped chicken. Also simple, quick, and delicious.

simple-summer-salad-recipe-2 
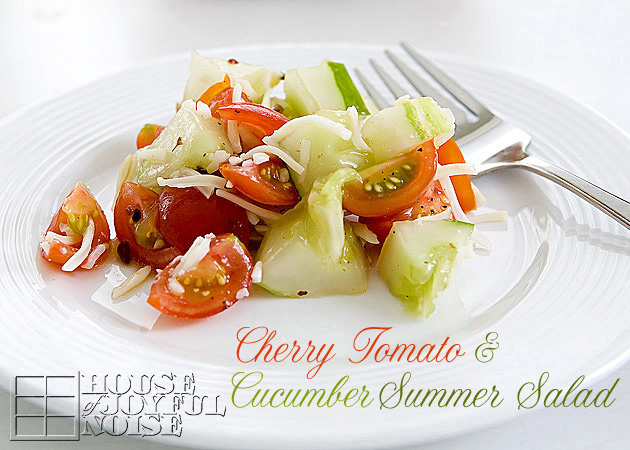
This is what summer tastes like.

It’s that simple.

What is your simplest summer dish?


Save

Filed Under: Recipes, Salads, Side Dishes Tagged With: cherry-tomato-cucumber-salad, cold-salads, light-salad-recipes, quick-salads, recipes, salad-recipes, salads, simple-summer-salad, summer-salads

Motor Vehicle License Plate Refurbishing | Before and After

August 9, 2012 By Laura 233 Comments

000

Many of you probably already know that my husband, Michael, letters company trucks, does vehicle graphics and makes business signs. If you’re curious to see some of the kind of work he does, you can click on ‘Photography & Lettering’ in the menu above, and look to the bottom of that drop down menu, for ‘Truck Lettering’ and ‘Vehicle Graphics.’

Well, an interesting sideline that he has gotten into over the years, is refurbishing older green Massachusetts license plates.

Our own state of Massachusetts here, is actually the very first state in the United States, to issue motor vehicle license plates.  It used to be that the plates only needed to be displayed on the back of the vehicle. Over the years, the state has been proactive in enacting laws regarding the registration and inspection of motor vehicles.  The vehicle’s license plate(s) are assessed as part of the required vehicle inspections, and if the plates are old and/or damaged and are deemed unreadable by at least 60 feet, the vehicle owner is required to get new plates, before it receives a passed inspection sticker.

If a motor vehicle has been issued front and rear license plates, which is typical, the vehicle must display both license plates issued by the Registry of Motor Vehicles on the front and rear of the vehicle.  Older plates that have the green lettering, which were the former standard and issued as a single plate, must only be displayed as that one plate on the back of the vehicles.  In 1988, Massachusetts began issuing red-lettered plates, which are issued as a set of two. If the newer red-letter plates are issued to the vehicle registrar, both must be displayed on both the front and back of the vehicle.  However, the single green-lettered plate is acceptable by law, for as long as it is readable.

It is for this reason, that Michael has refurbished an increasing amount of green-lettered plates. There are a host of reasons why some vehicle owners want to keep their older plate, for as long as possible. For some, it is just a somewhat sentimental reason. One 50-something year old man told Michael that he has had the same license plate since he was 18 years old, and he just doesn’t want to give it up.  Others own hot rods, antique vehicles, or other show cars, and there is no place for a front plate, nor do they want it to ‘blemish’ the look of their car.  Whatever the reason, if the plate is indeed salvageable, Michael is happy and capable of restoring them to their former beauty, if hired to do so.

Because it is a service he provides to aid in providing income for his family, he asked that I not show the whole step-by-step process.  Still, I thought it might be an interesting little post, to share with you all the before and after of just one of his green-lettered Massachusetts license plate restoration jobs.

  001_massachusetts-green-license-plate-restoring

002_massachusetts-green-license-plate-retouching

The condition of this particular plate when he received it, was a hot mess.

So the first thing he needs to do is strip the plate to bare metal and start from scratch.

003

004 Here it is, stripped. It’s still a little beat up and whatnot, but a good new place to start.

006_massachusetts-license-plate-refurbishing

007_massachusetts-license-plate-refurbishing All restored.  It is 100% reflective as needed as well, just as they were originally.

What do you think?

008_massachusetts-license-plate-refurbishing

I am aware and amused, that he is often needing to clean things up and make them look like new, while I spend some of my days working to make things look old, beaten up and quite used.

009_restoration-massachusetts-motor-vehicle-license-plate-before-after Have you ever had license plates that meant something to you? Have you ever been sad for the to need to get new ones, or was it exciting? And what I’d really love to know, is do you like the look of your state’s plates?  I’m not going to name names (of states, that is), but I’ve seen some ugly ones!  I can’t much complain about ours.  You?
. . . . . .
UPDATE: Since the creation of this post, and as a direct result of it on the internet as well as constant referrals, Michael has refurbished thousands of plates to date.  Every one has expressed great satisfaction with their finished plate, upon return, and of course, every one has gone on to pass inspection.

Because this unique service he provides is in very high demand,
Michael was previously booked up for months ahead. However, due to being able to increase the number of plates he restores per week, the wait is no longer that long. If you are looking to have your license plate restored to it’s former beauty, and would like to know the current booking time, please contact Michael at his e-mail address: Alphbtman@aol.com

for further details and instructions.

Save

Filed Under: Photography & Lettering, Refinishing, truck lettering, vehicle graphics Tagged With: green-Massachusetts-licence-plate-restoring, license-plate-refinishing, massachusetts-license-plate-refurbishing-services, massachusetts-motor-vehicle-license-plates, vehicle-license-plate-refurbishing

Oven Cooked Corn on the Cob – Perfect!

August 5, 2012 By Laura 45 Comments

cooking-corn-on-the-cob-perfect

 For the 20+ years Michael and I have been together, we have been trying to figure out how to cook corn on the cob, so it comes out just right.  Sometimes it has come out really good, but most times it hasn’t.  It’s just a gamble. We have tried cooking it a few different ways; over the fire with wet husks, steamed, and boiled.  The fire method corn came out amazing the first time, and not as much the second.  The steamed method we only did once, because we didn’t like how it came out. More times than not, we have boiled it.  For us, perfectly cooked corn is- when the kernels are popping right off the cob as you eat it. But we usually don’t seem to cook it for just the right amount of minutes.  Then we can’t figure out:  Is it over-cooked? Or did we not cook it long enough?

So most every time we have gotten corn, and the kids got it all husked, the conversation usually goes something like this:

Me: “Honey, how long do we boil the corn for again?”
Michael: “Oh my gosh…there’s that question again! We never remember. How long did we boil it for last time? Did it come out good?”
Me: “I don’t remember now. Do you?”
Michael: “Not really.”
Me:  “Is it 7 minutes? Remember the guy at the Butcher Block told us most people over cook it?”
Michael: “Kind of. But I don’t remember how long he said. I don’t think 7 minutes is long enough, though.”
Me: “Wait, I think it’s 10 minutes.”
Me again:  “Or, is that boiling eggs.  Hmmm. No, I think it’s 10 minutes .”
Michael: “Did we bring the water to a boil first, and then put the ears of corn in?”
Me:  “No, that’s lobster. And Ramen Noodles.”
Michael: “Why don’t you Google it and see how long it’s supposed to be.”

And that, is about how it has gone, for years.  We get so excited to have corn on the cob, but that is because we only tend to remember the times it came out perfect and delicious.

Finally, we have found the absolute easiest method to cook corn on the cob, perfectly. 
And that is, perfectly, every time.  It’s crazy how easy and hassle free this is.  So at this time of year, when corn on the cob is such a popular summer side dish, we thought we should share with you the method that will be our one and only from now on.

Pre-heat your oven to 350°

cooking-corn-on-the-cob-perfect-1 You have 2 options here:

1) You can lay your corn, unhusked, on a cookie sheet. (Tin foil or not is also optional.)

-OR-

2) You can put the corn right in your oven on the racks. If you choose that way, it is a good idea to cut off all of the silk hanging out, so it doesn’t catch on fire. << Important Tip there, I think. ; )

Both ways, the corn cooks wonderfully.  I use method 1, because it is easier for me. I can put the whole pan with all of the corn in, and take it out, quickly and easily. Plus I can’t reach in the oven very far, and my hands burn easily.  Michael prefers method 2, because he doesn’t want to get the pan out, or wash it, and he has longer arms.  He throws the corn cobs, in and take them out one at a time when the timer goes off, just grabbing them without even using an oven mitt. Because he doesn’t want to get the mitt out either. Even though the corn is piping hot.  He just doesn’t take precautionary safety measures, as a general rule of the fool.  You know . . . . . . protective eye wear when cutting wood, a face mask when spraying toxic paint fumes, or using oven mitts to take hot things out of the oven, for gosh sakes! It been an argument between us for years. I remember his father was the exact same way, about all of the same safety measures, including taking hot things out of the oven mitt-less. His mother would squabble at the father about it too, after he’d say “Ow!!” Throw the thing down quick. (Chuckle.) “That thing is hot!!”  Well HELLO!! What I don’t get, is why I thought my in-laws were so cute when they were bickering, and I get so aggravated at Michael about it, and I’m not feeling as cute. Honestly, I love my husband dearly, and I am thankful he is still alive, and well, in one piece. By the grace of God; this I know!  Anyway, you choose the method that works best for you, and I’ll leave you alone about it.

cooking-corn-on-the-cob-perfect-2  So put the corn in the oven however you choose to, and set the timer for 30 minutes. Oh how I love the smell of the corn cooking this way. A real roasted smell.
After 30 minutes, remove the corn from the oven.
You can leave it in the husks if the rest of your dinner is not ready. But if you are just about ready to all sit down and eat, here is what you do next:

cooking-corn-on-the-cob-perfect-3 You simply take a big knife, and cut off the tip of the corn, unhusked,  about an inch or so into the cob.

This is where it just gets amazing to me . . . . . .

cooking-corn-on-the-cob-perfect-4 Then you just peel back and off the husks, which come off so easily. And, pretty much all of the silks come right off with it! 
Break off the other end, and season as you wish!

cooking-corn-on-the-cob-perfect-5 We love it with butter and pepper.  Sometimes a little salt. OH SO GOOD! So very easy, and perfect.

Every time.

If you haven’t tried cooking corn in your oven, you must try it this way!

What is your usual way of cooking corn on the cob, so it comes out just right for you? And for how long do you cook it? 

We know there are many methods, and we’d love for you to tell us what has worked for you.

P.S.  As an update, if you want to make the husking even EASIER STILL, you can cut off both ends of the cooked corn (in other words, stem end included), and cob will just roll out of the husks and the silks practically fall off.  But whether you chop both ends or just the tip, stripping the cobs after cooking them (in the oven) is much easier than shucking ahead of time!
We are loving those of you coming back to give us your report! ~ The Richard Family


Save

Save

Filed Under: Recipes, Side Dishes Tagged With: best-way-to-cook-corn-on-the-cob, corn, corn on the cob, how-to-cook-corn-on-the-cob-perfectly, oven-cooked-corn-on-the-cob, perfect-corn-on-the-cob

  • « Previous Page
  • 1
  • …
  • 22
  • 23
  • 24
  • 25
  • 26
  • …
  • 100
  • Next Page »

We are wicked happy to have you here! We hope you find much inspiration, help, humor and enjoyment here.


Archives


POPULAR POSTS

* * * * * *

SUBSCRIBE to House of Joyful Noise blog! Every new post, delivered right to your email box!


Privacy Policy

Amazon Affiliates

Never at any additional cost to you, we may earn a small commission for our endorsement, recommendation, testimonial, and/or link to any products from our website. Your purchase through our links helps support our family, while sharing with you the products we authentically use and recommend, for various ideas, and letting you know where you can purchase them. Thank you for your support!

[footer_backtotop]

Copyright © 2026 HouseOfJoyfulNoise.com · Genesis Framework by StudioPress