• HOME
  • {A}’s Chipmunk Training Archives

 Homepage

  • The Homestead
    • Home Projects
    • Home Improvement
    • Home Decor
      • Seasonal Home decor
        • FALL Home Decor
        • WINTER Home Decor
        • SPRING Crafts and Creations
        • SUMMER Crafts and Creations
    • Our Chickens
    • Gardening
    • Organization
    • Re-Purposing
    • Furniture Refinishing
    • Budget
  • Crafts & Creations
    • Seasonal Home decor
      • FALL Crafts and Creations
      • WINTER Crafts and Creations
      • SPRING Crafts and Creations
      • SUMMER Crafts and Creations
    • DIY (Do-It-Yourself) Project
    • Kids Arts and Crafts
    • Homemade/Handmade Gift Ideas
    • Holiday Crafts
    • Fan Pulls
    • Free Printable/Downloadable
    • Sewing Projects
    • Giveaways
    • Business Features
  • Recipes/FoodFun
    • Breakfast
    • Lunch
    • Main Dish
    • Sandwiches
    • Appetizers
    • Slow Cooker
    • On The Grill
    • Side Dishes
      • Soups
      • Salads
    • Baking
      • Breads, Rolls and Muffins
    • Snacks
    • Treats
    • Desserts
    • Drinks
  • Homeschooling
    • Elementary Homeschooling
      • Elementary Homeschooling READING
      • Elementary Homeschooling MATH
      • Elementary Homeschooling LANGUAGE ARTS
      • Elementary Homeschooling SCIENCE
      • Elementary Homeschooling HOME ECONOMICS
      • Kids Arts and Crafts
    • Middle School Homeschooling
      • Middle School Homeschooling SCIENCE
      • Middle School Homeschooling HOME ECONOMICS
    • Language Arts
    • Math
    • History / Social Studies
    • Geography
    • Foreign Language
    • Field Trips
    • Games
    • Nature Study
  • The Big Picture
    • Life In General
    • Celebrations
    • Faith
      • Into the Light; The Series
    • Giveaways
    • Reviews & Sponsors
  • Photography & Lettering
    • Photography
    • truck lettering
    • vehicle graphics
    • Newborns
    • Kids
    • Engagement
    • High School Senior Pictures
    • High School Senior Pictures Sneak Peeks

It’s the Chicken Coop Reveal!

September 15, 2014 By Laura 11 Comments

Finally, we are ready to reveal to you the chicken coop that has been in the works for 2 months!
We know many of you have been waiting to see it, and we have to tell you, we’re pretty darn excited to show it to you!

PLEASE NOTE: There are many photos in this post, so please give them time to load.  Then at the end there is a link to even more photos that I thought some would like to see, such as early stages of the coop being built (for those who may have missed it on Facebook), the inside of the coop, and and a closer look at some of it’s other cool features.

So, as lots of people know, I have wanted to get some chickens for so very long!  Michael has always said I could, but the time was just not right for a long time, while we got the inside of our home finished, our property set up as we wanted it, and ready, etc.
It’s been a long time coming, but we’ve been living the little dream now, of having chickens, since we got 1 day old chicks about a week into July of this year.  Chicken-keeping has been as fun and exciting as we ever thought it would be!

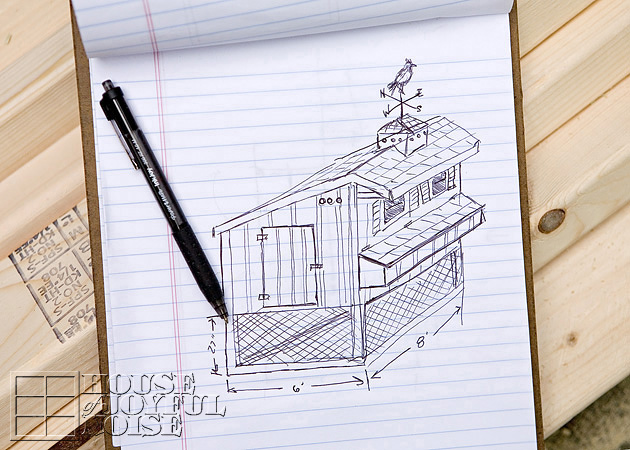
All I ever wanted or dreamed of for my someday-chickens, was a small and very simple coop. But, Michael really goes all out when he gets brain-storming. He’s very creative, ingenious, and handy in craftmanship, and well, he got sketching, as always. The detailed features also grew as he built it, and it has been pretty amazing and exciting to see it all come to life, built from the ground up, from what stared as little possible plans on paper.

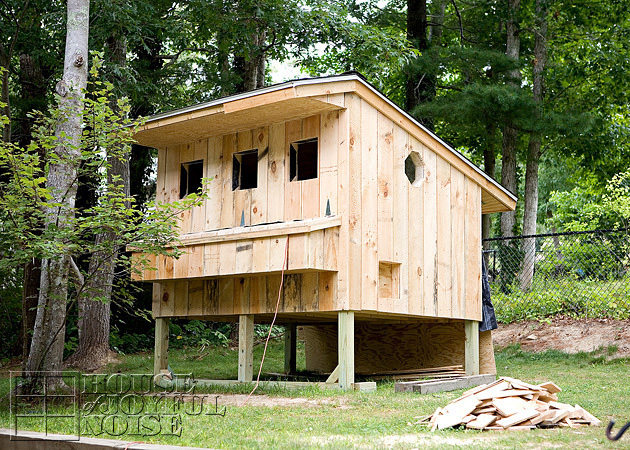
Many of you who follow us on Facebook  were able to see some progress photos of the coop that we shared, as we began to build.
The photo above was as far as we took you before we decided that anymore might ruin the surprise of the final reveal.
Especially when we were getting ready to stain it with color!  We figured many would be most curious about what color we’d choose.
(I mean, that’s an important and fun decision that needs to be made, I think.)
I considered many colors, but there was really one that was always just how I imagined my someday-chick-coop in my head, and while I looked at other colors, I just never could let go of that original image in my head go.
We hope you love it as we do, but it’s really o.k. if you don’t.  (We still will.).

And now for our 97% finished coop . . . . . .
[Read more…]

Filed Under: Home Projects, Life In General, Our Chickens, The Big Picture, The Homestead Tagged With: chicken-coop-designs, chicken-coops, chickens, coops, custom-designed-chicken-coops, DIY-chicken-coop

Protecting the Strawberries Growing in Gutters

July 15, 2014 By Laura 1 Comment

 I’ve been procrastinating doing this post that some of you have been waiting for, on the topic of how we’re protecting our strawberry gutter plants from birds, squirrels, and other small creatures that may be drawn to our delicious berries, and have their fill of our harvest.  The reason I have been hesitant, is because I’ve come to realize I’m not thrilled with our solution, nor excited to share it with you.  I’d even go so far as to say that in all of the years Michael and I have collaborated together over creative projects, and problem-solving, this is one we just never saw eye to eye. Our visions and plans were completely different, and……being the clever guy he often proves to be, I let him do it his way.  As a result, well……I’ll just say he may have been having an off day. My idea was far simpler, and I think would have been easier for me to manage. (I may be wrong. I’d need to experience it, to know for sure. But it works in my head!)  Does this system do the job? [Read more…]

Filed Under: Gardening, Home Projects, The Homestead Tagged With: Gardening, protection-for-strawberry-plants-in-gutters

Dream Craft Art Studio: Reveal – Move In Ready! – Part 3

September 16, 2013 By Laura 6 Comments

Good gosh!  Is it me, or has this been a long. time. coming?
I am THRILLED to say, the art studio is DONE!!
Construction and carpentry-wise, anyway.  I’m sure we’ll have a few more organization units to install, but I’ll figure out just what I need  in the process of moving in with all of my stuff!

Before you scroll down and see, you may want to see the previous states of progress, to really appreciate all it is now.  It’s still just a little bit hard to show you because….I’m afraid you all just might be bored by it!  It’s the reason I haven’t shared more of the progress along the way.  I’m the type who has the whole finished version in my head along the way, and so knowing where it’s going….anything prior to that is somehow……less than.  But, I did give you a few couple of progress updates as you know! It’s just that, it’s a whole lot of whiteness right now; as I said was my plan all along. My dream was a bright white canvas to work in and on, and to photograph in, with a whole lot of color accents.  And I must say, I do love it already, even just as all white at this point!  The light being thrown around, is divine!

Here’s a look inside now!

A view from the entry door! 
It’s instant cheer for me, just walking in.
The bright natural light in the mid-day all through the afternoon, is phenomenal!  And if you all know me, I need light.

The creative space/room is 13′ 8″x 12′.
One of the biggest features you may notice here, is that the single window was finally replaced with the larger (relocated) picture window, as planned.  It made the world of difference in the light that it lets in, as I knew it would.  

Those very simple shelves to the left are from Ikea; love them! While the plan was to build cabinetry, I realized we had white cabinets in 2 different rooms of the house that were emptied (of my craft stuff that was packed up), and they needed to get out of the rooms they were in.  After talking with Michael, we realized we could definitely re-purpose them into this art studio, and keep true to our original plans of white storage cabinets, drawers, cubbies, and one single counter space all along that wall. It worked!  The counter-top was custom-ordered through Lowe’s, and delivered. It is 13’4″.
We have a couple of white stools that fit well right under those cubbies, and are the perfect height for sitting and working. But I believe I’ll also be ordering some roll out paper storage, for the loads of paper I have in stock.
Also on the right wall will definitely be some art or a sign, over that control panel, and possibly another shelf or 2.

The crafting table is long!  From Ikea: it’s actually two (60″) tabletops combined for a total of 10′ of workspace. 
There is space for 6 people to sit and work comfortably, with foot room and all.
I’ve picked out the chairs, but still need to order them.


Also from Ikea, to support our tabletops:  2 work-horses, with cute storage shelving.
–

As well as this unit, that offer even more storage shelving.

So yes, the length of the work table is almost as long as the room; just like I wanted. The surface is perfect!  Quite stain and generally scratch resistant. 
But we’ll likely always protect the surface with newsprint or something just in case anyway.
In this photo you’ll also notice the 2 additional windows we have, to welcome more light in the late afternoon light.
Under the windows will likely be more shallow storage units of some kind, or something like that. I’m still unpacking, setting up, and figuring out what else I need.

I’ll be storing the big, ugly and/or cumbersome items for our crafting projects. The drawers are deep and hold lots of little and long stuff.  As I said, there will be more storage worked into underneath the cubbies, but will also offer additional seating, if necessary.  My husband will be doing a lot of his designing and cutting at the end on the far left, and be able to weed material easily on the table. (If I don’t have a project mid-mess, of course.)

Speaking of Michael, I am SO THANKFUL to him for all of the many hours of hard work he put in, making this dream of mine come true for me, and for our family. I am so very blessed for the many ways in which he is a wonderful husband to have.

Did you notice the amazing barn doors?….
Michael completely designed, custom-built and installed those, too!
No small project!  I love them.  Perhaps I will do another post just on those, and give you a closer look with more verbal details.
And then there is yet another reveal behind those barn doors: one of our boy’s awesome bedroom!  He’s all moved in, and loving it.

My art studio reveal is not done though! 

There will be one more, showing you what it looks like all moved in!  Expect lots of COLOR added!  And instant happiness and inspiration. We actually started moving stuff in right after taking these photos for this post.
We are so thrilled with how it’s all coming together. What do you think?  Do you have a dedicated space to get creative? Tell us about it or share your links, please.
And be sure you are following us for our next art studio reveal!
Thanks for coming over, Friends.

* * * * * *

Please come follow me here and there:

Save

Save

Save

Filed Under: Crafts & Creations, Home Improvement, Home Projects, Organization, Photography, The Homestead Tagged With: art-studio-ideas, art-studios, craft-art-organization, craft-room-ideas, craft-rooms, craft-spaces, craft-studios, craft-tables, crafting-furniture, dream-art-studio, dream-craft-room, home-renovating, Ikea, Improvement, organization

Home Improvement; Dream Craft Art Studio Progress Update; Part 2

May 20, 2013 By Laura 1 Comment

 Here we are in May, and I am finally giving you all a progress update on the building of our grand craft/art studio. It was back in January when we first revealed this big and exciting home project of building a custom studio, which has been a dream of mine, ever since I was a little girl.  There is no doubt that this creative space will get a whole lot of use. In fact, I can easily see it becoming the most occupied room, in the whole house, by our whole family.  I am always going at craft or art projects, and Michael’s design, cutting and lettering prepping work space will be in here too. The kids are often crafting with me, or doing their own thing, and I can imagine they’ll be doing some school work up here as well. If they have independent work to be done after the lesson is taught, I might as well be productive! They’ll be plenty of room for all of us, and everything, if it’s designed and laid out well. And it will be.

So before I show you how much progress we’ve made, let me show you first where we were when we first shared our plans.  [Read more…]

Filed Under: Crafts & Creations, Home Improvement, Home Projects, Organization, Photography, The Homestead Tagged With: art-studios, craft-art-organization, craft-rooms, craft-spaces, craft-studios, home-renovating

The Making of Mantels / Appeasing my Mantel Envy!

April 1, 2013 By Laura 8 Comments


A couple of weeks ago, I hinted on our Facebook Page about the weekend project we had in the works. I mentioned that I was all done dealing with the ‘mantel envy’ I have had going on, for years now. You know, mantels, the shelving surface that many homes have over their fireplace?  Many creative homemakers have great fun decorating their mantels for various seasons and holidays, switching it up all of the time. I wanted that, too!
We don’t have a fireplace, anymore. Years ago, before the little-house to big-house renovation, we had a built in coal and wood fireplace insert, with a brick mantel. But that was ripped out when our sun room was added on.
I wanted a mantel of my own to work with. And when I really want something, I usually figure out how to get it.
And you know how good I am at that?

I got me TWO mantels! HA!

I reckon some will have some envy for me, now. ; )  See, the good Lord blessed me, like Mary, with a carpenter of my own.  A very skilled carpenter, I might add, who can build just about anything I want. And because I am not only blessed, but possibly (possibly . . . ) spoiled, he does build me anything I want.

 
I had been telling my-personal-Joseph, how I thought it was a fine idea, for him to build me a great pair of corner mantels, over our beloved, ceramic wood burning, family-heirloom. I explained it to him in great deal, trying to paint the picture for him. I don’t think he was really getting my vision for awhile, because he kept looking puzzled, while assessing the area, and saying, “Really?”, every time I brought it up.  But then on the Thursday before said-prior weekend, I told him I just had to have it. And I’d love for him to get sketchin’, and bring home any materials he;d need for the weekend, home after work on Friday. And he said, “So let me get this straight. This is our new urgent project, that you’d like done right away, before I have even finished the last urgent project, that you’d like done right away? I’m supposed to stop that one, and do this one first, after stopping the one I was doing 2 projects ago, to do the last, new urgent project?”  And I said,
“Right. Honey.”

And so he got sketchin’,
and buildin’, and
yes, I helped quite a bit too.
Because I’m not that spoiled.

And by the next weekend, my mantel dreams had come true, x2.
And I was and am still, thankful.

WANNA SEE?!


Ok so this is the corner as it has been (before), when anyone is looking at, when they walk into our front door. On the left hand side there, is where our Prayer List Chalkboard has been hanging for years. (And we still use it, regularly.) For now, it’s moved to the wall beside the front door. But take not of the wall straight ahead.  It’s shorter . . . . .

. . . . than the corner wall perpendicular to it. This one is a bit longer.  So I’ll have two different lengths of mantels.
I also got thinkin’ about how much I’ll be photographing the mantels as it changes for our home decor. And it hit me that the backdrop will always be the same, and green. And the simple (right?…) mantels project instantly grew. I wanted a wider bead board like wall as a backdrop.
See? Spoiled. Possibly.

I knew if my Joseph built me these, I would be so grateful. I’d be happy to finish them myself. Of course, I wanted them to not look new. Or fresh. And for my vision, distressing on fresh wood was not going to work. So I researched how to weather/age the wood, before painting and distressing, and was pleasantly surprised to find a way to do it. That worked!
It’s fairly simple too.  You ‘paint’ the wood with tea, first. I made a big strong batch, soaking my tea bags over night.

So I brushed the tea on all over my two built mantels, and let them dry. There was no difference to see. 
But the tea is only applied to react with the next strange solution brushed on.


I had to cover very fine steel wool (#0000) with straight distilled white vinegar.  And just let it soak, at least for overnight. 
The next day, it didn’t look much different in the jar. I know in time, that wool would rust. (It has since…). But anyway, while applying it to the mantels (already treated with the tea), I could see the instant reaction happening. Very cool. Almost magical!

To see the dried wood after the vinegar/steel wool solution treatment, click on any image in the gallery below, use arrows to see each next, and then your ESC button to close.

[Show as slideshow]
07_weathering-wood-technique
08_weathering-wood-technique
09_weathering-wood-technique
10_weathering-wood-technique

Interestingly, even after the wood had been dry and I took the above photos, the wood seemed to turn even a bit greyer. which I was happy about. For a darker finish, I could have brushed on a second treatment, but I was quite happy with the results after just one, for this project.

So then it was time to paint both mantels, white.  I used about 3-4 parts paint to 1-part water.
And then a whole lot of sanding and distressing.

Meanwhile, Michael, a.k.a my Joseph in this post, was taking care of the walls to my every wishes.


And I’m pretty much done talking, and ready to show you lots of photos of this exciting home improvement project!
Here we go!


Now for anyone concerned, we were sure to make certain these mantels met fire code.  They needed to be at least 6 inches from the stove-pipe, and they are. It’s hard to tell in these photos, but trust us. We have the most to lose! That is why they don’t wrap around behind the pipe.  The mantel shelves are very thick, and keep in mind too, that the stove is only in use maybe 1-1/2 seasons a year.

So yes, while narrow bead-board goes all the way around the lower half of our green sun room (as of this post), the wider bead board (v-groove) type paneling is just in this corner.  I think because of where we let it end, and because of the molding we used, it works nicely! 
And how about those mantels?
I love that I have two to work with! Because sometimes you get going on a theme, but you really have another idea that kind of ties in too.
So that is going to be way fun.  One is 48″ and the other is 35″.
Let’s take a closer look at the beauty of the craftmanship of my husband, shall we?

He used  1×12″ and 1×10″ pine boards, crown molding, and base cap.

And these awesome pre-assembled 9×7″ shelf brackets. Which, I love.

Do you see how the wood looks older, peeking out from underneath the (supposed) worn paint?
Love it!
A few more photos . . . .


Beautiful, no?

 I am SO happy with them. Of course, the whole point of having them, was to decorate. They are looking kind of NAKED in these photos.
But as you can see peaks of in a few photos above, I have indeed gotten my Spring mantels together!
So my Spring Mantels…..that is a next post coming up!
Detail photos of what I adorned these mantels with, for this season, are on their way. Which I believe will really help you pull the whole vision together.
They are gorgeous, and so homey, all decorated. I can’t wait for you to see!
But this post is about the craftmanship of Michael’s work, and his ability and willingness to build my little dreams.
Please leave him your thoughts!
And then look for the Spring Mantels post real soon.! ; )

* * * * * *

Please come follow me here and there:


Filed Under: Furniture Refinishing, Furniture Refinishing, Home Decor, Home Improvement, Home Projects, Mantel Decorating (Ideas), The Homestead Tagged With: carpentry, corner-mantels, custom-mantels, home improvements, making-mantels, mantel-decorating, mantels, shelving, weathering-new-wood, wood-stove-mantels

  • « Previous Page
  • 1
  • 2
  • 3
  • 4
  • 5
  • Next Page »

We are wicked happy to have you here! We hope you find much inspiration, help, humor and enjoyment here.


Archives


POPULAR POSTS

* * * * * *

SUBSCRIBE to House of Joyful Noise blog! Every new post, delivered right to your email box!


Privacy Policy

Amazon Affiliates

Never at any additional cost to you, we may earn a small commission for our endorsement, recommendation, testimonial, and/or link to any products from our website. Your purchase through our links helps support our family, while sharing with you the products we authentically use and recommend, for various ideas, and letting you know where you can purchase them. Thank you for your support!

[footer_backtotop]

Copyright © 2025 HouseOfJoyfulNoise.com ยท Genesis Framework by StudioPress