• HOME
  • About Us
  • {A}’s Chipmunk Training Archives

 Homepage

  • The Homestead
    • Home Projects
    • Home Improvement
    • Home Decor
      • Seasonal Home decor
        • FALL Home Decor
        • WINTER Home Decor
        • SPRING Crafts and Creations
        • SUMMER Crafts and Creations
    • Our Chickens
    • Gardening
    • Organization
    • Re-Purposing
    • Furniture Refinishing
    • Budget
  • Crafts & Creations
    • Seasonal Home decor
      • FALL Crafts and Creations
      • WINTER Crafts and Creations
      • SPRING Crafts and Creations
      • SUMMER Crafts and Creations
    • DIY (Do-It-Yourself) Project
    • Kids Arts and Crafts
    • Homemade/Handmade Gift Ideas
    • Holiday Crafts
    • Fan Pulls
    • Free Printable/Downloadable
    • Sewing Projects
    • Giveaways
    • Business Features
  • Recipes/FoodFun
    • Breakfast
    • Lunch
    • Main Dish
    • Sandwiches
    • Appetizers
    • Slow Cooker
    • On The Grill
    • Side Dishes
      • Soups
      • Salads
    • Baking
      • Breads, Rolls and Muffins
    • Snacks
    • Treats
    • Desserts
    • Drinks
  • Homeschooling
    • Elementary Homeschooling
      • Elementary Homeschooling READING
      • Elementary Homeschooling MATH
      • Elementary Homeschooling LANGUAGE ARTS
      • Elementary Homeschooling SCIENCE
      • Elementary Homeschooling HOME ECONOMICS
      • Kids Arts and Crafts
    • Middle School Homeschooling
      • Middle School Homeschooling SCIENCE
      • Middle School Homeschooling HOME ECONOMICS
    • Language Arts
    • Math
    • History / Social Studies
    • Geography
    • Foreign Language
    • Field Trips
    • Games
    • Nature Study
  • The Big Picture
    • Life In General
    • Celebrations
    • Faith
      • Into the Light; The Series
    • Giveaways
    • Reviews & Sponsors
  • Photography & Lettering
    • Photography
    • truck lettering
    • vehicle graphics
    • Newborns
    • Kids
    • Engagement
    • High School Senior Pictures
    • High School Senior Pictures Sneak Peeks

The Making of Mantels / Appeasing my Mantel Envy!

April 1, 2013 By Laura 8 Comments


A couple of weeks ago, I hinted on our Facebook Page about the weekend project we had in the works. I mentioned that I was all done dealing with the ‘mantel envy’ I have had going on, for years now. You know, mantels, the shelving surface that many homes have over their fireplace?  Many creative homemakers have great fun decorating their mantels for various seasons and holidays, switching it up all of the time. I wanted that, too!
We don’t have a fireplace, anymore. Years ago, before the little-house to big-house renovation, we had a built in coal and wood fireplace insert, with a brick mantel. But that was ripped out when our sun room was added on.
I wanted a mantel of my own to work with. And when I really want something, I usually figure out how to get it.
And you know how good I am at that?

I got me TWO mantels! HA!

I reckon some will have some envy for me, now. ; )  See, the good Lord blessed me, like Mary, with a carpenter of my own.  A very skilled carpenter, I might add, who can build just about anything I want. And because I am not only blessed, but possibly (possibly . . . ) spoiled, he does build me anything I want.

 
I had been telling my-personal-Joseph, how I thought it was a fine idea, for him to build me a great pair of corner mantels, over our beloved, ceramic wood burning, family-heirloom. I explained it to him in great deal, trying to paint the picture for him. I don’t think he was really getting my vision for awhile, because he kept looking puzzled, while assessing the area, and saying, “Really?”, every time I brought it up.  But then on the Thursday before said-prior weekend, I told him I just had to have it. And I’d love for him to get sketchin’, and bring home any materials he;d need for the weekend, home after work on Friday. And he said, “So let me get this straight. This is our new urgent project, that you’d like done right away, before I have even finished the last urgent project, that you’d like done right away? I’m supposed to stop that one, and do this one first, after stopping the one I was doing 2 projects ago, to do the last, new urgent project?”  And I said,
“Right. Honey.”

And so he got sketchin’,
and buildin’, and
yes, I helped quite a bit too.
Because I’m not that spoiled.

And by the next weekend, my mantel dreams had come true, x2.
And I was and am still, thankful.

WANNA SEE?!


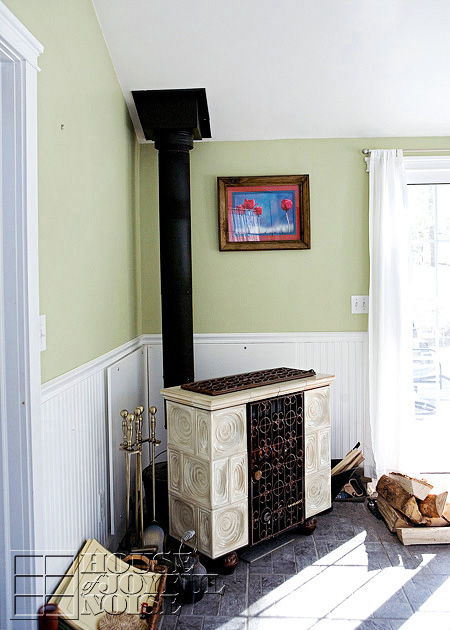
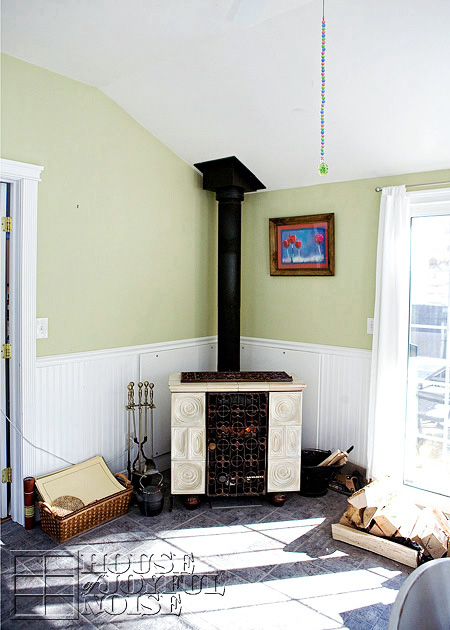
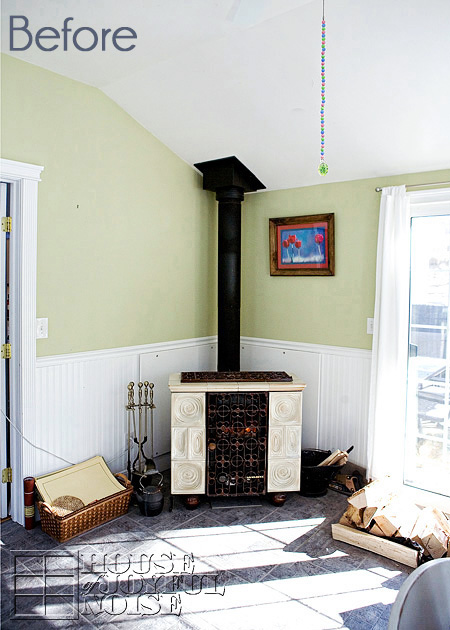
Ok so this is the corner as it has been (before), when anyone is looking at, when they walk into our front door. On the left hand side there, is where our Prayer List Chalkboard has been hanging for years. (And we still use it, regularly.) For now, it’s moved to the wall beside the front door. But take not of the wall straight ahead.  It’s shorter . . . . .

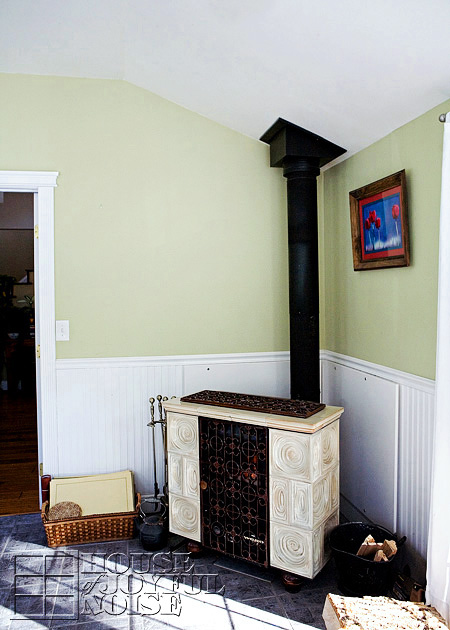
. . . . than the corner wall perpendicular to it. This one is a bit longer.  So I’ll have two different lengths of mantels.
I also got thinkin’ about how much I’ll be photographing the mantels as it changes for our home decor. And it hit me that the backdrop will always be the same, and green. And the simple (right?…) mantels project instantly grew. I wanted a wider bead board like wall as a backdrop.
See? Spoiled. Possibly.

I knew if my Joseph built me these, I would be so grateful. I’d be happy to finish them myself. Of course, I wanted them to not look new. Or fresh. And for my vision, distressing on fresh wood was not going to work. So I researched how to weather/age the wood, before painting and distressing, and was pleasantly surprised to find a way to do it. That worked!
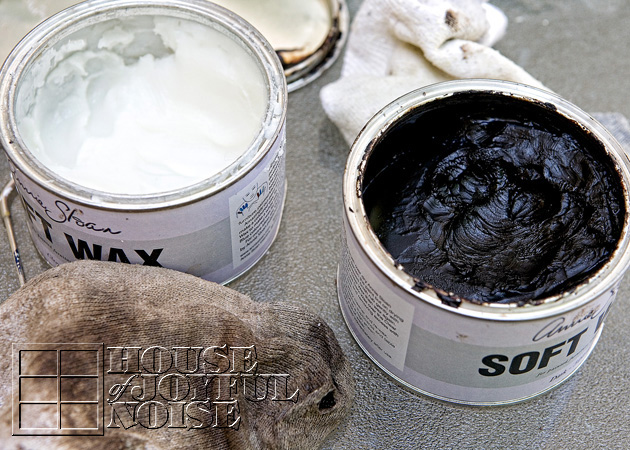
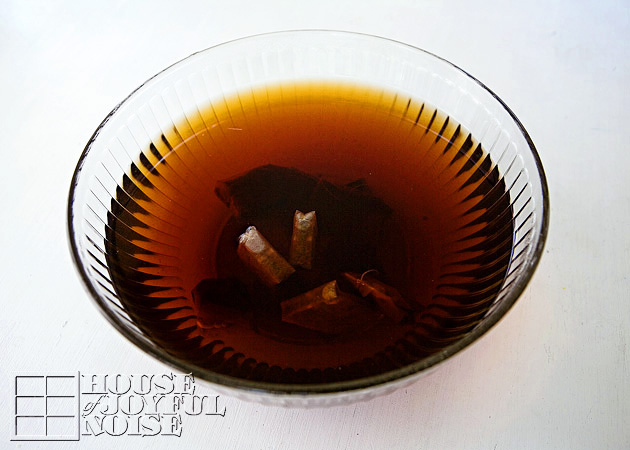
It’s fairly simple too.  You ‘paint’ the wood with tea, first. I made a big strong batch, soaking my tea bags over night.

So I brushed the tea on all over my two built mantels, and let them dry. There was no difference to see. 
But the tea is only applied to react with the next strange solution brushed on.


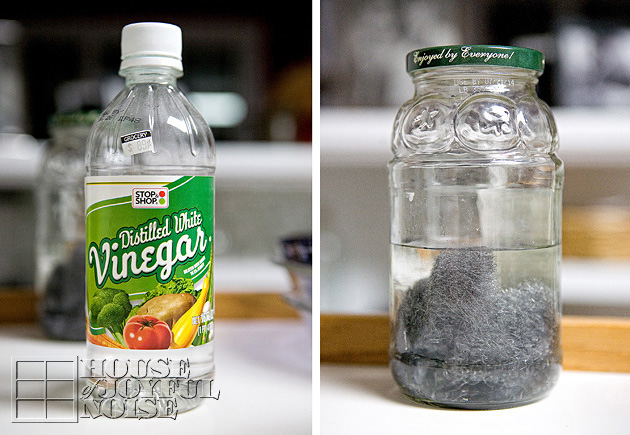
I had to cover very fine steel wool (#0000) with straight distilled white vinegar.  And just let it soak, at least for overnight. 
The next day, it didn’t look much different in the jar. I know in time, that wool would rust. (It has since…). But anyway, while applying it to the mantels (already treated with the tea), I could see the instant reaction happening. Very cool. Almost magical!

To see the dried wood after the vinegar/steel wool solution treatment, click on any image in the gallery below, use arrows to see each next, and then your ESC button to close.

[Show as slideshow]
07_weathering-wood-technique
08_weathering-wood-technique
09_weathering-wood-technique
10_weathering-wood-technique

Interestingly, even after the wood had been dry and I took the above photos, the wood seemed to turn even a bit greyer. which I was happy about. For a darker finish, I could have brushed on a second treatment, but I was quite happy with the results after just one, for this project.

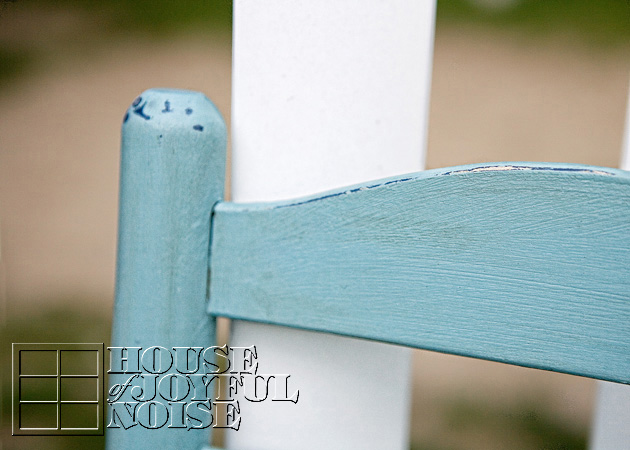
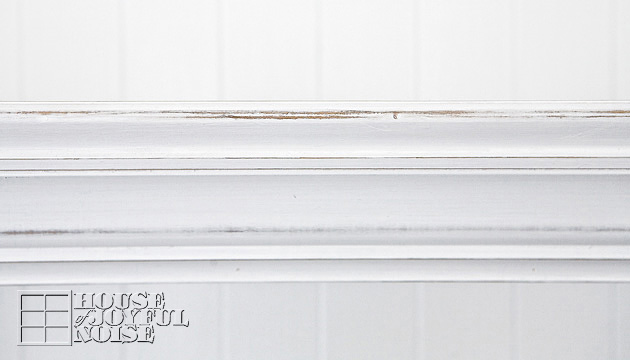
So then it was time to paint both mantels, white.  I used about 3-4 parts paint to 1-part water.
And then a whole lot of sanding and distressing.

Meanwhile, Michael, a.k.a my Joseph in this post, was taking care of the walls to my every wishes.


And I’m pretty much done talking, and ready to show you lots of photos of this exciting home improvement project!
Here we go!


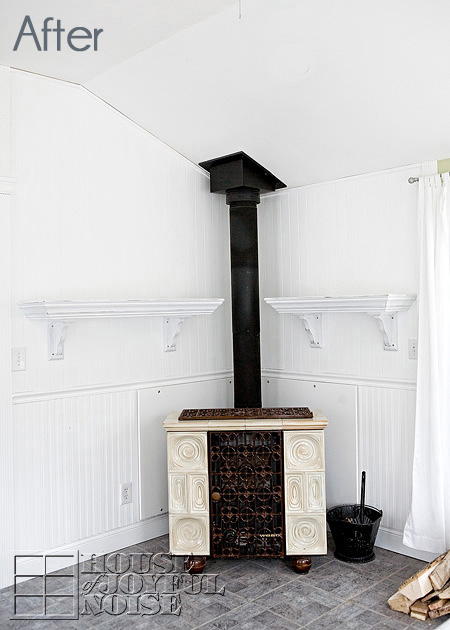
Now for anyone concerned, we were sure to make certain these mantels met fire code.  They needed to be at least 6 inches from the stove-pipe, and they are. It’s hard to tell in these photos, but trust us. We have the most to lose! That is why they don’t wrap around behind the pipe.  The mantel shelves are very thick, and keep in mind too, that the stove is only in use maybe 1-1/2 seasons a year.

So yes, while narrow bead-board goes all the way around the lower half of our green sun room (as of this post), the wider bead board (v-groove) type paneling is just in this corner.  I think because of where we let it end, and because of the molding we used, it works nicely! 
And how about those mantels?
I love that I have two to work with! Because sometimes you get going on a theme, but you really have another idea that kind of ties in too.
So that is going to be way fun.  One is 48″ and the other is 35″.
Let’s take a closer look at the beauty of the craftmanship of my husband, shall we?

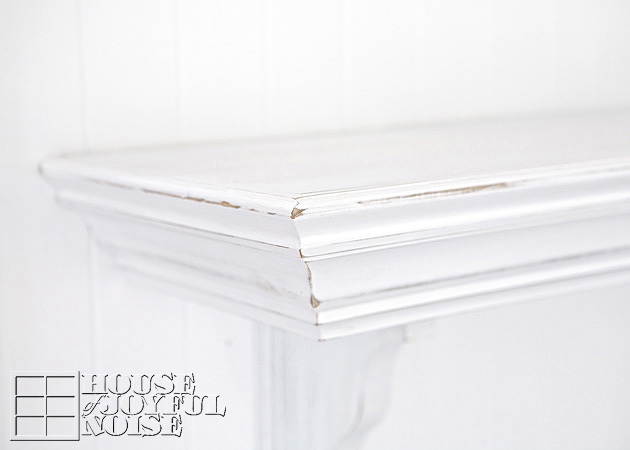
He used  1×12″ and 1×10″ pine boards, crown molding, and base cap.

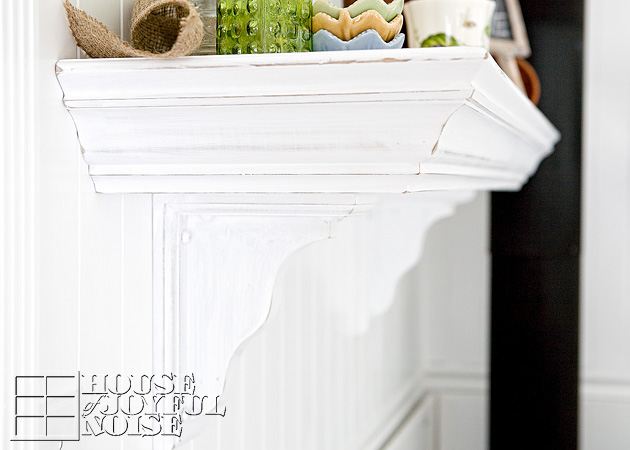
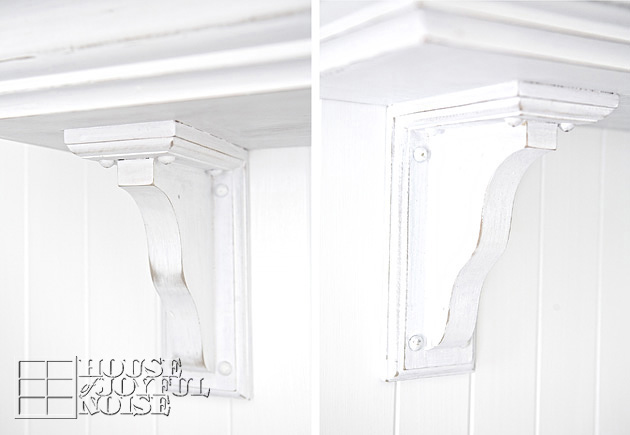
And these awesome pre-assembled 9×7″ shelf brackets. Which, I love.

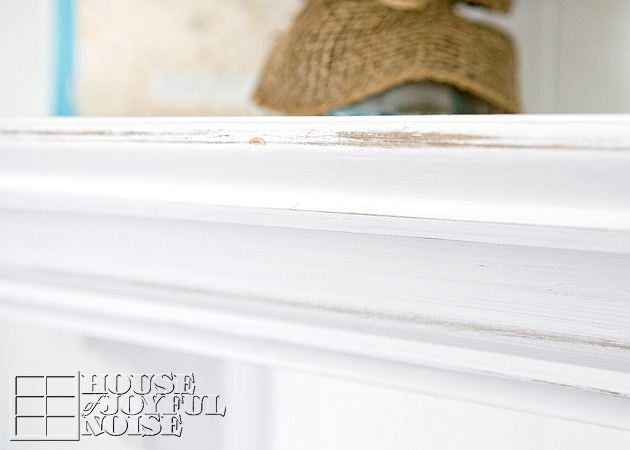
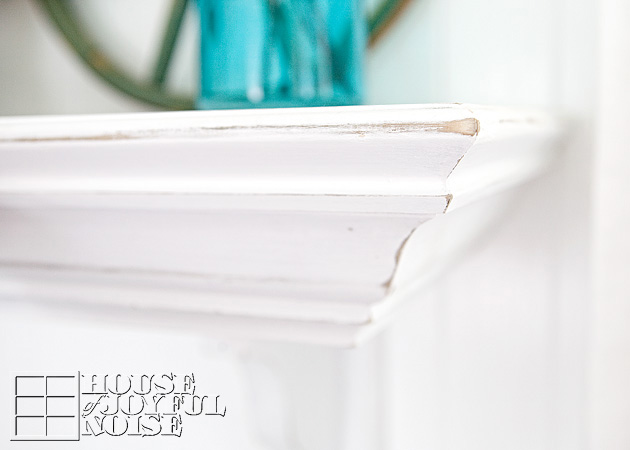
Do you see how the wood looks older, peeking out from underneath the (supposed) worn paint?
Love it!
A few more photos . . . .


Beautiful, no?

 I am SO happy with them. Of course, the whole point of having them, was to decorate. They are looking kind of NAKED in these photos.
But as you can see peaks of in a few photos above, I have indeed gotten my Spring mantels together!
So my Spring Mantels…..that is a next post coming up!
Detail photos of what I adorned these mantels with, for this season, are on their way. Which I believe will really help you pull the whole vision together.
They are gorgeous, and so homey, all decorated. I can’t wait for you to see!
But this post is about the craftmanship of Michael’s work, and his ability and willingness to build my little dreams.
Please leave him your thoughts!
And then look for the Spring Mantels post real soon.! ; )

* * * * * *

Please come follow me here and there:


Filed Under: Furniture Refinishing, Furniture Refinishing, Home Decor, Home Improvement, Home Projects, Mantel Decorating (Ideas), The Homestead Tagged With: carpentry, corner-mantels, custom-mantels, home improvements, making-mantels, mantel-decorating, mantels, shelving, weathering-new-wood, wood-stove-mantels

My Custom Built Farmhouse Home Office Desk

August 25, 2012 By Laura 33 Comments

custom-built-farmhouse-home-office-desk-5

 I know many of you have been waiting for this, with all of my teasing about it! And I have been dying to show you (show off…whatever) my custom-built farmhouse home office desk, that that my husband made for me!  For this first post, I am simply sharing with you the build itself, and some of the story behind it.  In upcoming posts, I will show you my work-space all set up and pretty. (When I get that far.)

So first, to put my appreciation and excitement in context here, you should know how I have been working.

In this large amoire in the photos below, is our TV, which we rarely use at all. But behind it was my work cubby.  It was always amusing when someone who had been to our house a few times before, before they realized there was a work space behind there.  They’d always react with such surprise and intrigue.  So come around the amoire (following the numbered photos), and see my little space I have had . . . . .

001_old-office-cubby-space It certainly was a workable idea for the past few years, in that it gave me a little privacy for editing client portrait work. It is rather organized and cleaned up here, but that is not how it has always appeared or felt. (I had already started cleaning out here, to empty this whole cubby.) To start, I hated the desk. The photo is deceiving I think, because this desk was mammoth, and yet not efficient at all; with shelves I couldn’t easily get to (dusting nightmare), and virtually no storage or room to work.  With a modern design, fake wood laminate and black accents-ugh! I wanted it GONE.  And what a dust magnet this cubby has been!

Anyway, imagine on the desk-top, on either side, a tall pile of papers, notebooks and dozens of folders.  And not just here. When I worked on my laptop for school and blogging, I’d sit on the couch, where beside the couch was small table with another 2 piles of papers, notebooks and folders.  Then there is the school room, where I’ve kept all of my teacher books.  I can’t stand clutter or disorganization, so having everything everywhere has tended to make me cranky, and yelling when I couldn’t find something!

 Between homeschooling my 4 kids, their work needing correcting or keeping, educational planning stuff, their activity schedules, forms needing to be filled out, home and life maintenance with mail, bills and records and the like that needs to be kept up with, and my work paraphernalia for the blog and it’s website, it has felt like unorganized madness to me! Like….losing my mind. I can’t manage and work my best like that.

What I needed and wanted was one organized management center to work from, with a style that said me, and reflected our farmhouse home decor.  A Pottery Barn home office knock-off, of sorts.  Yes please, Honey!

Whenever a new school year is about to turn over in the next 2-3 months, I always get into this nesting mode frenzy, wanting to get super organized and ready for the next year. So my chatter about my dream custom-built farmer’s table home office desk had picked up speed as of late!  I completely cleaned out that cubby, moved the amoire, and just gave away that huge desk to a very grateful girl, who really needed it.  It was going to be an all new space, that I could manage everything from.  Open, bright, stylish and cheery.

As always, Michael and I first got some initial drawings down on paper, which Michael threw out by accident! ; ( , and a few revisions later, Michael got to making it a reality for me.

002_carpenter-tools My design idea was simple;  the base of a plain old farmer’s table, with cubbies and shelving for storage. But it needed to be BIG. The full length of the wall opposite the large window, to accommodate and organize all areas of my life and family I need to manage, as well the larger equipment I need to do it, such as my 2 computers, hard-drives, copier, etc.

So if you haven’t scrolled down and peeked already (uh-huh), the reveal is next. But I have to say, this was SO HARD to photograph with the lenses I have, as this desk is 7 feet long!  But every inch was custom designed with a purpose for it’s space. Take a look . . . . . .

custom-built-farmhouse-home-office-desk Is it not GORGEOUS?!
I can answer that.

custom-built-farmhouse-home-office-desk-1
While there were no initial plans for drawers at all, the craziest things happen to us, and we ended up with some beautiful ones! I’ll get to that story-bit in a minute, but as you can see, the general structure of the desk is very much a farmer’s table design.

Let’s talk about some of the details:

custom-built-farmhouse-home-office-desk-2
Simple table legs support the desk.

Now let me tell you about the drawers, which really have added such beauty to the piece as a whole.  In the beginning, I had just planned on using lots of cubbies and little containers, for all of the little things, all built upon a farmers table, much like the one we eat at in our sunroom. But the craziest blessings happen to us all of the time, and this amazing happenstance is no different:

custom-built-farmhouse-home-office-desk-3 About the time the table was pretty much built, and yet still bare wood and unfinished (as seen above, minus the drawers), Michael had a job to go re-letter the back of one of his client account’s large moving trailer. While he was there on the job site, he went to throw some things in the dumpster. There, in the container, were 3 of these beautiful drawers and some big desk all broken apart! I can only imagine how beautiful the desk must have been, because the drawers are to me, breath-taking.  Crazier, the slim design and depth of the drawers would fit and work perfectly within the table side of the desk he was building for me. So he grabbed the drawers, and all of the attachment trackings for them, and  brought them home.  I was astonished. I immediately fell in love with them, and he installed them.

custom-built-farmhouse-home-office-desk-4 Just look at the hardware!

custom-built-farmhouse-home-office-desk-6 Even the keyhole makes me gasp and smile inside.

custom-built-farmhouse-home-office-desk-7 They silently and smoothly just roll out, like butt-ah!

And the inside of the large drawer had me flipping out with joy . . . . . .

custom-built-farmhouse-home-office-desk-8 Talk about great quality. HOW, could anyone throw these drawers away?  And what a blessing just meant to be, that Michael was there at that site on this particular day, and looked in that waste container, right when we were building this project!  The waste removal company was coming to empty that container the very next morning! The drawers would have been gone forever.

011 These two smaller drawers were installed side by side, on the opposite end of the large one.   Take note of the bare wood before finishing.  Aside from the drawers, the table-top is made of cabinet grade plywood, while the rest is plain pine and bead board.  A very light color wood.

Now, how I was going to finish this desk, was such a torn-dilemma! I even did various techniques experiments on several scraps of wood, trying to decide:  Did I want to just paint it white and then sand it down to worn in various places?  Crackle it? Use some dark wax or antiqued glaze?

Honestly, it feels like such a big an important decision, that it kind of paralyzed me.  So I kept it simple for now, and will likely continue to alter the finish more when I decide on one, or all of the ways I am contemplating. But at least then it will be a thought-out decision. For now here’s all I did:

0121 I sanded it to a worn state in specific places, such as corners, edges, and raised areas.

But because the wood underneath was so light, I went a step further using a possibly odd technique and medium, to bring the distress work out more . . . . . .

013 I mixed clear glaze and straight burnt umber watercolor paint.  I painted just over the areas where it was sanded to wood, let it sit a minute, and wiped off with a clean dry rag.  It stained the exposed under-wood just enough, to have a more distinct worn look.  As I said, I still may do some crackle work in areas, and/or antique it more with wax or glaze.  But I also expect it will get wear and age naturally, simply from me using it a lot, and owning it for a very long time to come. But for now, I am loving it as it is.  It may stay like this forever.

custom-built-farmhouse-home-office-desk-9
I am still ‘moving in’ to this large piece of furniture that is quickly organizing my whole world, and there will be a follow up post to show you how I arranged everything I needed in this space.  But as I said, parts of the desk were very specifically designed for certain things.  To give you one example today; that top left cubby you see, will hold my 4 external hard-drives, most of which are about to dumped of all client work. They are already mostly free space even still,  so I will be using them for a good many years to come, for external storage space for all of my other personal photo storage and designs.

custom-built-farmhouse-home-office-desk-10 As I am sure many of you know and will agree, it’s the accessorizing that is the most fun!  It’s the pretty little things, that really make a space yours, and I have always felt it’s important to surround yourself in your home and work space, with the things that make you feel those little leaps of joy inside. (Or that’s what happens to me, anyway. ; ) So I hope to share with you all just how I’ll be utilizing the space of my new custom-built workspace, the ways in which it’s organizing my life, and all of the little things I love that make me smile, and maybe will make you smile too. Or give you some ideas of your own.

Another crazy blessing story-bit:  I had told Michael I would probably just use one of our regular white farm chairs at the desk, rather than a black computer chair.  But that some day, I would love to find a nice white office chair on wheels, much like the Pottery Barn chairs, that we could never afford.
Well guess what he found and brought home with the drawers? . . . . . .

016_white-desk-chair
Again, for free. When Michael was chatting one of the moving company employees at the job site where he pulled the drawers out of the waste container, and told him all about this desk he built, the guy said, “I have a chair inside that went with the desk we got rid of, if you want to see it.” And this is what he brings out!  Oh, you know I’ll distress this some too, and get some pretty shabby-chic cushions for it.  But what a high-quality chair!  It not only is on wheels and swivels, but it rocks! I’m a rocker, still. Between my first baby-girl that loved to nurse forever, and then my triplets, Mama-rocking is a just part of my natural movement now. This is a big chair though. It definitely needs the cushions. I feel like a kid in it right now.  Michael was more excited about getting the chair for me, than the drawers. But the drawers were actually the biggest pleasant surprise for me.  Honestly, the chair is massive! Like, too wide and heavy for me. I may just keep using my computer chair for now.

custom-built-farmhouse-home-office-desk-11 So there it is! I know I am ridiculously blessed to have a husband whose skilled hands can create these things for me.  This desk would cost thousands of dollars, bought. And it wouldn’t be custom-built, for me and my specific needs. Or made with love! He’s built so many things for me, big and small.  This one is certainly very special to me, as it will really help me manage the most important aspects of my life; primarily teaching my children, and managing our family details, and lastly, doing what I can to help my husband provide for us, through blogging, which I love to do anyway.

I do apologize for the length of this post and number of photos, but there was a lot to share with you, and I’ve been SO excited to!
Wouldn’t you be?
Tell me what you think of it! Do you have a special space in your home, that helps keep you organized and everything managed? Please tell us about it, and leave any ideas you may have for us as well.  Thanks so much for coming by and looking!

Save


Save

Filed Under: Furniture Refinishing, Furniture Refinishing, Home Decor, Homeschooling, Re-Purposing, Refinishing, The Homestead Tagged With: Catholic-blogs, Catholic-families, custom-built-desks, custom-built-farmhouse-home-office-desks, custom-furniture, dream-home-office-desk, farmhouse-desks, furniture-refinishing, office-home-desk, pottery-barn-home-office-desk-knock-off

3 Little Garden Chairs | Refinishing

July 2, 2012 By Laura 9 Comments

006_annie-sloan-provence-paint-color-300x214

There’s been these 3 little chairs, sitting in our basement for years now.  One of my husband Michael’s clients offered them to him, knowing we had triplets, and thinking maybe we could use them.  They are about toddler size. So he brought them home, and they’ve been in the basement ever since. I’ve never been a primary-colors kind of girl.  I thought maybe I would repaint them or do something with them at some point, for the kids, or maybe as available props for my photography studio.   But, I was just never inspired to ‘have-at’ them.

Until of course, I was.

001 I know these are ugly. Please don’t leave! I promise you, it gets much better! We were hauling out all kinds of things out of our basement that needed to GO, for our yard sale. Michael put these chairs out there, and when I saw them I said, “Hey! We’re not selling these! I could make them into cute little garden chairs!”  Well then….there was my inspiration.  The idea hit me for the first time, and flew out of my mouth. (As most thoughts do, if you must know. But I’m getting better.)  As so as it was, I was finally inspired to do something with these 3 little chairs.

The challenge was the primary colors of paint that was already on them.  Yes, I was going to paint them anyway, but I was NOT going to NOT distress them. And I sure as heck was NOT going to strip them.  They didn’t mean enough to me, to work that hard.  I mean, I love to paint, and to sand, and even to wax.  But stripping off paint? Not so much. So the primary colors underneath were staying, and I was starting to imagine, they were going to look pretty cool when I was done!

I’ll say right here, that I didn’t take photos of every step of the process.  But I think you all know what painting and sanding looks like. I DID take a whole bunch of photos of the chairs all done though! Lots. Those are the more fun photos you all like to see most, right. Because there was no special complicated process. I will tell you just how I did it right now, which was easy as 1-2-3, and then you can see so many photos I had so much fun taking as well, simply to show you.

Since I had 3 chairs, I thought it would be perfect to use the cans of the 3 colors of Annie Sloan chalk paints that I still had: Provence, Versailles, and Paris Grey. So, 1) I painted each one those colors.  It was actually very scattered painting sessions over a period of a few weeks, and my girls helped some too when they wanted to.  2) Then I distressed them to my liking. (That means, a lot of sanding. ; )

002_annie-sloan-waxes 3) Lastly, I waxed them with my Annie Sloan waxes.  It was especially important for them to be waxed, because I knew they were going to be left outside in all kinds of weather. So they needed some kind of protection, to preserve all of my efforts, of making them into cute little garden chairs around our homestead.  I did wax each chair one at a time, from start to finish.  First I did the clear wax all over a chair, let it set up a bit, but before it was completely dry, I worked in some dark wax where I wanted it, to give them a more antiqued, aged look. It kind of has to be done that way, because the dark wax is potent stuff. It only takes a little bit, and if the clear wax is too dried, it is hard to rub off – or even rub around, the dark wax. So that is always the little bit tricky part, as well as wicked messy and sticky and stinky. But I’ll tell you what, this point in my project process really proved even to me, how much I love furniture refinishing! Because it was also sunny and hot this day.  But I was out on our deck working away in the sun, sweating my a*# off (but wouldn’t you know it, it’s still all there!), but singing and rocking out to the music, with that nasty sock on my busy hands, and having a ball!

Or I might of been high on wax fumes. Hard to say. But it was fun! That much I’m sure of.

Not much chatting left. Just a ton of photos, and some tidbits I think you might like to know.

003_chair-antiqued-with-dark-wax Here you can see a couple of things, that really make these chairs beautiful to me. Knowing the primary colors underneath were going to show, I was careful in deciding which paint color was going on which chair. So here is the (Annie Sloan) Provence, on the dark blue.  You can also best see in this photo, the dark wax work, that helps make the chair look more aged.

 And a bunch of photos, where I have this one right now . . . . . .

004_chair-refinish

005_chair-refinishing

006_annie-sloan-provence-paint-color

007_garden-chairs

008_garden-chair

009_repainted-furniture Do you love it? I do!! I love the color, and I love where it is, with the daisies and the white picket fence there.  What I don’t love, is our yard. You may have noticed the lack of real grass. We pretty much just have crabgrass, and fine sand. I don’t much like the cement steps either. But, we have decided to hold off a bit and not invest in our grounds anymore, until we make some other pretty big decisions.  So, we make due, with making ugly . . . pretty, best we can for now.

Next up, is the one that was yellow chair, which I painted Versailles.  It’s out front with the garden beds, next to the covered bench and potting bench . . . . . .

010_little-garden-chairs

011_garden-chair

012_annie-sloan-versailles-paint-color

Again, you can really see the paint underneath, where I excessively sanded, just the right amount. : )  You can also see the dark wax work, which only adds some character to it, to me. And do you see where the paint dripped? Some may think that is some imperfection. But I see it, and it makes me smile and feel happy. Because it reminds me of the memory, that my little girl was helping me paint this chair.

 And lastly, is the red chair, that I painted Paris Grey! I really wasn’t sure where I was going to put this one. So I just stuck it under the apple tree, and it seemed to look like it was at home there. Funny thing is . . . . . . it’s not at our home. (Yikes!)

013_little-garden-chair

The apple tree is not actually ours, nor on our property of course. Just over the line, but we pretend it’s ours. The owner is not usually around at all, and Michael does manage the property. (My excuse to take such liberties.) But she’s coming tomorrow for a week, so we’ll see if I get my hand slapped, or she kicks it back to our side, along with the birdhouse. And if I get arrested or anything, I’ll surely let you know. Because we’ll need to collect some bail!  (You all would help me get out. Right?!  Say yes.)

014_garden-chair

Care to sit for a spell, in the cool shade of the apple tree?

015_annie-sloan-paris-grey
See? I really go to town, with my sand paper!  This one even has a little broken piece. Again = love.

 I always say . . . . . . it’s the little things, that make me so happy.

016_three-little-garden-chairs Thanks for taking a stroll around my gardens with me. (We literally, walked around the garden beds.) I always love when you visit us here, so please come again. We invite you to join us on Facebook too.


Save

Save

Filed Under: Furniture Refinishing, Furniture Refinishing, Gardening, Home Decor, Photography, Refinishing, The Homestead Tagged With: aging-furniture, annie-sloan-chalk-paints, annie-sloan-wax, cute-garden-decorations, distressing-wood-paint, garden photography, garden-decor, garden-decor-ideas, how-to-antique-furniture, little-garden-chairs, making-furniture-pieces-look-antique, painting furniture, photography, re-painting-furniture, refinishing-chairs, refinishing-furniture, still-life-photography, triplets, weather-proofing-furniture

An Armoire Refinish

April 19, 2012 By Laura 6 Comments

furniture refinish


It’s been awhile since we’ve shared a furniture refinish project with you.  Unlike the last one which was extremely meaningful and refinished with much love, my mother’s dresser, this one is not so special.  It’s a useful piece for our home, but it’s just a piece we picked up years ago at some department store or other.
  Regardless, it has been in a room we wanted it out of.  The only other place we could figure that it could be used and where we also would have room for it, was in our youngest daughter’s bedroom.  Yes, the same bedroom my mother’s dresser was refinished for.  And I was NOT putting this darker piece up there, in that bright, fresh and airy room. So, it needed to be refinished to fit in up there, first.


furniture refinish
I’d always thought this piece was cheap quality, because it’s just seemed so, to me. Maybe because I have since bought another armoire (years ago also, but after this piece), that to me, has a lot more character than this one.  I just love the latter one more.  I’m not positive what type of wood this one is made of, but my husband’s guess is Poplar.  After researching his guess, I’m guessing he is right. Because something about it has reminded me of something like ‘balsam type wood’.  It’s not light in weight, but it is hella-absorbent!  Lord have mercy, painting it was no fun at all.

I have to admit, my heart was not in the refinish of this piece at all, as it was with my mother’s dresser, but it simply had to be done, = chore.  So I begged my oldest to help me paint it.  She agreed, but she wasn’t having any more fun than I was. So we were miserable together. We don’t have a paint sprayer and compressor yet, but this piece has really encouraged me to get one!  We had at it with good old paintbrushes and rollers.   And because of all of the hardware, it needed to be taken apart. Ugh.

I thought using a paint and primer in one, would keep it from needing to be painted twice, but no such luck.  Poplar = Sponge!  Maybe there is a prep trick to help with that, but I’m just an amateur learning. And what I learned this round was…..look into that before painting poplar again!

furniture refinish

Here, I just wanted to show you a little trick for moving heavy furniture on hard flooring. Put a large enough sized towel or blanket under the piece.  It makes it easy to just slide across the floor, without the need to literally pick it up and carry it.  (Unless steps or carpet are involved, of course.)   In this moment, we were just moving it through the family room into the sun room to be painted.  But then….it did need to go up a flight of stairs.

I did not take photos of the painting process. Not much to see but 2 busy people pouting, with paintbrushes. But the goal was to make it match, or at least coordinate, with my mother’s dresser in the same room it would be in. Although, I had no intentions of using the same entire refinish process as my mother’s piece.  And also…..the two pieces are completely different kinds of wood, as well as two completely different colors of original wood. But my hope and goal, was that somehow, they would pair well enough together.  You’ll see they did, if you stick with us here.

furniture refinish


Once it was completely painted, it went right upstairs, because we needed it out of the way where it was painted in the sun room.  But it still needed to be distressed.  If you know me, I’m not much into uniformly and perfectly painted pieces. Luckily, I had a couple littles who were begging to help.  I thank my lucky stars daily, that they think helping with most anything, is fun.  So I gave them some course pieces of sandpaper, and showed them all of the edges I wanted done.  We worked together until it was done. 

They were willing to work for free, but I gave them great big XOXO’s for the help. ; )

Here is a look at the finished piece, but then I’ll show you some details and another little step I took with it:

furniture refinish

furniture refinish This is my mother’s dresser. But you really should check out the whole post to see the amazing transformation.

armoire-furniture-refinish-4
They go together pretty well enough, don’t you think?

I did two things to really help age the look of the armoire, and help it tie in with my mother’s dresser. 

furniture refinish
The first as I said, was the sanding of the edges, to wear down or chip off the paint. That’s what the kids helped me with. 

furniture refinish
There were a lot of edges, inside and out!


furniture refinish

We also spray painted the hardware the same nickle color as the hardware on my mother’s dresser. It’s nicking off some on the handles here, but that only adds to the charm of it, to me.

 Lastly, if you notice the aged color to it in the photos of the whole piece, where it looks kind of dirty, (not done yet in closer detail photos above), as opposed to all fresh white, this was done with a plain old dry piece stainless steel wool. It really, really changed the look of the whole armoire, and made me finally love it! I think I do!  And here, is the Before and After….

furniture refinish In the end, it was really worth it, I think.  But only because I had lots of help! What are your thoughts?  I’d love to know, just out of curiosity. I learned in my research, that Poplar wood is meant to be a beautiful natural wood. So maybe most would never venture to paint it. (Or maybe they know how absorbent it is!).  But I didn’t hesitate. Would you?


Save

Filed Under: Crafts & Creations, DIY (Do-It-Yourself) Project, Furniture Refinishing, Furniture Refinishing, Refinishing, The Homestead Tagged With: antiquing-furniture, armoire-makeover, armoire-refinish, furniture-makeovers, furniture-painting, furniture-refinishing

We are wicked happy to have you here! We invite you to connect with us anywhere you are, too!


SUBSCRIBE to House of Joyful Noise blog! Every new post, delivered right to your email box!

Archives

Find Us on Facebook

SuperWebTricks Loading...


POPULAR POSTS

* * * * * *

SUBSCRIBE to House of Joyful Noise blog! Every new post, delivered right to your email box!


Privacy Policy

Amazon Affiliates

Never at any additional cost to you, we may earn a small commission for our endorsement, recommendation, testimonial, and/or link to any products from our website. Your purchase through our links helps support our family, while sharing with you the products we authentically use and recommend, for various ideas, and letting you know where you can purchase them. Thank you for your support!

[footer_backtotop]

Copyright © 2023 HouseOfJoyfulNoise.com · Genesis Framework by StudioPress