• HOME
  • {A}’s Chipmunk Training Archives

 Homepage

  • The Homestead
    • Home Projects
    • Home Improvement
    • Home Decor
      • Seasonal Home decor
        • FALL Home Decor
        • WINTER Home Decor
        • SPRING Crafts and Creations
        • SUMMER Crafts and Creations
    • Our Chickens
    • Gardening
    • Organization
    • Re-Purposing
    • Furniture Refinishing
    • Budget
  • Crafts & Creations
    • Seasonal Home decor
      • FALL Crafts and Creations
      • WINTER Crafts and Creations
      • SPRING Crafts and Creations
      • SUMMER Crafts and Creations
    • DIY (Do-It-Yourself) Project
    • Kids Arts and Crafts
    • Homemade/Handmade Gift Ideas
    • Holiday Crafts
    • Fan Pulls
    • Free Printable/Downloadable
    • Sewing Projects
    • Giveaways
    • Business Features
  • Recipes/FoodFun
    • Breakfast
    • Lunch
    • Main Dish
    • Sandwiches
    • Appetizers
    • Slow Cooker
    • On The Grill
    • Side Dishes
      • Soups
      • Salads
    • Baking
      • Breads, Rolls and Muffins
    • Snacks
    • Treats
    • Desserts
    • Drinks
  • Homeschooling
    • Elementary Homeschooling
      • Elementary Homeschooling READING
      • Elementary Homeschooling MATH
      • Elementary Homeschooling LANGUAGE ARTS
      • Elementary Homeschooling SCIENCE
      • Elementary Homeschooling HOME ECONOMICS
      • Kids Arts and Crafts
    • Middle School Homeschooling
      • Middle School Homeschooling SCIENCE
      • Middle School Homeschooling HOME ECONOMICS
    • Language Arts
    • Math
    • History / Social Studies
    • Geography
    • Foreign Language
    • Field Trips
    • Games
    • Nature Study
  • The Big Picture
    • Life In General
    • Celebrations
    • Faith
      • Into the Light; The Series
    • Giveaways
    • Reviews & Sponsors
  • Photography & Lettering
    • Photography
    • truck lettering
    • vehicle graphics
    • Newborns
    • Kids
    • Engagement
    • High School Senior Pictures
    • High School Senior Pictures Sneak Peeks

A Custom Fall Decor Sign

November 3, 2013 By Laura 6 Comments

The details of the season of Fall inspires me so much!
This time, it was to make a custom fall decor sign for our home.


–

I was going through some scrapbooking supplies recently, when I came across a handy little quote book.  Naturally I took the opportunity to take a break from the big task at hand, to read through it, because I was sitting in the middle of an overwhelming mess.  One of the quotes I came upon expressed some of the many little things I so love about the season of Fall, and I was immediately inspired to use that quote as a custom sign for my home decor. The quote read:

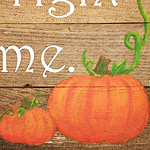
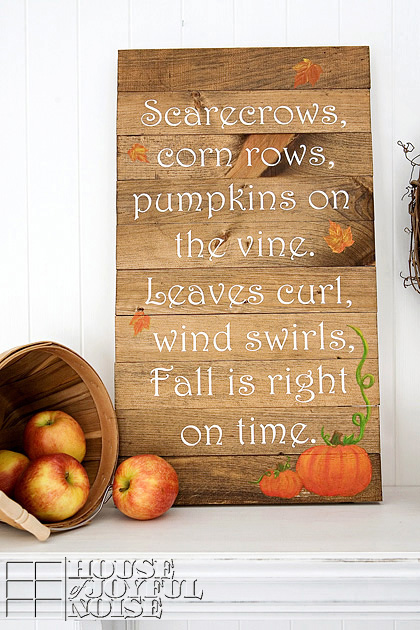
Scarecrows, corn rows, pumpkins on the vine.
Leaves curl, wind swirls, Fall is right on time.

There was no credit to the quote, so I did an internet search.  I found the quote has been widely utilized, which tells me I’m not the only one this beautiful little phrase speaks to. I had just never heard of it before.  Still, I found no credit, or else I would feel compelled to give credit where credit is due! (It’s only right to, Folks.)  Whoever you are though, thanks for such a lovely expression of the picturesque moments of Fall, and for the inspiration!

Here is a look at the finished sign, and then I thought I would share the makings of it with you today.


My mental vision of the sign was instant, really. There was no brainstorming session, although I did sketch out on paper the structure of the sign I was asking Michael, my husband, to build. Could I do these things myself? Yes, but why would a girl, when a girl doesn’t have to?  It would take me so much longer, and it probably wouldn’t come out as perfectly. Michael is happy to whip up these things for me in astonishing time, when I ask, and I say that with much appreciation.


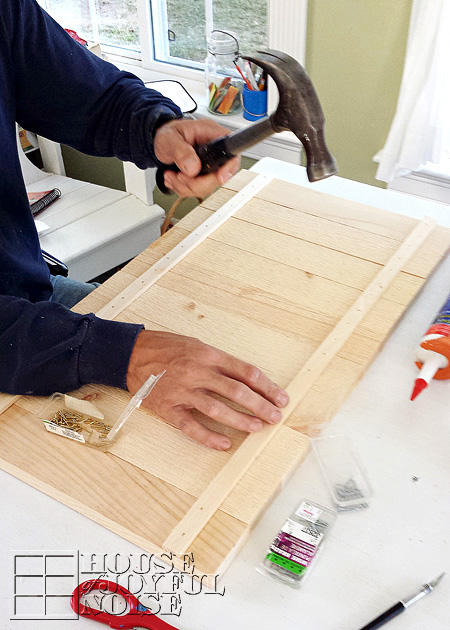
The 14 x 25″ sign consists of 10 2.5 x 14″ slats of wood, secured together on the back as seen above, with 2 little strips of pine.
–


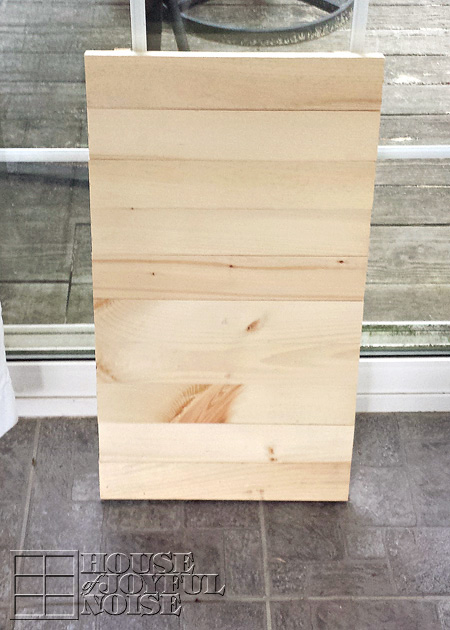
Finish build, and ready to stain.

I chose a dark stain.
(Minwax brand; Provincial)

The lettering was laid out in design to have a line of text on each slat of the sign, with a spare slat at the top and bottom, for any artwork.
The lettering was cut out and applied in vinyl.

My vision also involved some hand-painted artwork on the sign.  Oh, these grand ideas are always pulled off so very simply in our minds; aren’t they?  😉
I foresaw pumpkin vines climbing all the way up the side of the sign, and many leaves, swirling everywhere.
But my physical execution of painting these things, proved to be a bit more challenging than I managed so beautifully, mentally.

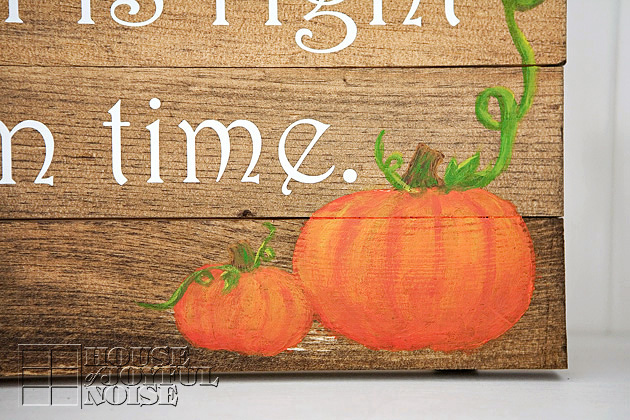
While, after much effort, I don’t think my pumpkins came out too bad in the end, my vines didn’t climb quite as high and wild, and I acquired far fewer leaves swirling about, than I had hoped as well.  Still, I am happy with the simplicity of the final outcome.

I’m also encouraged, because I realized when I was all finished with the painting project, that I really worked with a difficult medium.  They were acrylic paint tubes I had around and found in a baggie, but really poor and cheap quality.  They were very soft and clumpy, which really made it challenging to paint smoothly, and the paint application itself did not have any longevity for longer strokes.  Having painted with my more high quality acrylic paints on another project some days later, I really saw and experienced the difference, and I won’t make that mistake again.  I look forward to trying my hand at some more hand-painted work soon, with more cooperative paint, and I suspect I’ll have a more enjoyable time in the midst of it, with more pleasing results.

Nonetheless, I do love my sign, and believe I will include it as part of our Fall decor for many years to come.

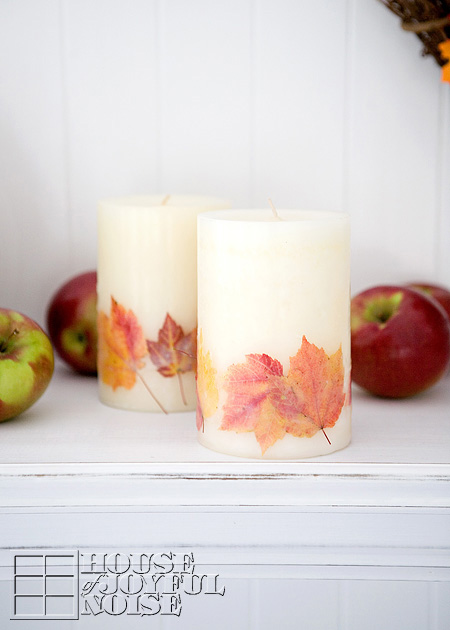
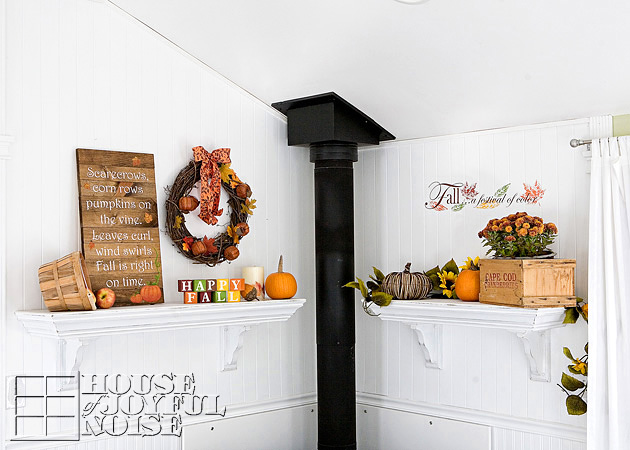
If you saw the tour of our Fall decor mantels post, you may have noticed the sign then. It was one of four handmade items included on the mantels.
Did you guess any of the others?
I hope this inspires you to try making some simple signs yourself, or purchasing some to include in your own home decor.
~Laura

* * * * * *

Please come follow me here and there:

Save

Save

Save

Save

Filed Under: Crafts & Creations, DIY (Do-It-Yourself) Project, FALL Crafts and Creations, FALL Home Decor, Home Decor, Mantel Decorating (Ideas), Seasonal Crafts and Creations, Seasonal Home decor, Signs, The Homestead Tagged With: fall-crafts, fall-decor, Fall-decor-sign, fall-home-decor, Fall-signs, farmhouse-style-decor, handmade-signs, rustic-fall-decor, sign-home-decor, sign-making, signs

Fall Themed Candles Embedding Real Leaves

October 10, 2013 By Laura 21 Comments

Today, I’m going to show you one way to preserve those beautiful Fall leaves you found, and make something beautiful to add to your warm Autumn home decor. Candles! Embedding real leaves.


We’re simply taking store-bought medium-pillar candles, and embedding the real leaves as a beautiful decorative element.
To do this, I’ll be using a separate wax medium.  The reason I am choosing to not just glue the leaves on, or seal them in with Modge Podge or something, is because those mediums are flammable.  I likely will be burning these candles. While I won’t burn them very low, I didn’t want to take the chance of having anything chemically-flammable as part of the candle, when it is easy enough to avoid that. Also, embedding the leaves within the sides of the candles will give the look I am trying to achieve.

All you’ll need for this project is some pillar candles of some sort, some plain melting wax (for candle making), your pressed leaves that you collected, and some pans. (A few other optional supplies will be mentioned along the way.)

The first step in working with real leaves, is to ‘press’ them.  This not only flattens them, but somewhat preserves their moisture for a bit, yet keeps their pliability to be able to work with them well.   I press them by placing my leaves between the pages of a newsprint pad of paper, and putting a small pile of magazines, or whatever for weight, on top.  A few days will do.

–

You’ll want to melt your wax over some kind of consistent heat. Making do with what I had, I cut some chunks off of my premium wax block, and put it in a roasting pan, over 2 burners on my electric stove on a very low heat. Possibly even the simmer setting. Start at the lowest and increase the heat as needed. Every stove is different, but generally speaking, you want the wax just liquid-y, but never to the point of bubbling. How much wax you melt depends on how many leaves you’ll be adhering, how many candles you are decorating, etc.  But regardless, you certainly want the wax deep enough to completely submerge a leaf.

  Once your wax is melted, you’ll want to have your pillar candles and leaves readily available to work with. Also, have a sheet of wax paper on a flat surface nearby, to be able to put your candle down as needed.

*This is a very important tip!
You need to keep your pillar candle itself somewhat warm to apply the dipped, hit-wax leaves successfully. The reason being is that lying your hot waxed leaf on the cold surface of the candle immediately sets the wax, and it does not apply well at all. 

But I have two great tips to choose from, for keeping your pillar candle warm:

1)  Have a heating pad on high on your nearby counter-top, with a sheet of waxed paper on it. You can roll the whole thing up with your pillar candle in it (in the waxed paper), or, you can simply lie the candle on it’s side, keeping warm on the side you’ll be applying to.

Or you can go with second option, which is what I ended up doing:
2) Simply lie the candle on the warm stove, beside the working burners to keep it warm. Obviously you don’t want your pillar candle to melt. But your burners should not be high enough to do that. This method worked well for me, as long as I did apply the just-dipped leaves to the warm area of the candle.

So here we go!

Dip your leaf in the hot melted wax, holding it completely submerging in the wax for a few moments. Keeping it submerged for a few moments (as opposed to dipping and retrieving) will really help the leaf get limp, which will be helpful in applying to the candle.

(View images left to right.)
Then quickly but carefully lie and really ‘cling’ your whole leaf to the candle, and begin to rub down all over as you can.  I say as you can, because it is hot!  And yet you want to press it down as much as you can, before it starts to set. So gently press it down all over, without rubbing hard in any way, and then really just lay your hand down over it as soon as you can while it sets.

Continue adding leaves for your overall design. It is alright to overlap some pf the leaves as well.
Remember to warm the candle in between, as you’re dipping your next leaf.

Now if you find the wax has set in an area that the leaf is not stuck down well, here is a little trick to re-work it:
Dip a fork into your hot melted wax, and drip it onto the area of your unsealed leaf that needs fixing.
Then press down again with your fingers.
The stems are optional to keep as is, cut shorter, or cut off at the base. I rather like them, and am leaving them for as long as they don’t break off on their own.

Once all of the leaves are applied, you might consider your candles done. But I really wanted to further seal the leaves onto the my pillar candles, so that they may better hold up for a longer period of time, without the leaves coming off.   The layer of wax over your leaves on your candle at this point is very thin, and that leaves (no pun intended) your decorative surface very fragile and at risk of being damaged.  It’s also somewhat bumpy from all of the pressing on. So another sealing coat is a good idea, and it’s easy to do!
Just heat up more wax in a sauce pan at a reasonable depth, and dunk the whole candle!  Use a size appropriate pan for the size of your handles, and no wider than you need, or you’ll need to use way too much wax to bring the level up.
Now….you also want to keep in mind that the submerging of your candle is going to drastically rise the level of your very hot melted wax. So, be mindful of the amount you melt.  My goal was to melt enough to dunk the candle to just over the leaf tips, without overflowing the wax all over my stove top range. I barely made it…missing just the tips of the leaves.

*Dunk it only once, (holding it submerged for a moment or two like the leaves), as double-dipping may create such a layer of wax, that it’ll become too difficult to see the beautiful shapes and colors of your leaves.
Once lifting them up out of the pan, just carefully set them down on that sheet of waxed paper, until the whole candle cools and sets.

Now they are finished, and ready to add some Fall beauty to your home wherever you choose to display them.  You can enjoy them long after the leaves outdoors have dried up and crumbled away.
I hope you enjoyed this tutorial too, and will consider having fun making some Fall candles with real leaves yourself.

* * * * * *
Please come follow me here and there:

Save

Filed Under: Crafts & Creations, DIY (Do-It-Yourself) Project, FALL Crafts and Creations, FALL Home Decor, Home Decor, Seasonal Crafts and Creations, Seasonal Home decor, The Homestead, Tutorial Tagged With: add-fall-leaves-to-candles, autumn-crafts, candle-crafts, candle-detailing, candles, crafts, decor, dipping-leaves, diy, elementing-candles, fall-crafts, fall-decor, fall-leaves, home, home-decor-projects, how-to-wax-real-fall-leaves, leaf-crafts, leaves, pillar-candles, waxed-leaves

Rustic Autumn Wreath | A Simple Craft

September 24, 2012 By Laura 20 Comments

000_autumn-decor-150x150

 If you’d like to add a touch of crafted Autumn decor to your home, but don’t have a lot of time or energy right now, this wreath is for you! It is so very simple and quick to make.  I think it’s beautiful, and has a real rustic flair that fits right in here at our homestead.

002_autumn-decor-crafts
I hung our wreath in the sun room, on the wall directly in front of anyone coming in through our front door.

It’s so very simple to make, you really don’t even need to be shown how.
But I will tell to you how, and give you a couple of tips as well.

003_fall-wreath
Start with a stick/branch wreath, which can be found ready-made at your local craft store.

The pumpkins I also found at the craft store. They are very light in weight, made of a paper medium, and some kind of painted wire.  They are finished with a shellac, and they came as a bunch in a net bag, much like potpourri comes. So you may want to look in that area.

005_fall-home-decor-crafts To attach them to the wreath, I used a small piece of raffia! I simply slipped it under the wire on the bottom/underside of the pumpkin, and tied it onto a branch where I wanted the pumpkin placed. How easy is that? I cut any excess tails of raffia I didn’t need, but I don’t even care if it is seen, because it just adds to the simple rustic charm of  the wreath, in my opinion.

004_autumn-decor-accents
Then I added some nice looking faux fall leaves.  You can simply just tuck them under the intertwining sticks of the wreath. But if you want to be sure they stay, and/or plan to save the wreath to use year after year, I recommend using a dab of glue from a glue gun at the base of the leaf or stem area, and stick in between branches in an inconspicuous place.  The leaves don’t need to be any more attached than that, and keeping the leaves loose gives it a more natural look.

006_autumn-wreath-decor-crafts
Just follow that technique with leaves and pumpkins, all the way around.

007_autumn-crafts-decor The little birdie is just a clip on, and was also picked up at the craft store at some point. It was one we had, and it not only went perfectly with this wreath, with it’s warm tones, but added new interest.

008_fall-wreath
The wide ribbon is wired, which can be a little difficult to work with, when tying bows or making nice curls. But I found a trick I’ll share with you.
TIP:   When working with wired ribbon, use an aluminum can, cup, or any cylinder object to make nice curls for the tail of your ribbon, or uniform loops in your bows.  Simply choose an appropriately sized cylinder object, relevant to the size you’d like your curls or loops, and use it to shape your ribbon.  You can place the cylinder into the loops to make them nice and round where they curve around, and/or wrap the ribbon around the tails to make nice curls.

009_autumn-home-decor It’s really as easy as that! It can literally be done in 10 minutes.

010_rustic-autumn-wreath
It’s not only a simple and beautiful wreath for this awesome season, but you can say you made it yourself.

Save


Save

Filed Under: Crafts & Creations, DIY (Do-It-Yourself) Project, FALL Crafts and Creations, FALL Home Decor, Home Decor, Seasonal Crafts and Creations, Seasonal Home decor, The Homestead Tagged With: autumn home decor, autumn-crafts, Autumn-decor-ideas, autumn-wreath-tutorial, autumn-wreaths, fall-crafts, fall-decor, fall-home-decor, fall-wreath-tutorial, fall-wreaths, rustic-wreaths, seasonal-crafts, seasonal-decor, seasonal-wreaths

Getting Creative with Pumpkins

September 29, 2008 By Laura 3 Comments

unique-pumpkin-decorating_

On Sunday after mass, we went and picked up our pumpkins, having planned to paint some for our home decor.  It’s such a wonderful and inspiring time of year, and we were really looking forward to this project.

The kids worked together on this white pumpkin, below.  The polka dot theme was inspired by September’s issue of Better Home and Gardens.  The circles were embossed with an plunger-type apple corer.  While the directions instructed to insert the completely cored out pieces from other colored pumpkins into other colored pumpkin’s holes, (which is a great idea), we opted to just just partially carve a circle, and paint it in. We didn’t have enough different colored pumpkins to do the other way anyway. The kids all worked on this one together.

kids-painting-pumpkins

And it came out great!  So fun and whimsical!!

polka-dot-pumpkin

I was really excited about a design idea I saw in a magazine last year.  That particular project suggested using paper doilies as a template.  After going to 3-4 stores that were out of doilies completely, or didn’t carry them, I came up with Plan B….have my husband cut some designs out of vinyl, and use those as a template! : )  Seemed like a great idea, but applying a flat piece of sticky vinyl to a very round pumpkin, was a challenge and 1/2, to say the very least.

pumpkin-masking_

I had intended on painting it with some black acrylic I bought, until we tried some gouache markers we had.  They colored in like a dream…the coverage was unbelievably perfect, fast and easy.

pumpkin-masking

I thought this big pumpkin was my own to work on, but soon had begging helpers who got to work with me too. It seemed you couldn’t really make a mistake, so I let them join in.  I was anxious to peel off the vinyl template anyway, so the more hands, the better.

pumpkin-decorating

But I got too excited, too soon. When we peeled off the template, it had really bled (a lot!) underneath the edges of the vinyl.  What a mess. While the designs look pretty dang nice in the end, I can’t tell you how much cleaning up I had to do on the first big pumpkin. (The one we are painting in above.)  I mostly used the edge of an x-acto blade, but also some wet q-tips and a pencil eraser for the light smudges left.  Talk about tedious work.  But it was worth it to me. : )

Just 2 pumpkins took so much longer than I had expected, so after the kids went to bed, my husband and I got to work on the other big one, with acrylic paint and a sponge brush this time.  It went pretty easy still, and came out much cleaner.  Some cleaning up to do still, but not nearly as much.   Then we did the little ones, and I was sad when I turned around and realized we did the last pumpkin!  I wanted to do more!!  I just LOVE them. and can’t decide exactly where to put the 6 we did around our home, because I want them everywhere, in every room!

Below are all of the ones we did. We may do more if we have time this month.  If not, this is a project worth doing again next year.

unique-pumpkin-decorating

Today, the colors of Fall we have seen so far, continued to inspire everyone…..

kids-watercoloring

We’ve only just begun to enjoy our harvest festivities!  We have so many places we want to go, plans and ideas for creating, crafting and baking, and can only hope we manage to get them all in!  We don’t want to miss a moment of the joy this season brings.

Thanks for dropping in.  Come by again soon.  : )

Filed Under: Crafts & Creations, FALL Crafts and Creations, Home Decor, Seasonal Crafts and Creations, The Homestead Tagged With: decorating-with-pumpkins, fall-crafts, painted-pumpkins, pumpkin-designs, pumpkins, seasonal-decorating, unique-pumpkin-decorating

We are wicked happy to have you here! We hope you find much inspiration, help, humor and enjoyment here.


Archives


POPULAR POSTS

* * * * * *

SUBSCRIBE to House of Joyful Noise blog! Every new post, delivered right to your email box!


Privacy Policy

Amazon Affiliates

Never at any additional cost to you, we may earn a small commission for our endorsement, recommendation, testimonial, and/or link to any products from our website. Your purchase through our links helps support our family, while sharing with you the products we authentically use and recommend, for various ideas, and letting you know where you can purchase them. Thank you for your support!

[footer_backtotop]

Copyright © 2025 HouseOfJoyfulNoise.com · Genesis Framework by StudioPress