• HOME
  • {A}’s Chipmunk Training Archives

 Homepage

  • The Homestead
    • Home Projects
    • Home Improvement
    • Home Decor
      • Seasonal Home decor
        • FALL Home Decor
        • WINTER Home Decor
        • SPRING Crafts and Creations
        • SUMMER Crafts and Creations
    • Our Chickens
    • Gardening
    • Organization
    • Re-Purposing
    • Furniture Refinishing
    • Budget
  • Crafts & Creations
    • Seasonal Home decor
      • FALL Crafts and Creations
      • WINTER Crafts and Creations
      • SPRING Crafts and Creations
      • SUMMER Crafts and Creations
    • DIY (Do-It-Yourself) Project
    • Kids Arts and Crafts
    • Homemade/Handmade Gift Ideas
    • Holiday Crafts
    • Fan Pulls
    • Free Printable/Downloadable
    • Sewing Projects
    • Giveaways
    • Business Features
  • Recipes/FoodFun
    • Breakfast
    • Lunch
    • Main Dish
    • Sandwiches
    • Appetizers
    • Slow Cooker
    • On The Grill
    • Side Dishes
      • Soups
      • Salads
    • Baking
      • Breads, Rolls and Muffins
    • Snacks
    • Treats
    • Desserts
    • Drinks
  • Homeschooling
    • Elementary Homeschooling
      • Elementary Homeschooling READING
      • Elementary Homeschooling MATH
      • Elementary Homeschooling LANGUAGE ARTS
      • Elementary Homeschooling SCIENCE
      • Elementary Homeschooling HOME ECONOMICS
      • Kids Arts and Crafts
    • Middle School Homeschooling
      • Middle School Homeschooling SCIENCE
      • Middle School Homeschooling HOME ECONOMICS
    • Language Arts
    • Math
    • History / Social Studies
    • Geography
    • Foreign Language
    • Field Trips
    • Games
    • Nature Study
  • The Big Picture
    • Life In General
    • Celebrations
    • Faith
      • Into the Light; The Series
    • Giveaways
    • Reviews & Sponsors
  • Photography & Lettering
    • Photography
    • truck lettering
    • vehicle graphics
    • Newborns
    • Kids
    • Engagement
    • High School Senior Pictures
    • High School Senior Pictures Sneak Peeks

Rustic Autumn Wreath | A Simple Craft

September 24, 2012 By Laura 20 Comments

000_autumn-decor-150x150

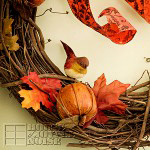
 If you’d like to add a touch of crafted Autumn decor to your home, but don’t have a lot of time or energy right now, this wreath is for you! It is so very simple and quick to make.  I think it’s beautiful, and has a real rustic flair that fits right in here at our homestead.

002_autumn-decor-crafts
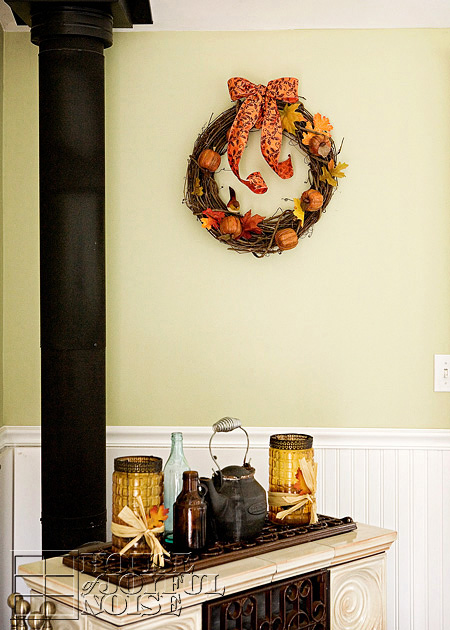
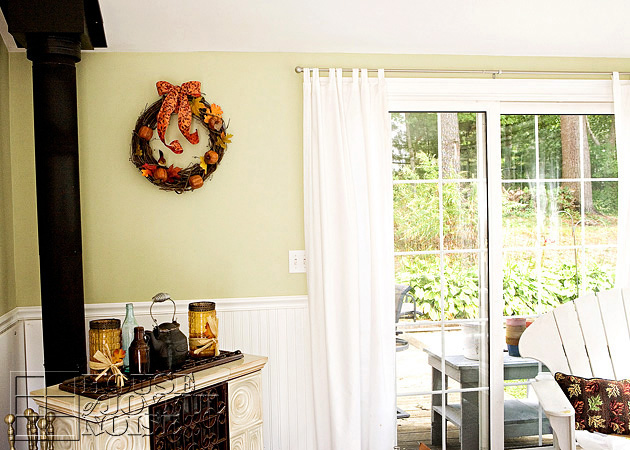
I hung our wreath in the sun room, on the wall directly in front of anyone coming in through our front door.

It’s so very simple to make, you really don’t even need to be shown how.
But I will tell to you how, and give you a couple of tips as well.

003_fall-wreath
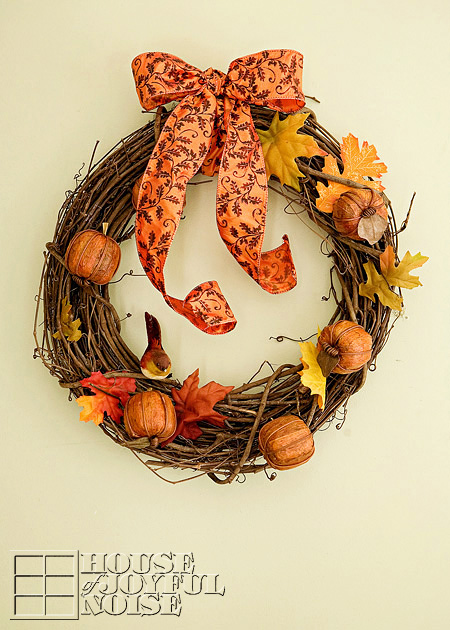
Start with a stick/branch wreath, which can be found ready-made at your local craft store.

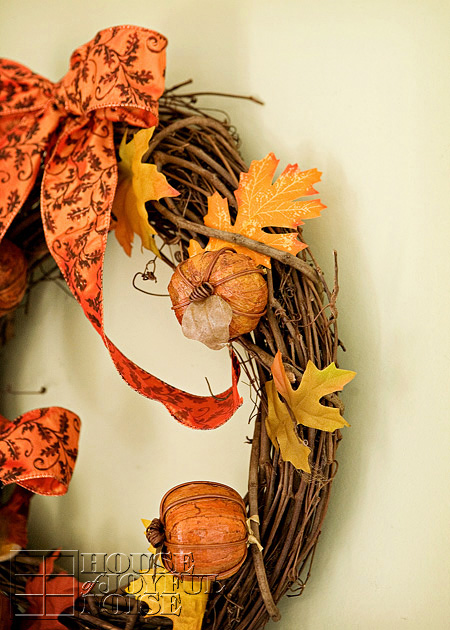
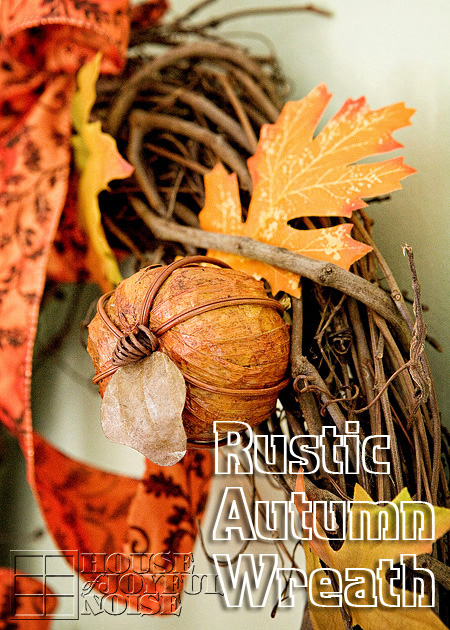
The pumpkins I also found at the craft store. They are very light in weight, made of a paper medium, and some kind of painted wire.  They are finished with a shellac, and they came as a bunch in a net bag, much like potpourri comes. So you may want to look in that area.

005_fall-home-decor-crafts 
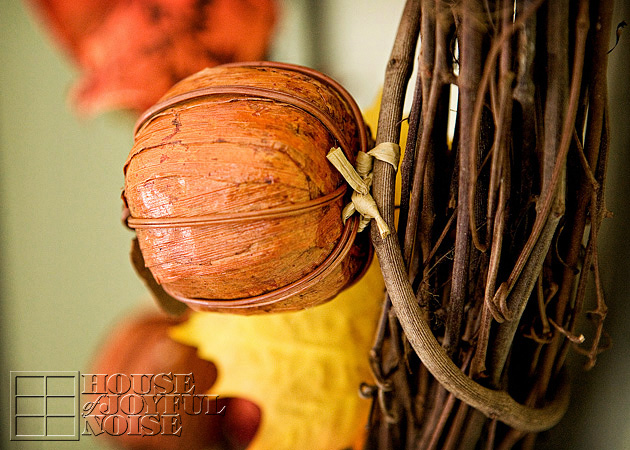
To attach them to the wreath, I used a small piece of raffia! I simply slipped it under the wire on the bottom/underside of the pumpkin, and tied it onto a branch where I wanted the pumpkin placed. How easy is that? I cut any excess tails of raffia I didn’t need, but I don’t even care if it is seen, because it just adds to the simple rustic charm of  the wreath, in my opinion.

004_autumn-decor-accents
Then I added some nice looking faux fall leaves.  You can simply just tuck them under the intertwining sticks of the wreath. But if you want to be sure they stay, and/or plan to save the wreath to use year after year, I recommend using a dab of glue from a glue gun at the base of the leaf or stem area, and stick in between branches in an inconspicuous place.  The leaves don’t need to be any more attached than that, and keeping the leaves loose gives it a more natural look.

006_autumn-wreath-decor-crafts
Just follow that technique with leaves and pumpkins, all the way around.

007_autumn-crafts-decor 
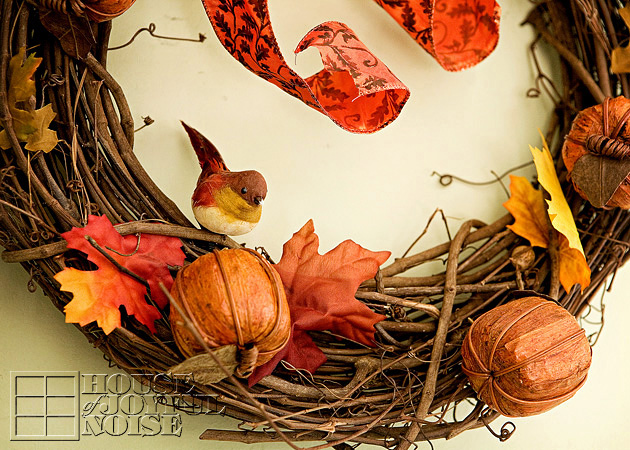
The little birdie is just a clip on, and was also picked up at the craft store at some point. It was one we had, and it not only went perfectly with this wreath, with it’s warm tones, but added new interest.

008_fall-wreath
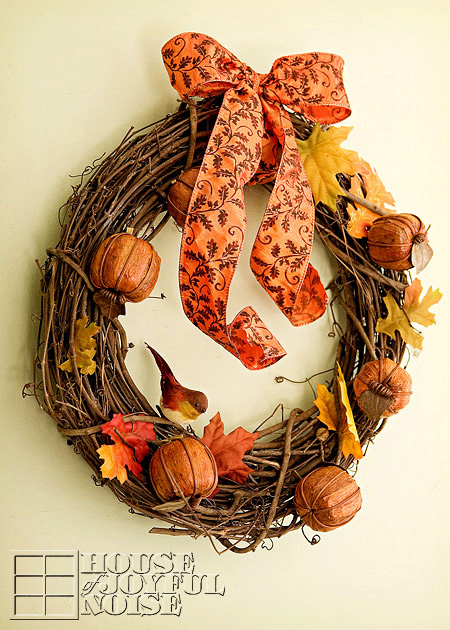
The wide ribbon is wired, which can be a little difficult to work with, when tying bows or making nice curls. But I found a trick I’ll share with you.
TIP:   When working with wired ribbon, use an aluminum can, cup, or any cylinder object to make nice curls for the tail of your ribbon, or uniform loops in your bows.  Simply choose an appropriately sized cylinder object, relevant to the size you’d like your curls or loops, and use it to shape your ribbon.  You can place the cylinder into the loops to make them nice and round where they curve around, and/or wrap the ribbon around the tails to make nice curls.

009_autumn-home-decor It’s really as easy as that! It can literally be done in 10 minutes.

010_rustic-autumn-wreath
It’s not only a simple and beautiful wreath for this awesome season, but you can say you made it yourself.

Save


Save

Filed Under: Crafts & Creations, DIY (Do-It-Yourself) Project, FALL Crafts and Creations, FALL Home Decor, Home Decor, Seasonal Crafts and Creations, Seasonal Home decor, The Homestead Tagged With: autumn home decor, autumn-crafts, Autumn-decor-ideas, autumn-wreath-tutorial, autumn-wreaths, fall-crafts, fall-decor, fall-home-decor, fall-wreath-tutorial, fall-wreaths, rustic-wreaths, seasonal-crafts, seasonal-decor, seasonal-wreaths

My Custom Built Farmhouse Home Office Desk

August 25, 2012 By Laura 33 Comments

custom-built-farmhouse-home-office-desk-5

 I know many of you have been waiting for this, with all of my teasing about it! And I have been dying to show you (show off…whatever) my custom-built farmhouse home office desk, that that my husband made for me!  For this first post, I am simply sharing with you the build itself, and some of the story behind it.  In upcoming posts, I will show you my work-space all set up and pretty. (When I get that far.)

So first, to put my appreciation and excitement in context here, you should know how I have been working.

In this large amoire in the photos below, is our TV, which we rarely use at all. But behind it was my work cubby.  It was always amusing when someone who had been to our house a few times before, before they realized there was a work space behind there.  They’d always react with such surprise and intrigue.  So come around the amoire (following the numbered photos), and see my little space I have had . . . . .

001_old-office-cubby-space It certainly was a workable idea for the past few years, in that it gave me a little privacy for editing client portrait work. It is rather organized and cleaned up here, but that is not how it has always appeared or felt. (I had already started cleaning out here, to empty this whole cubby.) To start, I hated the desk. The photo is deceiving I think, because this desk was mammoth, and yet not efficient at all; with shelves I couldn’t easily get to (dusting nightmare), and virtually no storage or room to work.  With a modern design, fake wood laminate and black accents-ugh! I wanted it GONE.  And what a dust magnet this cubby has been!

Anyway, imagine on the desk-top, on either side, a tall pile of papers, notebooks and dozens of folders.  And not just here. When I worked on my laptop for school and blogging, I’d sit on the couch, where beside the couch was small table with another 2 piles of papers, notebooks and folders.  Then there is the school room, where I’ve kept all of my teacher books.  I can’t stand clutter or disorganization, so having everything everywhere has tended to make me cranky, and yelling when I couldn’t find something!

 Between homeschooling my 4 kids, their work needing correcting or keeping, educational planning stuff, their activity schedules, forms needing to be filled out, home and life maintenance with mail, bills and records and the like that needs to be kept up with, and my work paraphernalia for the blog and it’s website, it has felt like unorganized madness to me! Like….losing my mind. I can’t manage and work my best like that.

What I needed and wanted was one organized management center to work from, with a style that said me, and reflected our farmhouse home decor.  A Pottery Barn home office knock-off, of sorts.  Yes please, Honey!

Whenever a new school year is about to turn over in the next 2-3 months, I always get into this nesting mode frenzy, wanting to get super organized and ready for the next year. So my chatter about my dream custom-built farmer’s table home office desk had picked up speed as of late!  I completely cleaned out that cubby, moved the amoire, and just gave away that huge desk to a very grateful girl, who really needed it.  It was going to be an all new space, that I could manage everything from.  Open, bright, stylish and cheery.

As always, Michael and I first got some initial drawings down on paper, which Michael threw out by accident! ; ( , and a few revisions later, Michael got to making it a reality for me.

002_carpenter-tools My design idea was simple;  the base of a plain old farmer’s table, with cubbies and shelving for storage. But it needed to be BIG. The full length of the wall opposite the large window, to accommodate and organize all areas of my life and family I need to manage, as well the larger equipment I need to do it, such as my 2 computers, hard-drives, copier, etc.

So if you haven’t scrolled down and peeked already (uh-huh), the reveal is next. But I have to say, this was SO HARD to photograph with the lenses I have, as this desk is 7 feet long!  But every inch was custom designed with a purpose for it’s space. Take a look . . . . . .

custom-built-farmhouse-home-office-desk Is it not GORGEOUS?!
I can answer that.

custom-built-farmhouse-home-office-desk-1
While there were no initial plans for drawers at all, the craziest things happen to us, and we ended up with some beautiful ones! I’ll get to that story-bit in a minute, but as you can see, the general structure of the desk is very much a farmer’s table design.

Let’s talk about some of the details:

custom-built-farmhouse-home-office-desk-2
Simple table legs support the desk.

Now let me tell you about the drawers, which really have added such beauty to the piece as a whole.  In the beginning, I had just planned on using lots of cubbies and little containers, for all of the little things, all built upon a farmers table, much like the one we eat at in our sunroom. But the craziest blessings happen to us all of the time, and this amazing happenstance is no different:

custom-built-farmhouse-home-office-desk-3 About the time the table was pretty much built, and yet still bare wood and unfinished (as seen above, minus the drawers), Michael had a job to go re-letter the back of one of his client account’s large moving trailer. While he was there on the job site, he went to throw some things in the dumpster. There, in the container, were 3 of these beautiful drawers and some big desk all broken apart! I can only imagine how beautiful the desk must have been, because the drawers are to me, breath-taking.  Crazier, the slim design and depth of the drawers would fit and work perfectly within the table side of the desk he was building for me. So he grabbed the drawers, and all of the attachment trackings for them, and  brought them home.  I was astonished. I immediately fell in love with them, and he installed them.

custom-built-farmhouse-home-office-desk-4 Just look at the hardware!

custom-built-farmhouse-home-office-desk-6 Even the keyhole makes me gasp and smile inside.

custom-built-farmhouse-home-office-desk-7 They silently and smoothly just roll out, like butt-ah!

And the inside of the large drawer had me flipping out with joy . . . . . .

custom-built-farmhouse-home-office-desk-8 Talk about great quality. HOW, could anyone throw these drawers away?  And what a blessing just meant to be, that Michael was there at that site on this particular day, and looked in that waste container, right when we were building this project!  The waste removal company was coming to empty that container the very next morning! The drawers would have been gone forever.

011 These two smaller drawers were installed side by side, on the opposite end of the large one.   Take note of the bare wood before finishing.  Aside from the drawers, the table-top is made of cabinet grade plywood, while the rest is plain pine and bead board.  A very light color wood.

Now, how I was going to finish this desk, was such a torn-dilemma! I even did various techniques experiments on several scraps of wood, trying to decide:  Did I want to just paint it white and then sand it down to worn in various places?  Crackle it? Use some dark wax or antiqued glaze?

Honestly, it feels like such a big an important decision, that it kind of paralyzed me.  So I kept it simple for now, and will likely continue to alter the finish more when I decide on one, or all of the ways I am contemplating. But at least then it will be a thought-out decision. For now here’s all I did:

0121 I sanded it to a worn state in specific places, such as corners, edges, and raised areas.

But because the wood underneath was so light, I went a step further using a possibly odd technique and medium, to bring the distress work out more . . . . . .

013 I mixed clear glaze and straight burnt umber watercolor paint.  I painted just over the areas where it was sanded to wood, let it sit a minute, and wiped off with a clean dry rag.  It stained the exposed under-wood just enough, to have a more distinct worn look.  As I said, I still may do some crackle work in areas, and/or antique it more with wax or glaze.  But I also expect it will get wear and age naturally, simply from me using it a lot, and owning it for a very long time to come. But for now, I am loving it as it is.  It may stay like this forever.

custom-built-farmhouse-home-office-desk-9
I am still ‘moving in’ to this large piece of furniture that is quickly organizing my whole world, and there will be a follow up post to show you how I arranged everything I needed in this space.  But as I said, parts of the desk were very specifically designed for certain things.  To give you one example today; that top left cubby you see, will hold my 4 external hard-drives, most of which are about to dumped of all client work. They are already mostly free space even still,  so I will be using them for a good many years to come, for external storage space for all of my other personal photo storage and designs.

custom-built-farmhouse-home-office-desk-10 As I am sure many of you know and will agree, it’s the accessorizing that is the most fun!  It’s the pretty little things, that really make a space yours, and I have always felt it’s important to surround yourself in your home and work space, with the things that make you feel those little leaps of joy inside. (Or that’s what happens to me, anyway. ; ) So I hope to share with you all just how I’ll be utilizing the space of my new custom-built workspace, the ways in which it’s organizing my life, and all of the little things I love that make me smile, and maybe will make you smile too. Or give you some ideas of your own.

Another crazy blessing story-bit:  I had told Michael I would probably just use one of our regular white farm chairs at the desk, rather than a black computer chair.  But that some day, I would love to find a nice white office chair on wheels, much like the Pottery Barn chairs, that we could never afford.
Well guess what he found and brought home with the drawers? . . . . . .

016_white-desk-chair
Again, for free. When Michael was chatting one of the moving company employees at the job site where he pulled the drawers out of the waste container, and told him all about this desk he built, the guy said, “I have a chair inside that went with the desk we got rid of, if you want to see it.” And this is what he brings out!  Oh, you know I’ll distress this some too, and get some pretty shabby-chic cushions for it.  But what a high-quality chair!  It not only is on wheels and swivels, but it rocks! I’m a rocker, still. Between my first baby-girl that loved to nurse forever, and then my triplets, Mama-rocking is a just part of my natural movement now. This is a big chair though. It definitely needs the cushions. I feel like a kid in it right now.  Michael was more excited about getting the chair for me, than the drawers. But the drawers were actually the biggest pleasant surprise for me.  Honestly, the chair is massive! Like, too wide and heavy for me. I may just keep using my computer chair for now.

custom-built-farmhouse-home-office-desk-11 So there it is! I know I am ridiculously blessed to have a husband whose skilled hands can create these things for me.  This desk would cost thousands of dollars, bought. And it wouldn’t be custom-built, for me and my specific needs. Or made with love! He’s built so many things for me, big and small.  This one is certainly very special to me, as it will really help me manage the most important aspects of my life; primarily teaching my children, and managing our family details, and lastly, doing what I can to help my husband provide for us, through blogging, which I love to do anyway.

I do apologize for the length of this post and number of photos, but there was a lot to share with you, and I’ve been SO excited to!
Wouldn’t you be?
Tell me what you think of it! Do you have a special space in your home, that helps keep you organized and everything managed? Please tell us about it, and leave any ideas you may have for us as well.  Thanks so much for coming by and looking!

Save


Save

Filed Under: Furniture Refinishing, Furniture Refinishing, Home Decor, Homeschooling, Re-Purposing, Refinishing, The Homestead Tagged With: Catholic-blogs, Catholic-families, custom-built-desks, custom-built-farmhouse-home-office-desks, custom-furniture, dream-home-office-desk, farmhouse-desks, furniture-refinishing, office-home-desk, pottery-barn-home-office-desk-knock-off

Terracotta Flower Pot Wind Chime | Tutorial

July 22, 2012 By Laura 104 Comments

terracotta-flower-pot-wind-chime-craft-3

Making this flower pot wind chime was a fun and simple project to do with my kids. I was really looking forward to hanging out with them and painting, and I knew I would also love seeing the wind chime in my gardens, where I had every intention of hanging it, when it was done.
While I think we kind of ‘made it our own’, this flower pot wind chime was not at all my idea. I have seen them so many times at crafty website now, and so many style-versions of it, that I’m not sure which style I saw first, or where! Someone must have come up with this adorable idea first, but I’ll be darned if I know who! Whoever did, we thank them for the fun inspiration, to make something (else) to have around, that makes me smile inside, every day.

Here’s the basics on how we made our terracotta flower pot wind chime.

001_terracotta-pots
We started with 3 different sized terracotta plants, that have drainage holes in the bottom.
The smallest is tiny, at 1-1/2″ tall. Then the 2 next sizes up: 2-2/3″ and 3-1/2″.

002_synthetic-flat-brushes
Using our little collection of synthetic brushes, we got to painting our pots.

003_paint-palette
We used Martha Stewart Craft Paints, which are an acrylic paint. We also looked around and found what wooden beads we had in the house, which we wanted to use on our wind chime as well. After choosing our colors of paint and how we were going to paint the pots, we wanted the beads the same colors. One we had already was the correct color-green. The other 3 we had were not, so we painted them correct colors. If you can imagine, painting small wooden beads was not that easy. But we quickly figured out a helpful trick: We stuck 2 toothpicks in the bead holes, to hold them while we brush painted them the colors we wanted them to be. You can see them resting on the palette, drying.

004_painted-terracotta-pots I really wanted to take photos of the kids painting, for me! But they were done and back outside, on the other side of my window, swimming again, before I ever got photos of them painting. But, since they weren’t paying any attention to me anymore, I did clean up the edges of their pot-rim painting, just a little. ; )

005
Our original idea, was to decorate our pots with little garden bugs.  Like butterflies, ladybugs, dragonflies, etc. It would have been so cute! Don’t you think? But none of us felt we could paint them that well, that small, and we couldn’t find any stickers or decals of any sort, to kind of Modge Podge them on. So, when it came time to decorate the pots, the boys were busy playing something else, and Alexis was at work. So O (Olivia) and I decided to just polka dot them.  I love polka dots, so I was sure I’d love it as much as the garden bugs idea.

006
Applying the polka dots could not have been easier. Since we wanted the dots very small, on our small pots, we just used q-tips! We dipped the tip in the paint, and then dotted it right onto the pot! The hardest part was spacing the colors. I always drive myself crazy with that…..not wanting the same colors right near each other, and trying to get even spacing too. But we did a well enough job!

0071 O and I worked together, polka-dotting, and our q-tip trick worked like a charm.

Now, I didn’t take photos of the assembly. But it’s easy enough to explain:  We used jute twine, and strung it through the holes of the pots. We tied big enough knots on the string, to hang the pots on the string as we wanted.  So each knot was inside the pot underneath the drainage hole.

terracotta-flower-pot-wind-chime-craft
Now, some crafters who have made flower pot chimes, opted to have the string come down out of the pot, with a wooden bead on the string (held in place with a knot before and after the bead) to act as the ‘ringer’, that would hit the pot when the wind blows. So they designed it that way, spacing their pots out more.  We chose to use the pots themselves, to be the ringers, so that when the wind blows hard enough, the pots hit each other. That required (visually) setting the pots overlapping each other a little.

As an afterthought too, I decided I wanted to give the chime a quick UV protectant spray coat of clear acrylic.  Since my chime was all already assembled, I just put some tin foil over the spoon, and sprayed it anyway, getting some up into the pots as well. I do recommend spraying the painted pots before assembly, if you wanted to. But no big deal.  It’s an aerosol, so it worked easy enough afterwards.

terracotta-flower-pot-wind-chime-craft-1
Aside from the paint design, the other touch that made it more ‘our own’, was that we added a stainless steel baby spoon as the bottom ringer. It really is a special touch, to me, with the memories of giving Alexis her first baby food, and then the triplets coming along, and the 3 little mouths we were trying to keep up with come the spoon- feeding age, with them. We didn’t bother having 3 bowls and 3 spoons, or we’d spend as much time picking up and putting down bowls and spoons, as we did putting spoons in sweet little open-waiting mouths.  Go ahead. Imagine that for a moment. No…..1 spoon, 1 bowl of food….down line of sweet, messy mouths we went. And then started at the beginning again.  Gosh I miss those days.

Wait. How did I end up talking about feeding my babies? Oh yes….the baby spoon, and the happy memories it brings me.

terracotta-flower-pot-wind-chime-craft-2

 So, it was simple as that. Anyone can make an easy and whimsical wind chime, even if you’re not that crafty. It’s a breeze.
Anyway, we’re happy you caught wind of this little fun project, and came to take a look.  Even if you’re just blowing through.

Ok, I’ll stop now.

P.S. Feel free to chime in, in the comments.
(Oh my gosh! Somebody stop me!)


Save

Filed Under: Crafts & Creations, Kids Arts and Crafts, Re-Purposing, Tutorial Tagged With: baby-spoon-chimes, crafts, diy, flower-pot-wind-chime, garden-decor, homemade-wind-chimes, kids crafts, Martha-Stewart-Craft-Paints, Plaid-products, polka-dot-crafts, terracotta-pot-crafts

How Much Wood, Could a Woodpeck Peck? : (

July 18, 2012 By Laura 5 Comments

003_birdhouse-woodpecker-damage-150x150

This is the telling of a sad little tale.

001_hand-painted-birdhouse-before-after The refinishing of this birdhouse, has been one of my most favorite projects ever.  Between the excitement of using Annie Sloan paint for the first time, the color I fell so in love with, and the YouTube crash course video lesson I watched, on how to paint tiny roses in order to adorn my sweet new birdhouse with, it’s a project I truly enjoyed the process of.

002_hand-painted-birdhouse I have to say, it’s held up so well, out there in the weather of all kinds, too.  I did put it away for the winter, but otherwise, it has stood right over on the other side of my garden beds, under the apple tree.  I have  finished projects I’ve done all over my homestead, of course, and I love to see them around.  This birdhouse has truly been a piece that still plays a part in bringing me a bit of joy every day.

So imagine my sheer panic this one very (very) early morning this summer:  The kids and I were still in bed, and I was still pretty much sleeping.  All of our windows were open a little, and I began to stir out of my sleep with the sound of some repetitive rhythm sound on hard wood outside.  I was confused by it, being somewhere between asleep and awake, and so I tried to bring myself out of the grog I was in, wondering if I was dreaming, or what.  But next thing I know, I hear little feet hit the floor hard, and come booming across the house floor, and my son yelling, “Mama, there’s a woodpecker pecking your birdhouse outside!”

That woke me up! The idea of the damage a woodpecker could do, had me wide-eyes, out of bed, out the front door, down the deck steps and out to the gardens, in a flash.  My abrupt arrival scared the woodpecker, and I watched him fly away. The peaceful silence after the commotion, caught my attention.  Even the birds stopped chirping. As I stood there in my summer nightie, in front of my house beside the street, amidst my gardens, our neighbor friend drove by in his truck to leave for work, and gave me a wave. 
It occurred to me in that moment, that it was a good thing I wear pajamas to bed.

I sauntered over to the birdhouse slowly,  not sure I really wanted to assess the damage done.

003_birdhouse-woodpecker-damage  {SIGH}. It looked like the woodpecker figured a hole already there, was a good place to start.
I put a trash bag over the house for the day, not sure what I was going to do about the matter.  But as the day went on, I thought, “What a cool photo that would have been, to get a shot of the woodpecker at the birdhouse.”  That’s what photographers do.  Think through life in images we’d love to get, as moments frozen forever.  So I took that bag off, and had my camera with my 70-200mm 2.8 lens on it, waiting by the open window near my work area in my house. I listened, and I checked repeatedly, for that woodpecker. All day long. But he never came back.  I thought that was the end of it.

004_birdhouse-woodpecker-damage

 Until very (very) early the next morning, of course. While we were all still sleeping.  I jumped out of bed again, grabbed my waiting camera, and opened the window. But as soon as I did, he flew away.  My boy and I, having both gotten a good look at the bird, decided it was a Downy Woodpecker. They are the most common in this area, and the description and picture matched.  I was really hoping to catch him flying to the birdhouse, and get him when he just landed on it. Before he got to work again.  Preferably the day before, while I waiting and so ready-window open already and everything.  I should have known it would come back the next morning, at the same time.  So these after-damage photos I show you were taken after morning 2.  In the end, you can see the window opening was pecked on both sides, but it also did damage to the arched trim over the window, which is a much softer wood.

I put the bag back on it, and left it on for several days after that.  Then I took it off, thinking; even a woodpecked birdhouse looked better than a black trash bag on a post. If the woodpecker did come back yet again, I was going to have to consider taking the birdhouse in for good, or, I don’t know…..installing some kind of taser device on it. A security system of sorts. But the woodpecker has not been back since.  For which I’m thankful!

005_birdhouse-woodpecker-damage

 When I refinished this birdhouse, and it came out so pretty, it really was my little hope, that some sweet little birds would move in.
It just never occurred to me, a woodpecker would come along, and decide the window wasn’t big enough for him.  Silly me.

006_birdhouse-woodpecker-damage

So maybe none of us ever did find out the answer, to the question: How much wood, could a woodchuck chuck, if a woodchuck could chuck wood?
But now we know how much wood could a woodpeck peck, if a woodpeck, could peck wood.
Too much! : (

P.S.  In the last week or so, we’ve actually noticed 2 woodchucks waddling around our property, too.
So if we learn the answer to the first riddle, we’ll let you know. ; )

Filed Under: Crafts & Creations, Home Decor, Life In General, Photography, Refinishing, The Big Picture Tagged With: annie-sloan-chalk-paint, downy-woodpecker, hand-painted-birdhouse, hand-painting-roses, nature photography, woodpecker-pecks-birdhouse, woodpeckers

4th of July

July 4, 2012 By Laura Leave a Comment

1_painted-american-birdhouse

HaPpY 4th of JULY, Everyone!

Since I wanted some photos, to go along with our wishes for you,  I thought today would be a good day to show you where I put my painted American Birdhouse.  It’s out on the potting bench near the gardens!  So now you know! I’ve got a whole red-white and blue theme going on out there, and it’ll be there throughout the month of July.  Then I’ll likely change it up, to some other summer theme.

 The birdhouse has held up very well in weather, despite the sun and rain beating on it.  Again, I credit that to the wax finish. It seems to be a great protector for outdoor wood, in my experience.

2_hand-painted-american-birdhouse-on-potting-bench Have a safe and memorable celebration of our country, with your families and friends!

We’ll see you again soon.


Filed Under: Crafts & Creations, Gardening, Home Decor, Refinishing, SUMMER Home Decor, The Homestead Tagged With: 4th-of-july-decor, american-birdhouse, american-home-decor, fourth-of-july-decor, garden-decor, red-white-blue-decor

  • « Previous Page
  • 1
  • …
  • 6
  • 7
  • 8
  • 9
  • 10
  • …
  • 16
  • Next Page »

We are wicked happy to have you here! We hope you find much inspiration, help, humor and enjoyment here.


Archives


POPULAR POSTS

* * * * * *

SUBSCRIBE to House of Joyful Noise blog! Every new post, delivered right to your email box!


Privacy Policy

Amazon Affiliates

Never at any additional cost to you, we may earn a small commission for our endorsement, recommendation, testimonial, and/or link to any products from our website. Your purchase through our links helps support our family, while sharing with you the products we authentically use and recommend, for various ideas, and letting you know where you can purchase them. Thank you for your support!

[footer_backtotop]

Copyright © 2025 HouseOfJoyfulNoise.com · Genesis Framework by StudioPress