• HOME
  • {A}’s Chipmunk Training Archives

 Homepage

  • The Homestead
    • Home Projects
    • Home Improvement
    • Home Decor
      • Seasonal Home decor
        • FALL Home Decor
        • WINTER Home Decor
        • SPRING Crafts and Creations
        • SUMMER Crafts and Creations
    • Our Chickens
    • Gardening
    • Organization
    • Re-Purposing
    • Furniture Refinishing
    • Budget
  • Crafts & Creations
    • Seasonal Home decor
      • FALL Crafts and Creations
      • WINTER Crafts and Creations
      • SPRING Crafts and Creations
      • SUMMER Crafts and Creations
    • DIY (Do-It-Yourself) Project
    • Kids Arts and Crafts
    • Homemade/Handmade Gift Ideas
    • Holiday Crafts
    • Fan Pulls
    • Free Printable/Downloadable
    • Sewing Projects
    • Giveaways
    • Business Features
  • Recipes/FoodFun
    • Breakfast
    • Lunch
    • Main Dish
    • Sandwiches
    • Appetizers
    • Slow Cooker
    • On The Grill
    • Side Dishes
      • Soups
      • Salads
    • Baking
      • Breads, Rolls and Muffins
    • Snacks
    • Treats
    • Desserts
    • Drinks
  • Homeschooling
    • Elementary Homeschooling
      • Elementary Homeschooling READING
      • Elementary Homeschooling MATH
      • Elementary Homeschooling LANGUAGE ARTS
      • Elementary Homeschooling SCIENCE
      • Elementary Homeschooling HOME ECONOMICS
      • Kids Arts and Crafts
    • Middle School Homeschooling
      • Middle School Homeschooling SCIENCE
      • Middle School Homeschooling HOME ECONOMICS
    • Language Arts
    • Math
    • History / Social Studies
    • Geography
    • Foreign Language
    • Field Trips
    • Games
    • Nature Study
  • The Big Picture
    • Life In General
    • Celebrations
    • Faith
      • Into the Light; The Series
    • Giveaways
    • Reviews & Sponsors
  • Photography & Lettering
    • Photography
    • truck lettering
    • vehicle graphics
    • Newborns
    • Kids
    • Engagement
    • High School Senior Pictures
    • High School Senior Pictures Sneak Peeks

Back-To-School Mantels | Home Decorating Ideas

August 25, 2014 By Laura 1 Comment

There is something about the back-to-school season, that I have always loved.  With all of the fresh new supplies and clothes, and the whole new school year stretched out before us, with so much yet to be learned, it’s just always been an exciting time to me.  Even though we homeschool, and even school right through the summer, we (even the kids) still love the excitement that the start of a whole new school year brings!  All new books, fresh supplies, new experiences, and a new season to grow academically.

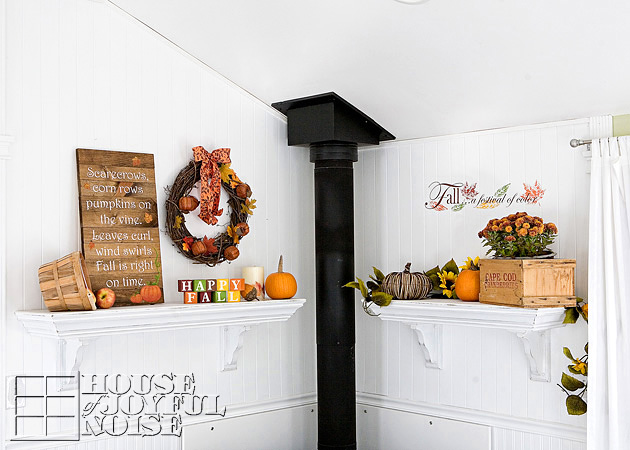
It’s that love for all things ‘back-to-school’ that inspired these mantels in our home! It’s a theme that fits just right, through the month of September!
I used [Read more…]

Filed Under: Home Decor, Homeschooling, Mantel Decorating (Ideas), The Homestead Tagged With: Back-To-School, back-to-school-decor, decorating-mantels, globe, home decor, mantel-decor, mantels, school-bell, school-supplies

Our New (Second) Bathroom – Finally!

June 15, 2014 By Laura 4 Comments

 Now, to all of you, this is likely just going to look like an ordinary bathroom. And in many ways, you’d be right.
But to our family of 6, who has lived with one bathroom all of our growing family life, it is . . . . . .
the end of never using the bathroom, without someone waiting just outside the door. 
Or, 2 or 3 people in the bathroom at the same time, getting reading to go somewhere.  At least the one bathroom we’ve had is large, and has a great sharing-layout, with the sink and vanity on one side, and the toilet and shower on the other side of a vertical half wall.  So there’s been privacy on both sides, with proper communication, at least.

This second/new bathroom is far simpler, and smaller at 5×10′. It’s been waiting to be finished for . . . . . . too many years.  It was just a plywood floor, studding walls, and the tub, behind a sheet of plastic, at the top of the stairs. Where paint cans and milk crates of art supplies collected. We either didn’t have the money, or the time, or both, to finish it after the expansion of our home in 2006.  But life has gotten easier, as God has continued to bless us, and we’ve finally been getting our house done room by room.  Who would think a bathroom would be so exciting?
We’ll be sure to appreciate it in the moments of urgency, that are bound to come.
It’s considered the kids’ bathroom, as it is upstairs where 3 (out of 4) of their bedrooms are.


Once Michael got going, it came together quickly.
Here it is in the very beginning stages, sheet-rocked and plastered!

(Ironically, as I type this blog post right now, I just heard, “Are you almost done? I have to go to the bathroom. BADLY!!”
Michael has been building the custom farmhouse door today, for this new bathroom, and it should be up and swinging by tonight.)

So now let’s take a look at the bathroom all done.


This is the best shot I could get in such a small space, of the bathroom completed, by shooting from just outside of the doorway.
We’ll be stepping inside in just a moment to take a closer look at some details. 
I chose a cool gray paint color for the walls, feeling it was a nice neutral color for boys and girls. 
(Not sure of the name of the color at the moment, but it was a Valspar Signature paint.)


The bead-board style vanity cabinet is in keeping with the style throughout our house.
–


It very much needed modifications, to fit and accommodate the special kind of sink we needed it fitted with.
Thankfully Michael is capable of problem-solving such challenges. It’s been built way out from the wall, and customized with a back splash.
I really dig the style of the lights over the sink.

We had special requirements regarding the sink in this bathroom.  In addition to the regular use as this bathroom’s sink, it’s also the sink right beside the art studio. Because we are often working in the studio, and needing to dump and refill paint water buckets, wash our brushes and pallets, etc., we really needed this sink to be deep and wide enough to be able to do those things, and easy to clean as well!  We’ve been having to go down and use the kitchen sink.


So I not only love the look of this faucet, but it’s height accommodates filling buckets, etc.

As I hope you can see, the sink is very wide, sloped in, and completely seamless to the vanity.
This will make easily accessible, and easy to clean when paint, and toothpaste, and whatnot, is everywhere.


This is just the towel rack on the left wall of the sink area.
For some reason I thought it was a cool photo.
I still do.


The bath towel double-racks.  There will be 4 towels always drying, so the kids and I were ecstatic when we found these.
We decided we needed to put them well-spaced, over each other, to prevent one from being partially behind the bathroom door, and always getting hit.

So, by now you’ve probably felt like you have the style of this bathroom pegged, right? 
How would you describe it so far?

Well if you ask me, and you think about it, it’s the shower curtain that really sets the mood or style of the whole bathroom. I didn’t know exactly what I wanted, but I knew it needed to either have some gray in it, or look nice with gray. And be gender-neutral, since the kids are 2 boys and 2 girls. Right? 
Interestingly, I wasn’t all excited about going shopping for the little things, much of what you’ve just seen, such as the towel racks, toothbrush holder, toilet paper holder and trashcan, etc.  This bathroom has been a project that has just needed to get done. Not fancy, not creative, just DONE.

But I was excited for finding a great shower curtain. I was looking forward to finding a design that I’d really love, and have it tie everything together beautifully.

The thing is, I took the kids with me, and that changed everything. We had let them have input in everything we had to pick out for this bathroom, but they were pretty non-chalant with their opinions, up until this point. But suddenly, they felt strongly about the shower curtain. Like, as much as I did!  And it was all 4 of them, against me! 

They insisted it’s their bathroom, and they should be able to choose the shower curtain together.
And so I let them . . . . . .


Ohhh…. my crazy kids!
You’d think this is rather…..elementary. A bit childish. Yes?
Especially for the almost 17 year old, right?
But “Oh NO,” they tell me, “it’s just FUN!”


I have to admit, it looks pretty o.k. with the gray walls.
And it does make me smile inside, when I see it. The kids really love it, and that actually makes me smile on the outside, too.
It really speaks of just how silly our kids are. They really get a kick out of this stuff.
And hey…..shower curtains aren’t permanent.

There is just a touch of decor left to do. I haven’t decided what yet, but I think I’ll know it when I see it.
When those touches are added, I’ll be sure to take photos and share on our Facebook Page and InstaGram, so you can see.
(So hope you are following us there!)
But I do believe I’ll be moving this sign from our current bathroom up into theirs, since I made it with them in mind anyway, and it matches……


And there you have it. The bathroom everyone has been waiting for!


Filed Under: Home Decor, Home Improvement, The Homestead Tagged With: bathroom, bathroom-fixtures, Catholic-blogs, Catholic-families, gray-bathroom, home-improvement-project, kids-bathrooms

A Rustic Christmas Cards Display Idea

December 3, 2013 By Laura 1 Comment

 When the Christmas season arrives every year, and the cards start coming in the mail, what do you do with them?  Do you just put them in a pile and let them stack up? Or do you like to display them somehow, for all to see?  If you display them, how do you manage that? I bet you all have had some pretty creative ideas yourselves.

We’ve had a few solution ideas of our own over the years, for the Christmas cards we gratefully get in the mail. Way back, we just put them in a beautiful Christmas basket. That was kind of sad though, as we know many are really excited about their cards every year, and we’d hate for them to be hidden. Especially the ones with photos of kids and families, or the special notes.
We’ve also just tied a pretty ribbon across a beam in our main living area, and let them hang on that.
Getting more creative still, for a few years, we stood a white folding accordion door in the corner of the room, and the louvers (slats) worked beautifully for hanging cards. Of course, like with the string idea, the vertical cards hung horizontally. It was still a nice way to display everyone’s cards though. 

Last year though, I came up with a new idea, that I think we’ll stick with for some time. It’s very homemade and rustic, and I just love it.
Take a look . . . .


What do you think? 
It was actually just a long scrap of plywood we had on hand. (Repurposing at it’s best!).  
This one happens to be about 11″x 76″.   You can use any similar long board though.  You just want to be sure it is thin enough to be able to clamp clothespins on.


We also used some rough rope, in which I intertwined some thin satin rope around, just to add some pretty to the rough look.
The roping is mostly for decorative purposes, though. It will hold some horizontal cards well enough, but if it slides, it knocks other down. And that’s just frustrating.
I like the look of the clothespins, and it helps secure the cards of all sizes.


So this scrap board was painted white and then rough sanded. I didn’t put a lot of effort into that wood-finishing part at all, because really….I was hopeful that if enough people thought of us whilst filling out their Christmas cards, most of that board would be covered, anyway.  ๐Ÿ˜‰
The scrap blocks of wood (you see) on the back, at the top and bottom of the board, not only add stability to the board for it to sit well on the floor and lean against the wall.  There is a notch cut at the top and bottom of the board, for the rope to wrap around to the other side inset, and then there is hole through the block for the rope to go though and be secured to the other side. It sounds complicated, but it really is simple in design.  Sorry I forgot to get a pic of the back side for you. If you are confused and  have a question on this, go ahead and ask in the comments.


Completely optional tidbit: 
I soaked my clothespins in tea water overnight, to try and antique them some. It worked; but honestly, it’s too subtle for the effort in my opinion. Maybe I did it wrong?
I think at some point I will take these clothespins, and revert to what always works beautifully for me; a touch of my Annie Sloane Dark Wax. Love-that-stuff!

To really dress up the top, I added these large rusted-looking jingle bells, hung with twine. I love jingle bells! 

CONSIDER THIS: 
You could use this whole idea, and change the whole style of it depending on how you finish it and what you use as detail elements!
For example: paint a smooth new board with a clean white paint, omit the sanding, putty and paint your screw holes, and use a wide frilly ribbon down the board, with a big fancy bow at the top!
 But the rustic, farmhouse look suits us just fine.
–


Yes, just another crazy idea, from our house to yours! 
If you love it, bookmark it! You could try the idea yourself this year or some other coming year. Or simply share it with your friends who follow you on your social networks.  They’ll love you for it.
  And hey, while your here, say hello, and share your thoughts.

Hope your homes are feeling a little bit of your Christmas love!
These are the little things that make any house, a home, for the ones you love.
~Laura / The Richard Family

Save

Save

Filed Under: Crafts & Creations, DIY (Do-It-Yourself) Project, Holiday Crafts, Home Decor, Organization, Re-Purposing, The Homestead Tagged With: Christmas-card-display, Christmas-cards-display-solution, Christmas-cards-organization, Christmas-decor-ideas, Christmas-DIY, Christmas-organization-tips, how-to-display-your-Christmas-cards

Reversible Fall to Thanksgiving Home Decor Blocks Craft Tutorial

November 18, 2013 By Laura 8 Comments

 I’ve got one last Fall-themed project to share with you this season, before I move on.
You may remember I shared these happy Fall blocks in this post, in which I was giving you a little close-up tour of my Fall mantels. I mentioned that I had made these blocks, that they were more versatile than they appeared, and that I would share why when I got to that project post.

Well this is that post!

Here are the blocks already shown to you.   They were created to look well worn, long loved, and a bit old.
Just how I like everything.  ๐Ÿ™‚

And shown here, are the blocks backsides . . . .
I made the block to transition from every day Fall, to a Thanksgiving-themed message for those weeks in November.
What do you think?  Nice surprise? Good idea?  I was thinking so!

They are really simple to make.  I just found making these blocks fun and relaxing.
I tend to get a little Zen, working in my studio anyway.
So if you think you’d like to make some, sometime, I’m going to show you just how I did it, right now.
–

I started out with 10 blocks, just like these.
Well, actually, I started out with 8 blocks just like these. Then 9. And finally 10. But that is a frustrating story I’ll tell you about later on.   But the project took 10 blocks, anyway.
These simple wooden blocks come in various sizes; these are the 2″ blocks.   I got them at A.C. Moore’s. They are not available at my local Michael’s, anyway.
They are smooth and finished-feeling on 4 sides, except for what I considered the tops and bottoms.
–

I chose my favorite Fall hues of acrylic paint, and painted them all. They did take two coats.
–


Next I had Michael cut two inch letters out of vinyl, and weeded out the letters.
–

After covering that sheet with transfer tape, I cut each letter block to size.
–

Peeling off the back, I then applied them well to a face of each block, one at a time with a squeegee, and pulled off the transfer .
It was important to make sure the rough surfaces were not used. The vinyl would work as a mask.
–

I had a pile of scraps that looked like I had been working really hard, so I photographed it, and left it for awhile. ๐Ÿ™‚
–


White acrylic paint and flat brush, ready to go.
–

All painted in.  I think it required two coats.
–

Before the second coat dried all of the way, I carefully peeled off the mask.
–
Now while painting them was rather enjoyable for me, these next steps are the part I really love to do….
But I didn’t really photograph those steps. :/  Sorry!   It’s easy enough to tell you about though.
I’m talking about sanding and aging the blocks.

To sand, I used 100 grit sand paper on a sanding block. I use the sanding block because it keeps my sanding surface flat and hard, for my uniform sanding.  Also, it’s a lot easier on my fingers, which get torn up very easily.  Where do I sand?  I like to hit the surface, to wear that a little. But I really go at the edges and corners, where they would normally wear the most.
But after sanding, we are left with clean, bare new wood. Not good, for antique blocks. Right?

So next I rub around some dark wax, with an old t-shirt rag.  I-love-this-stuff! It really does age the look of the paint, and just dirty things up just right.
You rub it on and essentially, rub it back off to. While working not as hard to get it off, where you want to leave more.
Make sense?  The stuff is messy, as you might guess from that rag up there. And it stinks to high Heaven. But, somehow I don’t mind it much, working with it. It’s like the smell of creativity, at work!

Here’s a closer look at the effects of my sanding and waxing . . . .

And now, my blocks all on display . . . .

Ta-DAAA!!!  I was so happy not to have to put my blocks away, to make room for some Thanksgiving decor.
I’m already pondering making more block sets for other holidays and seasons. In fact, actually, I already have a set for spring (in a very different finishing style and size) I made last year and never shared. I plan to come spring though.
But, back to the here and now.

–

Because it’s the details I worked so hard for (in a fun/playing sort of way), that make these blocks look like maybe one of our grandmothers passed them down to us, I couldn’t stop photographing them . . . .

Ok enough of that. Now, you can skip this little story-paragraph if you want, right down to after the next photo.

But I’d like to explain the story of the 10th block: 
For weeks, I only had 8, and then 9, blocks. Because that’s all there was at the store!  In fact the first trip, I bought none, because there wasn’t enough to spell what I wanted!  I needed 10 to do this project. I inquired though, and the lady assured me that if they were low, more was coming in the next day. So I returned the next day, and there were still only 8!!  So I figured…I need to buy those, so they be sure to get more! (Because supposedly, it’s all electronic.)

Next trip, the bin there was still empty. I was desperate!! So I plopped down on the floor and pulled out all of the other sized blocks onto the floor, hoping to find some 2″ers  in the wrong bin.
And I found ONE!!  ARRGGG!!  So I worked with the 9 I had. I got those all done, and had enough to make my HAPPY FALL.  But I’d need that last one to complete GIVE THANKS.
Finally, a new shipment of them came in, and I got my last block, which I did start to finish, all by itself, just in time. It was the “A” in THANKS.

What to do with the other side? . . . .

I made an exclamation point!  To use from then on, with my HAPPY FALL(!).  Because if you all know me, you know it’s worthy of an exclamation point.  I do love Fall, that much!

If you love what I’ve done here, believe me when I say, (if you have a vinyl cutter of any kind), you can do this!  And if not, other crafters will love you for sharing the idea!

So go ahead and PIN the image below on Pinterest, share on Facebook – whatever!!


That’s a wrap for projects for this season this year. ( I think. ๐Ÿ˜‰  )   Time to start thinking about Christmas!
Thanks for making my day, and coming by! 
Hope you take a moment to share your thoughts, and say hello!
~Laura


Save

Save

Filed Under: Crafts & Creations, DIY (Do-It-Yourself) Project, FALL Crafts and Creations, FALL Home Decor, Holiday Crafts, Home Decor, Mantel Decorating (Ideas), Seasonal Crafts and Creations, Seasonal Home decor, The Homestead, Tutorial Tagged With: aging-painted-wood, antiquing-painted-wood, craft-tutorial, crafts, fall-crafts. fall-home-decor, fall-decor, finishing-wooden-blocks, making-wood-pieces-look-old-worn, sanding-painted-wood, thanksgiving-decor, using-dark-wax-on-wood, wooden-block-crafts, wooden-blocks-diy, woooden-decor-blocks

A Custom Fall Decor Sign

November 3, 2013 By Laura 6 Comments

The details of the season of Fall inspires me so much!
This time, it was to make a custom fall decor sign for our home.


–

I was going through some scrapbooking supplies recently, when I came across a handy little quote book.  Naturally I took the opportunity to take a break from the big task at hand, to read through it, because I was sitting in the middle of an overwhelming mess.  One of the quotes I came upon expressed some of the many little things I so love about the season of Fall, and I was immediately inspired to use that quote as a custom sign for my home decor. The quote read:

Scarecrows, corn rows, pumpkins on the vine.
Leaves curl, wind swirls, Fall is right on time.

There was no credit to the quote, so I did an internet search.  I found the quote has been widely utilized, which tells me I’m not the only one this beautiful little phrase speaks to. I had just never heard of it before.  Still, I found no credit, or else I would feel compelled to give credit where credit is due! (It’s only right to, Folks.)  Whoever you are though, thanks for such a lovely expression of the picturesque moments of Fall, and for the inspiration!

Here is a look at the finished sign, and then I thought I would share the makings of it with you today.


My mental vision of the sign was instant, really. There was no brainstorming session, although I did sketch out on paper the structure of the sign I was asking Michael, my husband, to build. Could I do these things myself? Yes, but why would a girl, when a girl doesn’t have to?  It would take me so much longer, and it probably wouldn’t come out as perfectly. Michael is happy to whip up these things for me in astonishing time, when I ask, and I say that with much appreciation.


The 14 x 25″ sign consists of 10 2.5 x 14″ slats of wood, secured together on the back as seen above, with 2 little strips of pine.
–


Finish build, and ready to stain.

I chose a dark stain.
(Minwax brand; Provincial)

The lettering was laid out in design to have a line of text on each slat of the sign, with a spare slat at the top and bottom, for any artwork.
The lettering was cut out and applied in vinyl.

My vision also involved some hand-painted artwork on the sign.  Oh, these grand ideas are always pulled off so very simply in our minds; aren’t they?  ๐Ÿ˜‰
I foresaw pumpkin vines climbing all the way up the side of the sign, and many leaves, swirling everywhere.
But my physical execution of painting these things, proved to be a bit more challenging than I managed so beautifully, mentally.

While, after much effort, I don’t think my pumpkins came out too bad in the end, my vines didn’t climb quite as high and wild, and I acquired far fewer leaves swirling about, than I had hoped as well.  Still, I am happy with the simplicity of the final outcome.

I’m also encouraged, because I realized when I was all finished with the painting project, that I really worked with a difficult medium.  They were acrylic paint tubes I had around and found in a baggie, but really poor and cheap quality.  They were very soft and clumpy, which really made it challenging to paint smoothly, and the paint application itself did not have any longevity for longer strokes.  Having painted with my more high quality acrylic paints on another project some days later, I really saw and experienced the difference, and I won’t make that mistake again.  I look forward to trying my hand at some more hand-painted work soon, with more cooperative paint, and I suspect I’ll have a more enjoyable time in the midst of it, with more pleasing results.

Nonetheless, I do love my sign, and believe I will include it as part of our Fall decor for many years to come.

If you saw the tour of our Fall decor mantels post, you may have noticed the sign then. It was one of four handmade items included on the mantels.
Did you guess any of the others?
I hope this inspires you to try making some simple signs yourself, or purchasing some to include in your own home decor.
~Laura

* * * * * *

Please come follow me here and there:

Save

Save

Save

Save

Filed Under: Crafts & Creations, DIY (Do-It-Yourself) Project, FALL Crafts and Creations, FALL Home Decor, Home Decor, Mantel Decorating (Ideas), Seasonal Crafts and Creations, Seasonal Home decor, Signs, The Homestead Tagged With: fall-crafts, fall-decor, Fall-decor-sign, fall-home-decor, Fall-signs, farmhouse-style-decor, handmade-signs, rustic-fall-decor, sign-home-decor, sign-making, signs

  • « Previous Page
  • 1
  • 2
  • 3
  • 4
  • 5
  • 6
  • …
  • 16
  • Next Page »

We are wicked happy to have you here! We hope you find much inspiration, help, humor and enjoyment here.


Archives


POPULAR POSTS

* * * * * *

SUBSCRIBE to House of Joyful Noise blog! Every new post, delivered right to your email box!


Privacy Policy

Amazon Affiliates

Never at any additional cost to you, we may earn a small commission for our endorsement, recommendation, testimonial, and/or link to any products from our website. Your purchase through our links helps support our family, while sharing with you the products we authentically use and recommend, for various ideas, and letting you know where you can purchase them. Thank you for your support!

[footer_backtotop]

Copyright © 2025 HouseOfJoyfulNoise.com ยท Genesis Framework by StudioPress