• HOME
  • {A}’s Chipmunk Training Archives

 Homepage

  • The Homestead
    • Home Projects
    • Home Improvement
    • Home Decor
      • Seasonal Home decor
        • FALL Home Decor
        • WINTER Home Decor
        • SPRING Crafts and Creations
        • SUMMER Crafts and Creations
    • Our Chickens
    • Gardening
    • Organization
    • Re-Purposing
    • Furniture Refinishing
    • Budget
  • Crafts & Creations
    • Seasonal Home decor
      • FALL Crafts and Creations
      • WINTER Crafts and Creations
      • SPRING Crafts and Creations
      • SUMMER Crafts and Creations
    • DIY (Do-It-Yourself) Project
    • Kids Arts and Crafts
    • Homemade/Handmade Gift Ideas
    • Holiday Crafts
    • Fan Pulls
    • Free Printable/Downloadable
    • Sewing Projects
    • Giveaways
    • Business Features
  • Recipes/FoodFun
    • Breakfast
    • Lunch
    • Main Dish
    • Sandwiches
    • Appetizers
    • Slow Cooker
    • On The Grill
    • Side Dishes
      • Soups
      • Salads
    • Baking
      • Breads, Rolls and Muffins
    • Snacks
    • Treats
    • Desserts
    • Drinks
  • Homeschooling
    • Elementary Homeschooling
      • Elementary Homeschooling READING
      • Elementary Homeschooling MATH
      • Elementary Homeschooling LANGUAGE ARTS
      • Elementary Homeschooling SCIENCE
      • Elementary Homeschooling HOME ECONOMICS
      • Kids Arts and Crafts
    • Middle School Homeschooling
      • Middle School Homeschooling SCIENCE
      • Middle School Homeschooling HOME ECONOMICS
    • Language Arts
    • Math
    • History / Social Studies
    • Geography
    • Foreign Language
    • Field Trips
    • Games
    • Nature Study
  • The Big Picture
    • Life In General
    • Celebrations
    • Faith
      • Into the Light; The Series
    • Giveaways
    • Reviews & Sponsors
  • Photography & Lettering
    • Photography
    • truck lettering
    • vehicle graphics
    • Newborns
    • Kids
    • Engagement
    • High School Senior Pictures
    • High School Senior Pictures Sneak Peeks

Fall Themed Candles Embedding Real Leaves

October 10, 2013 By Laura 21 Comments

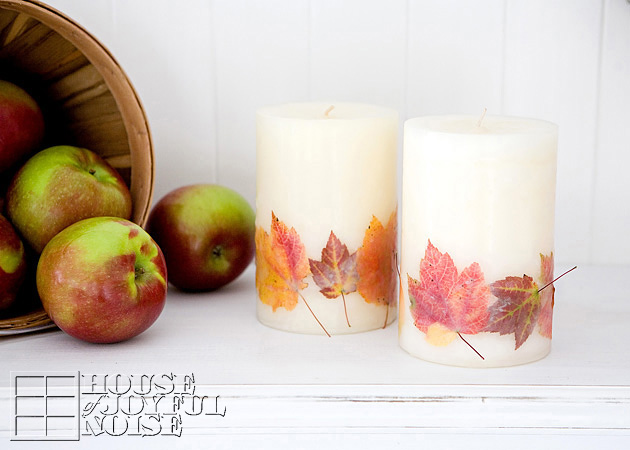
Today, I’m going to show you one way to preserve those beautiful Fall leaves you found, and make something beautiful to add to your warm Autumn home decor. Candles! Embedding real leaves.


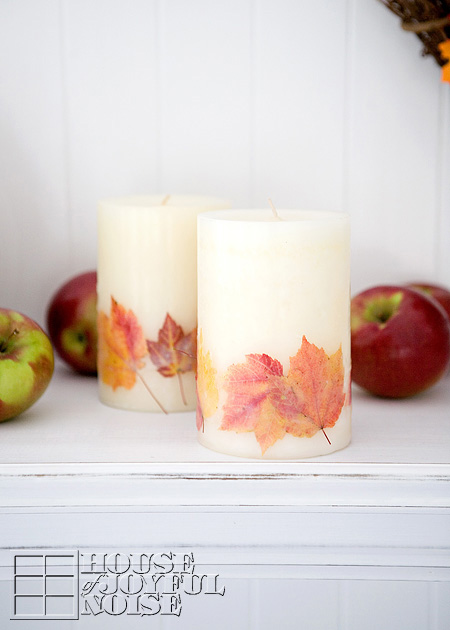
We’re simply taking store-bought medium-pillar candles, and embedding the real leaves as a beautiful decorative element.
To do this, I’ll be using a separate wax medium.  The reason I am choosing to not just glue the leaves on, or seal them in with Modge Podge or something, is because those mediums are flammable.  I likely will be burning these candles. While I won’t burn them very low, I didn’t want to take the chance of having anything chemically-flammable as part of the candle, when it is easy enough to avoid that. Also, embedding the leaves within the sides of the candles will give the look I am trying to achieve.

All you’ll need for this project is some pillar candles of some sort, some plain melting wax (for candle making), your pressed leaves that you collected, and some pans. (A few other optional supplies will be mentioned along the way.)

The first step in working with real leaves, is to ‘press’ them.  This not only flattens them, but somewhat preserves their moisture for a bit, yet keeps their pliability to be able to work with them well.   I press them by placing my leaves between the pages of a newsprint pad of paper, and putting a small pile of magazines, or whatever for weight, on top.  A few days will do.

–

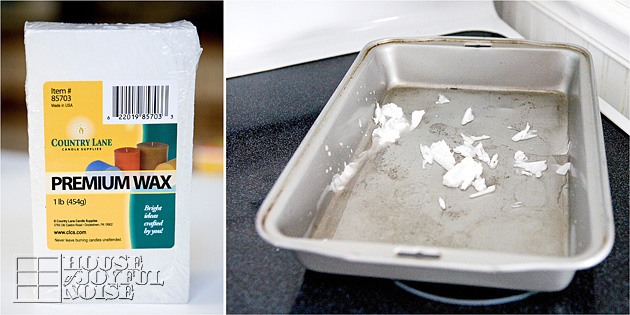
You’ll want to melt your wax over some kind of consistent heat. Making do with what I had, I cut some chunks off of my premium wax block, and put it in a roasting pan, over 2 burners on my electric stove on a very low heat. Possibly even the simmer setting. Start at the lowest and increase the heat as needed. Every stove is different, but generally speaking, you want the wax just liquid-y, but never to the point of bubbling. How much wax you melt depends on how many leaves you’ll be adhering, how many candles you are decorating, etc.  But regardless, you certainly want the wax deep enough to completely submerge a leaf.

  Once your wax is melted, you’ll want to have your pillar candles and leaves readily available to work with. Also, have a sheet of wax paper on a flat surface nearby, to be able to put your candle down as needed.

*This is a very important tip!
You need to keep your pillar candle itself somewhat warm to apply the dipped, hit-wax leaves successfully. The reason being is that lying your hot waxed leaf on the cold surface of the candle immediately sets the wax, and it does not apply well at all. 

But I have two great tips to choose from, for keeping your pillar candle warm:

1)  Have a heating pad on high on your nearby counter-top, with a sheet of waxed paper on it. You can roll the whole thing up with your pillar candle in it (in the waxed paper), or, you can simply lie the candle on it’s side, keeping warm on the side you’ll be applying to.

Or you can go with second option, which is what I ended up doing:
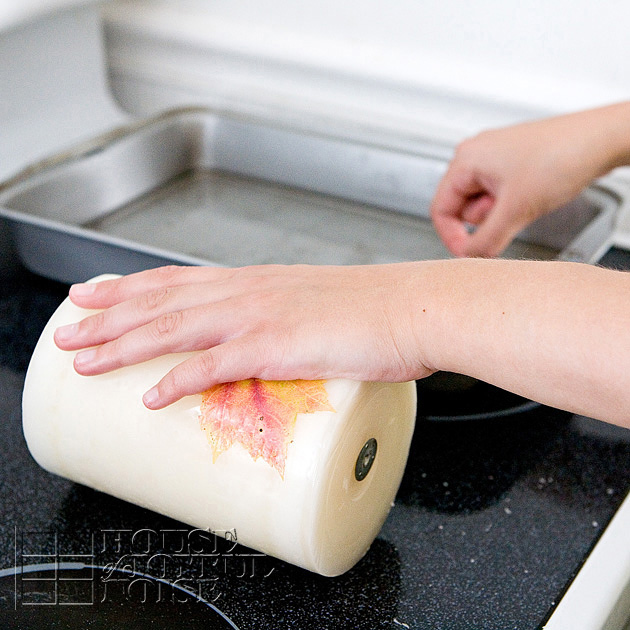
2) Simply lie the candle on the warm stove, beside the working burners to keep it warm. Obviously you don’t want your pillar candle to melt. But your burners should not be high enough to do that. This method worked well for me, as long as I did apply the just-dipped leaves to the warm area of the candle.

So here we go!

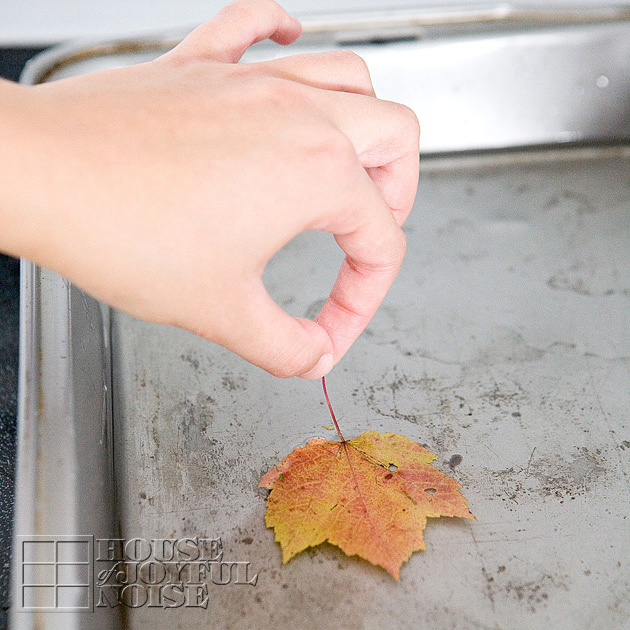
Dip your leaf in the hot melted wax, holding it completely submerging in the wax for a few moments. Keeping it submerged for a few moments (as opposed to dipping and retrieving) will really help the leaf get limp, which will be helpful in applying to the candle.

(View images left to right.)
Then quickly but carefully lie and really ‘cling’ your whole leaf to the candle, and begin to rub down all over as you can.  I say as you can, because it is hot!  And yet you want to press it down as much as you can, before it starts to set. So gently press it down all over, without rubbing hard in any way, and then really just lay your hand down over it as soon as you can while it sets.

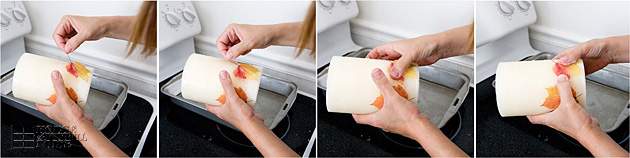
Continue adding leaves for your overall design. It is alright to overlap some pf the leaves as well.
Remember to warm the candle in between, as you’re dipping your next leaf.

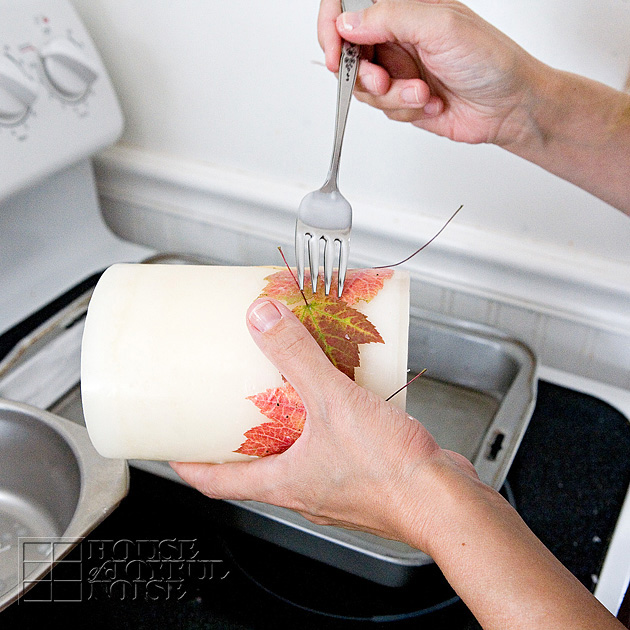
Now if you find the wax has set in an area that the leaf is not stuck down well, here is a little trick to re-work it:
Dip a fork into your hot melted wax, and drip it onto the area of your unsealed leaf that needs fixing.
Then press down again with your fingers.
The stems are optional to keep as is, cut shorter, or cut off at the base. I rather like them, and am leaving them for as long as they don’t break off on their own.

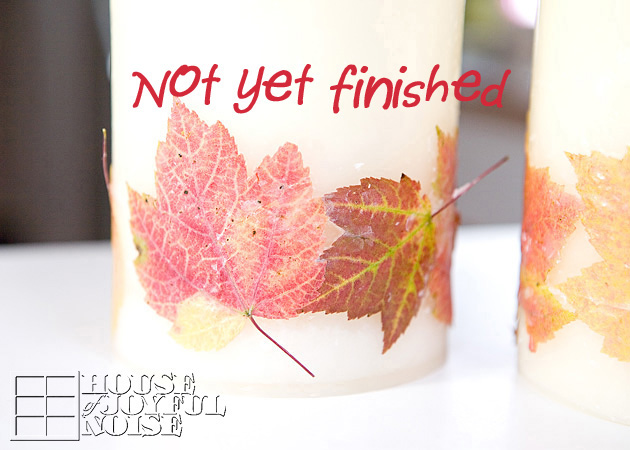
Once all of the leaves are applied, you might consider your candles done. But I really wanted to further seal the leaves onto the my pillar candles, so that they may better hold up for a longer period of time, without the leaves coming off.   The layer of wax over your leaves on your candle at this point is very thin, and that leaves (no pun intended) your decorative surface very fragile and at risk of being damaged.  It’s also somewhat bumpy from all of the pressing on. So another sealing coat is a good idea, and it’s easy to do!
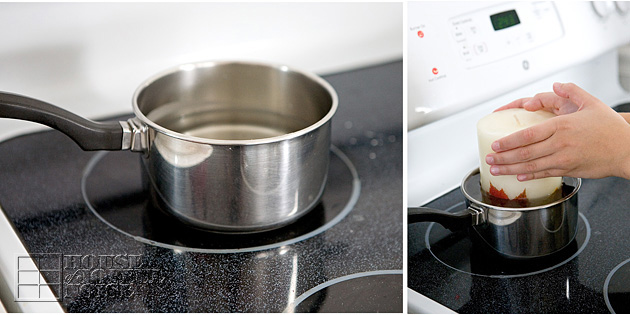
Just heat up more wax in a sauce pan at a reasonable depth, and dunk the whole candle!  Use a size appropriate pan for the size of your handles, and no wider than you need, or you’ll need to use way too much wax to bring the level up.
Now….you also want to keep in mind that the submerging of your candle is going to drastically rise the level of your very hot melted wax. So, be mindful of the amount you melt.  My goal was to melt enough to dunk the candle to just over the leaf tips, without overflowing the wax all over my stove top range. I barely made it…missing just the tips of the leaves.

*Dunk it only once, (holding it submerged for a moment or two like the leaves), as double-dipping may create such a layer of wax, that it’ll become too difficult to see the beautiful shapes and colors of your leaves.
Once lifting them up out of the pan, just carefully set them down on that sheet of waxed paper, until the whole candle cools and sets.

Now they are finished, and ready to add some Fall beauty to your home wherever you choose to display them.  You can enjoy them long after the leaves outdoors have dried up and crumbled away.
I hope you enjoyed this tutorial too, and will consider having fun making some Fall candles with real leaves yourself.

* * * * * *
Please come follow me here and there:

Save

Filed Under: Crafts & Creations, DIY (Do-It-Yourself) Project, FALL Crafts and Creations, FALL Home Decor, Home Decor, Seasonal Crafts and Creations, Seasonal Home decor, The Homestead, Tutorial Tagged With: add-fall-leaves-to-candles, autumn-crafts, candle-crafts, candle-detailing, candles, crafts, decor, dipping-leaves, diy, elementing-candles, fall-crafts, fall-decor, fall-leaves, home, home-decor-projects, how-to-wax-real-fall-leaves, leaf-crafts, leaves, pillar-candles, waxed-leaves

Doors to Storage. (Literally.)

September 28, 2011 By Laura 34 Comments

We are so excited to show you a couple of major storage solutions we came up with for our home, that has made a huge help to us!
Not only do we feel much more organized, but these are unique projects where we re-purposed old doors.

005_old-door_300


We’re guessing many of you love to see little home transformations, and creative spaces, as we do, and that’s just what we hope to share with you today.  The photos we share will likely explain what we have done. But if you have just a bit of time, grab a drink of choice, and let us amuse you with a little more about the birth of this project.

We’ve heard some people try to ‘ keep up with the Jones’. But that’s not our style.  I’m sure they’re really nice peeps, and all. But they don’t run in our circles, and even if they did, I doubt we’d want or care what they have, even if we could  afford a thing.  No, our wants and needs are really quite simple. If not a little off-beat sometimes, I suppose.

What we would love to keep up with, is ourselves, and our own plans and ideas.  Michael and I enjoy walking around our home and yard, chat, brainstorm, and hatch a plan, that continues to make the best of our little piece of the world. Our ideas always have a purpose, whether they are to create a sense of decor, efficiency, organization, to save money, or simply to amuse ourselves because we think it’s cool. Many times, it’s all of the above. One thing is for sure; 100’s of plans have been laid out between us, in detail, and never come to fruition, whether it was intended to be done right away or not. Time and/or funds usually hold up the process a bit, until we’ve forgotten we even had the plan!  Sometimes, new plans and ideas have been made over the old ones we forgot, or remember we had.  And we always have more, than we could ever realistically get to, anyway.  It’s craziness, actually. So priority is the key, and some things just need to be dealt with once and for all.


001_shoe-storage-problem

Case in point is this hot mess, known as our shoes issue.  First, you should know, “I” am the kind of person, that really prefers one take off their shoes, before walking around the house.  Not because we have any fancy home, or carpet that mustn’t get dirty for appearances sake.  But, because of the things I notice in the world around me, the things I think of, and the things I know dang well those shoes have walked through.

Take for example, (just to make the most of my point), those teenage/adolescent boys you see walking through parking lots from point A to B, when you suddenly see and hear them do a big collecting sniff of sorts, hack it up, and just let it fly out onto the parking lot ground.  It turns-my-stomach. I’ve seen/heard it hundreds of times, and I have told my boys every time, “Don’t you EVAH, in your life time, do that.  I don’t care if you are 36. That is absolutely dis-gust-ting, rude and UNacceptable.” To which they reply, “We know Mama. You tell us that every time.”  So along with 100 other examples I could give (I’ll spare you), I simply know it’s a small sample of what is on the bottom of anyone’s shoes, and I really do not want to know such disgust is all over the floors of my home.

I’ll take earth-dirty-feet over that kind of what-nots, any day of the week.

So that helps explain all of the shoes, along the walls of our sun room, right inside our front door.  Keep in mind, this is also the room with our wood stove, and one of our family tables where we often eat and school, half the time. We originally imagined it as a cozier room for reading and such, possibly with a chaise lounge chair or 2, and an area rug under the table. Not the feel we had going here. Using the table for eating and schooling the other half of the time, it is the room we enter when we come home, and through which guests come as well. With only our shoes for that season out, with 6 of us, it’s too many. Any, is too many, for me.  It’s actually worse then you see. At the time of this photo, some had just been put away, and 5 other pairs were busy walking around in the world of what-not.  The bottom line is this:  the sight of these shoes always puts me in a bad mood. It looks terrible, and we are always tripping over them.  So, for a couple of years now, our plan was to build a storage bench along the wall you see. We had designed it right down to the details, and frankly, the shoes could never let us forget that plan.  It’s just been on a list of many things we’re been trying to get to.  But we finally did, with a whole new spin, and we’re about to show you.

But completely related, you need to see this…..

002_antique-typewriter This is in (in part) our school room. If I ever took photos of these floor cabinets Michael built for our school room 4-5 years ago, I cannot find them.  So this photo and the one below, will have to give you an idea.  There are 3 of them along the 1/2 wall adjoining the kitchen.

003

If you can possibly look past one of our adorable boy when he was starting 1st grade, you will better see the size of these cabinets.  Michael did an great job, and they served us well in this room for 5 years.  But as of late I decided they are really (way) more specious inside, than we actually need, for our school books and materials. Very roomy.  And we probably did not need so much table-top space either.  As a whole, they take up a lot of space in this room, where there is also another long table and chairs, and where we also tend to gather to eat and school.

Since the sun room was meant to be cozier and lounge-ier than it is, we thought a good first step, is to not let it be the door we come inside the house through, for one.  The back door would probably be better for that.  More like a mud room. But there was still the countless shoes issue! We still needed somewhere to sit down and take our shoes off, and somewhere to store all of those shoes. What we did not need, was quite so much storage space, for all of our schooling materials.   I forget now exactly when, but the 2 matters collided at some point in my head, and ideas started rapidly coming together.  It was likely in the shower, which tends to be my most productive think-tank, but if that is TMI for you, disregard.

The gist of it all was….get rid of the big spacious cabinets in the school room, build some kind of more shallow shelving instead, and move this whole storage bench idea to the school room, where we should really enter the house from now on. A-hA!!  Then we can do better with the sun room! But that would be getting ahead of ourselves here.

004_old-doors

I also had an idea of how/where else we could use the big cabinets, but that too is for another time. In a nutshell, they were moved elsewhere, and it occurred to me that it would probably come out pretty cool, and save us big-time in material costs, to build our storage bench and shelves, out of old doors.

In a matter of days, we had found 4 doors on ebay offered for dirt cheap, just a hop, skip, and maybe 2 jumps, from us. Michael arranged to meet the guy to take a look, and he brought them home. (2 of them from this photo were already moved to the school room.) The doors were dirty, and somewhat mismatched, but that was all workable.

Show and tell will go fast from here I think.All 4 doors were re-purposed in this project(s).

005_old-door I loved the features on these old doors, and I knew I’d probably rough things up some more, from here.

006 First Michael relocated the huge cabinets to other locations. The floor space we gained just doing that, was unreal. Then, put up some leftover bead-board we had, as the back wall.

Then a bit of measuring and taking a moment to think things through, and we started to build.

007_old-door-repurposing-bench
The doors were sawed into half the long ways, as well as proper sized-pieces, for various parts, and we were able to start putting it together.   We wanted it a good height to sit on, and have as much room on the inside, to store/hide the abundance of shoes.


008_shoes-storage-bench As you can see, the bench unit, using the doors, was built 3 sided, simply using the back wall as the back of the unit.   And all of our shoes fit in there perfectly.

009_storage-bench Without all of the shoes inside yet, here is what the bottom looks like.  These removable racks are a feature we came up with, even when the plans was to build traditional storage benches in the front sun room:   The shoes we take off when we come indoors are not only dirty/sandy, but often times wet too.  I know what a mess the elements from the shoes made on the floor, so I had thought of that in terms of the inside of the bench, and what a pain it would be again, to move each pair of shoes, to vacuum up the sand and dirt.

010_storage-bench So we built these shoe racks out out of strapping and chicken wire, so that a whole rack with shoes on it, could be lifted out, and we could vacuum underneath.  They would also keep the shoe off the floor of the bench, so they could dry easier.

011_old-doors-repurposing
At the same time, we were not only building the storage bench with our old doors, but wall shelves beside it, for all of our school books and materials.


012_old-door-shelves
I know it’s quirky, but I really love this part of the door-shelves.  I knew the doorknob would serve purpose, aside from looking cool. The sharpener simply needed to be relocated from elsewhere, as it ended up being located in such a way they we could no longer use it, without moving it, and this was the best place for it.

As you can see, a lot of the doors were beat-up, and the dark wood of the original door showed through. I liked that.  But a few parts of the structures were also necessarily built with new wood.

013
Such as the shelving itself, built with new wood.  So there was still some distressing and aging to do anyway, on new wood and not, which I did with course sand paper, and dark wax, to properly stain and age the new wood, with the old.


016_doorknob-hangers Here is the lid to the storage unit open, pre-distressed. Obviously a door, but this side was painted by the original owner more recently, it appeared.  To add interest, and of course organization and function, we added a collection of old and mismatched doorknobs along the wall above it.

017_storage-doors-bench Here’s a better look as you step back and look at it as a whole. Again, we obviously used doors, and we intended for it to remain obvious, keeping every lock , doorknob and door feature we could.

Coming into the house using the back door, we come in and sit down on the bench to take off our shoes, and put them inside.  I should add, we will be putting down a mud runner, from the backdoor to along the front of this bench.  The little kids can hang their jackets and hats on the doorknobs, which is much easier for them as they cannot reach well in the coat closet that is in the room.  Yes, some coats will be too long to hang completely, leaving the bottom of the coats to sit on the bench, but that’s fine.  Scarves, bags and all kinds of accessories can be hung on the knobs too.

018_old-doorknob-repurposing

019_old-door-shelves The top shelves are for what you can see, as well as some of our music books.  I have many more of my teacher and resource school books that I plan to move from other shelves in the house to these upper ones, for my own use. But the depth we made the door shelves was just right for our needs.

020_old-door-storage The lower shelves are for the kid’s school books, and more of my every day teacher books.  As you can see, we found immediate use for this original doorknob, as well.

020_old-door-storage The kids hang their recorder instruments there. Perfect!

022_old-doors-bench I forgot to take photos of the bench with the lid closed, before we embellished it just a little bit.  But in closing this post, I wanted to give you a better look at the finished bench and shelves.

023_old-doors-bench

In an upcoming post, we will share with you the embellishments details you see, and how exactly we did it, with a surprise inside as well! But that’s pretty much the finished project as a whole.

We have found the entire project to serve us much better. It’s all so much more convenient, functional, and we think, has a cool factor.  I would think it’s the kind of thing that one would either love, or hate.  And I wonder, would features such as these, have a negative 0r positive impact on the ability to sell a house, should the time arise?  What do you think? We personally love the uniqueness and interesting features of people’s homes, and this fits right in with why we love ours. Everyone’s tastes vary, and so our feelings could never be hurt. But we’re curious to know what you think of this idea?  Is it cool, creative, or downright crazy?

* * * * * *

Come follow us here or there:


Save

Save

Save

Save

Filed Under: Budget, Furniture Refinishing, Home Decor, Home Improvement, Home Projects, Organization, Re-Purposing, The Big Picture, The Homestead Tagged With: antique-door-knobs, bench-seats, best-repurposing-ideas, custom-built-storage-benches, home, Home Improvement, home-organization-ideas, old-door-shelfs-shelving, organization, repurposing-old-doorknobs, repurposing-old-doors, shelving, shoes-storage-solutions, storage-benches, unique-shelving

Christmas at Home

December 28, 2008 By Laura 6 Comments

Christmas-tree-ornaments-lights

We hope your Christmas was as beautiful and filled with peace as ours was.  Of course, I don’t necessarily mean auditory peace, if you have a house full of excited kids as we do, but you know, inner peace.  That quiet kind of Christmas joy you feel in your heart, that tends to bring such moments of clear perspective of your whole life, all that truly matters, and all that you are blessed with.  I love those Christmas moments, and hope you all had many of them.

While I did take lots of photos of our kids on Christmas Eve and morning, I won’t be posting all of those.  Suffice it to say, they had such a wonderful Christmas, that seemed to go on for days here.  To see them embrace every moment with such beaming happiness and anticipation in their eyes, is truly a big part of our Christmas joy.   They even each had such beautiful and surprise gifts for us. And the HEART they put into them. <sigh/melt> Now we know what all of their ‘Club Days’ in big sister’s room was all about. We really had no idea.  I can’t tell you how much fun they have been having for weeks.  But here are just some fun Christmas shots I took around our home here and there, now and then, in quiet moments, and moments of loud celebration.

Happy-Birthday-Jesus-cake

cake-Happy-Birthday-Jesus

4songcake

5_nativity

6_lit-Christmas-tree

7_Christmas-tree-ornaments-lights

Below is one of my new favorite Christmas ornaments.  A friend of mine made it for me, and I just think it is so cute and fun!  I smile every time I see it on my tree. It has a soft white feather on it too-you can barely see.   I love polka dots.  : )

9_Christmas-tree-ornaments-lights

10_ornaments-on-Christmas-tree

{A} made waffles, one by one, for like 3 hours one day a few days before Christmas, and threw them in the freezer.  They were delicious as part of our late-morning Christmas breakfast.  Thanks Honey!

11_waffles-teapot

12_brunch

Chocolate Buddies.

13_chocolate-animals

There’s a few more Christmas-sy areas of our home I may take some shots of and share over the next couple of days as well, just for fun. We really enjoy making our home reflect the Christmas season, and many other holidays as well.  Thanks for coming to see!

Save

Filed Under: Celebrations, Faith, Faith/ Catholic, Holidays, Home Decor, The Big Picture, The Homestead Tagged With: Catholic, Catholic-Christmas, Catholic-families, celebrations, Christmas, Christmas decorations, Christmas-nativity-sets, decor, decorations, home, home decor, homestead, nativity-sets, photography, photos

Paintin’ Seashells and Movin’ Dirt!

September 13, 2008 By Laura Leave a Comment

paintnbrush1

Yesterday was a typical September Friday, here on the farm.  Ok, we really don’t live on a farm, but I like to pretend we do. : )

After all of our school work was done, the kids really wanted to paint some of the oodles of seashells and treasures they collected on a long seashore excursion they had gone on the day before. We just love these September days…working in new school books, and spending many hours of our free time outdoors, exploring, imaging, learning and creating, (sometimes working) where the unbearable heat is now just a memory, and we can sense those beautiful Autumn days coming down the road.

The deck table seemed like the best place for the kids to get to work painting their seashells.  The long and cold winter days are closer than we like to think too, and we’ll have plenty of projects to do gathered around our family table indoors, when those days are here!  So for now, we prefer to take advantage of nice weather, drawing in deep breathes of the fresh clean air, with every stroke of the brush.

They get so immersed in their work, their little serious expressions always catch my attention.  And it’s QUIET!

spainting
opainting
jpainting

jshell1

After a half day of work, Daddy got to a home project of his own ‘up in the mountains’, as our kids call them.  What they really are, are huge mounds of dirt, as the aftermath left from our home construction.  As the excavator dug out the earth for more house, it got dumped right up there….in where we used to call ‘up in the woods’. (Not very deep woods, mind you. lol).  The dirt piles, right outside of our school windows which we spend some of our school time peering and glancing out of, have nonetheless served us much enjoyment.  With our bird feeders out there, we have watched so many species of birds come and go, studying their habits and markings, not to mention the critters of the furrier kind, and their antics.  But our goal is to turn the ‘mountains’ into an upper yard, with part of it also serving as a more charming bird sanctuary.

So, Michael had begun moving a little dirt on another day, but not really having a firm plan of exactly what or how he wanted to do it.  Meanwhile, the kids had been begging to go up and help.  So yesterday, the whole idea of what needed to be done gelled in his head, and he got to work.  This time when the all of kids asked to help, he said ‘sure!’.  Of course, he didn’t expect them to really be much help, or last very long.  After all, it’s hard work, lifting and throwing shovel-fulls of dirt!  Especially if you’re 6 years old,  and less than 4 feet tall!

Here’s the big pic of what is being worked on.  I believe Michael will build one more retainer wall at the top. It’s all going to be LOVELY when we finish bringing to reality the visions in our head. We love projects like this!

bigpic

They worked really hard, and as time passed, collectively, were really ‘moving mountains’!!  Goes to show you what a little team work can do!!  What’s better, is that this is their idea of FUN!!!  I admit…I was in the house working, because I had to.  But I couldn’t help sneaking out quite regularly, just to watch their persistence, and to take photos of course.

all

While they all worked very hard, we need to give props to our little girl. While the other kids took breaks, alternating digging with playing, running and climbing elsewhere, {O} kept on working.  She was ‘loving it’, as they say.  With the exception of a lunch break, this little half-pint dug in and threw dirt for 4 hours straight!

ostilldiggin2

And was still smiling…….

osmile

After clean-up and dinner prepping, we had a nice meal of fresh vegetable stir fry pockets, with cheese of course. But the kids did not let me forget that it was ‘Friday night’!!  They have had these new big new glow sticks that friends of ours gave them, and they have been wanting to play with them at night. But really, having time to play would require them staying up late.  So I had told them they had to wait until Friday night.  Thankfully, once I gave that answer, they didn’t ask again.  They just counted down the days and discussed their excitement amongst themselves.  So the night had finally come, an when I told them they had to pick up their toys, and be in pajamas and all washed up first, the agenda got done faster than usual.  ; )

And so they played, and like with everything they do, their faith was not forgotten……

Shane’s ‘Jesus Fish’….

Jesus fish glow stick

3 little angels, …..pretending, we think. lol

glowangels

Soon it was really time for bed. They put up less resistance than usual, and as they lied in bed, they didn’t sing as many songs together as they usually do, as they drift off to sleep.  I guess they were pretty tired, and there is no wonder why!!  After all….they moved mountains that day.

Filed Under: The Homestead Tagged With: home, Home Improvement, homestead, projects, yard, yard projects, yardwork

We are wicked happy to have you here! We hope you find much inspiration, help, humor and enjoyment here.


Archives


POPULAR POSTS

* * * * * *

SUBSCRIBE to House of Joyful Noise blog! Every new post, delivered right to your email box!


Privacy Policy

Amazon Affiliates

Never at any additional cost to you, we may earn a small commission for our endorsement, recommendation, testimonial, and/or link to any products from our website. Your purchase through our links helps support our family, while sharing with you the products we authentically use and recommend, for various ideas, and letting you know where you can purchase them. Thank you for your support!

[footer_backtotop]

Copyright © 2025 HouseOfJoyfulNoise.com · Genesis Framework by StudioPress