• HOME
  • {A}’s Chipmunk Training Archives

 Homepage

  • The Homestead
    • Home Projects
    • Home Improvement
    • Home Decor
      • Seasonal Home decor
        • FALL Home Decor
        • WINTER Home Decor
        • SPRING Crafts and Creations
        • SUMMER Crafts and Creations
    • Our Chickens
    • Gardening
    • Organization
    • Re-Purposing
    • Furniture Refinishing
    • Budget
  • Crafts & Creations
    • Seasonal Home decor
      • FALL Crafts and Creations
      • WINTER Crafts and Creations
      • SPRING Crafts and Creations
      • SUMMER Crafts and Creations
    • DIY (Do-It-Yourself) Project
    • Kids Arts and Crafts
    • Homemade/Handmade Gift Ideas
    • Holiday Crafts
    • Fan Pulls
    • Free Printable/Downloadable
    • Sewing Projects
    • Giveaways
    • Business Features
  • Recipes/FoodFun
    • Breakfast
    • Lunch
    • Main Dish
    • Sandwiches
    • Appetizers
    • Slow Cooker
    • On The Grill
    • Side Dishes
      • Soups
      • Salads
    • Baking
      • Breads, Rolls and Muffins
    • Snacks
    • Treats
    • Desserts
    • Drinks
  • Homeschooling
    • Elementary Homeschooling
      • Elementary Homeschooling READING
      • Elementary Homeschooling MATH
      • Elementary Homeschooling LANGUAGE ARTS
      • Elementary Homeschooling SCIENCE
      • Elementary Homeschooling HOME ECONOMICS
      • Kids Arts and Crafts
    • Middle School Homeschooling
      • Middle School Homeschooling SCIENCE
      • Middle School Homeschooling HOME ECONOMICS
    • Language Arts
    • Math
    • History / Social Studies
    • Geography
    • Foreign Language
    • Field Trips
    • Games
    • Nature Study
  • The Big Picture
    • Life In General
    • Celebrations
    • Faith
      • Into the Light; The Series
    • Giveaways
    • Reviews & Sponsors
  • Photography & Lettering
    • Photography
    • truck lettering
    • vehicle graphics
    • Newborns
    • Kids
    • Engagement
    • High School Senior Pictures
    • High School Senior Pictures Sneak Peeks

Ham, Swiss, and Asparagus Rolls on a Bed of Potato | Recipe

April 9, 2014 By Laura Leave a Comment

 Our family really loves to try new recipes.  We love food in general, and certainly love to be gathered around the table together, with lots of it. We have many favorite meals that we have on a regular basis, but it’s always fun and exciting to try something new. And if it’s really good, we’ll have it again, or roll it right in with our regular rotations of meals.
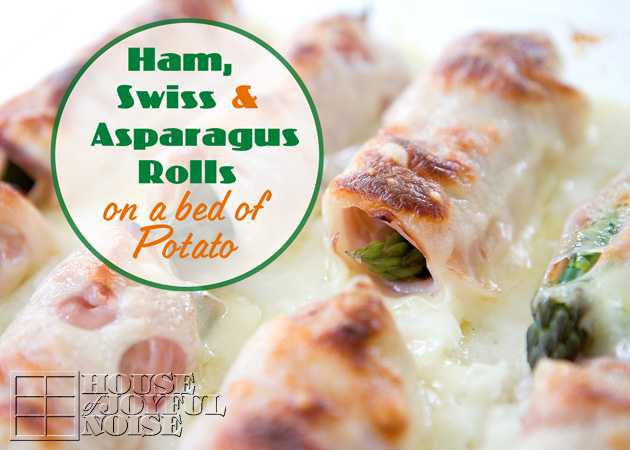
This new one, that I call ‘Ham, Swiss and Asparagus Rolls on a Bed of Potato’, we made for the first time well over a year ago, and it was a big hit.
Just getting to share this recipe with you all now.


 General Ingredients:
potatoes
deli/sliced ham
Swiss cheese
asparagus

I’d call it fairly healthy meal, except maybe for the ham. (With the sodium, nitrates and all of that.)
But swiss cheese is a good choice, potatoes aren’t all that bad, and asparagus is great vegetable.We really love it and eat lots of it – organic and steamed.

This casserole of sorts, couldn’t be easier to make. 
You simply whip up a batch of mashed potatoes, however you normally would. I know I add milk, butter, salt and pepper.
Spread it into the bottom of a buttered 9×13″ glass casserole/cake pan.
Then you do the following next –

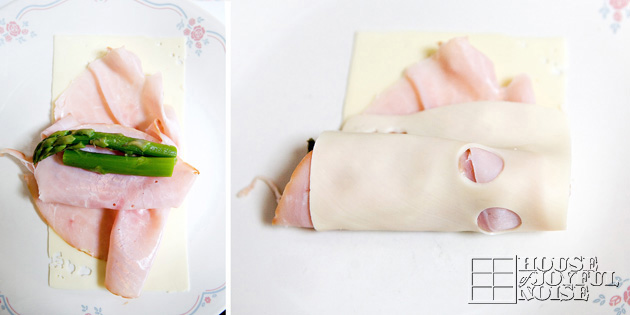
Lay a (not too thin) slice of swiss cheese, topped with sliced ham, and then asparagus.
Then you just roll it up, as seen above.
–

Line them up in your bed of potato!
You can add extra slices of swiss over the top if you wish.
Then bake at 400° for 25 minutes.
–

The house smelled so good!
We knew we’d be loving them.
–

And then . . . . . . we did.
Give them a try!
Hope you all do as well.


Filed Under: Main Dish, Recipes Tagged With: casserole, casserole-dish-recipes, dinner-ideas, ham-swiss-asparagus-potato-recipe, ham-swiss-asparagus-potato-rolls, main-dish-recipes, recipes

Stuffed Pepper Soup – Recipe

February 20, 2014 By Laura Leave a Comment

 Winters tend to be brutal and long here in New England!  We often have multiple snowstorms right on top of each other, and bitter cold temperatures more days than not.
It’s our least favorite season, but we always make the most of it, and keep our eyes on spring! Meanwhile, there is nothing like a delicious hot soup, to warm your soul and put a smile in your belly!

So today I’m going to share with you a new a great recipe: Stuffed Pepper Soup!  I don’t know where I even got it. I’ve had it printed out in my recipe folder, and we’ve enjoyed it a couple of time now. We’re about ready to make it again!  It’s a recipe you’ll want to have on hand to enjoy from the start of fall, right on through winter!

If you even ‘like’ stuffed peppers, you just might ‘love’ . . . . . .

Stuffed Pepper Soup!

Ingredients
1 lb of ground beef (we only use organic/grass fed)
1 small onion
1 large bell pepper; diced
1 can (29 oz.) diced tomatoes
1 (10 oz.) can tomato soup (or tomato sauce)
1 (14 oz.) can chicken broth (or beef broth)
2 c. cooked rice
1 tbs. sugar
1 tsp. garlic powder, salt and pepper, to taste
Shredded cheese;  topping

Directions

1. In a large pot, brown and crumble ground beef along with diced green peppers, and onion over medium high heat.
2. When cooked, drain excess grease from beef mixture.
3. Put beef back into pot.
4. Add in diced tomatoes.
5. Add in chicken broth, (or beef broth if using that).
6. Give it all a good stir. Then add in rice.
7. Stir again.
8. Then add seasonings: sugar, garlic powder, salt and pepper. (To taste.)

Cover and let simmer on low-medium heat for about 30 minutes to let the flavors get to know each other. 🙂 The longer they sit together, the better the soup is. So consider making it one day, refrigerating, and serving the next day. Or….just have leftovers the next day, and you’ll find it’s even better!


You might want to Pin this one. 😉
Enjoy, and keep warm!

Save

Save

Save

Save

Save

Save

Save

Save

Filed Under: Recipes, Soups Tagged With: fall-meals, fall-soups, recipes, soup, soup-recipes, stews, stuffed-pepper-soup, stuffed-pepper-soup-recipe, stuffed-peppers, winter-meals

Jalapeno Jack and Cheddar Macaroni and Cheese Recipe

September 11, 2013 By Laura Leave a Comment

Do you have a recipe that you are known for?  You know…a recipe that others consider ‘yours’.  Maybe one that’s requested by others for family and friend gatherings, with such expressions as, “Oh, can you make and bring your ___________?”. 
My mother was known for her baked beans.  Some even called them “Jean’s Beans”.  My husband is already known for his homemade pizza; which is actually his family’s recipe, handed down.

I wondered for some years if I would ever have a recipe others thought of as ‘mine’, until I did. My Jalapeno Jack and Cheddar Macaroni and Cheese!  Granted, I think it might only be my own little family here who knows of and requests my fabulous macaroni and cheese but hey….we all start small. And home is always a heartfelt place to start.   Oh wait, come to think of it, I did make a huge batch of this Macaroni and Cheese (double this recipe=LOTS) to our friend’s 4th of July bash this year; and not only were people eating it up, but she messaged me at 11 p.m. that night to tell me she was eating the leftovers.

But I’ve never given anyone the recipe until now. I’m happy to share it with you; our following-friends.

(You will want to save this recipe, so you might as well Pin this post with the photo above, now. 
There is a printable recipe at the bottom, that you can come and get anytime.)

Whether served for dinner after a brisk day, on a football Sunday afternoon, or just because you need some (it happens….right?), my recipe, Jalapeno Jack and Cheddar Macaroni and Cheese, is the epitome of comfort food. Mine has a little *kick* to it, because of the jalapeno jack cheese. (I also had extra black pepper to it. We love our black pepper.)
Make it once, and you may find your loved ones keep asking for it again and again, too.

I’m just going to walk you through the steps here as a visual aid, and then I’ll give you the printable recipe at the end of the post.

Participating Ingredients
1 box/lb. Rotini Pasta
1/2 stick or 4 Tbs. of Butter
1 medium. Onion, chopped
1 Tsp. of Salt
1/2 Tsp. of Black Pepper
1/3 C. of All Purpose Flour
3-1/2 C. of Milk
8 Oz. of Jalapeno Jack Cheese; rough into small blocks ~ 1-1/2″ or so
8 Oz. of Sharp Cheddar Cheese; rough into small blocks ~ 1-1/2″ or so

Also…..
  . . . . a sleeve of Ritz Crackers.

Place the crackers in a zip lock bag, and seal it, removing any air as best you can.
Then just crush the crackers all up.  Any bits of bigger pieces is fine. See photo above? Good enough.

Bring a sauce pan of water to a boil and cook pasta to al dente;  7 minutes, and drain.  Put pasta back in (same) rinsed pan.

But while you are waiting for the water to boil . . . .
In a skillet over medium heat (stove depending), stir butter, chopped onion, salt and pepper until the onion is tender, and appearing more translucent. 
 
*Slowly sift in flour, blending it in to the mixture as you go. 
*This will be the hardest part, because the mixture gets dry and crumbly, and it’ll really seem like you don’t need any more flour, when you still have lots to sift in. Just keep working with it. Add a little more butter if you feel you need to, but use at least most of your flour. Because remember, this is the base of your cheese sauce you’re about to make, and the flour adds to it’s thickness.

Next, and not shown in photos, once the flour is all mixed in, remove from the heat and slowly pour in your milk, stirring as you do.
Place back on heated burner, stirring constantly, and bring just to a boil.

 Remove from heat again, and add all of your cheese cubes.  Stir immediately, and place back on heated burner.
Continue to stir until all of the cubed cheese is melted.  (Don’t confuse the other lumps with your onions. 😉

— This is a good time to preheat your oven to 375º. —

Cheese sauce will be nice and smooth.

Pour all of your cheese sauce into your pan of pasta.
Scrape out every last bit, and mix with the pasta well.

Pour all of macaroni and cheese mixture into an ungreased 1-1/2 or 2 qt. casserole dish.

(Seen in photo above is a 2 qt. casserole dish.)
Then sprinkle the crushed crackers all over the top, covering it well.

Bake uncovered at 375º for 20 minutes.

Look at that!  Creamy and cheesy and soooo good, you can only imagine, until you try it!
Serve, enjoy and be ready for rave reviews!
This dish also reheats well. (If you have any left.)

The buttery Ritz crackers have a slightly sweet taste in complimentary contrast to the slightly spicy macaroni.
The heat does build in your mouth some as you eat. But we don’t mind.  😉

Hope you love it as much as we do! 

CLICK HERE FOR PRINTABLE RECIPE

~ Laura

* * * * * *

Please come follow me here and there:

Save


Save

Filed Under: Main Dish, Recipes, Side Dishes Tagged With: comfort-food, homemade-baked-macaroni-and-cheese, homemade-macaroni-and-cheese, jalapeno-jack-and-cheddar-macaroni-and-cheese, macaroni-and-cheese-recipes, main-dish-recipes, pasta-dishes, recipes, side-dish-recipes, spicy-macaroni-and-cheese-recipe

Tropical Popsicles

July 1, 2013 By Laura 2 Comments

Popsicles are just necessary for kids in the summer time. Don’t you think?  It’s right up there with swimming or sprinklers, catching lightening bugs in jars, and camping.  Our kids actually made these fruity ice treats themselves, and had so much fun making them, as much as they did eating them!  I have to confess though, that I’m not sure how legit it really is to call them tropical. They are truthfully partly tropical though!  And well, the word tropical just went so well with popsicle, that I couldn’t pass it up. (Please forgive me!)

Anyway, I have always wanted that Zoku popsicle maker by Williams-Sonoma, that freezes popsicles in like, 7 minutes.  Have you ever seen it? But for one thing, it only makes 3 at a time.  That’s a problem with 4 kids. And I figured, how urgent can popsicles be? (Now if it made chocolate….I do see the urgency in that sometimes.)  It’s good for my kids to have to wait for things they are looking forward to. I think we have enough instant gratification in kids’ hands these days. Don’t you?

What I did get are these fun popsicle molds at Wal*Mart. They are typical molds, except they have a great catch tray for the dripping, and a built in straw tunnel to suck it up!  As a kid, I could never stand the stickiness of popsicle juice on my hands, and the design of these really helps cut the mess. I love that, and the kids think they are great too.

Making our own popsicles is a great option to me most especially, because [Read more…]

Filed Under: Recipes, Treats Tagged With: fresh-fruit-popsicles, homemade-popsicles, kiwi-mango-orange-juice-popsicles, popsicle-recipes, popsicles, popsicles-molds, popsicles-recipes, strawberries-mixed-berries-grape-juice-popsicles, summer-treats, tropical-popsicles

Chicken and Salsa | Super Simple, Super Delicious | Slow Cooker Recipe

January 21, 2013 By Laura 1 Comment

I’m about to rave about this meal, and I have countless reasons why.  It’s been a favorite of our family’s for quite some time now.  We all really love it.  When we have a very busy scheduled day, this is most always what I plan for supper, because it’s that easy and fast, to prep any of it.  Like, ridiculous. Especially for the amazingly delicious meal that it is.  It can actually be made and ready in 2 to 2-1/2 hours cooked on high, if you’d like. Or, you can let it slow cook all day. Either way, it’s super quick, easy prep-work, and pretty much ready to eat when you are.

Here’s a few other reason why I love it:  You don’t have to handle raw chicken at all!  I don’t know about you, but I’m just not particularly fond of touching raw chicken.  I will, and I’m not real freaked out. But I’d rather not if I don’t have to. And with this meal, I don’t have to!  It  is sooooooo good, and it’s so healthy too!
It has 4 out of the 5 food groups in my book:  protein, vegetables, grain, and dairy.

You need a slow cooker of some kind. So I hope you have one.

This is the slow cooker we have. It’s a GE 6 Qt. Digital Slow Cooker, and I LOVE it. It holds enough to cook at least 2+ full meals for our family of 6.
The container lifts right out of the heating element, to be put on the table, and it’s super easy to clean as well.

So many different bursting flavors, with every bite.

Let me show you how easy this is to make.   Even the ingredients are minimal.
Chicken breasts, a jar of salsa, brown rice, and shredded cheese.

The pre-packaged chicken is our trick.  There are 2 breasts in each wrapper. Just cut open the end of each package with scissors, drain the excess water, and dump the chicken into the slow cooker pot. We make up to 8 breasts at a time, for a batch that last for at least 2 family (of 6) meals, and usually more still left over. The 2 breasts in each wrapper are sometimes attached to each other, so I just use a fork and make sure they are all open and spread well in the pot.


Then you just cover all of the chicken in salsa!
Now, just because I have my little ways of doing things, I actually put a little layer of salsa all over the bottom of the pot first, put in the chicken, and then pour the rest of the salsa over the top.
But that’s it!

Then I set the slow cooker.  I can set it to low, and let it cook for 5-6 hours or whatever. Or if it’s a last minute idea, the chicken will pretty much cook in 2 or 2-1/2 hours on high.
Now here’s an extra step that I personally do, because I want the chicken as flavorful as possible:  As soon as all of the chicken is cooked (it is so tender, it’s crazy), I take each cooked breast out at a time, cut it into chunks on a plate, and scrape it back in the pot.  Repeating for each breast until it’s all cut up.  Leaving it all simmering in there with the salsa just adds that much more tastiness.

We like to have this chicken and salsa over brown rice. (It’s healthier than white. We’re all about whole grains around here.) So here’s another speedy trick  . . .

Boil-in-Bag Brown Rice, in 10 minutes. No measuring!  We need 2 bags.
But gosh….could it be any easier? Take the bags of cooked rice out of the water, let drain for a sec, snip off the top, and dump it in a bowl. Done!


At the table, we each just sprinkle some cheese on top.  Because it’s just all so good together.

The chicken comes out so unbelievably tender, and so tasty with the salsa juices and bits of salsa vegetables. It’s perfect on top brown rice.
And the sprinkle of cheese on top makes a fabulous meal, even better.

I never really feel like I put any time worth mentioning, into making supper, when I make this meal.
And yet, we’re all around the table eating delicious food together, and talking about how good it is.
  Try it on your family, and let us know what the reviews are.
We’ll be surprised if you all don’t love it too.

* * * * * *

Please come follow me here and there:


Filed Under: Main Dish, Recipes, Slow Cooker Tagged With: brown-rice, chicken recipes, chicken-and-salsa, crockpot-recipes, easy recipes, easy-meals, healthy-recipes, main dishes, recipes, slow cooker recipes, supper-ideas

  • « Previous Page
  • 1
  • 2
  • 3
  • 4
  • …
  • 17
  • Next Page »

We are wicked happy to have you here! We hope you find much inspiration, help, humor and enjoyment here.


Archives


POPULAR POSTS

* * * * * *

SUBSCRIBE to House of Joyful Noise blog! Every new post, delivered right to your email box!


Privacy Policy

Amazon Affiliates

Never at any additional cost to you, we may earn a small commission for our endorsement, recommendation, testimonial, and/or link to any products from our website. Your purchase through our links helps support our family, while sharing with you the products we authentically use and recommend, for various ideas, and letting you know where you can purchase them. Thank you for your support!

[footer_backtotop]

Copyright © 2025 HouseOfJoyfulNoise.com · Genesis Framework by StudioPress