• HOME
  • About Us
  • {A}’s Chipmunk Training Archives

 Homepage

  • The Homestead
    • Home Projects
    • Home Improvement
    • Home Decor
      • Seasonal Home decor
        • FALL Home Decor
        • WINTER Home Decor
        • SPRING Crafts and Creations
        • SUMMER Crafts and Creations
    • Our Chickens
    • Gardening
    • Organization
    • Re-Purposing
    • Furniture Refinishing
    • Budget
  • Crafts & Creations
    • Seasonal Home decor
      • FALL Crafts and Creations
      • WINTER Crafts and Creations
      • SPRING Crafts and Creations
      • SUMMER Crafts and Creations
    • DIY (Do-It-Yourself) Project
    • Kids Arts and Crafts
    • Homemade/Handmade Gift Ideas
    • Holiday Crafts
    • Fan Pulls
    • Free Printable/Downloadable
    • Sewing Projects
    • Giveaways
    • Business Features
  • Recipes/FoodFun
    • Breakfast
    • Lunch
    • Main Dish
    • Sandwiches
    • Appetizers
    • Slow Cooker
    • On The Grill
    • Side Dishes
      • Soups
      • Salads
    • Baking
      • Breads, Rolls and Muffins
    • Snacks
    • Treats
    • Desserts
    • Drinks
  • Homeschooling
    • Elementary Homeschooling
      • Elementary Homeschooling READING
      • Elementary Homeschooling MATH
      • Elementary Homeschooling LANGUAGE ARTS
      • Elementary Homeschooling SCIENCE
      • Elementary Homeschooling HOME ECONOMICS
      • Kids Arts and Crafts
    • Middle School Homeschooling
      • Middle School Homeschooling SCIENCE
      • Middle School Homeschooling HOME ECONOMICS
    • Language Arts
    • Math
    • History / Social Studies
    • Geography
    • Foreign Language
    • Field Trips
    • Games
    • Nature Study
  • The Big Picture
    • Life In General
    • Celebrations
    • Faith
      • Into the Light; The Series
    • Giveaways
    • Reviews & Sponsors
  • Photography & Lettering
    • Photography
    • truck lettering
    • vehicle graphics
    • Newborns
    • Kids
    • Engagement
    • High School Senior Pictures
    • High School Senior Pictures Sneak Peeks

Wild Orange Lip Balm – Recipe and DIY How-To

June 1, 2014 By Laura 8 Comments

I’m so happy I now know how to make our own awesome lip balm!  It’s all-natural, made right at home, and in our extensive experience and personal opinion, it’s the best lip balm we have ever tried. This one is Wild Orange; made with real wild orange essential oil!  And all kinds of other nourishing stuff that is so good for your lips. It not only feels good, it leaves a nice gloss.

You have no idea how much we are a ‘lip stuff’ kind of family.  4 out of 6 of us anyway. “Where’s the lip stuff?” “Mama, can I have the lip stuff in your purse?” “The lip stuff is almost gone!”  If we are running out, we start to panic a little.
It’s as important to keep in the house, as milk and bread. It’s crazy. We need our lip stuff!

We’ve been through many kinds of ‘lip stuff’ over the years. But our favorite we really got stuck on, was some we could only get at the Farmer’s Market, and only when that vendor was there.  It’s from a local bee/honey farm, and they have many products with their honey in it. Their lip stuff rocks. It was a tangerine balm. But, it’s not really easily accessible. So we’d stock up a little when we saw them at the farm market, at $3.75 each. Yikes! Worth it but, I always thought it would be nice to figure out a way to make our own, for less.

That day has come! And we don’t need to worry about running out.

To figure out what ingredients to use, I went by those listed on our last tube of honey bee lip balm, as a guide, and figured the rest out from there.
My little O helped me make these, and we had great fun making them! It was like science for her, but she always enjoys helping me anyway (as I enjoy her help…ha haha), and she loves anything that involves making something in the kitchen. (What a blessing it will be for her if that lasts her whole life long. Eh??)

In this post I am sharing exactly how we made these lip balms, so you can make your own too, just like we did!

It’s a recipe, DIY how-to, with **FREE PRINTABLE LABELS** I designed for your lip balms as well!

Our recipe makes 6 lip balms, just like this.
Ready to learn how to make your own?

Here’s What You’ll Need


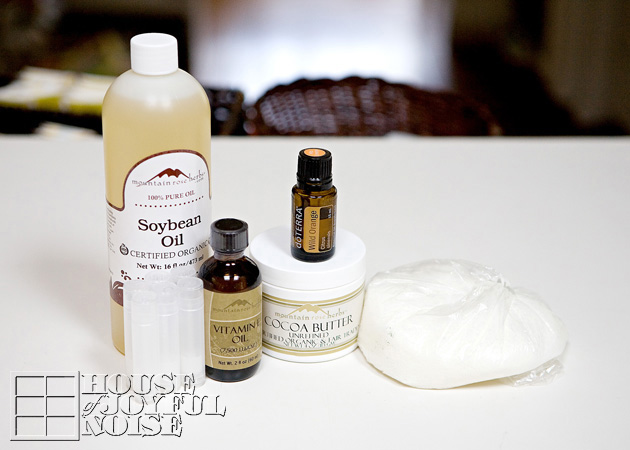
This is the Ingredients list.
You can find the following at Mountain Rose Herbs, using the search tool there:
(5-1/2 tsp) Soybean/Soy Oil
(2 tsp) Bees Wax Pastilles
(1/2 heaping tsp) Cocoa Butter
(1/2+ 1/8 tsp) Vitamin E Oil
6 Clear Lip Balm Tubes
(12 drops) *Wild Orange Essential Oil. (We use doTERRA).
* If you don’t know where to get Wild Orange Essential Oil, you can email us at TheRichardHome@aol.com and I’ll direct you to my shop.

HEY! – If you love these lip balms, you can also use the Wild Orange essential oil in our Wild Orange Sugar Scrub.
—

Equipment:  – A double boiler
– A stove top
– a glass dropper (or disposable pipettes?)

Here’s the How-To

It’s so simple, and so fun to make these lip balms! 
And it’s as easy as measure, melt and mix, and put in the tubes!

I did not take photos of the process with the double boiler because it’s easy enough to explain without unnecessary photos. (Even though I include unnecessary photos most all of the time in my posts, just because I like to take them. So who am I kidding, right? lol)  But my double boiler is just a pan you sit in the top of another pan of boiling water.  Got one of those? It would be a boring photo.

So get your double pans set up on the stove top. As you get the under-pan of water boiling, put your 5-1/2 tsp of Soy Oil in the top pan.
Once warm, add the 2 tsp of Bees Wax
Use a tiny whisk and get it melting.
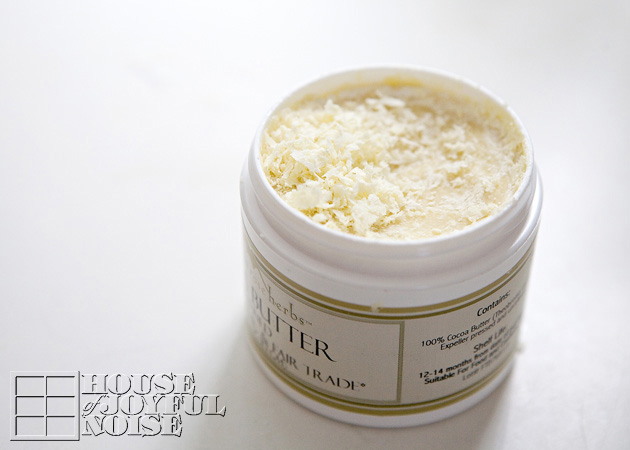
Next add 1/2 heaping tsp of Cocoa Butter.
This Cocoa Butter comes pretty hardened. So just take a spoon and scrape up shavings, until you have enough.
Add that your pan and whisk together.

Once the wax is melted and everything is blended, you can remove from the heat or simply turn off the burner, and add your Vitamin E Oil, which will be 1/2 tsp and then an additional 1/8 of a tsp, and then 12 drops of Wild Orange Essential Oil.

It’s important to keep the mixture in liquid form until you get your tubes filled. You can remove the upper pan as you work, but keep returning it over the pan of hot water if it begins to harden.  The mixture can be reheated to liquefy again at any point, if necessary.
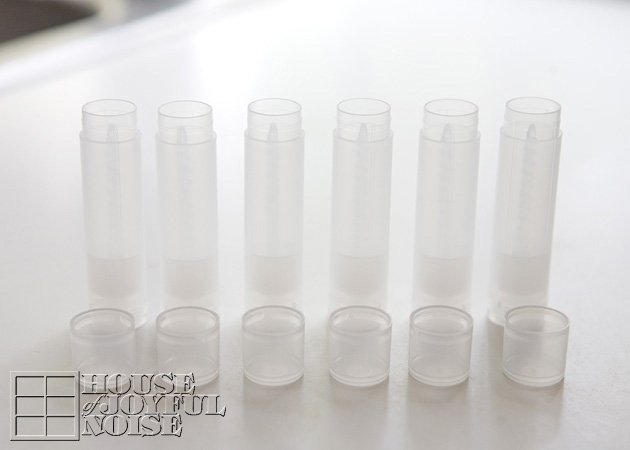
I had my tubes all lined up and ready to go.
I chose clear ones, because I’d like to be able to see how much is left in a tube as we use it.
–

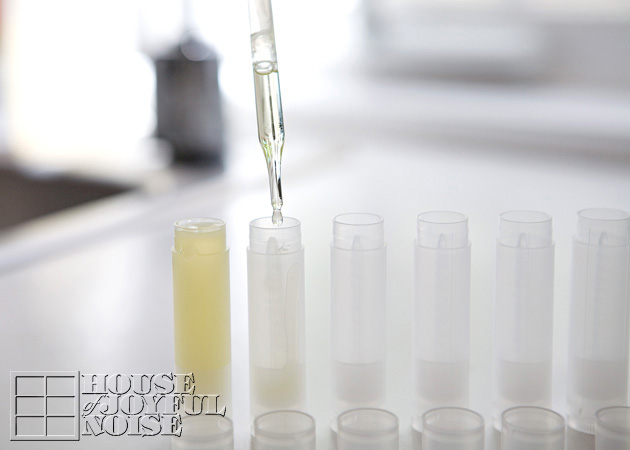
I used a glass dropper from one of our science kits, to extract the mixture from the pan, and fill the lip balm tubes.
–


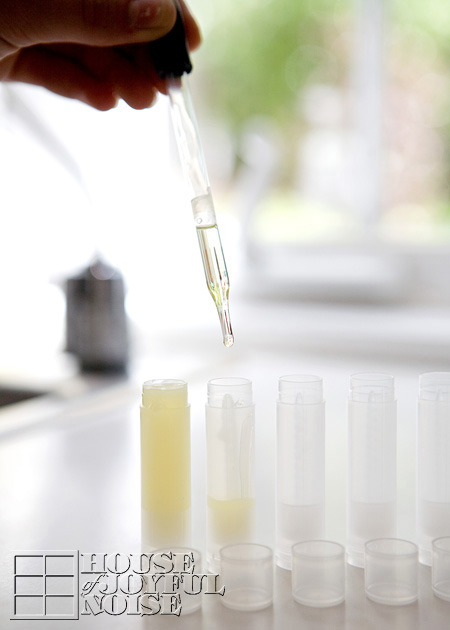
Work as quickly as you can (safely) and fill each tube to the brim with the liquid.
Then let them sit to cool and firm.

Clean-Up Tips

Meanwhile, you’ve got a pan and a dropper to clean! (Unless you used disposable pipettes – which I did not do. I don’t know if the mixture would be too hot for the plastic pipette? But if anyone tries it, come back and let us know how it works!)

To clean the pan, while it’s still hot, wipe any wax-liquid mixture out as best you can with paper towel. And then wash as normal.
To clean the glass dropper, I used pipe cleaners. That worked very well! But I wasn’t able to get every bit out. That’s ok, I’ll continue to use it for the same thing, as we make more lip balms.

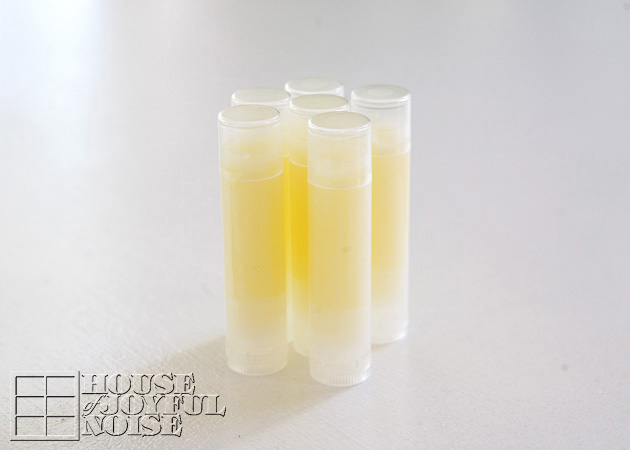
And there you have it!  6 awesome Wild Orange Lip Balms!
You can keep stocked up for yourself, or give them away as gifts.
I know we’ll be doing a whole lot of both!  Because these are so easy to make, literally costs you cents, and they are fun to give away as little tokens of love and care.

I even designed a label for them!  As seen below.
Just click on the big orange circle, and it’ll take you to a whole sheet of labels you can download and print right out.
It’ll look like this:

The printable sheet also lists the ingredients on it, with has simple directions as to how to put the labels on your tubes. (We secured the labels on with handy 2-sided sticky tabs. Love those things!)


 My oldest has requested Peppermint Lip Balms, so we’ll be making those, as well as more of these, very soon!
We hope you try making these yourself!  Please leave any questions you have below, or come back and let us know you made some and what you think!
ENJOY!


Save

Save

Save

Save

Filed Under: Crafts & Creations, DIY (Do-It-Yourself) Project, Essential Oils Tagged With: all-natural-lip-balm, diy-lip-balm, essential-oil-lip-balm, essential-oil-recipes, free-lip-balm-printable-labels, homemade-lip-balm, how-to-make-lip-balms, toxin-free-personal-care-products, wild-orange-lip-balm

My Art Style | Pushing Outside of my Comfort Zone

March 26, 2014 By Laura 8 Comments

For the past several months, about one night a week, a friend of mine comes over to play with me in the art studio.  It started out because she wanted me to give her watercolor lessons. But ultimately, I never could get quite comfortable in that role, and expressed it to her often, because honestly, she has some real skills herself, very different from mine. And I just felt like I had much to learn from her! Still, she continued to call it her lessons, until finally she realized that if we just called it having some creative time together, I’d settle in.  And I did.

One of wonderful things about spending time with her, is that she has a whole new perspective in seeing her art, which I find intriguing. She has a way with expressing what she is trying to accomplish in a piece she is working on, or in retrospect, where she felt she went wrong, and what she could have done better.  She enjoys the process of creating art, seeing where it takes her, and what she may learn along the way.  Furthermore, she is always content enough with how it came out, and grateful for the lessons she took away from it.

I have never been like that!

I tend to expect instant perfection from myself. I want to plan it right, and execute it right, right off the bat. And I want it to come out as perfectly as I see it in my mind. And if it’s not coming out that way, or I’m not happy with how it came out, well….it’s practically useless to me. And more shamefully, I see the whole process almost as a waste of my time and materials. 

Just imagine how that has hindered me over the years. Not only in productivity, but in an open willingness to experiment and learn. I am quite sure, that as a direct result of my demanding perspective, I have limited my productivity, and most certainly hindered myself from true growth as an artist.  Which is just SAD. And years I cannot get back.

The good news is, I have noticed that my friend’s healthy attitude and perspective practices, is rubbing off on me. I am trying to take this time with her, and any other time I can dig up, to just enjoy the process of art. As an artist should. And learn from it all I can, as I go, as well as when the project is complete.

Because of this, I am now growing as an artist, just a little bit so far, in my older years. I think that’s a really good, if unexpected happenstance, for me.

So today I thought I would share with you a bit of what my style has always been, and then how I have actually felt drawn lately, to styles that have never appeared to have been my own before, and am digging up the courage to experiment with them.

First, just a handful of samples of my work from my past.

These are all scanned photos. Some even scanned photos, of photos of photos.  (Did you follow that?) And I wasn’t always a professional photographer, so the exposure and color balance is not great on them. But anyway…. I am talking many years old artwork, here.  Some of it is almost hard for me to look at now, as I see mistakes and things I could have done better. But at the time I apparently was pleased enough with it.  And this awkward and humbling experience is an opportunity for me to grow as well. Right?

But my really intention is sharing these with you, is to show you what my style has always been. In my own words, I would describe my work as very tight, with an effort to make my subjects look as real as possible. That goal has always been what my style has been about.

Allow me to gush for a moment. This is a portrait of my nephew and Godson. To give you an idea of just how old this is, he just turned 21! So adorable. Michael and I always thought he resembled the actor Gene Hackman, in this photo. (Right, anyone?).  Anyway…..back in the day, as a freelance artist, I did a whole lot of large pencil and watercolor portraits, as client work. Approximately 22 x 30″, matted and framed.  Mostly pencil.  Possibly 100’s before and after this one.

–
This was a HUGE watercolor painting I did for our own kitchen, before we had any children. (Although I may have been pregnant with our first?) It was a serious painting project, that probably took me months to do.  It did hang it in our kitchen for years, and certainly served as a conversation piece at times, with guests.  I always liked most of the work here, except the very inaccurate perspective of the black and white tiles. I just couldn’t get that right. It was all to me more of an aerial perspective, but the tiles really tended to confuse the viewer I think. Which was usually me.  Painting the water puddles and droplets were my most challenging and favorite part.
–

This was one of my first watercolor portraits.  Working with the medium of watercolor in and of itself, has always been equally a joy and a challenge to me. I have always longed to work more loosely with the paint, and yet create work that, when viewed at a distance, really pulls together in a realistic way.  I would seriously consider myself a very amateur watercolorist, at best.
–

And yet I have sold many watercolor paintings. Including this one, I believe? I forget. This is Nobska Lighthouse in Falmouth, MA.   I did a few lighthouse paintings in my time. This photo of this painting was very underexposed, so the color to the true painting is not accurate.  Though in truth, nor was the painting accurate to the actual scene. Another challenge of mine:  mixing the the color I need, with the paints I have.

Anyway, the shingles on the roof are an excellent example of how tight I always worked, when really, there is a looser form to paint such things, that appear realistic, for which I have not even begun to master yet.  In conclusion, you have no idea how hard I would work, to replicate exactly when I was using as a reference. (Which was often from a photo given tome, or one I took myself.  I never took liberty to change anything from the reality, which I think is a real weakness in an artist.

OK, so back to the present.  Lately I have had an urge to create a more abstract piece of work. Which may quite possibly be because of the freedom it would lend me, when I have felt as of late, as I work in the studio with my friend, that I have lost any art skills I once had.
The style of abstract artwork is an area I have never even remotely been interested in. Not as a an artist, or a viewer. I have always somewhat liked mixed medium kind of artwork, but have never done such a piece of work myself.  But in the past couple of months, an idea/visual of such a piece has begun to take shape in my mind. Something very much layered, and of mixed medium. I have decided that although I have decided on a theme of sorts, and a general palette of colors I’d like to work with, I am not going to try to make the vision in my head so clear in detail before I begin, nor make an effort to create that vision exactly.

I really want to just enjoy the process of creating art.

These are just some of the materials I gathered, to work with. I have thought of many other materials since, that I may, or may not, incorporate as I go. I decidedly don’t know entirely, what I’ll use as I go. I’m just going to go with the flow!

I do know, that I will share it with you when the piece is done. Whether or not I like it. And I will not see it as a waste of my time, or materials.  For it’s my intention to just enjoy the process of creating it, and seeing what lessons I can take from it along the way, or in the end.  If nothing else, I will have grown from the experience.
And that alone, can often be the best piece of work, of it all.
– Laura


Save

Filed Under: Crafts & Creations Tagged With: art, art-abstract, art-realism, art-styles, artists, artwork, pencil-illustrations, watercolor, watercolor painting

Tips and Ideas for Card Making

February 9, 2014 By Laura 4 Comments

I thought I would share with you a little bit about making your own cards, today.  To be honest, I feel a little bit silly, because my sister is the real card-making whiz. And I’m, well….the one who most always forgets to even buy a card, and send it on time….to even those with birthdays in our families.  I’m flat-out awful about it. They’ll tell you.

But, last year I challenged myself to make sure I get a card to everyone, and on time, for at least a year from that point forward. I think I’ve managed so far! I’ve even made most of them, myself. Now that’s planning ahead. I’d be proud of myself, if it weren’t for all of the prior years I forget altogether.  I think if I patted myself on the back, someone might slap me. ๐Ÿ˜‰

My sister is awesome at making a whole bunch of great cards at once. She has files of ready-made cards, made with love, to just grab last minute.  There is always something fitting for any occasion, for any one.  We love her cards. I save them all. Plus she usually writes a little something that makes me cry.

I have a different style. I make cards one at a time, and I make them specifically for whoever I need one for. I custom make something I think they’ll like. Or they they will anyway.
I have fun with it. Like a little art project.

I thought I’d share with you some of my tips, ideas and tools you might use, to make cards of your own.
Clockwise from the top left (in my studio): 
1. I have a basket of blank cards and envelopes, in a few different colors and textures, and in 2 different sizes.  Blank cards w/ envelopes can be bought in packages at craft stores, and they are very handy. It’s also an option to make your own cards, by folding and cutting to size card stock, in a variety of colors and textures. I do that sometimes as well.
2.  Another basket in my studio holds just some of the elements I have. Shown here are some specialty ribbons, colored strings, tags, and flat gems.  Seen in the back, as more ideas, are washi tape, and striped baker string. You can also use stickers, embossers, or die-cuts. I love working with elements on my cards, to add those special little touches.
3. I highly suggest a Fiskar trimmer. I just find them so quick and easy to work with, for cutting paper to size and trimming. I have a cutter in 2 sizes, and I use them super-regularly in crafting.
4. Sticky-tabs!!  It doesn’t matter what brand you get. But these little 2-sided tabs come on a roll in a box like this, and I use them as an adhesive when working with paper or photos. They are so convenient, mess and hassle-free. My kids love using them when doing their own crafts too, as evidenced by the little blue peel-offs I find here and there that I didn’t leave. ๐Ÿ˜‰ 
–


Rubber stamps are very useful in card making!!  I have…a LOT. My sister used to be in the Stampin’ Up business. So I have bins of sets. You can get really creative with stamps like these, just stamping with different colored inks, or really getting into it with embossing powders.
I have struggled with the flatness of the stamp look though, when just working with ink.

So I tend to get coloring, because I love to color!

Colored pencils are so much fun to use, with rubber stamps.  By deciding which direction light might be hitting your subject (such as my octopus and sea horse above), and coloring lighter where light may be hitting more, and harder where the areas would be more in shadow, you can really take your flat stamped art to a more dimensional look.

So this card was created for my Goddaughter, with a blank white card and envelope, rubber stamps, white card stock, colored pencils, some aqua textured cardstock, and washi tape. ‘Happy Belated Birthday’ was a stamp, and I free handed ‘Julia‘ and the word ‘Crabby‘ to match the same letter-style as the stamp. And just wrote the rest of the message in regular printing. So the little sea creatures were stamped on separate card stock, trimmed to a rectangle, and then mounted on slightly bigger aqua rectangles, to kind of frame it. Sticky tab this, to this, to this. Voila! 

The image of the card in the upper right is sitting on the envelope, which I stamped with the starfish. See it?  I addressed it right next to that star fish. I think it’s fun to pull out mail from the mailbox and see a decorated envelope. I always imagine it makes the mailmen/women smile too.

Part of the fun for me, of making cards, is trying to come up with something clever or witty to write inside. Trying is the key word there. No one else may think I’m very funny, but I promise you, I’m laughing and really enjoying my own jokes sometimes, making cards. ๐Ÿ˜‰    I’ve always said, “Nobody thinks my jokes are funnier, than I do.” True story. I amuse myself more than anyone else.
–
This was for my mother-in-law/Grandma. That’s her on the front. ๐Ÿ˜‰  Another rubber-stamped card (using the set seen near the beginning of this post). On this one, I stamped right on the card, except for the message inside and out, and colored. The pink polka-dot wash tap is along the side of the inside of the card only. But I trimmed the front/cover side of the card off to reveal that element, even when the card is closed.

I used the trio of pink flamingos stamp twice, so there was a family of 6. That would be us, who the card was from. We all signed the card next to ourselves. ๐Ÿ™‚ 
The envelop was also stamped and colored. (See left photo.) 

When Michael was talking to his mom on the phone, he asked her if she got her card. She had to think about it, and then said she wasn’t sure…she couldn’t remember. So…either it was forgettable, or it never got to her. But the thought was there, she got a call anyway (and us singing!), and I had fun making the card. For whoever got it. lol
–

This one was for one of my teen nephews. I just wanted to keep it boyish.  The elephants were stamped. Although my sister-believed I illustrated them myself, because…..well, she knew I could.  But why? When I have the stamp? LOL.  I did color/’paint’ it though….with chalk!  That might have been a bit crazy. And time-consuming. But again, it was all fun, and specially made for someone I love. The dirt clouds around the elephants were specially fun, and the chalk was a suitable medium to work with, to create that. The ‘Happy Birthday’ was stamped, and I hand-matched the exclamation point, which I punctuated with a hand-hammered rivet. (More fun elements to work with!).  I ‘hung the tag, with his name hand-drawn on both sides, off of the rivet. The string was actually hammed in there, to stay.  
I gave the card a quick fixing spray when I was done.
–


This one was for another nephew, who is an avid, very serious, very good, hunter. I really planned this one in my head.
Now, you’d think with all of my paper stock, I’d have some kind of camouflage patter, or any kind, right? No. So I decided, to pick a background color, and just cut out those weird random shapes, in the other colors, and layer it together. I used glue this time.
His name I stamped, and that star is another fun rivet! 
The inside: card stock, tissue paper, washi tape, and hand writing. Again, I was too-amused with myself.  But I totally had to Google and research, what a ‘sight’ mark might look like. I’m probably not even using the right terminology. But hopefully he could tell I put some real love in it. Although, it was from all of us.
–

My niece is very much into sports; basketball being one of her favorites. Can you believe I had basketball skin stock?  I did. So I cut a circle out of it that would fit on the front of her card. Loved that I had orange striped baker’s twine to work with too. And washi tape that complimented well enough too. I often use a piece as a seal on the envelope. (Well, I lick it too. For security-paranoid purposes.) I think it’s another nice touch.

I could not even believed I pulled off drawing the basketball lines and name with permanent markers. Her name is in the Wilson band letter style. ๐Ÿ˜‰  (Had to tell you in case it wasn’t good enough to notice.  Ha haha.)  This is the little free-hand thing (the ball)I did that and I walked room to room, showing everyone in my house, and the kids totally ‘checked’ me about boasting. < Insert eye roll here. >
I shared about that on our blog’s Facebook Page, in case you missed it.


Post by House Of Joyful Noise.

Hope the ball makes up for the lame joke inside. : [ . 
–
Next!

Lastly, for today, a card I made for my sister. I have an eyelet edge punch, which I used all over this card, as well as on the edge of the envelope flap.
All hand drawn I think…copied from that stamp. The pretty decorative paper along the bottom of the inside of the card, was shown when closed too, by making the front of the card trimmed smaller, like before.

My sister and I share a birthday. Did you know that? We do. (I won’t say she’s the older one, this time. ๐Ÿ˜‰  ) So on the inside, I said something like….
“If all of your birthday wishes come true,
Then all of my wishes will have come true, too.”
–

So…..there are just some of the cards I made during my self-challenge here. I did make a few others and mailed them out, forgetting to photograph them. And even some of these photos were just taken with my phone, because I hadn’t thought of making a blog post and sharing them with you all at the time. So, the photo quality varies, and I apologize about that.  But I do hope you enjoyed this big share, and I hope you feel inspired to make some custom, personalized cards for others as well.

You can do this card-making thing! 
Fold, stamp, color, sticky-tab, ….it’s all fun you need to get in on!

Save and share the card-making love!  PIN this on Pinterest and be sure you are following us there!
Thanks for coming to hang out with me today.
– Laura

Save


Filed Under: Crafts & Creations, Tutorial Tagged With: card-making, card-making-tips-ideas, custom-card-making, elements, how-to-make-your-own-cards, rubber-stamps, supplies-for-cardmaking

Printable Valentines (free): Crazy Straws, Socks and Guitar Picks

January 17, 2014 By Laura 1 Comment

 Last year I designed some last-minute valentines for my kids to give to their friends, that go with a fun little ‘extra’, most of which can easily be found at a dollar store.
I think they are cute and clever. Although I have always said, “Nobody think my jokes are funnier than I do.”

This year I am offering them to you as free printables.  Aren’t I nice? ๐Ÿ™‚  You will see that there is room for your child to write their friends’ names, after Valentine and before the comma, as well as a space for them to sign their valentine in the bottom right hand corner.
The link to the printables will be available at the end of this post.


I found fun kids’ sock in different sizes at the dollar store. They came as 2 in a set (different patterns), for $1.
These would be for girls, but….


….they also had some sets for boys.
We attached the socks to the valentine card using colorful paper clips. 
Worked like a charm. Or, a paper clip.  But with socks.
–


This valentine was designed to hold a crazy straw.  All you need to do is cut a slot at each heart, and insert the straw.
A while pack of straws can be bought for $1 also at, of course, the dollar store.
–


This is the perfect valentine for any little friend who is a budding musician of any kind!  If they have an appreciation for music, they’ll have an appreciation for this valentine.
I picked up the picks at a local music store.  They were for coin change.
We just stuck the pick on using a 2-sided sticky tab.

 If you like them, they are all yours!

They come 2 on a sheet for easy printing of a standard sheet size of 8.5″ x 11″ of heavy stock paper. Just cut along the center line for two!
So the individual valentines are about 8.5″ x 5.5″.  Yes a little large, to accommodate the socks and straws.

>>>>>>  You can get all of these printables HERE. <<<<<<

Click on the one you want.  Then look for options for actions, download to your computer, and print them from there.
(Any problems, please let me know in the comments, and I’ll see if I can help you.)
You can also share this offer on Pinterest or your other social networks for me, using the image below.


ENJOY! 


Save

Filed Under: Crafts & Creations, Free Printable/Downloadable, Holiday Crafts Tagged With: budget-valentines, cheap-valentine-ideas, crazy-straw-valentines, free-valentine-printables, free-valentines-day-cards, fun-free-kids-valentines, music-valentines, socks-valentines, valentine-ideas, valentines

A Wind Chime from the Seashore

December 8, 2013 By Laura 2 Comments


Today I am sharing with you a craft project that was a true labor of love. Or….I should rephrase that: It was labor, in the name of love.  This wind chime made with sea glass was a Christmas gift we all wanted to make for Michael’s mother/Grandma last year. I was so excited about it. It was only once we got going and invested time we didn’t want to write off, that we realized it was not going to be a quick gift-making project, by any means! But, it was a gift of love and so, it would be worth it.


Here it is all done. Photographed last winter, before packaging it up and shipping it off.
It’s an idea I actually borrowed from my always clever and creative fellow bloggin’ friend Angie of The country Chic Cottage.  When I saw hers, I just loved it, and thought it would make a nice gift for my mother-in-law who lives in Florida part of the year. In the end, I am sure Angie’s took a lot less time to make, because she managed to find some nice, big flattish pieces of sea glass to work with. And frankly, I just like hers better.

All we could find were glass sea glass rocks; just bulkier and impossible to work with as her tutorial went. So we had to improvise. Big time. And thus put a lot more time into it. BIG TIME. 

The supplies needed were two embroidery hoops; a bigger and smaller one, lots of sea glass in various colors, jute string, E600 or some string glue, and in our case some silver-plated copper *wire and a set of needle-nose pliers. (I forget if the wire was 18 or 22 gauge; but it needs to be pliable enough to really reshape and work with well.)

My post here is not a tutorial by any means. I didn’t take photos along the way for that, as my hands were busy doing tedious work in late hours of the night. And I sure cannot tell you all about how we made it exactly because, for gosh sakes, it was last year!  My memory skills leave much to be desired. Such as, remembering things. And I struggle with recalling yesterday morning. 

Anyway, no one in their right mind would take the time to make this lovely wind chime our way, with this bulky sea glass. So if you’d like to make one, I’d recommend finding big sea glass with big flat surfaces, and make it the way Angie did. Unless you just like the fine art wire-work on ours. ๐Ÿ˜‰   I do think it adds some fancy.


We tied a knot everywhere we planned to put a piece of sea glass. But since tying on and gluing the rocks to the jute was not going to keep them secure enough, we used wire as well.  We took a long pieces of cut wire, laid each over the front of the sea glass (with the back being glued to the jute where the knot was), wrapped it around to the back, twisted it a couple of times over the knot placement, and brought both ends to the front again. Then using the needle nose pliers to create nice designer curls with the ends.
–


Now do you see those kinks in the wire, here and there?  That’s from tightening everything up to make the glass nice and secured, once it’s all wrapped and curly-cued. By taking the tips of the needle nose pliers, grabbing the wire in a suitable place, and giving it a little twist, we’d get this kink that gave it even more of an artistic element, and also made everything tighter.
–


We did actually really like the look of the wire work, since we turned it into art. But it was truly hours of work, for such a simple gift, that really did look homemade in the end. (Not saying that with any kind of pride.)   ๐Ÿ˜‰

As I said earlier, it was from all of us for Michael’s mother/my mother-in-law/the kids’ grandmother. (I wanted it to be really nice!) And it was a collaborative effort among us all. The kids went shopping with me and got everything we needed. They also picked out all of the pieces to use out of our batch of sea glass, and helped with other little tasks.  But Michael and I did all of the gluing, and especially the wire work, for 2-3 hours every night, until it was finished. 

When all was done, it took so long, this Christmas gift for our loved one was belated!  When Michael happened to be talking to his mother on the phone, he told her that her gift was going to be late, because we were still working on it! 
–

She did receive it shortly thereafter Christmas, and called us with many expressions of gratitude.
I think she realized how much work we really put into it, and she even convinced us that she loved it. ๐Ÿ˜‰  I’m not sure it really chimes per say.  It takes a mighty wind for those rocks to hit each other. But when they do, it does make a pleasant and interesting sound. I just wouldn’t describe it as, you know, chime-y.  Of course, it’s also decorative for her deck or yard.

We realize that some crafts are just going to come out better than others. We were going for something more like……well, like Angie’s!  But hey…..it was made with love, and received with love. And that’s always nice, no matter which way the wind blows.

Thanks Angie, for the inspiration!
And thank you all, for coming to see our wind chime.

Save

Save

Filed Under: Crafts & Creations, DIY (Do-It-Yourself) Project, Homemade/Handmade Gift Ideas Tagged With: nautical-gifts, sea-glass-wind-chime, seashore-gift-ideas, seashore-themed-wind-chime, wind-chime

  • « Previous Page
  • 1
  • 2
  • 3
  • 4
  • 5
  • …
  • 29
  • Next Page »

We are wicked happy to have you here! We invite you to connect with us anywhere you are, too!


SUBSCRIBE to House of Joyful Noise blog! Every new post, delivered right to your email box!

Archives

Find Us on Facebook

SuperWebTricks Loading...


POPULAR POSTS

* * * * * *

SUBSCRIBE to House of Joyful Noise blog! Every new post, delivered right to your email box!


Privacy Policy

Amazon Affiliates

Never at any additional cost to you, we may earn a small commission for our endorsement, recommendation, testimonial, and/or link to any products from our website. Your purchase through our links helps support our family, while sharing with you the products we authentically use and recommend, for various ideas, and letting you know where you can purchase them. Thank you for your support!

[footer_backtotop]

Copyright © 2023 HouseOfJoyfulNoise.com ยท Genesis Framework by StudioPress