• HOME
  • {A}’s Chipmunk Training Archives

 Homepage

  • The Homestead
    • Home Projects
    • Home Improvement
    • Home Decor
      • Seasonal Home decor
        • FALL Home Decor
        • WINTER Home Decor
        • SPRING Crafts and Creations
        • SUMMER Crafts and Creations
    • Our Chickens
    • Gardening
    • Organization
    • Re-Purposing
    • Furniture Refinishing
    • Budget
  • Crafts & Creations
    • Seasonal Home decor
      • FALL Crafts and Creations
      • WINTER Crafts and Creations
      • SPRING Crafts and Creations
      • SUMMER Crafts and Creations
    • DIY (Do-It-Yourself) Project
    • Kids Arts and Crafts
    • Homemade/Handmade Gift Ideas
    • Holiday Crafts
    • Fan Pulls
    • Free Printable/Downloadable
    • Sewing Projects
    • Giveaways
    • Business Features
  • Recipes/FoodFun
    • Breakfast
    • Lunch
    • Main Dish
    • Sandwiches
    • Appetizers
    • Slow Cooker
    • On The Grill
    • Side Dishes
      • Soups
      • Salads
    • Baking
      • Breads, Rolls and Muffins
    • Snacks
    • Treats
    • Desserts
    • Drinks
  • Homeschooling
    • Elementary Homeschooling
      • Elementary Homeschooling READING
      • Elementary Homeschooling MATH
      • Elementary Homeschooling LANGUAGE ARTS
      • Elementary Homeschooling SCIENCE
      • Elementary Homeschooling HOME ECONOMICS
      • Kids Arts and Crafts
    • Middle School Homeschooling
      • Middle School Homeschooling SCIENCE
      • Middle School Homeschooling HOME ECONOMICS
    • Language Arts
    • Math
    • History / Social Studies
    • Geography
    • Foreign Language
    • Field Trips
    • Games
    • Nature Study
  • The Big Picture
    • Life In General
    • Celebrations
    • Faith
      • Into the Light; The Series
    • Giveaways
    • Reviews & Sponsors
  • Photography & Lettering
    • Photography
    • truck lettering
    • vehicle graphics
    • Newborns
    • Kids
    • Engagement
    • High School Senior Pictures
    • High School Senior Pictures Sneak Peeks

Heart Strings / A Valentine’s Craft

January 17, 2011 By Laura 49 Comments

If brilliant colors make you happy, and you love fun projects, then this Valentine’s craft is just for you!  We’re showing you just how to do it, step by step today!

heart-strings-valentines-craft-30

While my home is not completely decorated for the upcoming ‘month of love’ just yet, I knew it was time to get to some Valentine crafting! I happened to see this craft from Martha Stewart Living, and was inspired to try it ourselves, with a spin or 2 of our own on it.  By melting crayons in between wax paper, and cutting out hearts, some very cute Valentine’s decor can be made!  That Martha is a clever one, huh? ( Or, her creative team – whatever. lol.)  You can make this craft as quick and simply. or as involved, as you choose, and I am going to tell you the ways how.

Supplies needed:

  • Crayons, with paper removed (This craft is a great way to use up those old broken crayon pieces!)
  • A sharpener with a fat hole.
  • *Wax paper
  • Clothing iron
  • Brown craft paper, or brown paper bags (Just a protection layer for ironing.)
  • Hearts stencils or cookie cutters (2-3 sizes is nice.)
  • Pen or pencil
  • Scissors
  • Scotch-like tape

*  DO NOT substitute parchment paper for the wax paper. It is not the same thing, as parchment paper has teflon in it.

Other optional supplies, depending on what you want to do with your crafts decoration:

  • White cotton twine and food coloring. (Simplified option:  thin ribbon in white or any Valentine color.)
  • A clothing hanger, or a long tree branch

I intended to hang our hearts once they were done.  So instead of using some satin ribbon (which is simple and faster, if you want to go that route), I had this vision of hanging our hearts on dyed string, that varied in color.  So, with a roll of white cotton twine, and some food coloring, this is how I did it:

heart-strings-valentines-craft

heart-strings-valentines-craft-1 
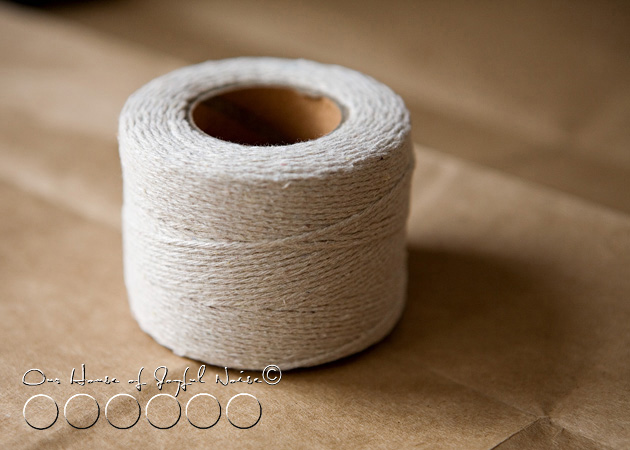
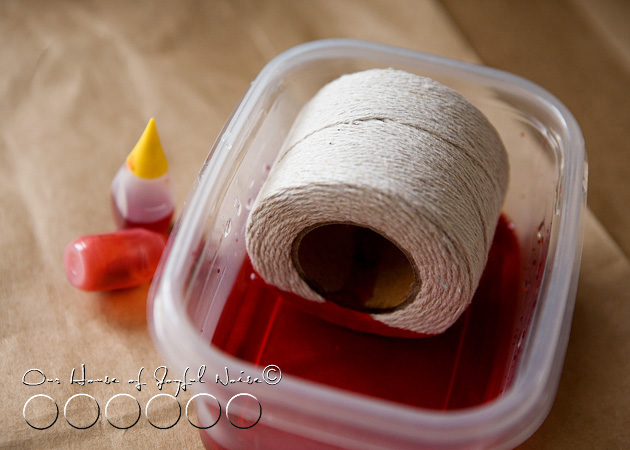
In a plastic container, I added some red food coloring to some water, deep enough to soak the roll on it’s side to the cardboard roll core. I just let it sit for awhile, while I did other things,  until I thought it soaked through all of the layers of twine.  Then, I made orange and yellow soaks as well, letting a different side of the roll sit in each.

heart-strings-valentines-craft-2 
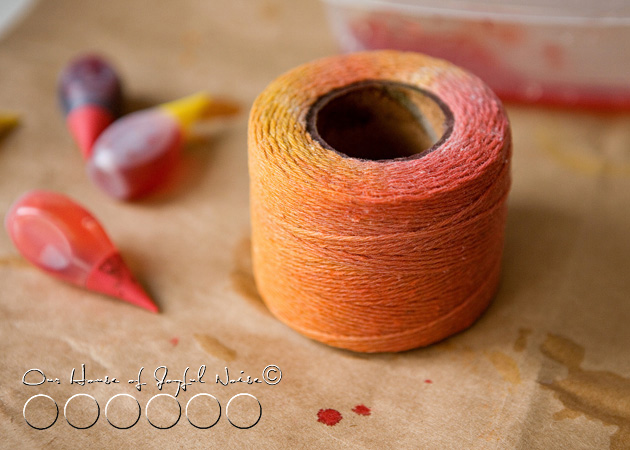
I loved the results!   How pretty is that?

heart-strings-valentines-craft-3

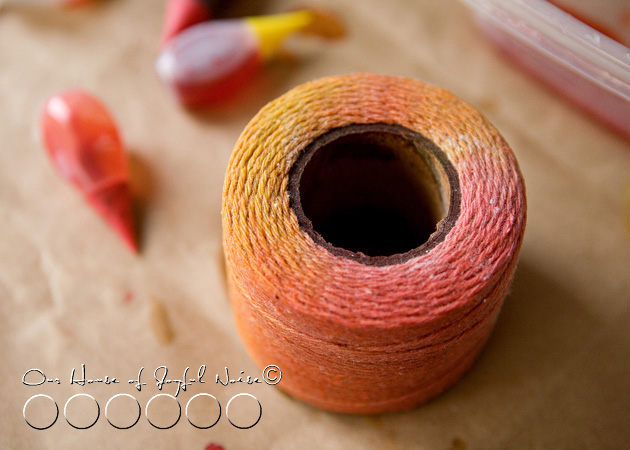
I knew as the twine was pulled off the roll, the layers would get lighter, but that too would only help the variations in the string colors.  Now, all of this string is not going to dry on the roll all the way through, any time this year, but that’s o.k.  You’ll be able to use the string damp just fine, and it’ll dry hanging.


heart-strings-valentines-craft-4 But while the string roll was soaking in various colors, the kids and I got to making our hearts.

heart-strings-valentines-craft-6

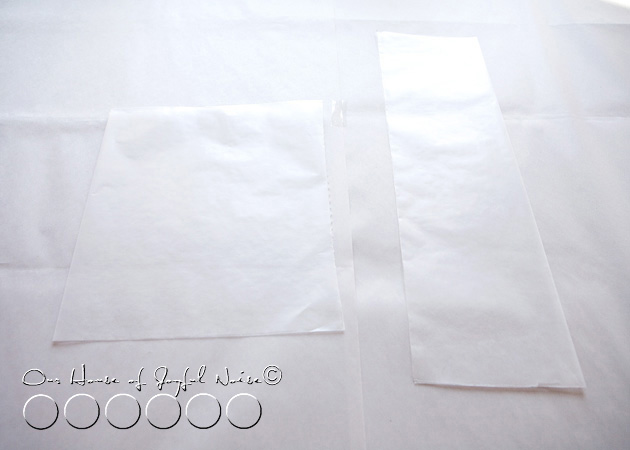
Pull off a piece or 2 of wax paper, fold in half to make a good crease, and then open back up. . . .


heart-strings-valentines-craft-5 
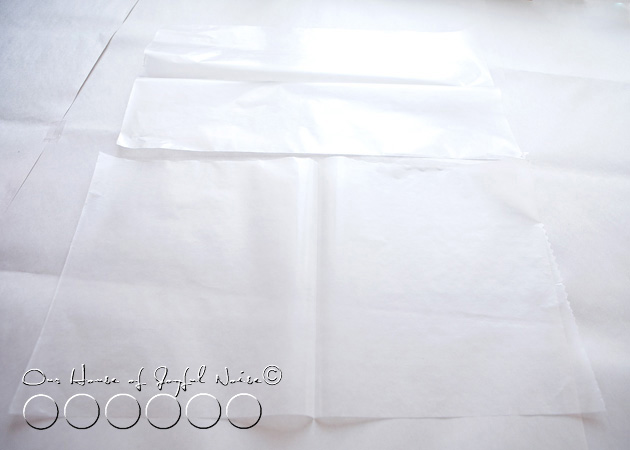
What size piece you use depends on how many hearts you’ll want to make.  Remember, you’ll only be able to get hearts out of one half, as it will be ironed together soon, with crayon shavings in between.


heart-strings-valentines-craft-7 
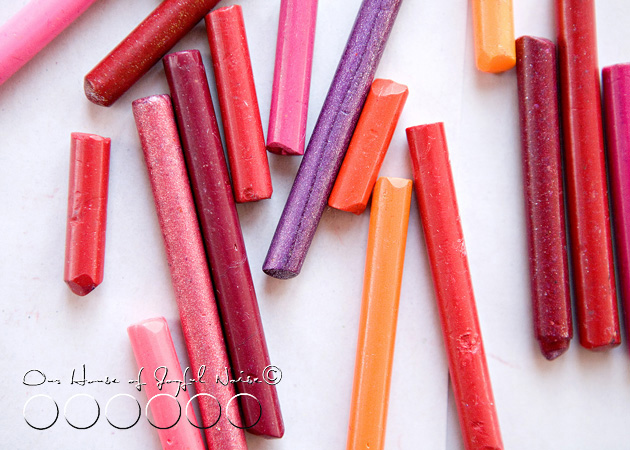
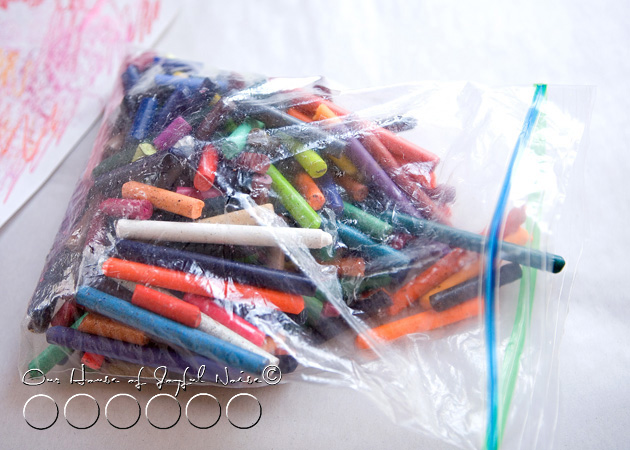
Grab your old peeled crayons, and start choosing some great colors for Valentine hearts.  No need to stay with strictly traditional colors, such as red and pink.  Try some purples, raspberries, and even oranges and yellows!


heart-strings-valentines-craft-8 
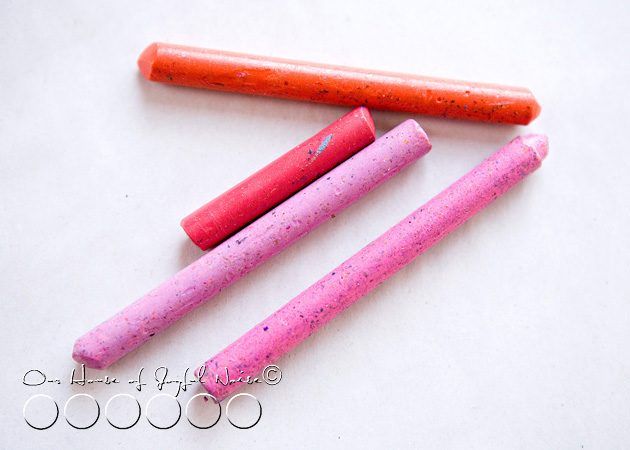
Now, if your old crayons have been kicking around together for some time, as ours have, they are going to have yuckity-doo-dahs all over them.  Even as a kid, with me and my sibling’s bottomless bucket of crayons, I hated this.

So because I have had particular issues, long before I was a blogger, I have had a trick for this crayon problem.  And since you came to this blogger with issues blog, I’m going to share it with you.  : )


heart-strings-valentines-craft-9 
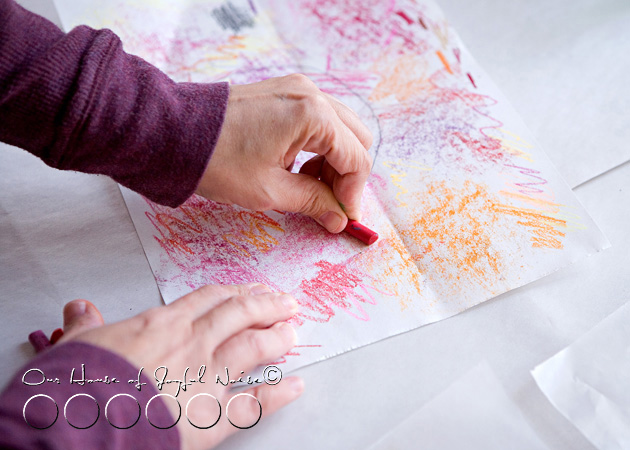
Just lay the crayons down, one by one, on some scrap paper, and rub the yuckity-doo-dahs away!  I found this is also a good way to test what the color really looks like!!  Some crayons when used, do not look anything like the shade of the actual crayon!  So deceiving.


heart-strings-valentines-craft-10 Old crayons, like new:  Yuckity-doo-dah free!


heart-strings-valentines-craft-11 
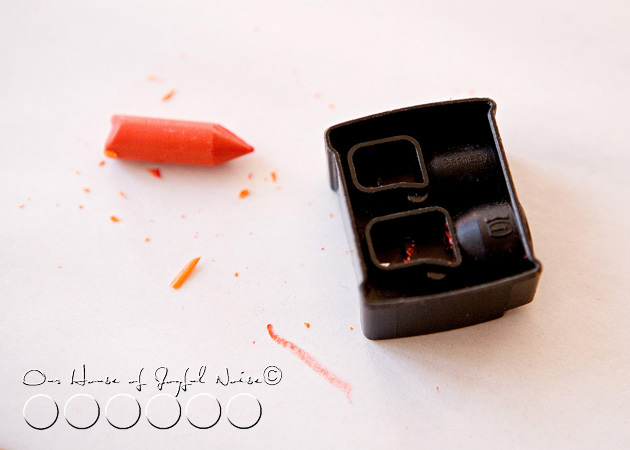
To make crayon shavings, you need a sharpener of some kind.  Our little hand pencil sharpener did not have a hole big enough for a crayon, so we used my make-up one!  Thanks Lancome!

Now….you’ll need to iron on your table or other flat surface, so I highly recommend putting down some crafts paper to protect your surface, from both melting crayon, and the heat from the iron.

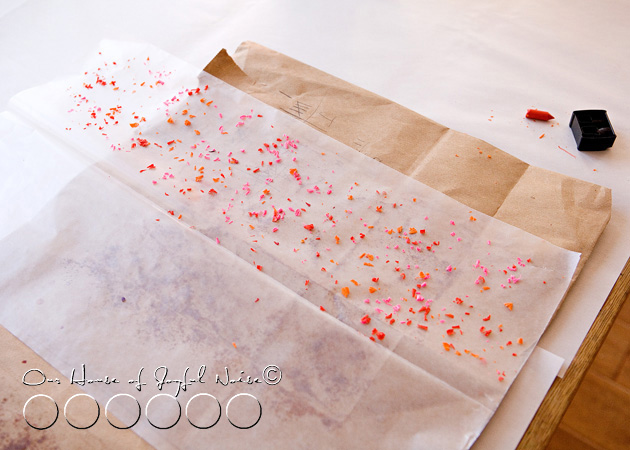
On top of the protected surface, lay your open wax paper pieces.


heart-strings-valentines-craft-12 
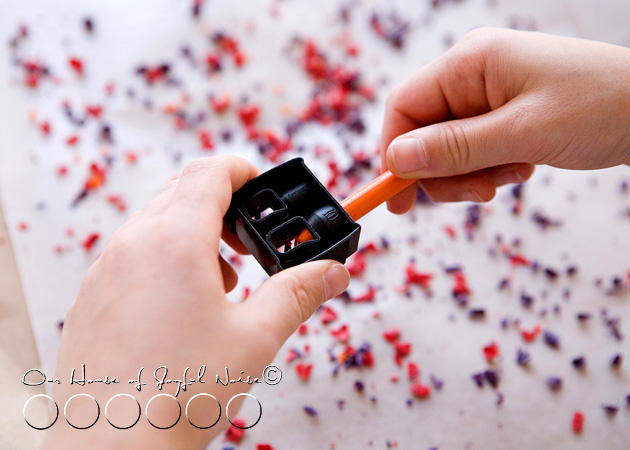
Over only one side of your wax paper piece, sharpen your crayons and let the shavings fall onto the paper.  Each of my our kids did their own, and had their own unique colors combinations, which was going to make for a nice variety of colored hearts.

heart-strings-valentines-craft-13 
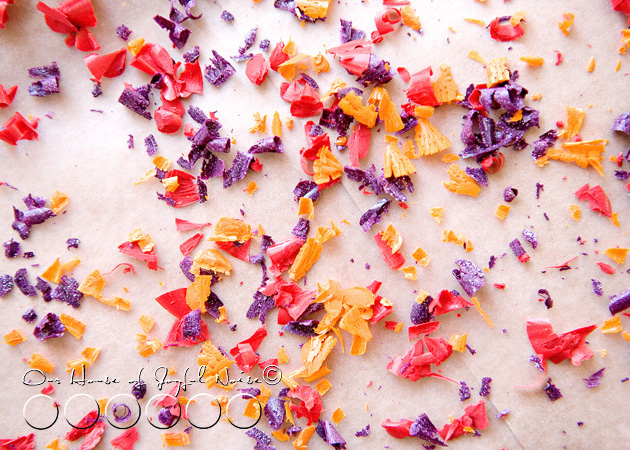
Some of our crayons were metallic ones!!  So that was adding a whole new element of pretty!


heart-strings-valentines-craft-14 Make sure you cover the whole side with shavings pretty well.  Brush any pieces in from the very edge though.

heart-strings-valentines-craft-15 
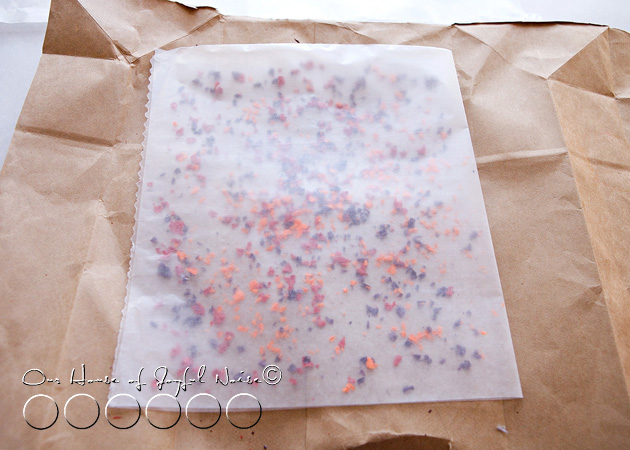
Fold over the empty side of wax paper, onto the side with the shavings.

Now, Martha’s directions say to fold up each open side some, to keep the melting crayon in.  But, I didn’t want to waste any space, as we wanted to make lots of hearts, and some on the bigger side too.  So….I just made sure I was working on my brown paper bag.  (We also had other craft paper taped to cover our surface under that.)

heart-strings-valentines-craft-16 
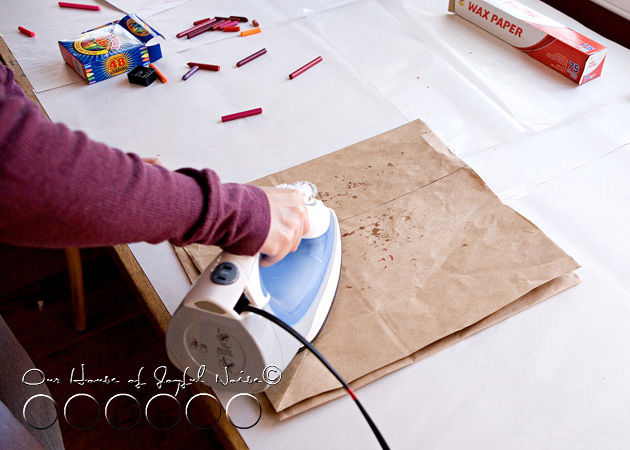
Now, after putting brown paper on top of your waxed paper and shavings, you can start ironing.  What setting?  Good question!!  See, Martha said on a ‘medium setting’.  But guess what?  Our iron doesn’t have a medium setting!  So I set it between silk and wool, ; )  …. and adjusted the heat up or down from there.

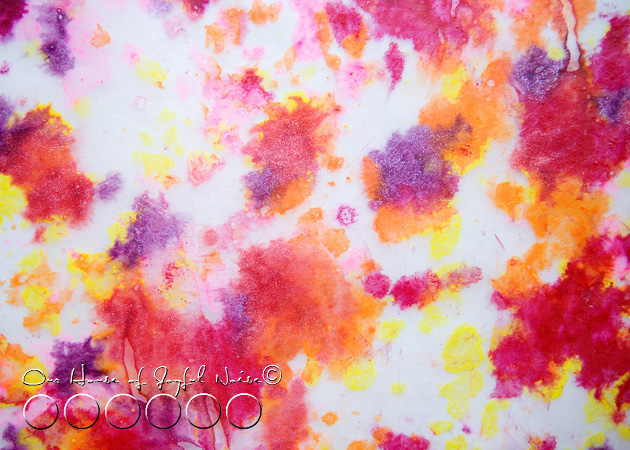
As you can see, some oils from the crayons may seep through the wax paper and the brown paper.  It doesn’t cause any problems. Just make sure you clean the surface of your iron off when you are done with this craft, so it doesn’t transfer to your clothes!  What a hot mess that would be!   (Note to self:   Clean surface of iron from crayon craft!!)  (By the time I decide to iron an article of clothing, I’ll have forgotten I ever did this craft with it.)

As you iron, you’ll want to keep peeking,  to see if there are more shavings that still need melting in areas.


heart-strings-valentines-craft-17 
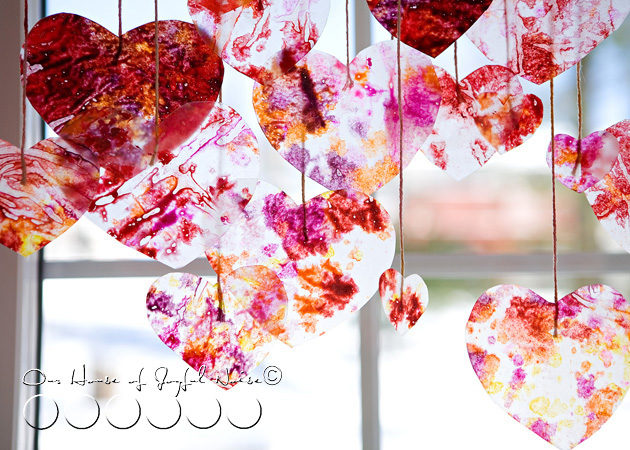
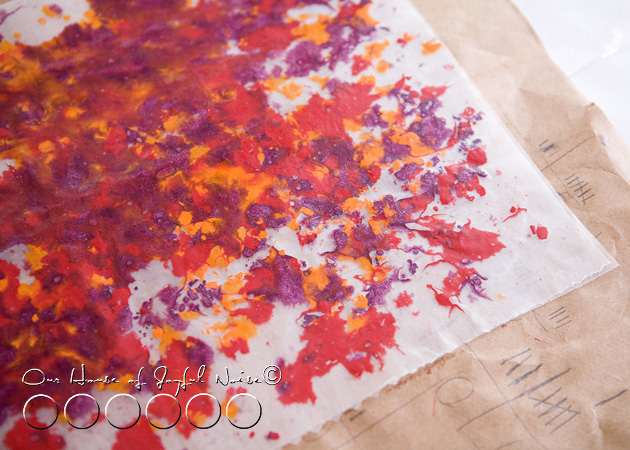
Heavy in crayon wax…..but nice!!


heart-strings-valentines-craft-18 
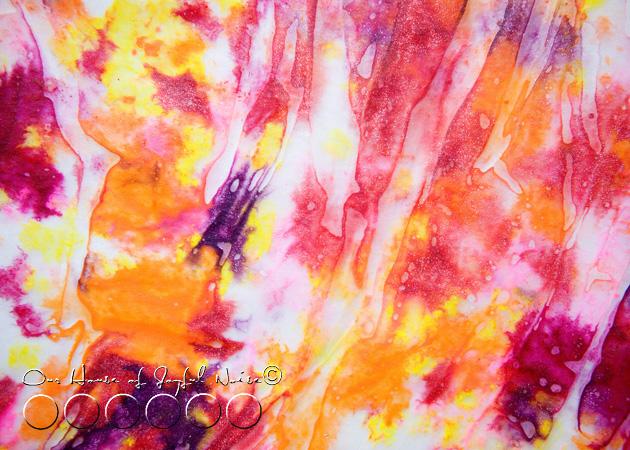
The next kiddo went with a lighter layer of shavings, for a new effect.  Or, his hands just got tired from sharpening the crayons.


heart-strings-valentines-craft-17 They were looking good!!  Just holding each of them up to the light, I could tell this was going to look super cool when we were done.

heart-strings-valentines-craft-18

I couldn’t wait to see what this one was going to look like, all melted.

heart-strings-valentines-craft-21 LOVE!!!


heart-strings-valentines-craft-22 Now, you may notice some bubbling or wrinkling in areas.  I’m not sure why this happened sometimes.  I was guessing maybe it was too much heat at times.  But since this was a fun crafts class, and not our Science class, we weren’t going to waste time running tests, to figure it out.  We decided it was a cool effect, and embraced it.

Next, came tracing hearts onto our waxed pieces, and cutting them out with scissors.

heart-strings-valentines-craft-19 We used simple heart shaped cookie cutters that we had, in 3 different sizes.  Just trace them using a pen or pencil, and then cut out on the heart shaped line.  I used a pen, and because I was using it on wax paper, it wouldn’t really write, which I preferred anyway.  I was able to see the tracing indention well enough to cut, just by tracing it a couple of times.    * I did not take photos of tracing and cutting.  I have faith you get the picture.

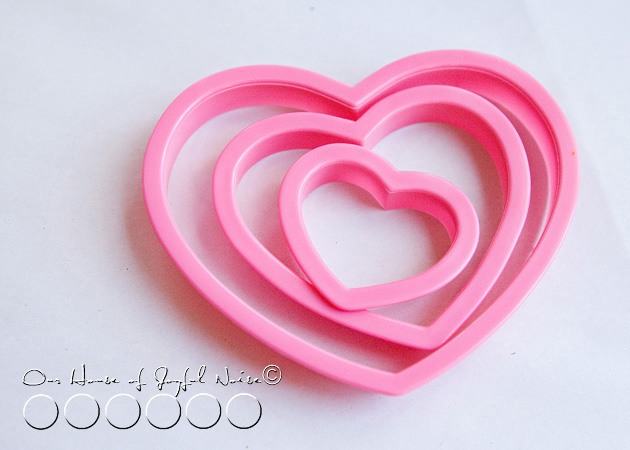
Nor did I take photos of exactly how we did the rest of our crafts.   BUT……Once your hearts are all cut out, there several things you can do with them:

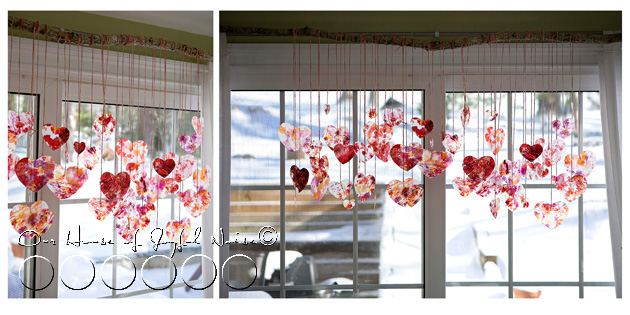
1)  The easiest thing you can do, is just put them on your windows much like window clings, using a little transparent tape!  The hearts have a stained-glass look, and they would be beautiful  with the light coming through, and the colors so radiant.

2)  Another option, is using pieces of thin cut ribbon, tape one end to the back of each heart, and tie them to a clothing hanger at different lengths.  Instant Valentine’s themed mobile!!

3)  You can take it to the extreme, like we did…..


heart-strings-valentines-craft-23
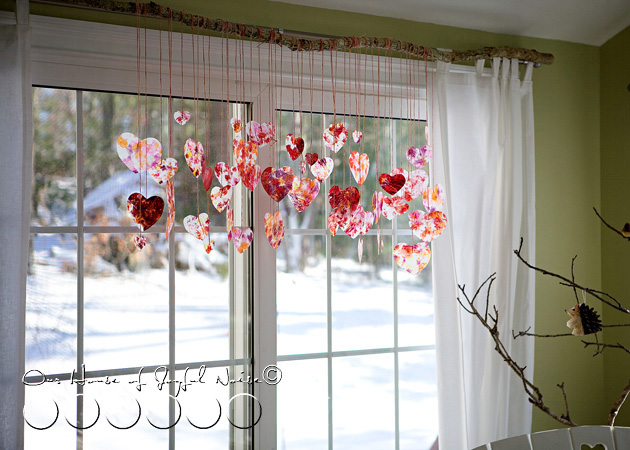
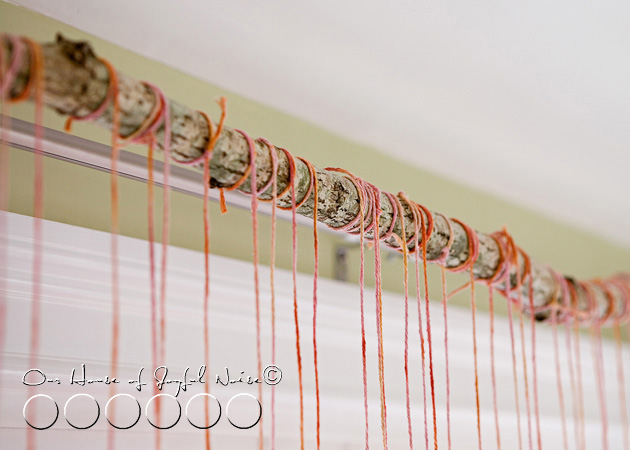
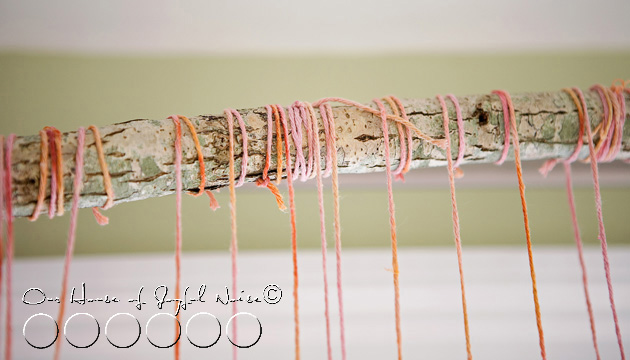
Michael went out and found us a really long and fairly straight tree branch, that would meet the length of our sliding glass doors.   Then, to work in a comfortable manner tying our hearts on it, we set 2 chairs very far apart, and rested each end of the stick on the top back of each chair.  Using long pieces of our dyed string, we wound one end around the stick a few times, and taped the dangling end to the back of each heart, at different lengths.


heart-strings-valentines-craft-24 Yes, you could just tie it on quickly, but I knew I would love the look of our pretty, hand-dyed string, wound around this rustic tree branch.  And I was right.


heart-strings-valentines-craft-25 It was worth ll of my efforts.  It may not be worth it to you.  Also….my girls helped with this some.


heart-strings-valentines-craft-26 
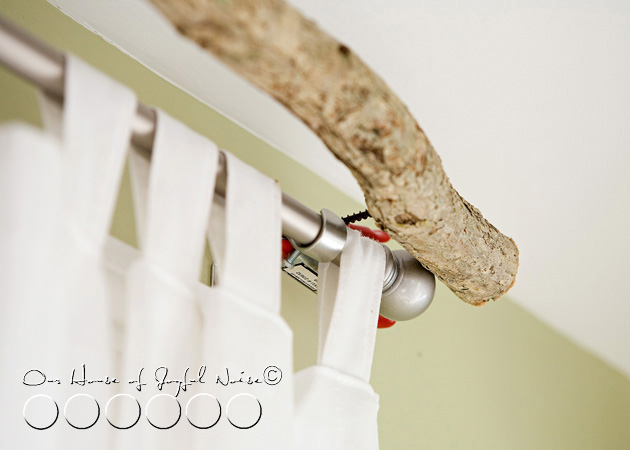
If you’re wondering how we hung this long tree branch adorned with colorful Valentine hearts up high and across our slider glass doors, I’ll tell you:   Michael screwed a long screw into the backside of the stick on each end.  Then we simply used those little tight-clamp thingies, and clamped them to the curtain rod bracket.  See?  No permanent damage anywhere.


heart-strings-valentines-craft-27

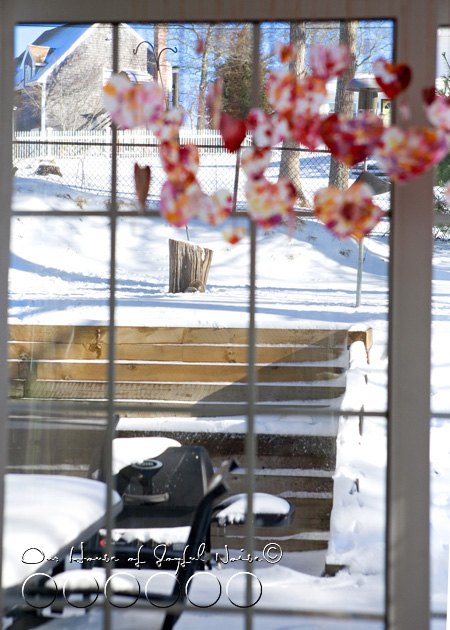
They colors really look beautiful, hanging there, even as I look past them, through our window into the snowy scene behind them.   There are often squirrels out there frolicking in the snow (o.k. …finding the fallen bird seed), and birds at the feeders, eating.

We think the critters rather appreciate our Valentine decorations on display.

heart-strings-valentines-craft-28
I love coming in our front door, and seeing them swaying in the breeze across the room in front of us.  I can feel the love in the air.  It makes us smile.


heart-strings-valentines-craft-29 The colors of love are a beautiful thing.

Let them shine, shine, shine.

(Love this craft idea?  Share the link on your Facebook!  Your mom-friends will love it too! Or….*pin it* to one of your boards! ; )


Save

Filed Under: Crafts & Creations, Holiday Crafts, Home Decor, Kids Arts and Crafts, Tutorial, WINTER Crafts and Creations, WINTER Home Decor Tagged With: crayon crafts, February-crafts, February-projects, heart shaped crafts, heart-crafts, heart-strings, heart-strings-tutorial, kids crafts, Valentine-crafts, valentine-decorations

No-Sew, Double-Sided Fleece Blanket | Tutorial

November 6, 2010 By Laura 4 Comments

The kids and I were recently brainstorming for ideas, to put together a very special package for a certain little boy.  It was very special circumstances, that called us to put something together very special, just for him. I wanted to share with you all this idea our oldest, {A}, came up with:  Making a no-sew, double-sided fleece blanket for him.

no sew double sided fleece blanket
It was the perfect idea for this little boy.

The kids had received fleece blankets like this before, as gifts, and as single layer blankets.  But I wanted to see if we could make a double-sided blanket, so that it would have a different pattern on each side. How FUN, right? And it would be double warm and cozy!

It’s really quite easy, and well worth the effort!   Maybe this is a home-made gift idea you can use sometime, for Christmas gifts, or birthdays.


They are great for anyone, at any age.  From babies to grandparents, and anyone in between.  Just change up the patterns to be more suitable for the recipient, and it’s perfect. Who doesn’t use blankets? It can be a single layer too, and would take even less time. It just wouldn’t have a different pattern on the reverse side.  They are great as throws for beds, getting all wrapped up and cozy to watch a movie, as a lap blanket while you read, or even traveling in the car.  Just choose the appropriate patterns, and a suitable size for whom ever it is for.

Here’s How Easy it is to Make a No-Sew, Double-Sided Fleece Blanket

no-sew-double-sided-fleece-blanket-tutorial We found this set of 2 different patterns, at Joann Fabrics!  I didn’t know there was such thing, and had planned on having to choose 2 patterns separately, and have them cut off the roll to size.   So we were pleased to find these available!  (I also unexpectedly got it at half price!!)  There are a few sizes available in sets. This one was 48″ x 60″.  Perfect width and height for a little boy.  But you can buy any patterns you want off the rolls, and just cut them to matching size.

no-sew-double-sided-fleece-blanket-tutorial-1

I was tickled with this 2-in-1 fleece fabrics of chocolate brown with colored polka dots, and bugs!

Again, perfect for a little boy.

  • The first thing we did was lay it out on a clean table, layering the 2 pieces, one on top of the other, as perfectly lined up as possible.

Then we chose a side to start on, and laid a heavy board several inches away from, but along that edge, to keep the fabric from moving too much.

no-sew-double-sided-fleece-blanket-tutorial-2

We were prepping to cut fringes through both layers.   So using a snapline chalk, we measured up 5 inches from the edge, and snapped a chalk line across from one end to the other, to indicate where to stop cutting, so the fringes would all be the same length. This would create 5 inch long fringes, minus what is taken up when we knot them. Then we measured in from each corner 4 inches,  and cut 1 inch wide fringes, all the way across in between.   In other words, we stopped cutting fringes 4 inches from each end.   This would leave you a squarish block piece on all of the corners, for now.   We’ll get to why we did that, in a bit.

Now, if you don’t have a chalk-line to mark things off, you can use a ruler and chalk per usual.  But this was faster.

no-sew-double-sided-fleece-blanket-tutorial-5 Then, we just started tying each top layer of fringe piece, to the bottom layer fringe piece.

no-sew-double-sided-fleece-blanket-tutorial-6 Now because this blanket is 2 layers, the fringe pieces need to be double tied. Or else it would just un-tie.

But if it was a one-layer blanket, you would just knot the one piece of fringe, and once, would do.

You get me? ; )

no-sew-double-sided-fleece-blanket-tutorial-3
This is how it starts looking.
–

There can be a cool little technique here, where the print of the same side can show most. or the other side.  While tying it (like the beginnings of shoe tying), I found whichever side you stuffed through the whole, is the side that ended up on top. I wanted the opposite side showing, so I made sure to stuff that piece and pull it through to on top.

Now you even get that, or you don’t.  Either way will not ruin your blanket.  This project is virtually fail-proof!

no-sew-double-sided-fleece-blanket-tutorial-4
This is done all the way down, to your 4 inch corner piece.

The same process is done on every side of the blanket.  Again, stopping 4 inches for each corner.

Now what to do with the 4 inch corners:  We just cut 1 inch fringes, on angles, to go around the corner. I think it was 3 cuts, creating 3 more fringes.  Just make then 1″ -ish wide, like the others. This was to create a rounded corner blanket.   It IS an option, to just make fringe cuts one inch apart, all the way to the end, on 2 ends, to make the whole blanket more rectangular.  If you do it that way, I would do one whole side first, and then the opposite side, so they are the same.  Then work on the other 2 sides.

no-sew-double-sided-fleece-blanket-tutorial-7

Cutting 2 layers of fleece at once was a little hard for the kiddos, but they were very helpful for tying!    They took a lot of care with their work.

no-sew-double-sided-fleece-blanket-tutorial-8

Look how cute!   I just loved the colors.  And the bugs.  And the polka dots!

We were really happy with how it came out.

no-sew-double-sided-fleece-blanket-tutorial-10

The kids were really excited to send it out to our special gift, to this special little boy, along with some other gifts. It was a big package.

We hope our home made blanket warms his heart, as much as it warms him, head-to-toe.

It was certainly made with love!

Save

Save

Save

Save

Save

Filed Under: Crafts & Creations, DIY (Do-It-Yourself) Project, Holiday Crafts, Homemade/Handmade Gift Ideas, Kids Arts and Crafts, Tutorial Tagged With: birthday gift ideas, blankets, Christmas-gift-ideas, gift-ideas-for-anyone, gift-ideas-for-kids, handmade-gift-ideas, homemade-Christmas-gift-ideas, how-to-make-a-fleece-blanket, how-to-make-an-easy-blanket, no-sew fleece blanket, no-sew projects

Our Halloween Costume Ideas from the Past

October 30, 2010 By Laura 4 Comments

I don’t plan on having a big post on our Halloween/Hallowtide this year.  But last night I got to thinking about some of our past Halloween costume ideas we’ve come up with, and I went digging through photos. Putting together costumes, is a creative process of sorts, so we thought this section of the blog was a good place for this.

There is SO much I could share with you from our pre-blogging days, because I have always taken lots of photos.  But I haven’t always shot digital.  The scanning of old photos, and cleaning up dust particles, etc, is not a process I enjoy. At all.  But if I’m inspired enough to share with you some old stuff, I guess I will do it.  As I just did!

I thought it would be fun, to share with you some of {A}’s Halloween costume photos from when she was little, as well as the triplet’s second Halloween, but first in costume.  Naturally, we think they are all so cute.  But then, they are all our kids. Maybe we’re bias. But something tells us you might get a chuckle or 2 as well, looking at these.  Or we might at least get a smile out of you, and that’s good enough for us too.

kid-clown-costume
{A} in 1998, as a clown.   She was 1 year old.    I have to laugh at the ‘very best first walking shoes’ she has on.   No, we didn’t do that too, for babies 2, 3 and 4.  Turns out they are all walking and running just fine!
–

kid-genie-costume
In 1999, as a genie, and 2 years old.   Is she not the cutest thing?  My sister-in -aw made the costume for us.  I helped cut fabric and stuff though.  And I also made the bottle.  I have to admit, I’m not into allowing my girls to jaunt around with bare midriffs anymore.  But I wouldn’t give up this photo of her at 2 year old, in this costume, for anything.  What a doll she was.
–

kid-pediatrician
In 2000 at 3 years old, she was her own pediatrician, at the time. lol.  We have had a new pedi now since I was pregnant with the triplets, and the former one is no longer practicing, that I know of.  But she was beyond ecstatic to learn that {A} was her, for Halloween that year.  She (the pedi) showed everyone in the office that day, while {A} waited in her paper gown. lol I think this photo is still hanging in the office there.
–

kid-indian-girl-costume
In 2001, as an Indian, at 4 years old.    I really loved this costume.

kid-indian-girl-costume-2
But this head shot, is one of my all-time favorite photos of her when she was little.
–

baby-farm-animal-costumes-triplets And then we had our little farm animals, in 2003.   lol.  They were 1 year old.  Remember the Tom Armani costumes?  The kids were a riot in them.  We had so much fun this year.  {S}, on the far right, was just on the verge of another hysterical laugh.  He would always, get laughing so hard, he couldn’t compose himself.  He still does that.  He was a happy baby, all of the time, despite all he went through.
–

baby-cow-costume
Our big cow.  He was as heavy as one too.
–

baby-lamb-costume

Our sweet little lamb.
–

baby-goat-costume
Our Billy Goat – always smiling.
–

farmer-girl-costume
{A} (big sister) was their loving farmer, who tended her little farm animals with such care.
–

We just had to show them all off, and trick or treating is always out of the question for us (with {S}’s severe peanut allergy)….so we thought we’d take them to the mall, and just pull them around.  There was Halloween festivities going on there anyway, and it was warm, light, and safe.

And from that idea, our idea grew….

farmer-and-baby-farm-animals-triplets-big-sister We put a little picket fence around our farm animals, in their ‘choo-choo wagon’.   They were the biggest attraction.   People just stopped, and watched us, cracking up.

The funniest thing that night, that still gets us hysterical when we think about it, was that {S}, was the billy goat, and every time we looked back as we pulled him, he was chewing on the fence!!  I was always laughing too hard, to get a photo.

Then we heard there was a costume parade judging contest at the other end of the mall.  So we went down there and pulled them through.  There was a big crowd, and then we had to go by this whole panel of judges at a table. They were all so smitten with our farm.

farmer-and-baby-farm-animals-triplets-big-sister_2 We won 1st Place,  for Most Original Costume!

The judges thought our farm yard was very creative.  The farmer and her little animals had a fun night, and then they went back to the farm and went fast asleep in their barn.

If you have blogged your kids in some of your favorite Halloween /Hallowtide costumes, leave us a link so we can come see them!  If you haven’t, wouldn’t it be a fun post?

Thanks for stopping by.  We hope you enjoyed seeing our kiddo’s costumes from the past, as mush as we enjoy revisiting these wonderful family memories.

Wishing you all a Happy Halloween / Hallowtide!!

Save

Save

Save

Save

Save

Filed Under: Celebrations, Crafts & Creations, Faith, Faith/ Catholic, FALL Crafts and Creations, Holiday Crafts, Holidays, Seasonal Crafts and Creations, The Big Picture Tagged With: clown-costume, costume-contest-winners, farm-animals-costumes, farmer-costume, genie-costume, Halloween, Halloween-costume-ideas, Halloween-costume-ideas-for-triplets, kids-Halloween-costumes, triplets

Summer Fan Pull (and Some Special Gifts) | Crafts

July 29, 2010 By Laura 6 Comments

07-300x224

Call me way late to the party, but I ‘just’ got around to making my summer fan pull.  I’ve kept this one up, which I made for spring, all of this time.

But I’ve got 2 things to say about that:  1)  I’m not really late TO the party.  I think more, I’ve been too busy being AT a party, to find time for such things, as getting crafty.   2) The spring fan pull did not look all that out of place, so it didn’t bug me too much.  I mean, it’s not like it was snowflakes or anything.

Thus, I’m giving myself a break.  Just in case no one else does.

01_summer_fan-pull-decor

I did a have a plan in my head for a long time though!   I knew I wanted to make it beachey-themed.  Seashells, beach colors like warm tans and sea blues.

What I didn’t know, was that I would have splendid company, while I crafted my summer fan pull.  My brother and his family were down, and my nephew and niece decided to make a fan pulls of their own, with me!   So I enjoyed some nice chit-chat with them, while we crafted.  I found it all rather enjoyable, and I think they did too!

02_fan-pull-decor-craft

So here’s my summer fan pull.  Quite summery I think.  Do you like??  I had planned to take photos of my nephew and niece’s  fancy fan-pulls as well, but they had put them away, and then we forgot!  Darn-it-all.  But they did a nice job!

Moving on.

My God Daughter, and her mom (my cousin) and brother (and her brother’s friend) were down recently as well, for the kid’s photo shoot.  And my God-Daughter brought me this……

03handpainted-cupcakes-wineglass
….a hand painted cupcake wine glass, by Delish.  Because she knows I love everything about cupcakes.

I really do.  I love this glass.  I love her.

04

It’s not the first time she has been so thoughtful. (Nor is is it the 2nd.  Or the 22nd.).   Last time she was down, she brought me this cupcake plate set and sugar bowl!    Because she knows I love everything about cupcakes.

I really do.  I  love this set.   I love her.

But wait…there’s more….

05_winecork-craft
…..She made me, all by herself, this wine cork pull.

06

07

I think it’s beautiful.  It has HER all over it.  Sprinkled with love, for me.

I really love it. And her.

I know….it does kind of seem like she gets the impression I drink a lot of wine, huh?

LOL.  But no….I don’t think so.  Just look how full that bottle of wine IS!!  I’ve had it for weeks!  My dad brought it for me, when he came down several weeks ago.  He knows I love wine, on occasion.

I really do.  I love him.


Save

Save

Filed Under: Crafts & Creations, Fan Pulls, Kids Arts and Crafts Tagged With: crafts, fan pull crafts, gift ideas, hand-painted-wine-glass, homemade-gift-ideas, kids crafts, summer fan pull

Announcement of SUMMER FLAG Giveaway Winner!

July 7, 2010 By Laura 7 Comments

summer-flag-giveaway

THANK YOU to all 12 of our commenting participants for the Summer Flag Giveaway!  I thought it was a bust at first, and it got me down, but you all came through, and got me excited again, because we have so many AWESOME Giveaways coming up!  Our best yet!!  So if you didn’t win this time, keep joining us and you are BOUND to win something great!

So far, we have chosen to choose winners via the random drawing generator from the numbered comments.  We love all of our visitors and commenters, and are so happy you all participated, we’d have a hard time choosing ourselves.  But some day, we may try a different method.

Ok, on to the WINNER!!

If you can believe it……the random drawing generator from the numbers 1 through 12 chose:

summerflagwinner

The first commenter!!

(We laughed out loud.)

Ohh…..WHO was the first commenter?

KIM from ‘The Inadvertent Farmer’

(Here is the link to the comments/post for this Give-Away.)

I like to call her ‘Kim the Farmer’, because for 1, I have a sister in law Kim who comments here sometimes, so it helps keep them straight.  But also, I just love that she lives on a farm.  Heck, I love her. And I love her blog!  You’ve got to check it out.  Always fun stuff going on, and ‘fabulous photos, too. Plus, you think having a hedge hog is strange?  Wait until you see what SHE has!!

CONGRATULATIONS, KIM (the Farmer)!!   Send me us an e-mail with your mailing address please, and we’ll get your gift right out to you!

Now, naturally, I have a few comments to your comments!  I couldn’t comment before, or I might be at risk for winning my own summer flag!  (hee hee.)

So yes Everyone who inquired, Michael is having a beer on his break, sitting on the roof covered bench. Was anyone surprised? I think we surprise people a lot, somehow.  Neither of us are big drinkers in the way of intoxication.  lol. But we do both have a drink or 2 on weekends.  Lately, Mike’s Hard Lemonade has been my refreshment drink of choice.

Thanks to Everyone who just said nice things!  Sorry if you didn’t win….but again, lots more coming up!

Rene….We have done mostly annuals in the past, but will be getting more and more into perennials as our landscaping/front yard transformation really starts coming to life.  No herbs yet…..good thought.   We got tons of strawberries, and are in between the 2 varieties right now.  The gardens are looking fab, and hopefully still will when you get here!  I will save a few strawberries for my freckle-faced girl.  They are in the freezer.

Teri…..What a dream come true it would be, to have you sitting there on our bench.  Even if you were just drinking and spewing pearls of your supervisory wisdom!

Paula……I didn’t expect you to be a bit impressed, with the gardens YOU have grown!  So your comment meant a lot, even if you are lying because you love us.

Laura S…..We did not know that about the cosmos!!  Thanks for that info!  They have grown HUGE this year so far.  More like trunks, than stems.   Can you comment or send us an e-mail, with a little more specifics about what you do with them?  Like…directions. lol

To Everyone Else….who mentioned about being excited to watch how the pumpkins grow, US TOO!!  Boy do we have an update blog post on that.  We have SO MUCH to blog about…..and so much work at the same time.   So bare with us, and see it all as something to look forward to!  Because we’re excited to share it all, even with slight delays!

YOU ALL ROCK!!!

Save

Save

Filed Under: Giveaways, Giveaways, The Homestead Tagged With: giveaway-winner

  • « Previous Page
  • 1
  • …
  • 16
  • 17
  • 18
  • 19
  • 20
  • …
  • 28
  • Next Page »

We are wicked happy to have you here! We hope you find much inspiration, help, humor and enjoyment here.


Archives


POPULAR POSTS

* * * * * *

SUBSCRIBE to House of Joyful Noise blog! Every new post, delivered right to your email box!


Privacy Policy

Amazon Affiliates

Never at any additional cost to you, we may earn a small commission for our endorsement, recommendation, testimonial, and/or link to any products from our website. Your purchase through our links helps support our family, while sharing with you the products we authentically use and recommend, for various ideas, and letting you know where you can purchase them. Thank you for your support!

[footer_backtotop]

Copyright © 2025 HouseOfJoyfulNoise.com · Genesis Framework by StudioPress