• HOME
  • {A}’s Chipmunk Training Archives

 Homepage

  • The Homestead
    • Home Projects
    • Home Improvement
    • Home Decor
      • Seasonal Home decor
        • FALL Home Decor
        • WINTER Home Decor
        • SPRING Crafts and Creations
        • SUMMER Crafts and Creations
    • Our Chickens
    • Gardening
    • Organization
    • Re-Purposing
    • Furniture Refinishing
    • Budget
  • Crafts & Creations
    • Seasonal Home decor
      • FALL Crafts and Creations
      • WINTER Crafts and Creations
      • SPRING Crafts and Creations
      • SUMMER Crafts and Creations
    • DIY (Do-It-Yourself) Project
    • Kids Arts and Crafts
    • Homemade/Handmade Gift Ideas
    • Holiday Crafts
    • Fan Pulls
    • Free Printable/Downloadable
    • Sewing Projects
    • Giveaways
    • Business Features
  • Recipes/FoodFun
    • Breakfast
    • Lunch
    • Main Dish
    • Sandwiches
    • Appetizers
    • Slow Cooker
    • On The Grill
    • Side Dishes
      • Soups
      • Salads
    • Baking
      • Breads, Rolls and Muffins
    • Snacks
    • Treats
    • Desserts
    • Drinks
  • Homeschooling
    • Elementary Homeschooling
      • Elementary Homeschooling READING
      • Elementary Homeschooling MATH
      • Elementary Homeschooling LANGUAGE ARTS
      • Elementary Homeschooling SCIENCE
      • Elementary Homeschooling HOME ECONOMICS
      • Kids Arts and Crafts
    • Middle School Homeschooling
      • Middle School Homeschooling SCIENCE
      • Middle School Homeschooling HOME ECONOMICS
    • Language Arts
    • Math
    • History / Social Studies
    • Geography
    • Foreign Language
    • Field Trips
    • Games
    • Nature Study
  • The Big Picture
    • Life In General
    • Celebrations
    • Faith
      • Into the Light; The Series
    • Giveaways
    • Reviews & Sponsors
  • Photography & Lettering
    • Photography
    • truck lettering
    • vehicle graphics
    • Newborns
    • Kids
    • Engagement
    • High School Senior Pictures
    • High School Senior Pictures Sneak Peeks

Spring | Easter Fan Pull | Craft

April 2, 2010 By Laura 3 Comments

Just a quick share of my fan pull for Spring & Easter!

spring-easter-fan-pull-craft-3

These beads are so beautiful. They are heavy, like marbles, but smaller.

And just ….pretty.


spring-easter-fan-pull-craft-1
The beautiful piece on the end is glass as well.

spring-easter-fan-pull-craft

It has definitely put another touch of  ‘spring in the air’, in the sun room.

Just in time for a lovely Easter this weekend, too.

spring-easter-fan-pull-craft-2

Thanks for dropping by, and taking a peek!

***HaPpY SpRinG!!***

Save

Save

Filed Under: Crafts & Creations, Fan Pulls Tagged With: bead-crafts, crafts, Easter decor, Easter-craft, fan-pull-craft, fan-pulls, home decor, home decorating, spring craft, spring-decorating, spring-fan-pulls

Palm Cross

March 20, 2010 By Laura Leave a Comment

how to make a palm cross

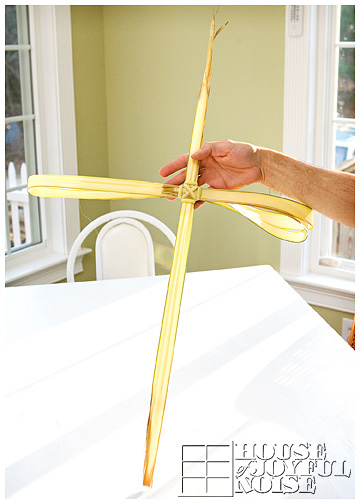
With Palm Sunday almost upon us once again, we thought we would re-post this tutorial which we had in the Big Picture section last year, on how to make a nice cross for your home, with the blessed palms you bring home from mass on Palm Sunday.  We hope you find the instructions and photos helpful, and the craft enjoyable, in making a beautiful palm cross for the walls of your home.

how to make a palm cross

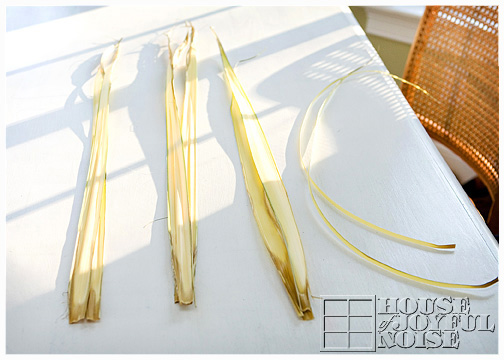
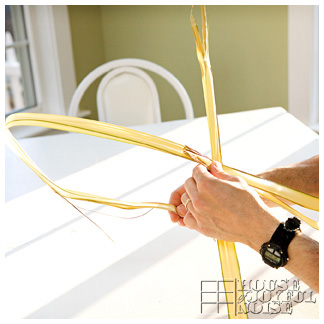
First, take 3 sets of 2 palms each, and at least one good palm wisp.

how to make a palm cross

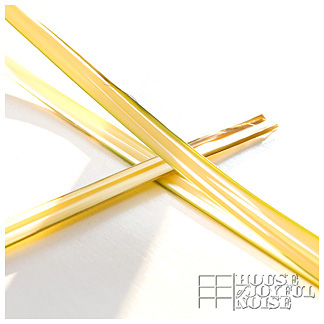
In the area the intersection of the cross is, put the ends of one set of palms alternately layered in between 2 of the others, going in the opposite direction of course.

how to make a palm cross

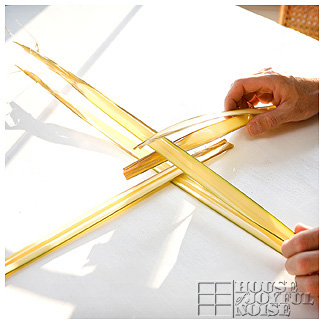
Then takes the last set, and layers those for the other side.

how to make a palm cross

Pinching it all together at the intersection, take one side of the palms and makes a loop with them to the back of your cross.

how to make a palm cross

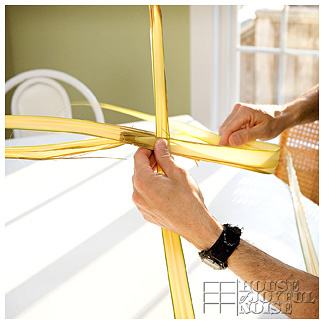
Securing that with your fingers to the middle as well, and then do the same with the other side.

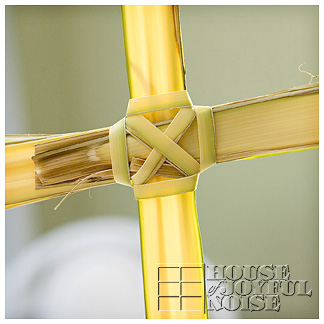
With the formed cross in hand, take the wisp of palm you had set aside, and start wrapping the intersection of the crossed pieces, to secure them tightly.

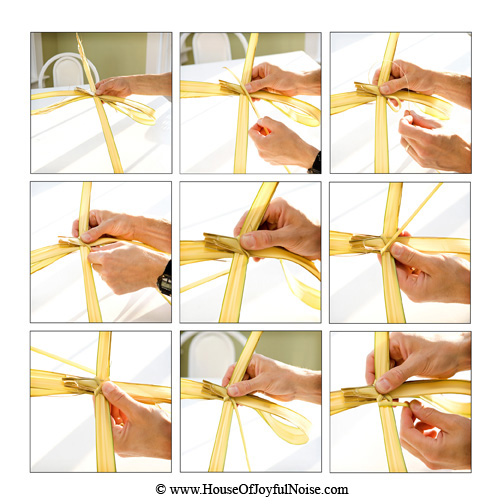
The below collage, to be viewed left to right in rows top to bottom, is not every single move. It just gives you a general idea of how it is wrapped around, crisscrossing, and going up and down as well.

how to make a palm cross

how to make a palm cross

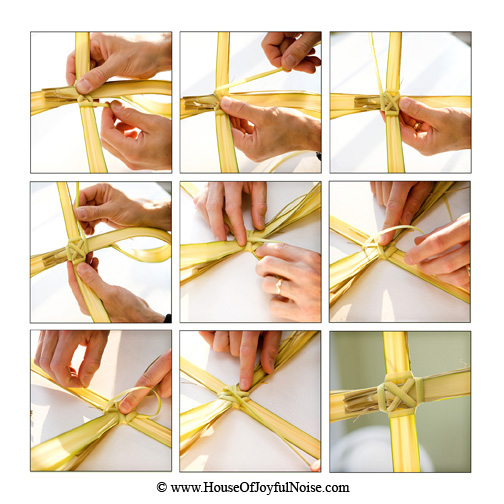
When you only have about 2 inches left, turn the cross over,  place it on the table, and holding the wrap tightly, take the remaining end and feed it under the wrap a couple of times, and then just pull it tightly. The front of the middle of the cross then looks like the last square in the above collage.That’s it!

how to make a palm cross

We hope you have a happy and peace filled Palm Sunday !


* * * * * *

Please come follow me here and there:

Save

Filed Under: Celebrations, Crafts & Creations, Faith/ Catholic, Holiday Crafts, The Big Picture, Traditions, Tutorial Tagged With: blessed-palms, Catholic, Catholic-holy-week, Catholic-palms, Easter, Holy Week, palm craft, palm cross, palm cross how-to, palm-cross-tutorial, palms, plam sunday

The Benefits of Kids Using Their Own Creative Imagination: Making Something Out Of Anything

March 8, 2010 By Laura 9 Comments

Sometimes, I like to plan my kids crafts and art. But whether I plan arts and crafts or not,  it still happens in this house, and all over this house, every day! The kids sure don’t need me, to come up with creative ideas. The kids use their own imagination, and it’s awesome!  In fact, I’d go so far as to say, that their wild imagination tends to venture further than mine does.  And frankly, their are great benefits of kids using their own creative imagination.

While a child following directions (such as to make someone else’s craft idea) is crucial skill to their development, the benefits of a child completely using their very own imagination, far outweighs it. In thinking of and creating their own ideas/crafts/creations, they are:
– developing brainstorming skills
– learning how to think outside of the box
– developing planning skills
– learning how to problem-solve
– developing the abilities of an inventor!
– developing great personal character
– increasing their own self-confidence
– . . . . and so-much-more.

So, I try to keep the school room stocked with art supplies at all times, so that the kids can get creating any time it strikes their fancy to.  But to tell you the truth, they often end up using lots of materials I didn’t supply, or would have never even thought of! Every time I turn around in this house, there is some new creation sitting there, or they are playing with one, or someone is suddenly at my side saying, “Mama, look what I made!“.   I’m always surprised, over and over, by their creativity.  But really, I shouldn’t be anymore.

Here are just a very few things our young triplets have made lately, that I have found around the house, and happened to get photographed.

kids-creative-imagination-crafts-3

A robot, made by {JM}.  Materials used:  a Dunkin’ Donuts coffee cup, paint, marker, and a toy car.  You should see it travel across the floor.

–

kids-creative-imagination-crafts-4

Pistachio Shell Art, made by {A}.
Materials used:  Pistachio shells, and markers.
–

kids-creative-imagination-crafts-7
A Tissue Paper Doll, made by {O}.
Materials used:  Tissue paper, glue, wooden screw cover buttons, and pencil.

–

kids-creative-imagination-crafts-6

kids-creative-imagination-crafts-5

A Pop-Up Card made by {JM}.
Materials used:  Paper, marker, black pen, scissors, and glue.

–

kids-creative-imagination-crafts-1

A Deck Hang-Out 2-Dimensional Art Piece, made by {JM}.  Materials used:  Rubber material (the scraps from a kit), ribbon, tape, glue,  a pencil, a cupcake tin, and firewood.

*Note:  {JM} made this creation for someone we really care about, who suffers from frequent migraines.

kids-creative-imagination-crafts

The hammock, which is my favorite part, is so she can lie there and relax until she feels better.  Since the project is so big and heavy, we decided to just send her photos, which she really appreciated.  She used one of the photos, in a blog post of her own, about migraines.
–

kids-creative-imagination-crafts-2

A Watercolor Painting, made by {S}.  Materials used:  Paper, Crayola watercolors, pencil, brush and water.

I think I can let go of the guilt I feel sometimes, when I haven’t planned a craft project in awhile.  I don’t think they even need me.
And leaving the kids to figure out all of their own creative activities, is a gift of some time to us parents!  More time to do what we need or want to do, while they are busy making awesome things!

I encourage you, to encourage your children’s very own imagination! On the next rainy day, or a day they say they are ‘bored’, challenge them to find different kind of materials around the house, or even from outdoors, and make something creative and really unique! And when they do, and show you, make them feel really good about what they created! Because it is their very own imagination and efforts on display, and it has grown them in more positive ways than can meet the eye. And that is something to celebrate!
They may just inspire you too, as my own kids creations inspire me.
Please consider sharing, and spreading the creative inspiration.

kids-creative-imagination-crafts-3_b

Save

Save

Save

Save

Filed Under: Crafts & Creations, Elementary Homeschooling, Homeschooling, Kids Arts and Crafts, Kids Arts and Crafts Tagged With: art, creativity, developing-your-childs-imagination, encouraging-your-kids-imagination, homeschooling, kids crafts, kids-arts-and-crafts, kids-creativity, kids-imagination, Parenting, positive-parenting, rainy-day-ideas-for-your-kids, robot-craft, tissue-paper-doll-craft

Superbowl Menu

February 8, 2010 By Laura 2 Comments

We had a nice little Superbowl Sunday.  We kept it pretty low-key, for a couple of reasons:

1) Our own New England Patriot’s weren’t playing.

2) It was a school night.

Every year, I get all excited about Superbowl Sunday, no matter who is playing. And then I realize how late the game is starting!  And then I remember, that I forget that that is the case, almost every year!

Still, we can’t let the opportunity for a little private family party, pass us by.  But considering the circumstances this year, we kept the menu simple-simple.

pastrami-sandwiches Pastrami Sandwiches – we love them. We just put a pound 1/2 of pastrami in our steamer for 10-15 minutes, rearranging in the steamer basket about 1/2 way through for even heating of the meat, and then we pile it on a toasted wheat roll.  The kids prefer no mustard, but Michael and I like a little French’s.

jalapeno-poppers

Here’s an item we were downright excited to try:  Jalapeno Poppers!

Participating Ingredients:

  • 18 fresh jalapeno peppers
  • 8 oz. package cream cheese, softened
  • 3/4 shredded or grated cheddar cheese
  • 1 green onion chopped
  • package of bacon, cut in half to shorten (18 slices, 36 halved)
  • brown-sugar BBQ sauce
  • toothpicks
  • RUBBER GLOVES!

(You will only chop jalapeno peppers without gloves once, but never again.  I did, once, and my fingers spent the entire night in HELL.  Literally, I’m quite sure.  The throbbing pain of burn, was nearly unbearable.  I was near tears.  Just take my word for it, and use gloves when chopping these babies, and don’t touch any part of yourself after having touched the peppers!  Especially your eyes!)

1) SO….once dressed in your gloves, slice the peppers in half, lengthwise. We keep the stems on, and try to cut those in half too. It gives you a little handle later, and keeps them cute! Clean out the inside of the peppers completely – free of seeds and white membrane.  However, the real heat is in the seeds and the white membranes – so if you like more kick, leave a little.  We left just a little seed in ONE pepper, and I got the Lucky Popper. ; )

2) In a bowl, combine softened cream cheese, chopped green onion, and cheddar cheese. Mix well.

3) Being sure your gloves are on again, or still, using a little old-style butter knife, or a cheese spreader, fill all of the peppers halves with the cheese filling. We filled it well, as a little heap.

4) Pre-heat the oven to 275 degrees.  (I realize most cooks/bakers do this first, but I’m too slow to prep the food, so the oven is on for too long, for no reason.  Plus, I feel pressure because the oven is waiting and ready, but I’m not done! lol)

5) Next, wrap each cheese-filled pepper, with a 1/2 piece of bacon.  Do not pull it tight, as the bacon shrinks when it cooks. Secure each one with a toothpick through the side of the pepper as you go, and place on a cookie sheet.  (We cover the cookie sheets with tin foil for stuff like this, to avoid having to wash the pan after. ; )  Call us lazy.

6) Generously brush each bacon-wrapped-cheese-filled-pepper, with brown sugar BBQ sauce.

7) Put in oven for about an hour, or until the bacon is crisp and sizzling.

*You can serve immediately, at the risk of burning mouths.  But we found anyway, that letting them set & cool some for 10-15 minutes, really makes them all the better!  They firm up a bit, and you can really enjoy the different elements of the Jalapeno Popper in your mouth, instead of it all being very soft and mushy in your mouth.

A friend asked us, “Will the kids eat those?”, and the answer was YES!  Our little ones, especially, like hot stuff.  {A} just thought they “were just o.k.”.   But it’s not the recipe, it’s her.    ; )

We’ll be adding these to our appetizer hit-list for future occasions.  We put 1/2 f this batch, already cooked, in ziplock bag and into the freezer, to be able to just heat some up sometime soon. And trust me, soon it will be!

BTW – My friend Mary Beth, from Nothin’ But Country, made up a batch of the Bacon-Wrapped Pineapple Bites for her Superbowl party, and came by the blog here to leave a fantastic review of the recipe!  Check it out! If her review doesn’t convince you to try them, nothing will!  And check out her blog too! She and her husband LOVE to cook, and all kinds of great recipes.

chips-and-salsa We also snacked on tortilla chips and salsa through the game, in between hoots & hollers at the tv.   As you can see, we already had been at them before I remembered to take a photo. lol.

jsfootball Our ever-creative boy, {JM}, made a football for our party, as some festive decor.  He made it out of gold and white tissue paper, and a little gold mylar.  That boy is ALWAYS ‘making something’, and he never ceases to surprise us with his great ideas either.   Get this……..

jslitfootball  …..the football lights up!!  In the dark, it really puts off quite a glow!

Since our New England Patriot’s weren’t playing in the Superbowl this year <boo-hiss!!>, we decided to cheer on the Saints!  Why?  No real significant reason, except maybe because their names is the Saints, and we like their logo the best. : )  We are really happy for New Orleans.

Did YOU watch the Superbowl?  Which team did you cheer on?
And more importantly, what was on your Superbowl Menu, if you had one?  Do share!

Save

Filed Under: Appetizers, Crafts & Creations, Kids Arts and Crafts, Life In General, Recipes, Sandwiches, Snacks Tagged With: appetizers, jalapeno-poppers-recipe, party food, pastrami-sandwiches, superbowl-menu-ideas

Fan Pulls: for Winter and February

January 29, 2010 By Laura 9 Comments

I have found I enjoy making fan pulls for our home decor, to go with various seasons or holidays. But it was almost the end of January, when I put up our winter-themed fan pull. Reasons being, I had to make it first!  Next year, they will all be up right on time, because they’ll all already be made.  But for this little craft-session, I also made February’s. A LOVE theme of course.

We’ll look at the winter one first.  This one we’ll probably use maybe in late November, if it has snowed, and maybe the first week or so of December. But then we’ll be having our Christmas fan pull up for the rest of December.  The winter one here will go back up for the month of January, and maybe early March until it feels like spring.  Unless of course I make a St.Patrick’s Day one, although we’re not Irish. But I suppose that’s not St. Patrick’s fault. lol

winter-fan-pull-decor-craft

I’d like to take this opportunity to say . . . fan pulls are very hard to photograph!    Maybe I’m not using the right lens, that I don’t have. : )   But I just can’t seem to capture beauty of the fan pulls, in relation to the room, if that makes any sense.  So…I do the best I can for you.  They are also difficult to crop, being a very thin piece straight down so – forgive me for some of the tall vertical photos that require extra-scrolling. I did get into the photo taking because, they have beautiful detail.  So the extra photos are just some art-fun I was having, that I hope you’ll appreciate.

The winter fan pull was easy to make, because I found little snowflakes, already on a chain!  So I bought 2 of them, and just connected them.  I used 26 gauge wire at the very top and like last time, just sort of balled it, to slip into the catch from the actual fan chain higher up.

You will find I am showing lots of seemingly similar photos in this post, because I want to show you the various displays of color that these throw when the light hits them. BEAUTIFUL hanging there on a sunny day.

winter-fan-pull-decor-craft-1

See here….blues, purples….
–

winter-fan-pull-decor-craft-2
… and here….oranges and pinks!
So as it spins or swings some, it’s just lovely with the colors changing rapidly.
–

winter-fan-pull-decor-craft-3
Here is a closer up of the snowflakes on the chain.

Yesterday when I was making them, it was snowing out!

But it’s gone today.  It’ll snow again though.

winter-fan-pull-decor-craft-4

The gorgeous big snowflake on the bottom, I found separately at the craft store, and added to the snowflake chains.
Love the colors in this one above.

winter-fan-pull-decor-craft-5
Now look at this!  Same big snowflake from a different angle.  See?
It’s glass or crystal I think.  I’m not sure.
–

winter-fan-pull-decor-craft-6 Here is the snow flake chain laying on the table.
It is SO much easier for me to photograph them this way, than them hanging in the middle of the room.
Pretty though, huh?

winter-fan-pull-decor-craft-7

So these are more what they look like hanging up.  It’s just hard to photograph that way.

winter-fan-pull-decor-craft-8

winter-fan-pull-decor-craft-9
I couldn’t stop taking photos. lol

So…..that’s for winter.

For February, the month of love, here is what I did….

valentines-day-fan-pull-decor-craft

…which again, the photo just doesn’t do it justice.   I do want to mention that this one IS threaded beads all the way.  And, unlike using 26 gauge wire all the way through as I did for December’s, I found that heavy fishing line works great!  I did double it for extra strength, just in case.  And THEN, I used the wire to attach at the top.   It’s one of those things, like with anything new, you learn a little bit every time, and do better next time.  If you recall, December’s has a little swagger, from the wire through the beads.  It didn’t hang straight.  I SAID I liked it, and thought it gave it character. But I just didn’t want to do it over. ; )  I like the slinky flexibility of heavy fishing line, much better.

So here is a much better and closer look.   Red beads in 2 different sizes, some little silver bars, and some diamond-like studded squares.  I LOVE them.  They did not come with the red beads….I put them all together.  They were all cheap-cheap.

valentines-day-fan-pull-decor-craft-1

But the big heart at the bottom….not so much!!  When I found it, it was SO PERFECT and JUST what I was looking for for the bottom of this fan pull.   So I looked to see how much it was.  $15.00!! It was a cubic zirconia.  I almost cried.  I mean….I just don’t spend money on such frivolous things.  We can’t!!  But I REALLY wanted it!  Most all of the beads were on sale….so I was thinking, somehow, this one must be too.  It was with all of the beads. So {A} brought it to the register to have them price check it.  But guess what?  It was really and truly $15.00.

I just stood in the aisle…frozen.  I couldn’t spend that on it, and I couldn’t leave with out it.   So there was nothing else to do, but just stand there.   With my whole family around me, who were losing their patience.

So, Michael finally said, “Oh just get it!!.  Gosh….every time I pull that fan chain, I’m going to say, “$15.00!!  $15.00!!” He really would too.  Trust me.  Not that I would ever forget myself….but the joy of seeing the beauty of it would help me get past it, in time. But not Michael. Well, I already felt guilty enough.  That little announcement would surely tarnish that ‘love’ feeling I would have had going on through-out the month of February.  So….when I got to the register, I did what I would recommend YOU ALL DO, whenever you can.   I begged for a coupon or a discount!  I said, “Please….do you have a coupon hanging around I can use?” And she said promptly answered, “No I don’t. Sorry.” (For the record, she didn’t really sound sorry.)  So I said, “But my husband said he is going to say “$15.00″ every time he pulls the fan pull chain!”.  THEN she said….“Actually, I guess I do have this 40% off one item coupon in my drawer here.”

See?  : )  So then I did the happy dance, let out a “YA-HOOOO!!” through out the whole store, the kids said, “MAMAAAA!“, and then I thanked her profusely, of course.

She said I was welcome, and I believed her that time.

valentines-day-fan-pull-decor-craft-3

Oohh….Be still my heart!  (No pun intended. lol)

It’s a gorgeous piece, is it not?

I think the whole fan pull, is just beautiful. Classy.  Gorgeous. It twinkles!

And every time Michael pulls that chain to turn the fan on and off, he can smile and say…

valentines-day-fan-pull-decor-craft-2
“40% off!”.

“40% off!”

Well Folks, that’s it for this edition of ‘Fan Pulls’!

I hope you found that my crafting, and shopping tips, inspired you!

Save

Filed Under: Crafts & Creations, FALL Crafts and Creations, Fan Pulls, Holiday Crafts, Seasonal Crafts and Creations, WINTER Crafts and Creations Tagged With: crafts, fan pull crafts, fan-pull-decor, fan-pull-ideas, love-fan-pull-craft, snowflake-crafts, valentine's-day-fan-pull-craft, winter-fan-pull-craft

  • « Previous Page
  • 1
  • …
  • 17
  • 18
  • 19
  • 20
  • 21
  • …
  • 28
  • Next Page »

We are wicked happy to have you here! We hope you find much inspiration, help, humor and enjoyment here.


Archives


POPULAR POSTS

* * * * * *

SUBSCRIBE to House of Joyful Noise blog! Every new post, delivered right to your email box!


Privacy Policy

Amazon Affiliates

Never at any additional cost to you, we may earn a small commission for our endorsement, recommendation, testimonial, and/or link to any products from our website. Your purchase through our links helps support our family, while sharing with you the products we authentically use and recommend, for various ideas, and letting you know where you can purchase them. Thank you for your support!

[footer_backtotop]

Copyright © 2026 HouseOfJoyfulNoise.com · Genesis Framework by StudioPress