• HOME
  • {A}’s Chipmunk Training Archives

 Homepage

  • The Homestead
    • Home Projects
    • Home Improvement
    • Home Decor
      • Seasonal Home decor
        • FALL Home Decor
        • WINTER Home Decor
        • SPRING Crafts and Creations
        • SUMMER Crafts and Creations
    • Our Chickens
    • Gardening
    • Organization
    • Re-Purposing
    • Furniture Refinishing
    • Budget
  • Crafts & Creations
    • Seasonal Home decor
      • FALL Crafts and Creations
      • WINTER Crafts and Creations
      • SPRING Crafts and Creations
      • SUMMER Crafts and Creations
    • DIY (Do-It-Yourself) Project
    • Kids Arts and Crafts
    • Homemade/Handmade Gift Ideas
    • Holiday Crafts
    • Fan Pulls
    • Free Printable/Downloadable
    • Sewing Projects
    • Giveaways
    • Business Features
  • Recipes/FoodFun
    • Breakfast
    • Lunch
    • Main Dish
    • Sandwiches
    • Appetizers
    • Slow Cooker
    • On The Grill
    • Side Dishes
      • Soups
      • Salads
    • Baking
      • Breads, Rolls and Muffins
    • Snacks
    • Treats
    • Desserts
    • Drinks
  • Homeschooling
    • Elementary Homeschooling
      • Elementary Homeschooling READING
      • Elementary Homeschooling MATH
      • Elementary Homeschooling LANGUAGE ARTS
      • Elementary Homeschooling SCIENCE
      • Elementary Homeschooling HOME ECONOMICS
      • Kids Arts and Crafts
    • Middle School Homeschooling
      • Middle School Homeschooling SCIENCE
      • Middle School Homeschooling HOME ECONOMICS
    • Language Arts
    • Math
    • History / Social Studies
    • Geography
    • Foreign Language
    • Field Trips
    • Games
    • Nature Study
  • The Big Picture
    • Life In General
    • Celebrations
    • Faith
      • Into the Light; The Series
    • Giveaways
    • Reviews & Sponsors
  • Photography & Lettering
    • Photography
    • truck lettering
    • vehicle graphics
    • Newborns
    • Kids
    • Engagement
    • High School Senior Pictures
    • High School Senior Pictures Sneak Peeks

{Ju} & Big Bro | Urban to Beach

March 6, 2011 By Laura 4 Comments

These two kids, have always been ‘cake’, in front of my camera.   This is my God-daughter {Ju}, and her big brother, {N}.  You may have seen the recent post (as I type this), where {Ju} was a guest crafter with us at Our House Of Joyful Noise.  But I did this photo shoot with them back in July last year, 2010.  Their mom, my cousin, brings them down from western MA every now and then, to have their photos done, and we spend a little time all together too.  Whether I am doing individuals of the kids, or shots of them together as siblings, they always do great!  They are just pretty natural in front of the camera, and that’s always nice!

We decided to do a little urban shooting, and then hit the beach!  I wanted to go for a little serious/tough-boy look with big brother {N}, but it is hard to pass up his smile – which is always readily available!  (Just like his little sister’s!)  Also note, this particular photo shoot trip, {N} brought his buddy along, so I did some shots of, and with, him too.

I had fun processing these, to finish off the images as I saw them in my head. Not much more of my chatter, from here on.

As you’ll see, this is one of several sweet brother & sister shots of them together.  Their connection is the real thing, that came through easy for me, too.

This is my favorite shot of {Ju}. I just love it. It’s a great view of her freckles, and beautiful eyes.  I did her french-braided pigtails, myself.

“Boyz of Summer”

How handsome is this guy!!

This is one of my ‘senior guy’ shots I love to do at this location. He really pulled it off, for a 12 year old, huh?

This was another great one of them together.

I can be very funny. ; )  {Ju} has the best giggle in the world!  (Much like her mother’s.  Who knew such a thing was genetic?)

Their mom wanted me to design a family Christmas card with some of the photos.  Considering the urban/beach kind of shots we got, I went the ‘fun/grunge/non-traditional route’, and she loved it!  ( I did too. : ).    This is a flat, 2-sided 5×7, printed on linen.  It really made the most of their images, and all of my texture work.  (There was no LLR watermark on the real cards.  lol 😉

Front

 –

Back

–

One of the greatest works out of this photo shoot, was this shot below.  I knew the second I took it, it was going to be something special.  It was bound to be made into even more of an art piece, so I had fun with it.  Their mom ordered a large piece of artwork of it, as a framed piece for their home, and then also got linen note cards of it too.  (Of course, all minus my LLR web frame.)

I can always count on an over-abundance of shots I am happy with, with these two.


Save

Filed Under: Kids, Photography, Photography & Lettering Tagged With: laura-lee-richard-photography-plymouth-ma

Bottle Cap Art, with a Special Guest Crafter!

February 28, 2011 By Laura 9 Comments

bottle-cap-art

It’s a new first, here at House Of Joyful Noise!
(And just so you know, this post contains an affiliate link.)

This is one of those opportunities, that I just could not pass up!!  It’s not every day that we have someone come through our place, who knows her craft-stuff like this one!  So without further ado…..

We’d like you to meet our first ever (and very special) Guest Crafter!

bottle-cap-art-2

This is *{Ju}. She is my God-Daughter, and daughter of my cousin. I’m just seeing, in this photo here, that I think she was still a tad sleepy on this morning. Oops!! I was excited to get to our crafting! She is so sweet looking, sleepy.

*In Photography & Lettering, you can see the ‘Urban to Beach Photo Shoot’ I did with {Ju} and her brother, this past summer. She was such a doll, with her usual great big smile, and her brother has a great smile too! I can’t wait to show you their shots. I see now how much she has grown, since the summer!

But back to this craft post. We have had a visit planned with her for awhile, for her to come stay with us over her February school vacation, which just passed. She is a true little artist in the making, and spends lots of time crafting. So I had this exciting idea, to let her teach us a new craft, while she was here with us for a visit!

If you’ve been reading along here at HOJN for awhile, you may have read where {Ju} sold LOTS of ‘Capsters’ that she made with her friend, at a Harvest Fair in her own town. She definitely has the makings of a successful entrepreneur.

bottle-cap-art-1

‘Capsters’ is the trademarked name to the Klutz company (who we will talk about in a moment), but are basically a ‘bottle cap art’ kit. Creating bottle cap art, is the craft {Ju} is going to teach us how to make, in this post.

–

bottle-cap-art-18 While the ones we made here today, are geared in design towards kids, I have lots of ideas to share towards the end of this post, as to how this can be a great grown-up craft too!
–

bottle-cap-art-3 A couple of supplies you will definitely need, are clean bottle caps, and a crystal clear lacquer.

–

bottle-cap-art-4 The rest of what you use to make your bottle cap art, is up to you!! It’s all about what you want to put inside your bottle caps. That may include some background papers (more on that in a moment), gems, googly eyes, or anything else creative that you can come up with, that fits.

bottle-cap-art-9 Little stickers, are another idea.

bottle-cap-art-19 This 3D Crystal Lacquer is a necessary and amazing little product. You will see how it holds the contents of the caps in place, and dries like a crystal clear glass.

We’ll discuss the supplies, and where you can get them, also towards the end of this post.

–

bottle-cap-art-6 My oldest daughter got this simple and fun little ‘Capsters’ kit from Klutz’ (affiliate link) many years ago, and it is the same one {Ju} got too, when her mother told me she was making bottle cap art, and I suggested this kit to her. The book that comes with the kit, has pages and pages, of all kinds of other ideas, that they can do with the ‘Capsters’ they make, like jewelry, key chains, belts and notebook art, just to name a few. (I bet you could think of some of your own!)

It’s a great kit, for kids to start making bottle cap art with, for another reason…..

bottle-cap-art-7 There are several pages, of perforated circle background art, that the kids can just pop out of the book, and pop into their cap. They make adorable caps alone! But {Ju} loves to embellish hers, with different colored gems, googly eyes, or other charms, too.

–

bottle-cap-art-8 More pages of ideas, in the kit book.

–

bottle-cap-art-10

{Ju}, along with my daughter {O}, made several bottle caps, and she is going to show you the steps to this easy craft, right now.

–

bottle-cap-art-11 1) Start by squeezing some 3D Lacquer, into the center of the bottle cap. You want to squeeze it in almost drop-by-drop, almost filling the inner circle of the cap. 2) Add your background and any other contents, pressing it down all over. 3) Drop-by-drop again, squeezing it in very closely to the surface, covering the surface, and filling the cap about 1/3 to half, and being sure it is all covered evenly.

–

bottle-cap-art-12 {Ju} actually added a little gem to this one, before adding the surface lacquer.

So to review again….

bottle-cap-art-13 1) Add lacquer to the center of the cap,… 2)….spreading it out a little. 3) Place your background circle or other contents in,…4)… pressing it down well so that it will stick to the lacquer beneath it.


bottle-cap-art-14 {Ju} added googly eyes to the king, because she is silly like that. 5) (not numbered) Then, she covered the surface well, with the lacquer.

bottle-cap-art-15 You will notice, that the lacquer is cloudy when dispensing. On the left, is the bare background, and on the right, is the background covered with googly eyes, and the lacquer. But have no fear!! This lacquer dries crystal clear, and glossy, just like glass. Love it!

bottle-cap-art-16 Here are a few more, that were just finished, and need time to dry.
* Allow to dry for 24 hours!! *
If you touch it before then, because it looks dry, you may leave a fingerprint before it’s truly a hard glassy surface.

–

bottle-cap-art-17 {Ju} letting {O} give it a try. She was a great teacher!

–

bottle-cap-art-18 Here is all of the caps the next day.

Bottle cap art is a really fun collectible!! You can also glue a magnet onto the back of the caps, and use them on your refrigerator, or office boards.

–

bottle-cap-art-19 This particular brand of crystal clear lacquer is Sakura, and can be found here. This is {Ju}’s big refill bottle. I believe Mod Podge’s Dimensional Magic, is the same type of product, but I have only been able to find it in a 2 oz. bottle, which wouldn’t last very long, if you are making lots of caps.

O.K., so here are some links to where you can get these supplies again – but feel free to do an internet search, or check your local crafts stores for other brands or better prices too.

Silver Bottle Caps – a bag of 144

3D Crystal Clear Lacquer

* Klutz Bottle Cap Art Kit
(aff. link)

* This kit comes with everything kids need to get started. But be aware, that the bottle caps are white on the outside, and are marked with the Klutz logo.

Now, how about some ideas for Bottle Cap Art, for adults?

~ All kinds of beautiful bottle cap backgrounds, can be made with a simple 1″ circle punch, and scrap scrapbooking paper, stationary, greeting cards, the pages of a book……the ideas are limitless.

~ Any gems or charms can be used as well. Dimensional pieces do not need to be completely beneath the surface of the lacquer. It’s fine to put a coat of the lacquer over the piece, but letting the piece protrude from the surface of the lacquer makes the caps very 3D artsy.

~ Cutters, such as Cricut and Silhouette, are very popular with crafters now. They can be used to cut out any customized letters or designs, to fit in your caps. Consider putting a letter in each, on a pretty background, and then gluing/lacquering the caps together, to spell a meaningful word.

~ Perhaps some of your child’s simple artwork, or a photo of someone you love, can be shrunk down to put in a cap.

~ Dried flowers and leaves, would make a beautiful set! Dare I say, you could also preserve pretty small bugs, this way? : D

~Glitter is another element you could use, and there are also colored lacquers.

*Remember, your custom designed bottle caps can be used as art in many ways, and as many gift ideas as well.

The creative possibilities here, are endless.

Do you have any ideas of your own, that you can share with us in the comments? We’d love to hear more.

bottle-cap-art-20

(This cap is not yet lacquered.)

{Ju} — Thank you so much, for teaching us all this craft, and being our first Guest Crafter! You did so great, and I’m so happy you love being creative, as much as I do! XOXOXO to you!!

* * * * * *

Please come follow me here and there:

Save

Save

Save

Filed Under: Crafts & Creations, Kids Arts and Crafts Tagged With: bottle-cap-art-tutorial, bottle-cap-magnets, craft-ideas, fun-craft-ideas-for-boys-and-girls, Klutz, magnet-art

Welcome to the ValenDiner | Our Valentine’s Day Diner Theme Party

February 23, 2011 By Laura 6 Comments

Valentine theme party idea

For this past St. Valentine’s Day, I had the urge to throw a fun little party for our kids.  The more I got thinking about the little details, (which I love to do), a theme party sort of started snowballing in my head (which is often the case, when I think), and I got beside myself with excitement (which happens quite easily with me.)

Simply put, my idea, was simply, a St. Valentine’s Day diner theme party.

We invited a family we are good friends with, who have just as many kids as we do!  That was enough for me, because frankly….I had never (evah!) waitressed before.  But I was about to!

Valentine theme party idea

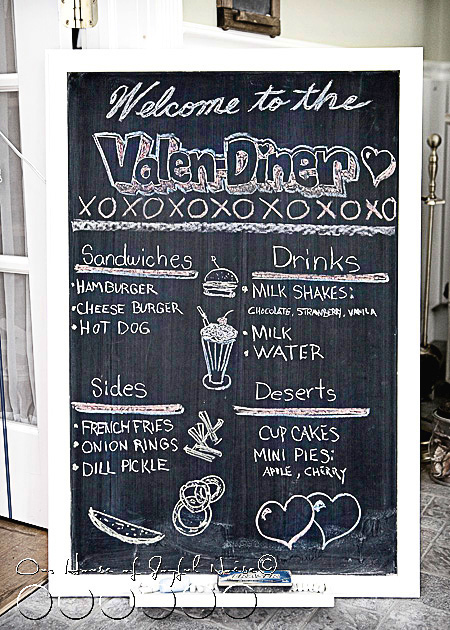
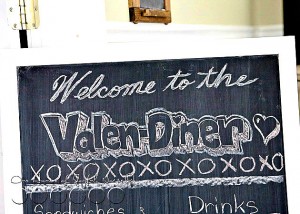
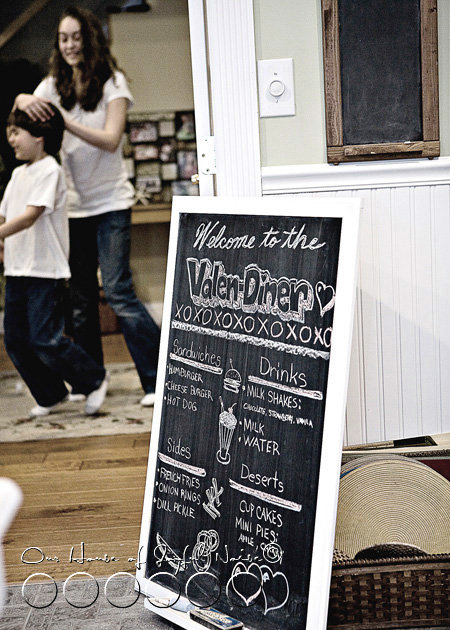
A menu sign welcomed them, as soon as the ValenDiner was open, at 1:00 in the afternoon.

The menu offered all of the specialties any good diner would, as you can see.  Milkshakes, in 3 flavors, and even deep fried french fries and onion rings!

(   Soon, our home would smell like a real diner too. ; )    )
–

Valentine theme party idea

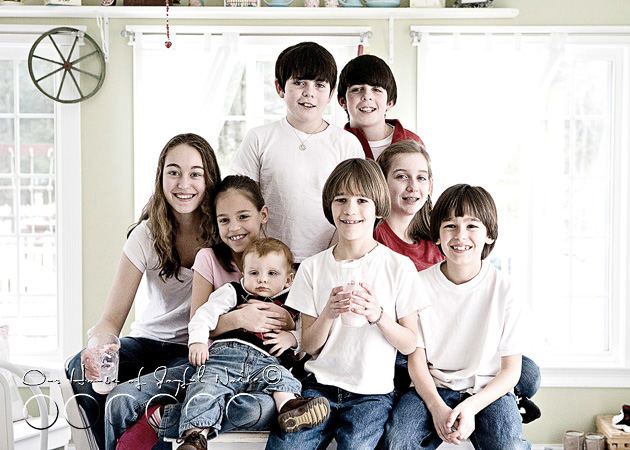
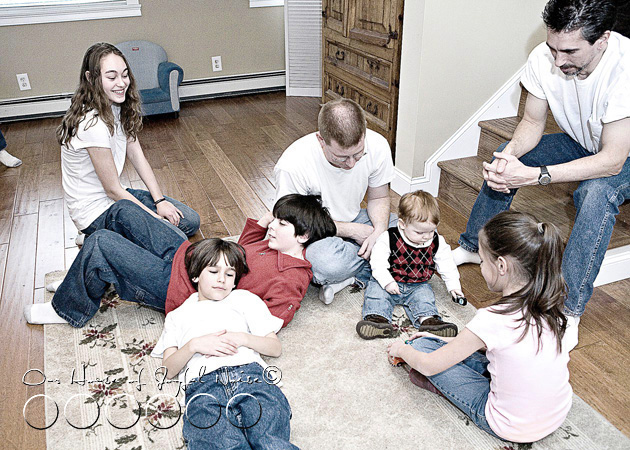
Here are our special patrons!!  A happy-go-lucky, handsome little crew, huh??   One of our crew, {D}, top center, was even so kind enough to take a shiner at his wrestling match that weekend.  I could have taken care of that, with my photo editing skills,  of course.  But us parents decided it added a nice 50’s sort of touch  to our party…..like one of  “The Outsiders.”  ; )  So, we just thanked him.
–

Valentine theme party idea 
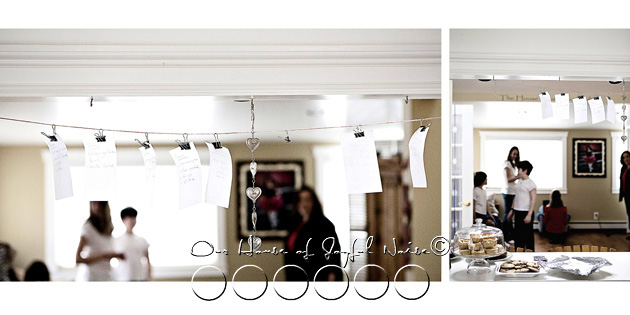
Us moms (a.k.a – the waitresses), took the kid’s orders soon after ‘we opened’.  We hung the order up, for the kitchen crew, over the breakfast bar window. (See them?)  Me and my side-kick were just like ‘Alice and Flo’.  (From that old sitcom, Alice.  Remember?  I’ll tell you a secret….I had a crush on Alice’s son, Tommy. Sshhhh.)  I really got into my role,….more like Flo. (Because it would just be weird, to be Tommy’s mother.)  I had fun blowing bubbles with my bubble gum, as I took orders, and asking, “Alright kids, what’ll it be.” <Pop!>

Valentine theme party idea

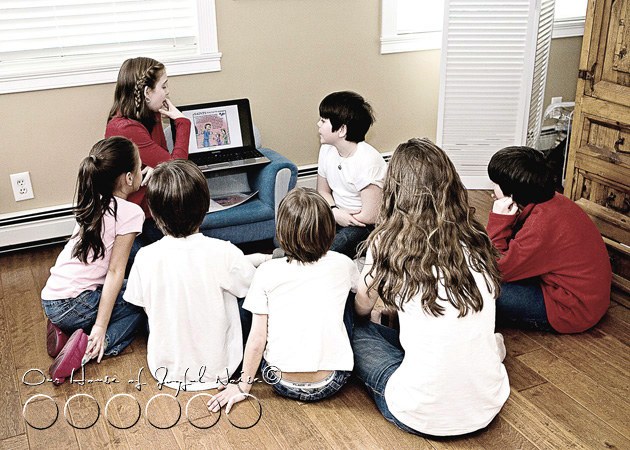
As many of you know by now, we take every opportunity we can, to let the kids learn.  It’s personally important to us (4 parents), that our children understand the history and true meaning behind every holiday or saint day.  (or anything else, educational, that we can squeeze into them.)  So while the kids were waiting for their orders to be up, and being that our celebration on this day, revolved around the life of St. Valentine, they watched a very informative and wonderful (wonderful!) power-point presentation, put together by….well, Alice.  ; )     I learned a thing or 2 more, I didn’t know, myself!  (More on that later.)


Valentine theme party idea

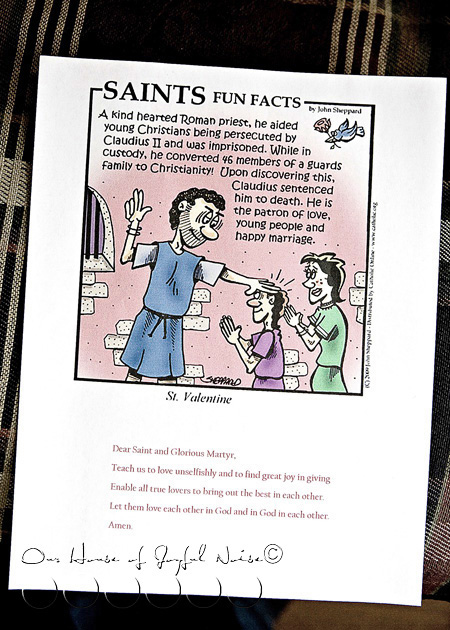
They each got a printout, too.
–

Valentine theme party idea Here’s ‘Grill Boy”.  (Mel?) He was cookin’ up those hot dogs and cheeseburgers.

We  had some unexpected mechanical difficulties with the frialator, that really held things up a bit.  But eventually, we got it working right.


Valentine theme party idea 
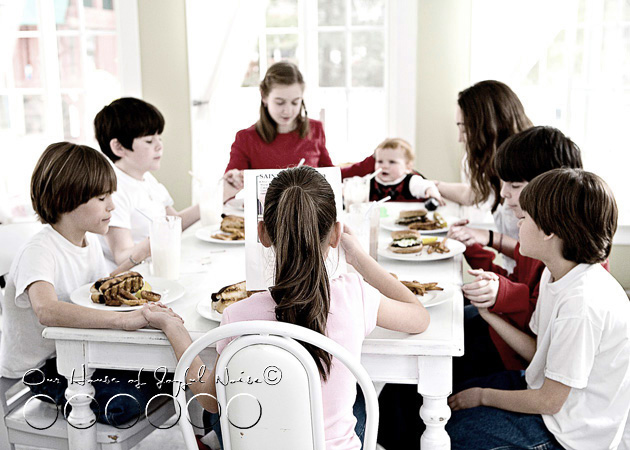
The little wait, just made the kids extra-thankful for their food!!  Honestly, it melted my heart, to see them join hands, and say grace together.

–

Valentine theme party idea 
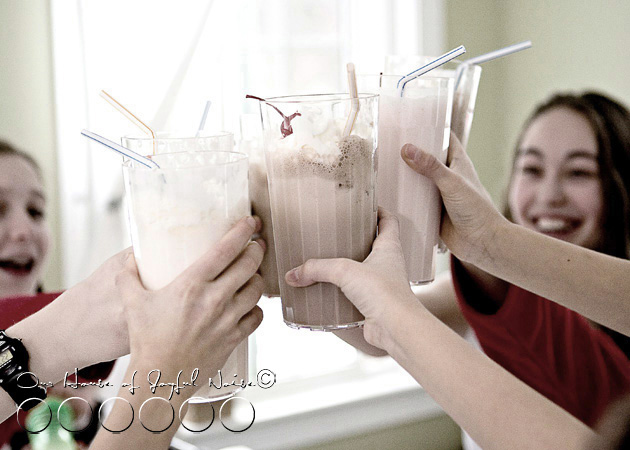
A ‘cheers’, with milkshakes…..in vanilla, chocolate, or strawberry.
–

Valentine theme party idea


Valentine theme party idea
Yum.  It’s hard to find good diner food, these days.

–

Valentine theme party idea 
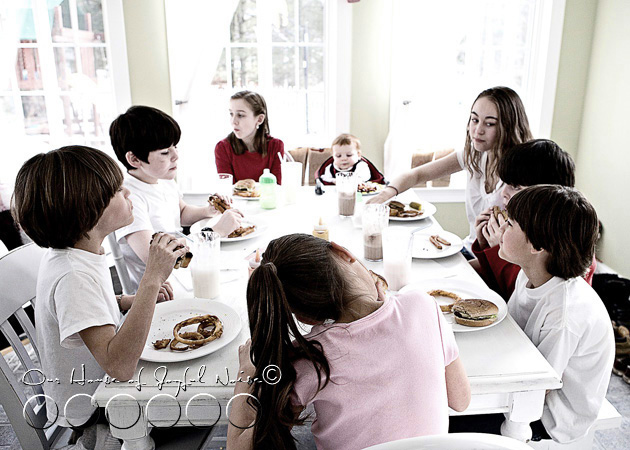
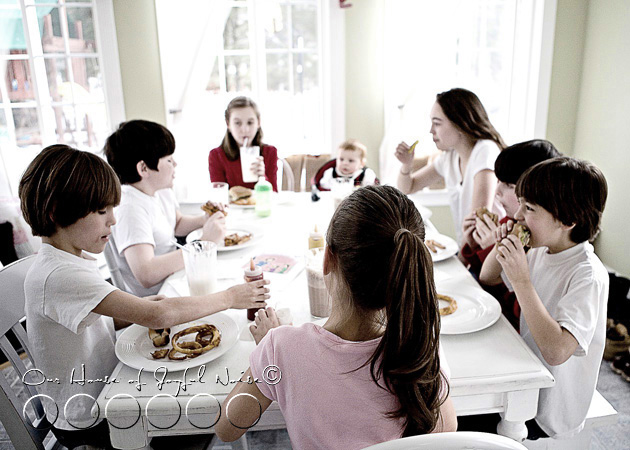
Us parents loved seeing the kids, all chowing down, giggling and chatting.  There was a real ‘hum’ of a busy diner.


Valentine theme party idea <Swoon.>  I so wish, I had gotten the shot of this sweet boy’s expression, when he tried that dill pickle.  I was a fraction of a second too late.  But I think I’ll remember it in my head forever, because it was ‘that’ comical.  There was actually a couple of hysterical moments with that pickle.  What a blessing this boy is.   (Well, that all are. But, you know.)

–

Valentine theme party idea

Valentine theme party idea

The patrons lingered.  And our tip they left us, was the echo of their generous giggles, in our hearts.
–

Valentine theme party idea 
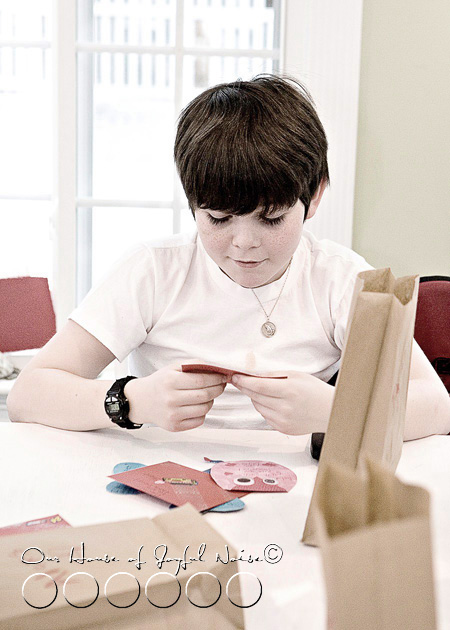
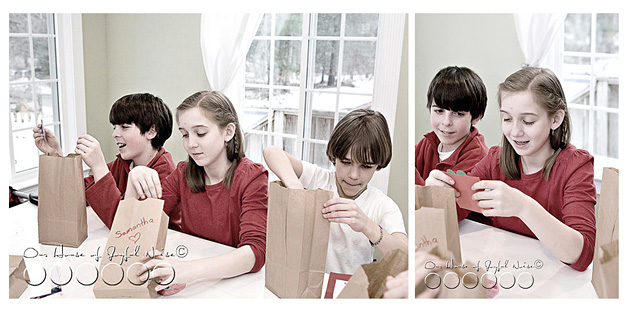
All of our kids, made Valentine cards, for each other.  (More on that later, too.)  But our friend’s sweet girl {S}, above, got an extra-special, unique Valentine, made by our boy, {JM} (with a little wording help from his Mama. ; ).  You need to know……{S} is a competitive Irish Step Dancer.   So, her Valentine was a 4 leaf-clover, with a heart center.  And it read:

*  “I-RISH” you’d “Step” into my heart, and be my Valentine!   *

Do you want to know the best part?  (Of course you do. )   As I type this post this moment, that Valentine card, right now, is in IRELAND!!  I’m not even kidding.  {S} took it there with her, for ‘good luck’, as she competes against the best Irish Dancers in the world!!


Valentine theme party idea
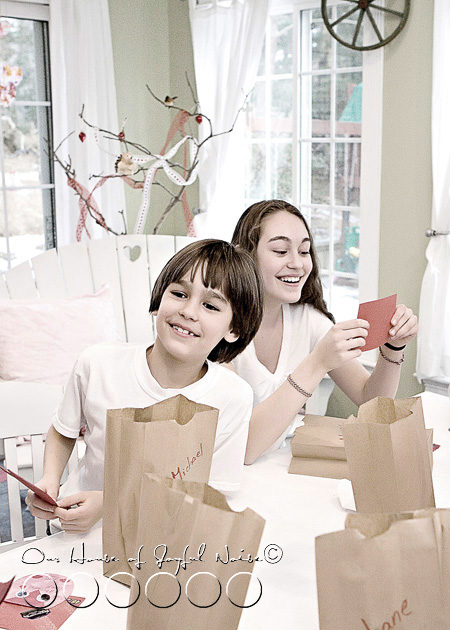
All of the kids, totally loved exchanging Valentines with each other.  They were all ‘keepers’.

–

Valentine theme party idea

Valentine theme party idea

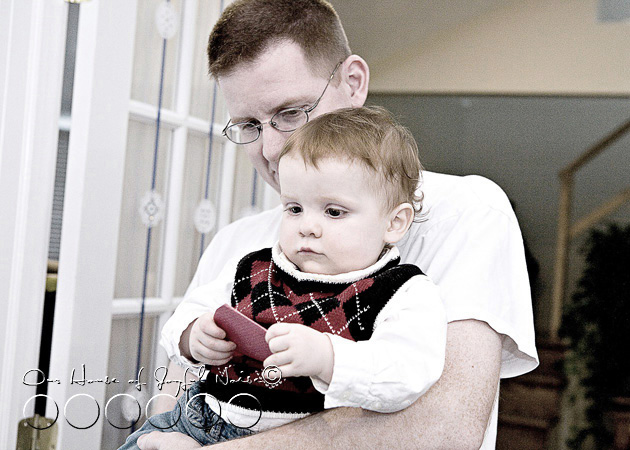
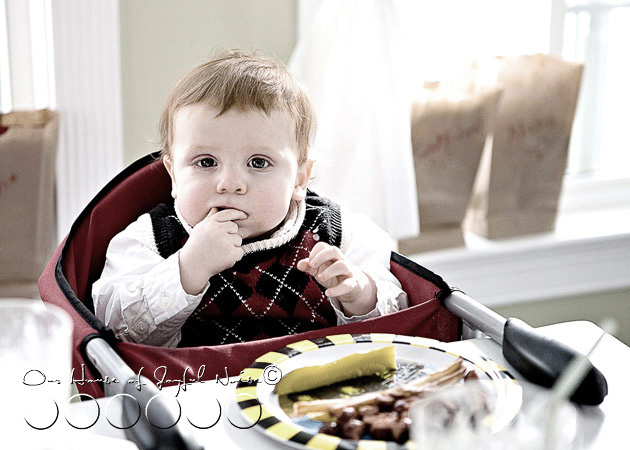
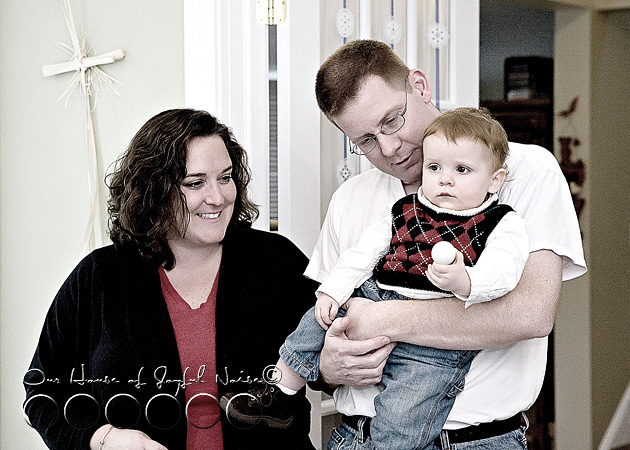
{Baby E} loved his Valentines, too!  Holding him, is “Milkshake Man”…..a.k.a Daddy!   He and
“Grill Boy” get along great.

–

Valentine theme party idea

Valentine theme party idea There’s my good friend, “Alice!”.  I would have never survived the diner crowd on this day, without her.  Actually…I may have not survived a few things in my life, with out her.
–

Valentine theme party idea

The kids partied on, to the 50’s ‘jukebox’ playing.

(Pandora. Whatever.)

–

Valentine theme party idea We all partied, until we started poopin’ out!!

Honestly, it’s always a good time of memory-makin’, when our families get together.

And this St. Valentine’s Day celebration,  was no exception.

–

Valentine theme party idea

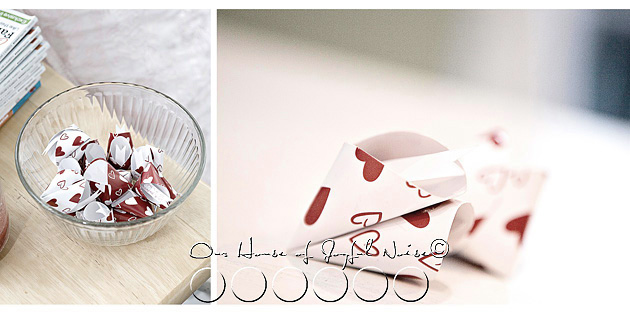
Before we all parted ways, we each had a Valentine fortune (paper-cookie) to read.   They actually came with fortunes already.  But because “Alice” and I have higher, perfectionistic standards, I pulled those lame ones out, and re-stuffed them, with our own alternative fortunes.    The theme of course, was “LOVE”, and together, we combined our lists of messages about “love”,  that we wanted our kids to be sent <wink-wink>, including some Biblical Scripture quotes.

It was a wonderful St. Valentine’s celebration, I think we ALL, always will remember.

If not, we have this post to remind us!

And if that fails us, there is that faint “deep-frying Diner” scent, I  swear still lingers in the air.

***  We hope you “LOVED” this theme party post!!   As an FYI…..we have more Valentine season ideas/photos from this year, that we hope to share with you next year, pre-Valentine’s Day, if I am still blogging away! Then perhaps you might like to use those ideas too, when you might need them.  (I’m sure you all are all Valentine’d out, by now.) There will be some treats under the ‘Recipes’ tab, as well as some Valentine card ideas (complete with sayings) under ‘Crafts & Creations’ tab.  And just maybe, I can manage to get that educational power-point presentation on St. Valentine, to share under ‘Homeschooling.’   That’s my plan, if I blog-on, anyway.  Hey, a lot can happen in a year! Right?***

Meanwhile, leave us your thoughts, and then….let’s get on with Spring!  (Lent, Easter….Alleluia!!)

Save

Save

Save

Save

Save

Save

Save

Save

Save

Save

Save

Save

Save

Filed Under: Celebrations, Faith, Faith/ Catholic, Holidays, The Big Picture Tagged With: Catholic-blogs, Catholic-families, diner-theme-party, St-Valentine's-Day, St-Valentines-day-party, Valentines-party-theme-ideas

Our "Lucky Liker’s" Surprise Giveaway Gift

February 8, 2011 By Laura 3 Comments

snowman-note-cards-giveaway-6

Last week, I decided rather spontaneously, to have a surprise giveaway to the 100th ‘Liker’ of our Facebook Page for House Of Joyful Noise. The unsuspecting ‘Lucky Liker’, Tammy N.,  got a happy surprise, and I had so much fun doing it!   I’ve decided that using our Facebook Page, when announcing having such giveaways, and sharing other random tidbits, photos, and inside-info, is the way to go!!  SO…..if you haven’t ‘Liked’ our Facebook Page yet, you might want to do that riiiiiight now.  Or else, you’ll be missing out.   (It just means, you’ll see us in your Facebook feed, and you’ll be in the know, with things not necessarily here on the blog.  It’s fun!  Please join us.  Buttons are in the sidebar. )

Here’s the sweet gift we sent out to Tammy, today!

snowman-note-cards-giveaway

Custom-designed thank you note-cards, by artist, Jessica Dittmer.

She’s a true artist, in many senses of the word.  Painter, graphic artist, photographer, crafter…..it’s ridiculous, really.  She has designed for the Demdaco Company, you know.  You know…the company with the Willow Trees line?  True story.

snowman-note-cards-giveaway-1

 So I am always watching Jessica’s work, and fell in love with this watercolor snowman she created.  I wanted to get some note cards with it, and so inquired with Jessica about it.  It was just easier for both of us at the time, for me to just purchase the file.  I was finally getting ready to order my note cards from the printer, (for MEEEE!! : ) when I had this giveaway idea.   I thought maybe, I should share my set.  Even though it’s a little hard! ; )

They were printed on watercolor stock, which is perfect for them.  I know you can’t tell the texture in these photos.  I didn’t try that hard. lol.  But beautiful quality.  They are just s w e e t.

snowman-note-cards-giveaway-2

Interestingly, I got several extras in my pack, from the printers.   That happens sometimes. But, I think this time they got a little print happy, knowing Jessica is, you know… somewhat famous.  In this creative world we all float around in, she is.  (Maybe outside too, but I’m in my own little world here. lol)   The printers certainly know who she is.   So this name on the back is her mark, and it makes these custom designed cards extra special.

Of course….I wish the printer sent as many envelopes. (HELLO? <sigh> It’s o.k., I can get more.)  But, I did spread the blessing with the extra cards.   I gave our winner a dozen, instead of 10!   ; )    (Notice I didn’t tell you how many extras I got. lol.  But really….it was nice of me to give her more!)

snowman-note-cards-giveaway-3

I knew I would find more uses, for my dyed string.  ; )   It matches soooo perfectly.  I put it next to the cards and was like….“NO SIR!!  GET OUT!!!”   (And then, per usual, the whole family is calling from various places in the house…..“What?!  What’s going on?”  Just every day happenings around here.  I get excited about the little things, a lot. )

I really had fun getting this little package together for Tammy.  Don’t be jealous.  There will be more giveaways coming up!  It’ not the first giveaway we’ve had…. and it sure won’t be the last.  But sure hope you’ve ‘Liked’ us on Facebook!  ; )

snowman-note-cards-giveaway-4

I decided to use on of my own thank-you note cards, to thank Tammy for ‘Liking’ us.  We like her too.
–

snowman-note-cards-giveaway-5

Here’s her package, all ready for Michael to drop off at the post office, on his way to….somewhere. I forget.   I was thinking….it sure would be nice, if the post office offered some nice designer packaging options.  Don’t you think?  Some a little pretty…..some a little festive for holiday shipping….you know. Like they have special edition stamps.  Can I talk about the postal service like that?  Am I going to get arrested now?  Just saying.  I hate making my packages all pretty, and then having to put them in these standard boring boxes.  The should hire Jessica Dittmer, for a nice designer line of packaging.

Well, we hope the arrival of this little package at your door, puts a smile on your face, Tammy.  Who will our next giveaway gift-receiver be?  We’ll seeee!


Save

Save

Save

Filed Under: Giveaways, Life In General, The Big Picture Tagged With: giveaways, Jessica-Dittmer-artist, snowmen-note-cards

Banana-Fanna-Fo-Fanna…Fe-Fi-Fo-Fanna…Banana.(CHIPS!) | Recipe

February 2, 2011 By Laura 7 Comments

There’s nothing like a snack you can give your kids, and feel good about!
So today, we’re going to show you how to make a simple, healthy and natural snack – Banana Chips!

banana chips recipe

Like most recipes, there are always a few variations or different ways to go about preparing a food.  Banana chips can either be fried, or baked.   We try to opt for the healthy options first.

Making baked banana chips really couldn’t be any simpler.

Get this:

Participating Ingredients:

  • Bananas!

Need I say more?   Maybe.  Some may want to know exactly what to do with them.  But I am willing to bet, this is going to go just about how you think it is.

bananas The main thing you need to make banana chips, is a bunch of bananas.

bananas-1

But really, if you want a bunch of banana chips, you might want to go with two bunches of bananas.  Because they shrink up to nothing, and you may find yourself asking in the end, “That’s all we got?  Seriously?”     Much like mushrooms, or onions…..you start out with a big pile, get cooking them, and wonder where it all went!

banana chips recipe

So, you’ll want to peel and slice the bananas to about 1/8″ thick.  Now…above, is a little thicker than that.   I went thinner after this one.  (And after I already took the photo.)

banana chips recipe

But either way….if you cut them or like them a little thicker, you’ll just bake them a little longer, and I’ll get to that.

banana chips recipe

If it’s gardening season, and you garden, remember…..banana peels are a wonderful organic compost ingredient!  They are a great source of potassium for the soil.  That means excellent nutrients for your producing plants.   When burying peels near your rose bushes, you’re bound to get bigger blooms too!

But right….we were talking about banana chips.

Preheat your oven to ~150 degrees for thinner slices, 200 degrees for thicker.

Then, you can lightly grease your pans, or spray oil on them.

Spread your banana slices on the cookie sheets, not touching.

healthy-banana-chips-recipe-3

Now, if it’s important to you that the banana slices maintain their color for the most part, and don’t turn too brown, you can spray them with lemon juice.

We didn’t care, and I was afraid I would taste the lemon juice.  (Not a lemon fan.)  So….we skipped that.

How long you bake them, depends on how thick you sliced them:

1/8″ : 2-3 hours, turning over every 30 minutes or so.

(The temp is so low, I used a spatula the first time, but used me fingers after that.)

When they are dried out and nice and a little golden brown, they are done.

Thicker than 1/8: Bake an hour, turn over and check if they are dehydrated yet.  If not, put in a little longer.

Really……when they are chippy, they are done.  You can’t do it wrong,  People. (Unless they are still mushy, or burnt. ; ).  After that, just leave them out to harden a little more.   Then put them in a storage container to keep fresh.

banana chips recipe

Ours came out crunchy at first bite, and then a little fun and chewy.

They can be eaten alone, or added to a trail mix.

A couple of other Fun Banana Facts!:

1)   Bananas make you HaPpY!!   They contain the natural chemical found in prozac.

2)  Bananas, eaten raw, do not make me happy. Well, they used to make my mouth happy.  But then I found, they do not make my stomach happy.  After several bouts of excruciating stomach pains, on different occasions, I had always asked myself what I had recently eaten.  The common consumption?  A banana.    I’ve come to the conclusion that my stomach can digest anything under the sun, except raw bananas.  Which is a bummer, because I love them.  So I make myself feel better with, banana chips!….banana bread…..banana muffins…..banana pancakes…..banana-fanna-fo-fanna….you get the idea.

008_

Banana chips (baked)  are a healthy, organic snack for the kiddos too!  So be sure to share!


Save

Save

Filed Under: Recipes, Snacks Tagged With: banana-chips-recipe, banana-snacks, healthy snacks, how-to-make-banana-chips, kids-snacks, snack-ideas

  • « Previous Page
  • 1
  • …
  • 40
  • 41
  • 42
  • 43
  • 44
  • …
  • 100
  • Next Page »

We are wicked happy to have you here! We hope you find much inspiration, help, humor and enjoyment here.


Archives


POPULAR POSTS

* * * * * *

SUBSCRIBE to House of Joyful Noise blog! Every new post, delivered right to your email box!


Privacy Policy

Amazon Affiliates

Never at any additional cost to you, we may earn a small commission for our endorsement, recommendation, testimonial, and/or link to any products from our website. Your purchase through our links helps support our family, while sharing with you the products we authentically use and recommend, for various ideas, and letting you know where you can purchase them. Thank you for your support!

[footer_backtotop]

Copyright © 2026 HouseOfJoyfulNoise.com · Genesis Framework by StudioPress