• HOME
  • {A}’s Chipmunk Training Archives

 Homepage

  • The Homestead
    • Home Projects
    • Home Improvement
    • Home Decor
      • Seasonal Home decor
        • FALL Home Decor
        • WINTER Home Decor
        • SPRING Crafts and Creations
        • SUMMER Crafts and Creations
    • Our Chickens
    • Gardening
    • Organization
    • Re-Purposing
    • Furniture Refinishing
    • Budget
  • Crafts & Creations
    • Seasonal Home decor
      • FALL Crafts and Creations
      • WINTER Crafts and Creations
      • SPRING Crafts and Creations
      • SUMMER Crafts and Creations
    • DIY (Do-It-Yourself) Project
    • Kids Arts and Crafts
    • Homemade/Handmade Gift Ideas
    • Holiday Crafts
    • Fan Pulls
    • Free Printable/Downloadable
    • Sewing Projects
    • Giveaways
    • Business Features
  • Recipes/FoodFun
    • Breakfast
    • Lunch
    • Main Dish
    • Sandwiches
    • Appetizers
    • Slow Cooker
    • On The Grill
    • Side Dishes
      • Soups
      • Salads
    • Baking
      • Breads, Rolls and Muffins
    • Snacks
    • Treats
    • Desserts
    • Drinks
  • Homeschooling
    • Elementary Homeschooling
      • Elementary Homeschooling READING
      • Elementary Homeschooling MATH
      • Elementary Homeschooling LANGUAGE ARTS
      • Elementary Homeschooling SCIENCE
      • Elementary Homeschooling HOME ECONOMICS
      • Kids Arts and Crafts
    • Middle School Homeschooling
      • Middle School Homeschooling SCIENCE
      • Middle School Homeschooling HOME ECONOMICS
    • Language Arts
    • Math
    • History / Social Studies
    • Geography
    • Foreign Language
    • Field Trips
    • Games
    • Nature Study
  • The Big Picture
    • Life In General
    • Celebrations
    • Faith
      • Into the Light; The Series
    • Giveaways
    • Reviews & Sponsors
  • Photography & Lettering
    • Photography
    • truck lettering
    • vehicle graphics
    • Newborns
    • Kids
    • Engagement
    • High School Senior Pictures
    • High School Senior Pictures Sneak Peeks

Blooming Beauty Around the Gardens and Yard | June 2018

June 25, 2018 By Laura 5 Comments

Just a short but lovely post, to share with you all the beauty of the flowers blooming all around us, that we have been enjoying every day around here. We have a long list of vegetables growing in the garden beds as well right now, that most likely we will show you at a later date. This early in the season, however, they all have much more growing and producing to do, and they are hardly worth photographing quite yet.

But oh, the flowers blooming!

As you will see, this year we went crazy with Superbell – Calibrachoa hybrids, by Proven Winner.  And we have to say, I think they are a favorite we’ll be sticking with, year after year, from here on out!  They are so easy to maintain! They are tolerant of the heat, the occasions we didn’t get to watering, and there is never any deadheading to be done!  We’ve got them in all kinds of colors, blooming all over the place, and couple of other kinds of flowers as well to let you take in, as well.
Let us show you!


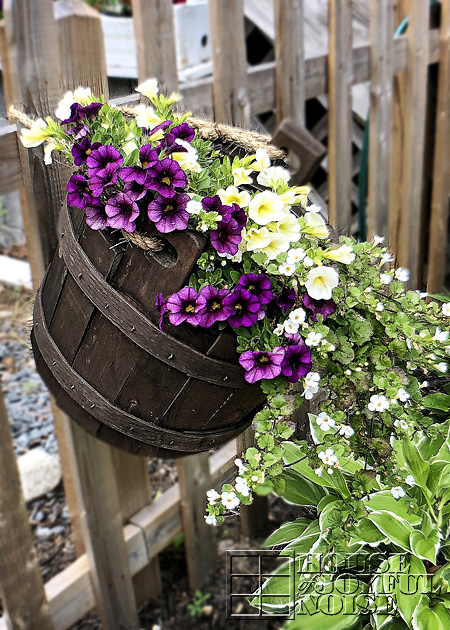
This wooden bucket holds a bountiful spillage mix of Superbells in Plum and Chiffon, as well as some Snowstorm Giant Snowflake.  So in love with it.

[Read more…]

Filed Under: Gardening, Re-Purposing, The Homestead Tagged With: beautiful-gardens, container-flowers, flowers, garden-container-flowers, gardens, Lantana, Proven-Winners, Superbell-Calibrachoa, superbells

Yet Another Pallet Mug Holder – How and Why

March 16, 2016 By Laura 2 Comments

Alright, so maybe you’ve already seen the pallet mug holder idea a good many times. But there is more than that to this post. And anyway, give us a little break here; you know most all of the time, we are sharing our own custom and very unique projects with you! Like the time we built our shoes-storage bench out of old doors! Or custom-designed and built our mac-daddy chicken coop! So we have no shame in being inspired by others ourselves now and then, and running with it! Creative people sharing their ideas is what it’s all about. Right? Being inspired by others is why we all share. And we’re not immune to loving other’s ideas! Anyway, today I’m going to share some how-tips about this popular project, and why I personally wanted a pallet mug holder (just like I’ve seen), so bad.

So yes, I’ve seen a few variations of the idea many times online before, (also). However, [Read more…]

Filed Under: Home Decor, Home Page, Organization, Re-Purposing, The Homestead Tagged With: kitchen-organization, kitchen-storage-help, mug-organizer, pallet-mug-holder, pallet-projects, pallet-recycling, recycling, recycling-projects, rustic-mug-holder

Old Antique Bottles

October 7, 2014 By Laura 6 Comments

My family and I live on the south shore of Massachusetts, now. But I (Laura) was born and raised out in western MA, in the city of Westfield. Most times when I go back home to my parent’s house, my father urges me to take anything in the house that I want, for myself. “Anything at all”, he stresses.  I most always dismiss his invitation because, frankly, I want everything to stay there, just as it is.  Forever, really. But at least, for as long as possible.

You see, my mother passed away in 2005.  It’s so hard for me to believe it’s been that long already.  But what’s harder for most others to believe, is that my father has kept everything in the house, just as it was when my mother was there.  He even keeps it clean. Vacuumed, dusted, the dishes done; everything. You’d think she was still there.

It’s a 100 year old 3-story, 2 family house. Walking into that house, [Read more…]

Filed Under: Home Decor, Life In General, Re-Purposing, The Big Picture, The Homestead Tagged With: antique-bottles, antiques, knobby-milk-glass, milk-glass, old-bottles, Westfield-MA-Massachusetts, Whip-City

A Rustic Christmas Cards Display Idea

December 3, 2013 By Laura 1 Comment

 When the Christmas season arrives every year, and the cards start coming in the mail, what do you do with them?  Do you just put them in a pile and let them stack up? Or do you like to display them somehow, for all to see?  If you display them, how do you manage that? I bet you all have had some pretty creative ideas yourselves.

We’ve had a few solution ideas of our own over the years, for the Christmas cards we gratefully get in the mail. Way back, we just put them in a beautiful Christmas basket. That was kind of sad though, as we know many are really excited about their cards every year, and we’d hate for them to be hidden. Especially the ones with photos of kids and families, or the special notes.
We’ve also just tied a pretty ribbon across a beam in our main living area, and let them hang on that.
Getting more creative still, for a few years, we stood a white folding accordion door in the corner of the room, and the louvers (slats) worked beautifully for hanging cards. Of course, like with the string idea, the vertical cards hung horizontally. It was still a nice way to display everyone’s cards though. 

Last year though, I came up with a new idea, that I think we’ll stick with for some time. It’s very homemade and rustic, and I just love it.
Take a look . . . .


What do you think? 
It was actually just a long scrap of plywood we had on hand. (Repurposing at it’s best!).  
This one happens to be about 11″x 76″.   You can use any similar long board though.  You just want to be sure it is thin enough to be able to clamp clothespins on.


We also used some rough rope, in which I intertwined some thin satin rope around, just to add some pretty to the rough look.
The roping is mostly for decorative purposes, though. It will hold some horizontal cards well enough, but if it slides, it knocks other down. And that’s just frustrating.
I like the look of the clothespins, and it helps secure the cards of all sizes.


So this scrap board was painted white and then rough sanded. I didn’t put a lot of effort into that wood-finishing part at all, because really….I was hopeful that if enough people thought of us whilst filling out their Christmas cards, most of that board would be covered, anyway.  ๐Ÿ˜‰
The scrap blocks of wood (you see) on the back, at the top and bottom of the board, not only add stability to the board for it to sit well on the floor and lean against the wall.  There is a notch cut at the top and bottom of the board, for the rope to wrap around to the other side inset, and then there is hole through the block for the rope to go though and be secured to the other side. It sounds complicated, but it really is simple in design.  Sorry I forgot to get a pic of the back side for you. If you are confused and  have a question on this, go ahead and ask in the comments.


Completely optional tidbit: 
I soaked my clothespins in tea water overnight, to try and antique them some. It worked; but honestly, it’s too subtle for the effort in my opinion. Maybe I did it wrong?
I think at some point I will take these clothespins, and revert to what always works beautifully for me; a touch of my Annie Sloane Dark Wax. Love-that-stuff!

To really dress up the top, I added these large rusted-looking jingle bells, hung with twine. I love jingle bells! 

CONSIDER THIS: 
You could use this whole idea, and change the whole style of it depending on how you finish it and what you use as detail elements!
For example: paint a smooth new board with a clean white paint, omit the sanding, putty and paint your screw holes, and use a wide frilly ribbon down the board, with a big fancy bow at the top!
 But the rustic, farmhouse look suits us just fine.
–


Yes, just another crazy idea, from our house to yours! 
If you love it, bookmark it! You could try the idea yourself this year or some other coming year. Or simply share it with your friends who follow you on your social networks.  They’ll love you for it.
  And hey, while your here, say hello, and share your thoughts.

Hope your homes are feeling a little bit of your Christmas love!
These are the little things that make any house, a home, for the ones you love.
~Laura / The Richard Family

Save

Save

Filed Under: Crafts & Creations, DIY (Do-It-Yourself) Project, Holiday Crafts, Home Decor, Organization, Re-Purposing, The Homestead Tagged With: Christmas-card-display, Christmas-cards-display-solution, Christmas-cards-organization, Christmas-decor-ideas, Christmas-DIY, Christmas-organization-tips, how-to-display-your-Christmas-cards

Re-Purpose Old Calendars | DIY Wall Art

March 26, 2013 By Laura 17 Comments

Have you ever found yourself sad to turn the page on your 12 month wall calendar, because you liked the image for the ending month better? Or hesitant to throw out a calendar with so many great visuals at the end of the year? After all, when we buy a wall calendar, we usually pick out the one we did, because we liked the pictures or designs that went with each month. 

So isn’t it a great recycling idea, to re-purpose old calendars into DIY wall art, using some of those favorite months, for home decor?

I had chosen this 2011 calendar for my youngest daughter to use in her room, because I just loved the artwork in it, so much. 
And can you believe I got it for $1.00, at Michael’s Arts and Crafts?! A buck!
Our girl enjoyed it hanging in her room the whole way through. And she used it to remember things on certain days, as well.
When the year came to an end, she was sad to take it down, and I just couldn’t throw it out, either.


I loved so many of the months artwork pictures, that I was hoping I might figure out something creative to be able to do with them. 
I had it for the whole following year; busy with other projects most times, forgetting I even had this calendar other times, and then finding it again and remembering I wanted to do something with it. I just wasn’t sure what.
And then it hit me: Why not keep it simple, and just frame some of the pages as artwork?!

So we chose 2 picture-pages for each of our girls’ rooms. Ones that they loved, but that also went well with each of their room colors.
After taking those 4 pages out, I DID throw the rest of the calendar away, because it had already been hanging around for a year after it’s expiration.

But in looking at all of the photos I took of the calendar for this blog post, I wish I kept the cover! 
Because I’ve realized the cover was the artwork I loved most. Dag nabbit!
I could have trimmed it right over the bottom copy there, and had say a 12″ x 1o or 11″ piece of artwork too.
Oh well. Trying to let go of the regret, since there is nothing I can do about it now.

So let me tell you the simple way in which I turned this old calendar into 4 awesome, colorful and artistic looking pieces of wall art.

The calendar measured 12″ x 12″, so that was the size to work with.
To give the floppy calendar page some stability, it needed to be mounted on something. You can also just use some sturdy pieces of cardboard. 
But my husband had some corrugated plastic around, that he uses to make yard stake signs for different companies.  Real estate agents use them a lot, as does various home contractors, etc.
So I used that stuff. I cut four 12″ square pieces.

Then I simply adhered each artwork page onto each corrugated backing, using Modge Podge as the glue.

Next we needed 4 12×12″ frames.  I am quite sure square frames are available in stores. One could certainly get them custom made, if necessary. But my husband is pretty good at just banging out any frames when I need them, and it’s a lot more cost efficient to make them ourselves, than buying them at retail stores. I also really prefer to finish them myself, so they have the look and style I am envisioning. 
So he builds the frames, and I paint them.

I have various ways of finishing frames or any woodwork pieces.
For these, I painted them dark grey first, then white, and then distressed the edges well with sandpaper.
This resulted in some grey paint as well as bare wood showing through the distressed areas of the white finish. That mix of shades and depth was just what I was aiming for.

The mounted artwork just popped into the back of the frames, and I used a few tiny nails to ensure they were held in.
Done!

Here’s a look at several photos of the finished art pieces, adding pretty and cheerful decor to each of the girls’ rooms:

(Our oldest daughter, Alexis’ room.)


–
(Next, our youngest daughter, Olivia’s room.)

There you have it. Inexpensive and beautiful accent wall decor.

As anther tip, stores often sell expiring soon calendars at a steep discount, when it’s already half way through a year, etc. So if you keep an eye out for them, making framed pictures such as these is another way to create more awesome budget friendly decor for your home, or to give as gifts.

The more I think about it, the more creative ideas I can think of, to recycle and make the most of out-of-date calendars.
So before you throw out your next expired calendar, think about what else you can use it for.
Hope you enjoyed this idea, and seeing the results of it.

* * * * * *

Please come follow us here and there:


Filed Under: Crafts & Creations, Home Decor, Re-Purposing, The Homestead Tagged With: budget-home-decorating, DIY-wall-art, handmade-frames, home-decor-ideas, inexpensive-wall-art, Modge Podge, recycling, repurposing, repurposing-ideas, repurposing-old-calendars, wall-decor-ideas

  • 1
  • 2
  • 3
  • 4
  • Next Page »

We are wicked happy to have you here! We hope you find much inspiration, help, humor and enjoyment here.


Archives


POPULAR POSTS

* * * * * *

SUBSCRIBE to House of Joyful Noise blog! Every new post, delivered right to your email box!


Privacy Policy

Amazon Affiliates

Never at any additional cost to you, we may earn a small commission for our endorsement, recommendation, testimonial, and/or link to any products from our website. Your purchase through our links helps support our family, while sharing with you the products we authentically use and recommend, for various ideas, and letting you know where you can purchase them. Thank you for your support!

[footer_backtotop]

Copyright © 2025 HouseOfJoyfulNoise.com ยท Genesis Framework by StudioPress