• HOME
  • {A}’s Chipmunk Training Archives

 Homepage

  • The Homestead
    • Home Projects
    • Home Improvement
    • Home Decor
      • Seasonal Home decor
        • FALL Home Decor
        • WINTER Home Decor
        • SPRING Crafts and Creations
        • SUMMER Crafts and Creations
    • Our Chickens
    • Gardening
    • Organization
    • Re-Purposing
    • Furniture Refinishing
    • Budget
  • Crafts & Creations
    • Seasonal Home decor
      • FALL Crafts and Creations
      • WINTER Crafts and Creations
      • SPRING Crafts and Creations
      • SUMMER Crafts and Creations
    • DIY (Do-It-Yourself) Project
    • Kids Arts and Crafts
    • Homemade/Handmade Gift Ideas
    • Holiday Crafts
    • Fan Pulls
    • Free Printable/Downloadable
    • Sewing Projects
    • Giveaways
    • Business Features
  • Recipes/FoodFun
    • Breakfast
    • Lunch
    • Main Dish
    • Sandwiches
    • Appetizers
    • Slow Cooker
    • On The Grill
    • Side Dishes
      • Soups
      • Salads
    • Baking
      • Breads, Rolls and Muffins
    • Snacks
    • Treats
    • Desserts
    • Drinks
  • Homeschooling
    • Elementary Homeschooling
      • Elementary Homeschooling READING
      • Elementary Homeschooling MATH
      • Elementary Homeschooling LANGUAGE ARTS
      • Elementary Homeschooling SCIENCE
      • Elementary Homeschooling HOME ECONOMICS
      • Kids Arts and Crafts
    • Middle School Homeschooling
      • Middle School Homeschooling SCIENCE
      • Middle School Homeschooling HOME ECONOMICS
    • Language Arts
    • Math
    • History / Social Studies
    • Geography
    • Foreign Language
    • Field Trips
    • Games
    • Nature Study
  • The Big Picture
    • Life In General
    • Celebrations
    • Faith
      • Into the Light; The Series
    • Giveaways
    • Reviews & Sponsors
  • Photography & Lettering
    • Photography
    • truck lettering
    • vehicle graphics
    • Newborns
    • Kids
    • Engagement
    • High School Senior Pictures
    • High School Senior Pictures Sneak Peeks

Calvary Hill Planting | A Kids’ Lent Project

February 26, 2012 By Laura 29 Comments

020_easter-empty-tomb-calvary-hill-plant-kids-project-150x150

When Lent comes around, it’s difficult enough for us as adult Christians, to decide in which ways we’d like to embrace the 40 days leading to Easter. We are led by 3 things: Sacrifice, Prayer, and Alms-giving.  But as parents, we also want our children to take part in some way, and fully realize the significance of this period of time, too!  Attending Mass (especially through Holy Week), hearing the Scripture relating to Jesus’ death and resurrection, and witnessing (or participating in, depending on the ages of the children) their parent’s participation throughout Lent, certainly helps build their understanding of the importance of this season in our faith. 

However, I was thrilled last year, to come across this great project for the kids, that really invited them to be involved in some significant way even more, throughout the Lenten Season!:
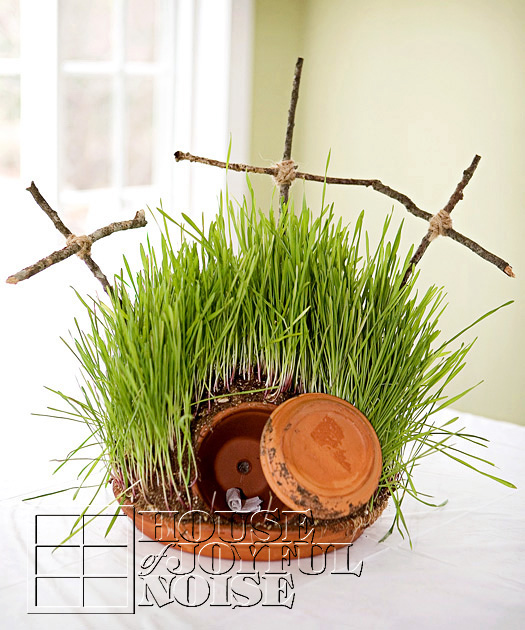
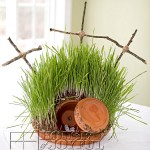
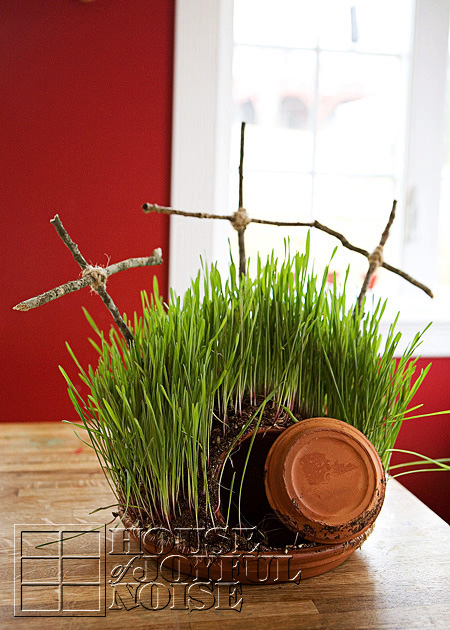

020_easter-empty-tomb-calvary-hill-plant-kids-project
Calvary Hill

As parents instruct the kids how to build this project, and plant and water the grass seeds, they have the opportunity to teach, or further discuss, the reality of the death and resurrection of Jesus, why and how He died, and what that means for all of us!

 This Calvary Hill plant needs to be nurtured and tended to by the kids, throughout Lent. By Easter, it is beautiful plant, symbolic why we celebrate. It makes for a wonderful Easter table centerpiece, and can also be put outdoors to keep for many months!  We put ours out near our gardens, on our potting bench.  It can also simply be placed right into a garden bed, or on a deck. We trimmed the grass down when necessary, and kept it watered, enjoying it for long past Easter.

001_calvary-hill-plant-supplies 
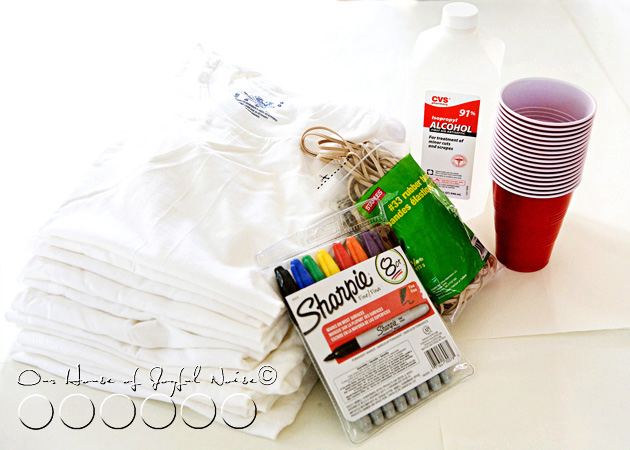
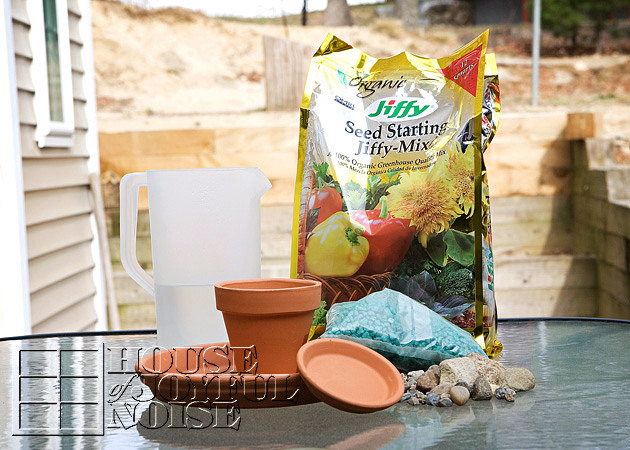
Pictured here are some of the supplies you will need.

Here is a more complete list: 

  • Organic Seed Starting Mix (we used Jiffy brand)
  • Organic Hard Winter Wheat Berries, OR, Winter Rye (we used Winter Rye),
  • a large (12″) flower pot dish (w/ no drain hole),
  • a small (4″) flower pot and it’s dish,
  • small rocks (for drainage),
  • a pail
  • pail and shovel, with some water, for mixing soil.
  • some straightish-sticks of any kind, for the crucifixes
  • brown twine to tie together crucifixes
  • probably a glue gun

002_easter-kids-lent-project 
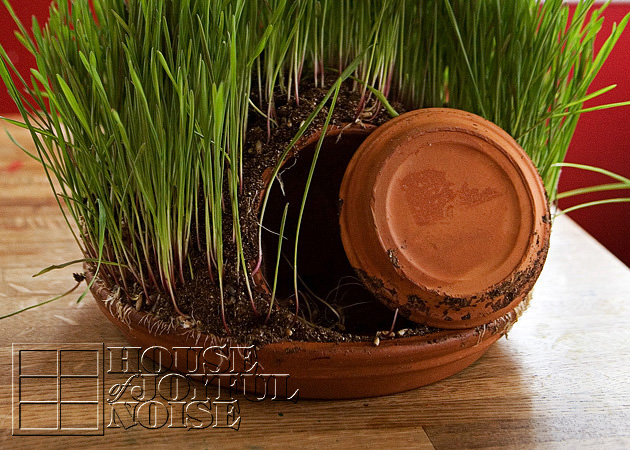
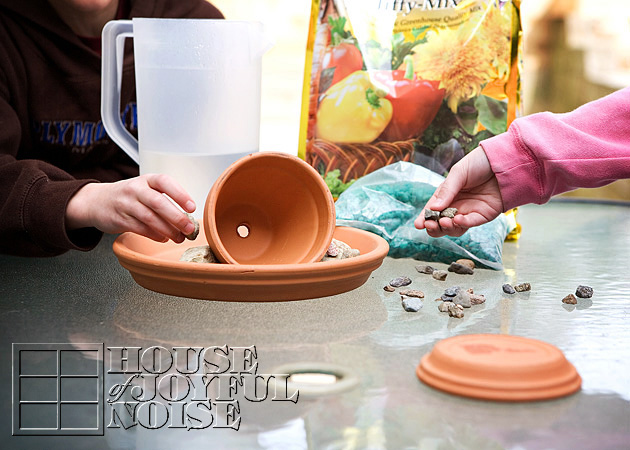
First will be creating Jesus’ tomb: Lie the small pot on it’s side, in the center of the large pot dish, with the opening of the pot a couple of inches or so from the inside edge of the big dish. The small pot is representative of Jesus’ tomb. You just want to be sure you leave room for the dish to that pot, to be in front of the pot opening, and room to roll to the side, which will serve as the stone in front of Jesus’ tomb.
–

003_kids-lent-project 
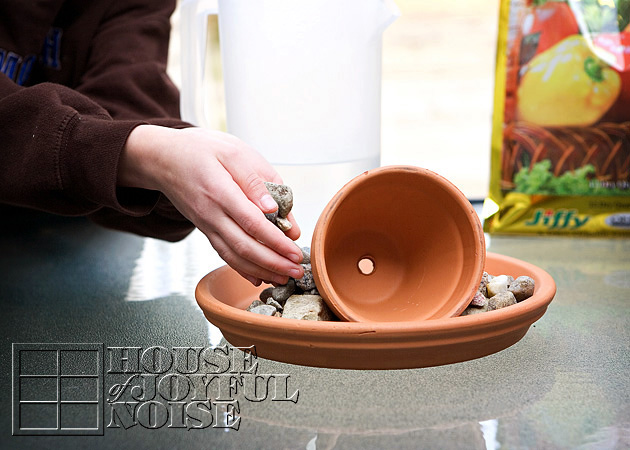
Fill the whole bottom of the large potting dish with small rocks on the 3 sides of the small pot (Jesus’ tomb), supporting it to keep it from rolling. Smaller rocks than we used are acceptable and may even be more suitable and manageable. We just grabbed some from our driveway! 
–

004_mixing-soil 
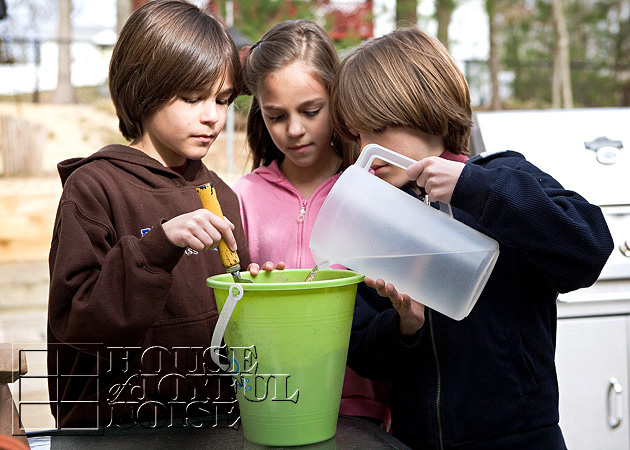
Next, in a pail, add water to some Organic Seed Starter Mix . . . . . .

005_ 
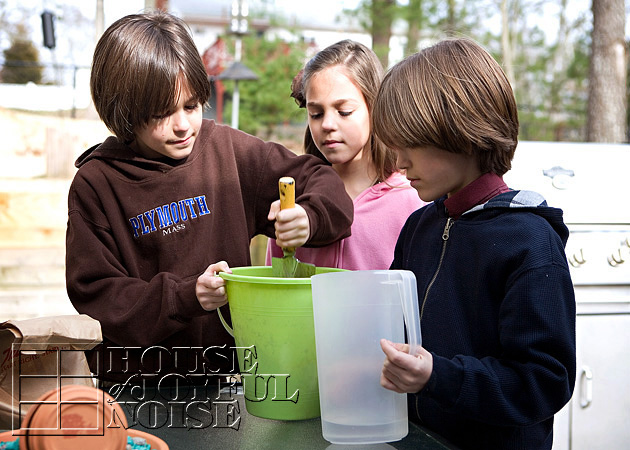
. . . . . .and mix to make some nice wet dirt!
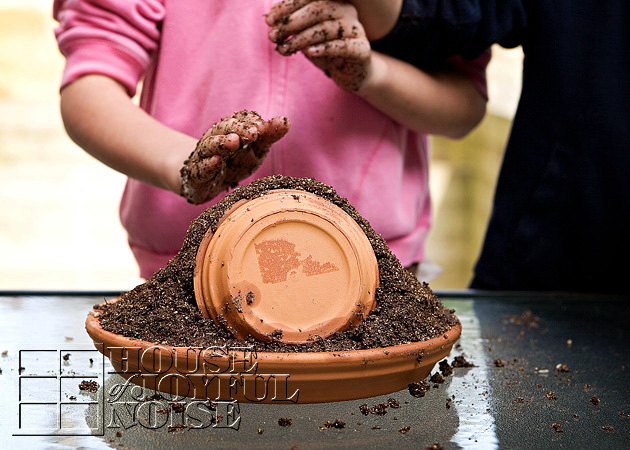
006_ Time to get dirty!

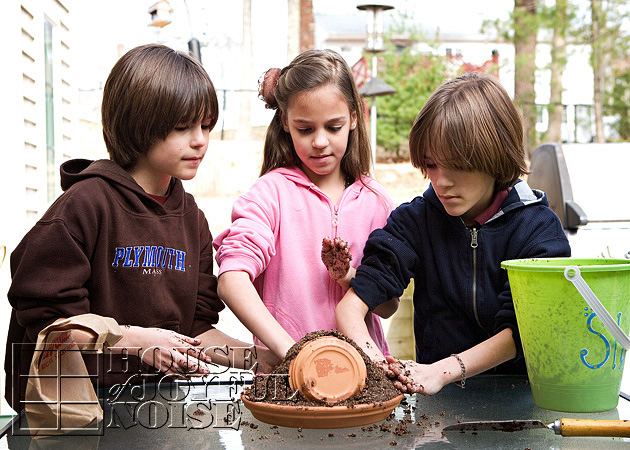
Scoop handfuls of dirt out of the pail, and place it all around the sides of and behind the tomb, as well as right over the top of it.  Create a nice round hill. 

*Note that in these photos, you see some dirt in front of the lid and somewhat in the way here. We learned that was not a good idea, as dirt was always falling out when we moved the lid. It is best to keep it clear of any soil.

007_soil  Again, keep the dirt away from the front of the tomb, so the ‘stone’ can roll away.  But be sure the tomb is covered in the soil mixture.

009_calvary-hill-seeding 
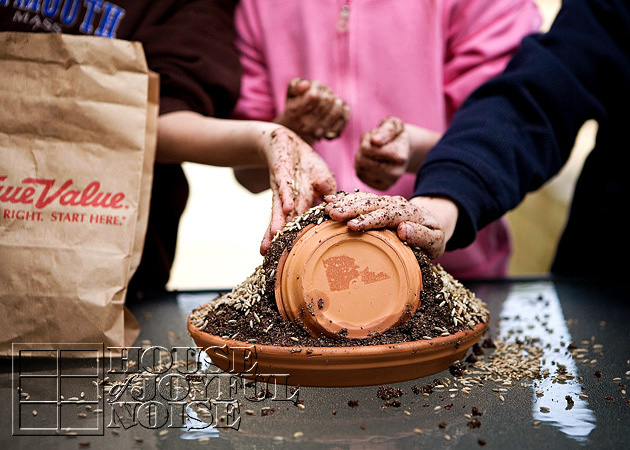
Next, is planting the seed. As mentioned earlier, we used Winter Rye, but Organic Hard Winter Wheat Berries can also be used.  Either grow quickly!  Simply cover the soil with the seed, pressing down into it if possible, and perhaps cover it with some more where you can, if there is room.

010_stick-crosses 
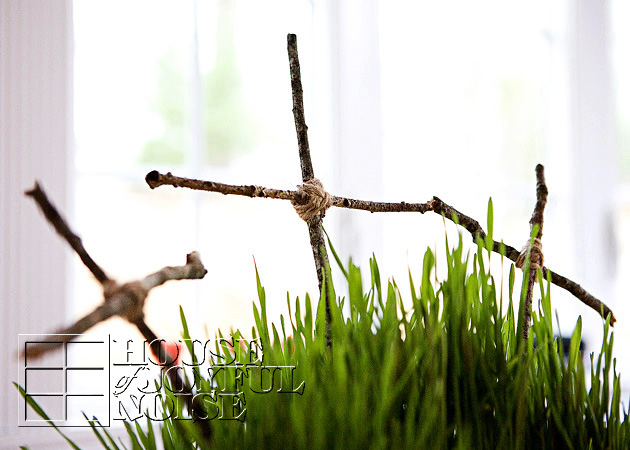
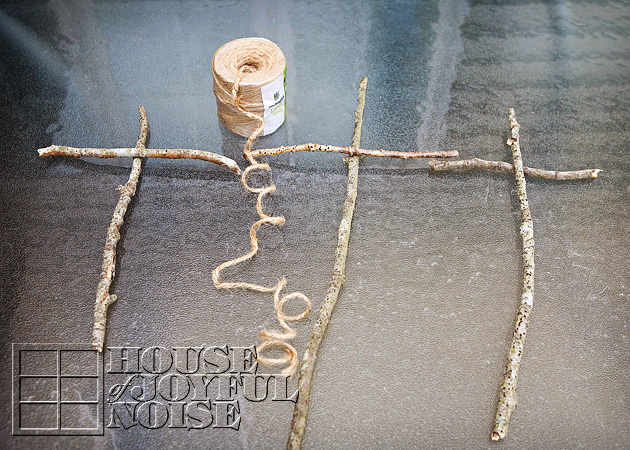
Now 3 crucifixes need to be made.  We wanted to keep it simple and rustic, so we simply found some straight sticks up in our wooded area, and created crossed wrapping the twine in a criss-cross effect around the intersection of the 2 sticks.  We tied off and then cut the twine ends, but then also used a dab of glue with a glue gun to secure it.

011_building-calvary-hill-plant-easter 
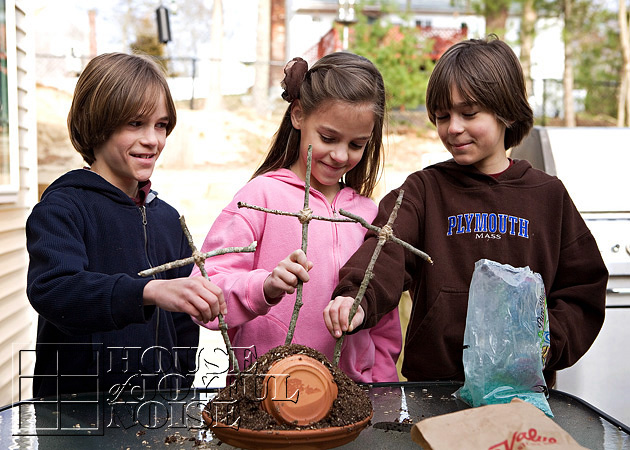
The crucifixes can be placed into the soil of your Calvary Hill now, as we did right away.  But as a tip, they would stay in place better, if you waited a bit for the seed to sprout and begin to grow, so there is a bit of a root system established to support the sticks.


012_kids-calvary-hill-plant-project
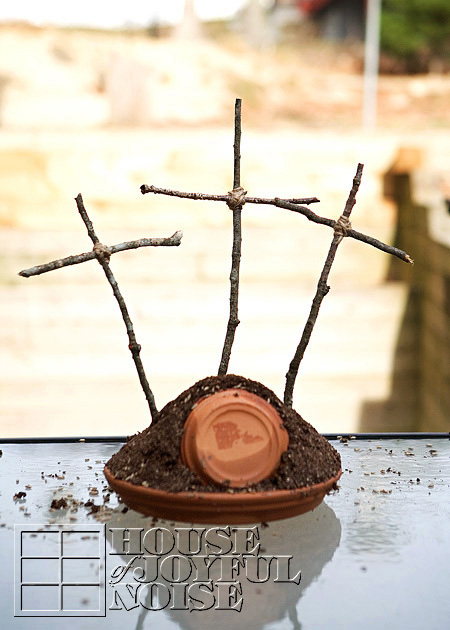
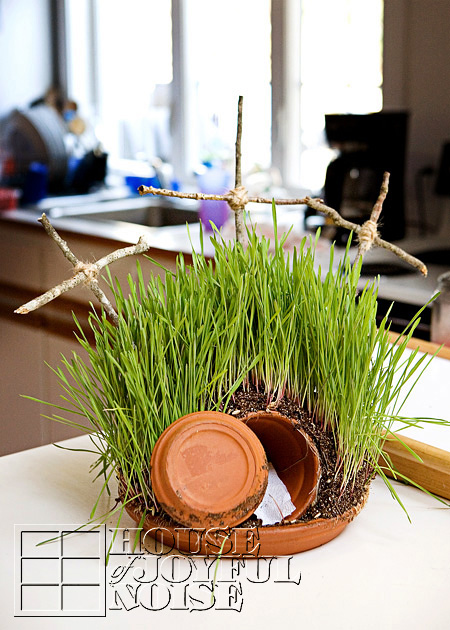
Here is what ours looked like, all done and ready to grow!

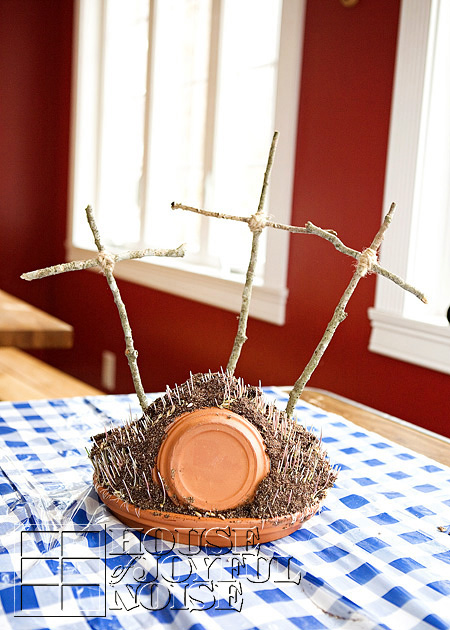
We brought it indoors, and placed it on a plastic covered table where sunlight would be on it a good part of the day. Throughout the first week or so, the kids need to simply mist spray the soil with water, in a spray bottle, 3 times a day, to keep the soil moist, and encourage the seed to sprout.  Perhaps you can come up with a simple 1 or 2 line poem to say, while they do this, as a form of meditation.
–

013_kids-lent-project
It’s growing!  The kids will be so excited to see this.

As sprouts push upward from beneath, some dirt will tumble down. This is why it is important to really try to keep the soil quite moist, until it is all held in place by the grass that grows. We thought the plastic table covering was wise, because all of the water spraying.
–

014-seeds-sprouting 
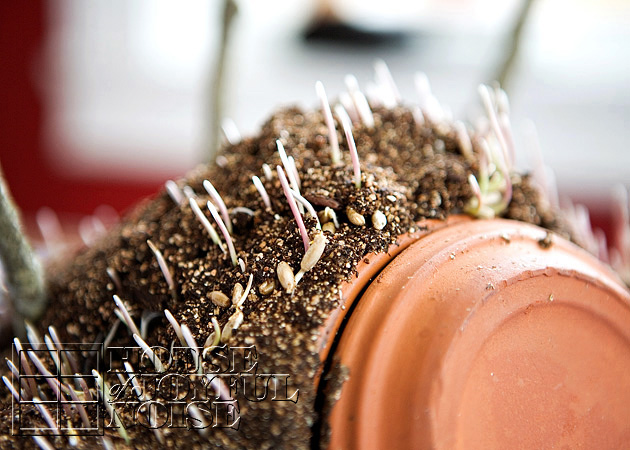
You will also notice some seeds and seed casings being pushed up to the surface. It’s fine.


015_calvary-hill-plant-easter
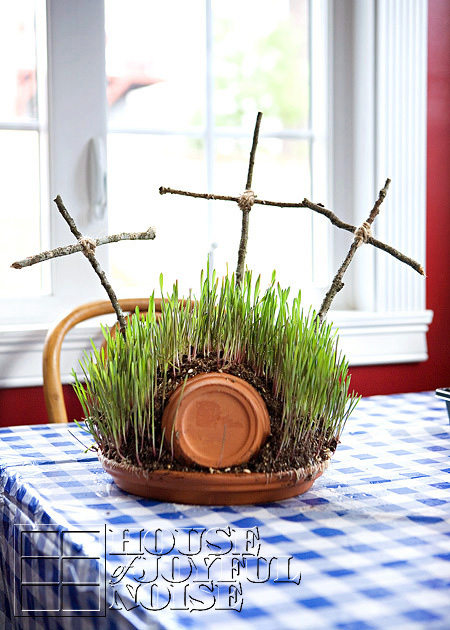
Before you know it, you’ll have lush green grass, on your Calvary Hill!

More photos of Jesus’ empty tomb….

016_calvary-hill-plant

017_calvary-hill-plant-jesus-tomb

018_rustic-stick-crucifixes I just love this photo.


019_calvary-hill-kids-project
On Good Friday, you can wrap a clothespin with a white piece of cloth or paper towel, or simply cover it.  The clothespin and wrap is representative of Jesus’ body.
  Then roll the stone to close the opening of His tomb.  : (
–

020_easter-empty-tomb-calvary-hill-plant-kids-project
On Easter morning
, JESUS IS RISEN!  When the kids get up in the morning, let them find the stone rolled away from Jesus’ tomb, and his garments folded or rolled neatly inside. 

It is our hope and prayer as adults, that our Lenten Season practices, help draw us closer to Jesus, deepening our relationship with Him.  May your kids not only enjoy this project, but like the seeds in the fertile soil, may it help sprout a faith in their hearts, that is bound to grow within them, and help guide them all throughout their lives.

ALLELUIA!!

(We’re happy to discuss this project, or answer any questions for you, in the comments below.)

* * * * * *

Follow us on FACEBOOK!


Filed Under: Crafts & Creations, Faith, Homeschooling, Kids Arts and Crafts, Kids Arts and Crafts, The Big Picture, Tutorial Tagged With: calvary-hill-plant, calvary-hill-plant-how-to, calvary-hill-plant-tutorial, Catholic-blogs, Catholic-families, Catholic-kids, christian-kids-project, Easter, easter-kids-projects, Easter-plant, Easter-table-centerpiece, kids-easter-crafts, kids-easter-lent-projects, kids-lent-projects, lenten-arts-and-crafts, lenten-projects, triplets

A T-Shirt Craft / Wicked Cool, Fun, Easy, & Not Messy!

August 17, 2011 By Laura 35 Comments

cool-fun-kids-t-shirt-craft-21

This just may be the coolest and most fun craft, I have ever done with our kiddos.  If that wasn’t awesome enough, it is super easy, and it doesn’t make a mess either!!  I know, right? It’s perfect for kid’s birthday parties, scouts, camps, etc.  Our kids didn’t want to stop.  They even made a couple of shirts for their friends.  But all of you mothers, as we show you how simple this project is,….think outside the box, for yourselves, or other projects, too. I am!

awesome fun t-shirt craft All you need is:

  • some white t-shirts (in your sizes)
  • sturdy plastic cups
  • rubber bands
  • bottled rubbing alcohol
  • a (liquid) dropper
  • and Sharpie Permanent Markers in colors!

Easy supplies to gather, right? Here’s how you get creative with them.

awesome fun t-shirt craft Lay your t-shirt on the flat surface you are working on, front side up. Take the cups, and arrange them upright in different places inside the t-shirt, one at a time.  As you do this, consider that where ever you have a cup, that’s where a design will be put on your shirt. Secure each cup as you go, with a rubber band. (You can do more later, on the sleeves or backside of the shirt.)

awesome fun t-shirt craft Using your colored Sharpie Permanent Markers, get creative and make some designs or simple line drawings on t-shirt fabric that is over the opening of the cups. My kids even played a game of Tic-Tac-Toe on one.  In a moment or 2, I’ll get to what colors or techniques you may want to avoid, and which ones worked best. We learned from little mistakes so you don’t have to, and figured out some tips and tricks that I’ll share with you too.

You’ll be able to see them for yourself, too. ; )


awesome fun t-shirt craft Each designer can personalize them in their own style, symbols, colors, or simple line drawings that they like, or mean something to them.  Or if it’s a gift, think of the recipient. Simple words may be able to be used as well.

Here’s where it gets even more fun.

awesome fun t-shirt craft

Working on one design at a time, slowly drop drops of alcohol in the *center of the circle/design.  As you do, you will see the marker ink start to spread.  You don’t want to drop too much alcohol though…..you need to do this slowly, and watch what is happening. The spreading will slow down, but if you watch carefully, it is often still spreading. If it does seem that it stopped, add more drops, one at a time, and keep watching.

*TIP:  It’s important, to only drop the alcohol drops in the center. Reason being, it pushes the ink from the center, outward, spreading it evenly and nicely, for the right effect. Also, if the fabric becomes too saturated with alcohol, the drops drip into the cup beneath, which pretty much evaporate. But that is why it’s important to keep the cups pretty upright, as to not spill any colored alcohol that may be sitting in the bottom of the cup.

awesome fun t-shirt craft Once you get the feel for it, you can do more at once. As one design is spreading, you can start another (and another) beside it.

Do you see the multi-color burst? That one is still spreading very slowly.  Do you see the little purple swirly one? That’s a little shot glass, instead of a bigger plastic cup.  Perfect for the side of a sleeve too.


awesome fun t-shirt craft

Here, {O} had finished drawing out her designs, and she’s now dropping alcohol on them.  It’s really so exciting, to watch them and see how they are going to turn out.


awesome fun t-shirt craft

As you can see, black can get pretty messy.  In the case of the smiley face, I like how it turned out. It reminds me of a record. Remember those? ; )  But if the black were in the center of the design, it really would have blotted out the rest of the colors.

Now look at the rainbow and clouds. Because she was dropping alcohol under the last color of the rainbow, where the center is, all of the color above that pushed up. Because again, it spreads from the center. So that’s a good thing to keep in mind with your designs.   Blue reeeeaaallly spreads, so be mindful with that color, too.  It may seem like it’s a lot to remember, but really, once you are working with the colors you, you get it quickly.

*TIP:  We actually did a test t-shirt before we began our own t-shirts, and played a bit, just to see how it was going to work. But the colors’ chemistry is something we learned on the real ones.  So you may want to consider 1 practice t-shirt for everyone to do a practice design on collectively.  Or, you all can just live on the edge, and go for it!

Here, the boys draw out their designs…..


awesome fun t-shirt craft

awesome fun t-shirt craft

awesome fun t-shirt craft

Sometimes, the ink will spread so much, that you can’t hardly tell what it was anymore, such as with the blue and yellow one above. It was a thunder cloud, with lightening coming out. But that’s ok! The designer knows what it was, which makes it fun!  Other times, you can vaguely still see the deign, like a subliminal message. ; )  In the photo above, the very top two designs in the photo are not alcoholed yet. So let’s take a look at how those came out….


awesome fun t-shirt craft See, I was concerned that that “J”, so colored in and outlined so darkly like that, might turn into a hot mess. Using dark colors and solidly coloring in something, is going to turn out much like that J. But the flag turned out pretty cool! Again….see how it spread from the center? It creates it’s own design.


awesome fun t-shirt craft

Drop…..drop…………….drop…..we don’t really want to stop!

Here are some of my favorite designs…..

awesome fun t-shirt craft
Antony…..get it? ; )


awesome fun t-shirt craft

awesome fun t-shirt craft Have a nice day.


awesome fun t-shirt craft Love this one. It’s {S}’s design.


awesome fun t-shirt craft Dragonfly.

awesome fun t-shirt craft

Here’s how the kid’s own t-shirts turned out.  WHICH, they are loving wearing. We have not washed them yet. I think I will just hit them with an iron before throwing them in the wash, to kind of ‘heat-set’ them first. Even though, it IS permanent marker, and shouldn’t come out.

Also…the shirts dry very fast, because it’s just alcohol, which evaporates.

Next time……because there will be a next time, very soon……we’re going to try not securing the rubber bands so tightly, and try to make a less defined circle.  Because it’s the fabric pulled tight over the edge of the cup, that really keeps the ink from spreading much more.  I bet it would look cool to let it go, too.

awesome fun t-shirt craft Our kids ‘signed’ the shirts to their friends, on the back side, bottom left, of the shirt.  Here, the shirt is secured over a square vase container.

Check out how cool it spread…..


awesome fun t-shirt craft I have more designs in mind, that will be fun trying.

Other Ideas: This technique can be used in the more traditional way that tie-dyed shirts are done, by twisting and rubber banding the shirt, coloring it with markers, and applying the alcohol.

I’m going to try making my own shirt, with a design just in the center, on a women’s t-shirt. Maybe a little something cool on the sleeve cuff too.

Another idea: white bandanas!!

Hope you loved this easy, fun crafts, that’s (not just) for kids!!

You may also be interested in another t-shirt craft we did years ago: T-Shirts with Sole!

* SPREAD the craft idea with others!  Facebook it, Twitter it, or Pinterest it for yourself.*

Have fun with it!

If you and your kids do this craft, take photos, and blog it….come back and leave the link in the comments of this post, so we can see how yours came out!

******


Save

Filed Under: Crafts & Creations, DIY (Do-It-Yourself) Project, Kids Arts and Crafts, Kids Arts and Crafts Tagged With: best-t-shirt-crafts, Catholic-blogs, Catholic-families, crafts, fun-not-messy-kids-crafts, kids-arts-and-crafts, sharpie-markers-craft, t-shirt-art, t-shirt-craft, t-shirt-project

The Benefits of Kids Using Their Own Creative Imagination: Making Something Out Of Anything

March 8, 2010 By Laura 9 Comments

Sometimes, I like to plan my kids crafts and art. But whether I plan arts and crafts or not,  it still happens in this house, and all over this house, every day! The kids sure don’t need me, to come up with creative ideas. The kids use their own imagination, and it’s awesome!  In fact, I’d go so far as to say, that their wild imagination tends to venture further than mine does.  And frankly, their are great benefits of kids using their own creative imagination.

While a child following directions (such as to make someone else’s craft idea) is crucial skill to their development, the benefits of a child completely using their very own imagination, far outweighs it. In thinking of and creating their own ideas/crafts/creations, they are:
– developing brainstorming skills
– learning how to think outside of the box
– developing planning skills
– learning how to problem-solve
– developing the abilities of an inventor!
– developing great personal character
– increasing their own self-confidence
– . . . . and so-much-more.

So, I try to keep the school room stocked with art supplies at all times, so that the kids can get creating any time it strikes their fancy to.  But to tell you the truth, they often end up using lots of materials I didn’t supply, or would have never even thought of! Every time I turn around in this house, there is some new creation sitting there, or they are playing with one, or someone is suddenly at my side saying, “Mama, look what I made!“.   I’m always surprised, over and over, by their creativity.  But really, I shouldn’t be anymore.

Here are just a very few things our young triplets have made lately, that I have found around the house, and happened to get photographed.

kids-creative-imagination-crafts-3

A robot, made by {JM}.  Materials used:  a Dunkin’ Donuts coffee cup, paint, marker, and a toy car.  You should see it travel across the floor.

–

kids-creative-imagination-crafts-4

Pistachio Shell Art, made by {A}.
Materials used:  Pistachio shells, and markers.
–

kids-creative-imagination-crafts-7
A Tissue Paper Doll, made by {O}.
Materials used:  Tissue paper, glue, wooden screw cover buttons, and pencil.

–

kids-creative-imagination-crafts-6

kids-creative-imagination-crafts-5

A Pop-Up Card made by {JM}.
Materials used:  Paper, marker, black pen, scissors, and glue.

–

kids-creative-imagination-crafts-1

A Deck Hang-Out 2-Dimensional Art Piece, made by {JM}.  Materials used:  Rubber material (the scraps from a kit), ribbon, tape, glue,  a pencil, a cupcake tin, and firewood.

*Note:  {JM} made this creation for someone we really care about, who suffers from frequent migraines.

kids-creative-imagination-crafts

The hammock, which is my favorite part, is so she can lie there and relax until she feels better.  Since the project is so big and heavy, we decided to just send her photos, which she really appreciated.  She used one of the photos, in a blog post of her own, about migraines.
–

kids-creative-imagination-crafts-2

A Watercolor Painting, made by {S}.  Materials used:  Paper, Crayola watercolors, pencil, brush and water.

I think I can let go of the guilt I feel sometimes, when I haven’t planned a craft project in awhile.  I don’t think they even need me.
And leaving the kids to figure out all of their own creative activities, is a gift of some time to us parents!  More time to do what we need or want to do, while they are busy making awesome things!

I encourage you, to encourage your children’s very own imagination! On the next rainy day, or a day they say they are ‘bored’, challenge them to find different kind of materials around the house, or even from outdoors, and make something creative and really unique! And when they do, and show you, make them feel really good about what they created! Because it is their very own imagination and efforts on display, and it has grown them in more positive ways than can meet the eye. And that is something to celebrate!
They may just inspire you too, as my own kids creations inspire me.
Please consider sharing, and spreading the creative inspiration.

kids-creative-imagination-crafts-3_b

Save

Save

Save

Save

Filed Under: Crafts & Creations, Elementary Homeschooling, Homeschooling, Kids Arts and Crafts, Kids Arts and Crafts Tagged With: art, creativity, developing-your-childs-imagination, encouraging-your-kids-imagination, homeschooling, kids crafts, kids-arts-and-crafts, kids-creativity, kids-imagination, Parenting, positive-parenting, rainy-day-ideas-for-your-kids, robot-craft, tissue-paper-doll-craft

Chalkin’ It Up To FUN! – Kids Sidewalk Chalk Art

May 28, 2009 By Laura 5 Comments

Took the kids sidewalk chalkin’ the other morning.  Except in a big empty lot at the playground. They were having so much fun, but we had to get back home by a certain time that morning, so we went back later that day so they could keep going.  Had my camera of course, both times, so you know what that means….. = lots of photos, and boy did I have fun too!  Here’s 1/2 of them.

sidewalk chalk art

sidewalk chalk art

sidewalk chalk art

4_kids-sidewalk-chalk-art

sidewalk chalk art

6_j

7_aarmwork

8_aandjxo1

9_aandjxo2

sidewalk chalk art

sidewalk chalk art

12_s

14_kids-sidewalk-chalk-art

15_kids-sidewalk-chalk-art

16_kids-sidewalk-chalk-art-love

sidewalk chalk art

sidewalk chalk art

sidewalk chalk art

sidewalk chalk art

sidewalk chalk art

sidewalk chalk art

I’m curious….which is your favorite photo?

Mine is my boy’s back-pocket of chalk – but don’t let that influence your choice.

Save

Save

Save

Filed Under: Crafts & Creations, Kids Arts and Crafts, Kids Arts and Crafts, Life In General, The Big Picture Tagged With: kids-arts-and-crafts, kids-outdoor-activities, kids-sidewalk-chalk-art, sidewalk-chalk-ideas, triplets

We Rock! – Painted Rock Family – Kids Craft

April 24, 2009 By Laura 7 Comments

painted-rock-family

I was wondering what my oldest daughter was doing out there in the driveway.

She was getting rocks together, to surprise us with our very own Rock Family. Ourselves, actually.

Left to right: Mama, Daddy, {A}, {J}, {O} and {S}.

I was taking photos before the glue even dried, and became transparent.  Sorry ’bout that.

It’s a little (well known) craft she saw in my very favorite magazine subscription: Faith & Family; The Magazine of Catholic Living.

It ROCKS, too.

For those who get this magazine, and are interested, it’s the May/June issue 2009. Page 94.

Just thought I’d share how cute we are.  : )

Save

Filed Under: Crafts & Creations, Kids Arts and Crafts, Kids Arts and Crafts, The Big Picture Tagged With: craft, kids crafts, ladybug-rocks, painted-rock-family, rock-painting

  • 1
  • 2
  • 3
  • 4
  • Next Page »

We are wicked happy to have you here! We hope you find much inspiration, help, humor and enjoyment here.


Archives


POPULAR POSTS

* * * * * *

SUBSCRIBE to House of Joyful Noise blog! Every new post, delivered right to your email box!


Privacy Policy

Amazon Affiliates

Never at any additional cost to you, we may earn a small commission for our endorsement, recommendation, testimonial, and/or link to any products from our website. Your purchase through our links helps support our family, while sharing with you the products we authentically use and recommend, for various ideas, and letting you know where you can purchase them. Thank you for your support!

[footer_backtotop]

Copyright © 2025 HouseOfJoyfulNoise.com · Genesis Framework by StudioPress