• HOME
  • {A}’s Chipmunk Training Archives

 Homepage

  • The Homestead
    • Home Projects
    • Home Improvement
    • Home Decor
      • Seasonal Home decor
        • FALL Home Decor
        • WINTER Home Decor
        • SPRING Crafts and Creations
        • SUMMER Crafts and Creations
    • Our Chickens
    • Gardening
    • Organization
    • Re-Purposing
    • Furniture Refinishing
    • Budget
  • Crafts & Creations
    • Seasonal Home decor
      • FALL Crafts and Creations
      • WINTER Crafts and Creations
      • SPRING Crafts and Creations
      • SUMMER Crafts and Creations
    • DIY (Do-It-Yourself) Project
    • Kids Arts and Crafts
    • Homemade/Handmade Gift Ideas
    • Holiday Crafts
    • Fan Pulls
    • Free Printable/Downloadable
    • Sewing Projects
    • Giveaways
    • Business Features
  • Recipes/FoodFun
    • Breakfast
    • Lunch
    • Main Dish
    • Sandwiches
    • Appetizers
    • Slow Cooker
    • On The Grill
    • Side Dishes
      • Soups
      • Salads
    • Baking
      • Breads, Rolls and Muffins
    • Snacks
    • Treats
    • Desserts
    • Drinks
  • Homeschooling
    • Elementary Homeschooling
      • Elementary Homeschooling READING
      • Elementary Homeschooling MATH
      • Elementary Homeschooling LANGUAGE ARTS
      • Elementary Homeschooling SCIENCE
      • Elementary Homeschooling HOME ECONOMICS
      • Kids Arts and Crafts
    • Middle School Homeschooling
      • Middle School Homeschooling SCIENCE
      • Middle School Homeschooling HOME ECONOMICS
    • Language Arts
    • Math
    • History / Social Studies
    • Geography
    • Foreign Language
    • Field Trips
    • Games
    • Nature Study
  • The Big Picture
    • Life In General
    • Celebrations
    • Faith
      • Into the Light; The Series
    • Giveaways
    • Reviews & Sponsors
  • Photography & Lettering
    • Photography
    • truck lettering
    • vehicle graphics
    • Newborns
    • Kids
    • Engagement
    • High School Senior Pictures
    • High School Senior Pictures Sneak Peeks

Thanksgiving Place Card Holder Turkey / Free Personalizable Place Cards Printable

November 17, 2012 By Laura 9 Comments

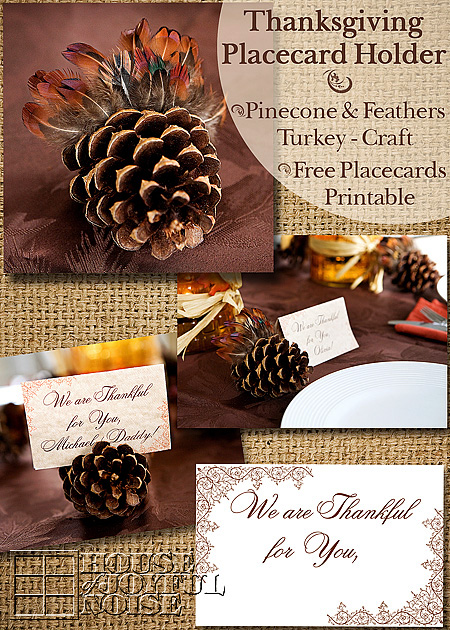
I’m so happy to offer you some free printable designs I created just for you:
Thanksgiving Place Cards

 as well as an adorable turkey craft to hold the cards, or as beautiful added detail to your table, if you’d like.

Thanksgiving is only days away.  If you are still scrambling to add a little ‘fancy’ detail to your Thanksgiving table setting, here’s an idea for you.  This idea is one I came up with for my own Thanksgiving table setting from last year that I never got a chance to share with you all.  Our guests loved them, and hopefully you will too.

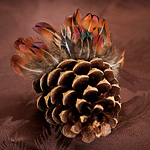
Turkey Place Card Holders

I think they are just simple, yet classy and beautiful looking.  They are easy to make, and require minimal supplies.  It’s so easy, there is no point in even showing you how to make them, when I can simply tell you in a few words:

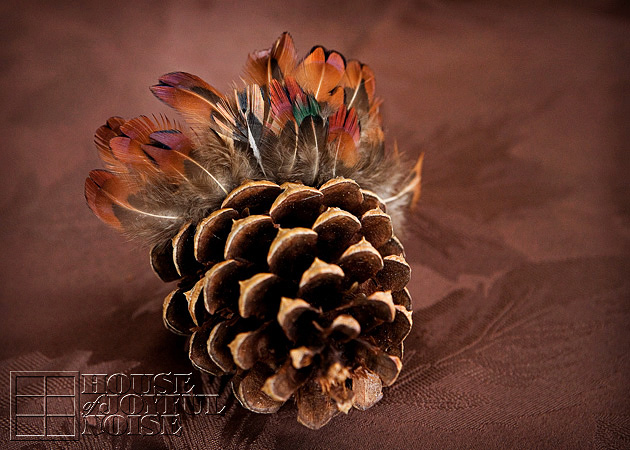
I got a net bag of plain, natural pine cones at Michael’s Arts & Crafts.  They are for crafting and decor. I recommend not using the pinecones from any kind of potpourri, because they can be so strongly scented, and really clash with the otherwise enjoyable aromas of your Thanksgiving dinner.

The feathers were also bought at the same craft store, and come loose in a clear, flat cellophane bag.

The kids and I simply put some glue right between the last two rows of blades, on the backside of the second to last row. Then we simply stuck the feathers onto the backside there, starting in the middle and working our way outwards to the sides,being sure they were facing forward, and fanning nicely as we worked across. That was it!  These particular feathers are very fine, so it took just a little patience.  But I chose them because I loved the colors in them. We used toothpicks to be able to maneuver the feather into the position we wanted on the still wet glue, without using our fingers and getting glue all over them.

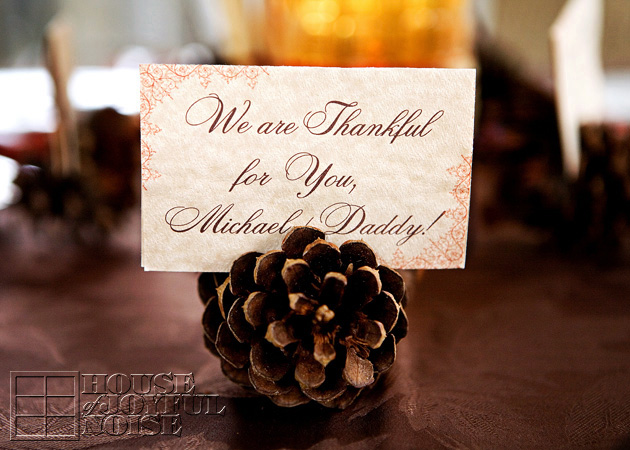
I made them to be place card holders, so I needed to make some of those too . . . . . .
. . . . . . and I’m going to share that customize-able printable with you too, so you can have your own personalized settings like this.
I printed them out on sheets of card stock that a variegated warm beige color to it, rather than bright white.

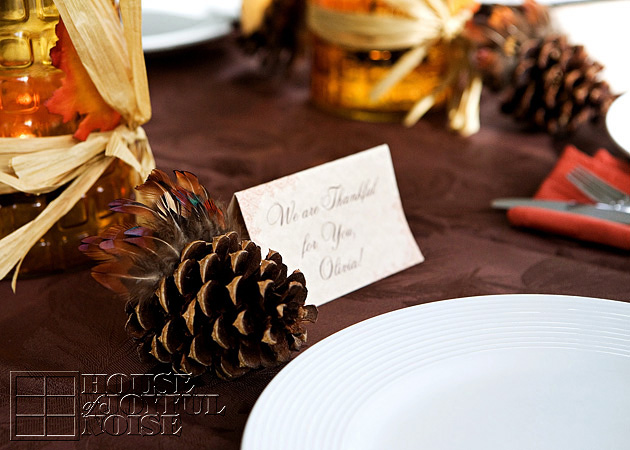
  Of course you also have the option of putting the place card on the table, beside the turkey, as seen in the photo above.

We also did something special on the inside of these place cards
; and so this is another idea or suggestion for you:
In light of Thanksgiving, and being most thankful for the blessing of those we love, the 6 of us in our family wrote a little something on the idea of each person’s card, expressing something about that person that we love or are thankful for.  It was an unexpected surprise for those joining us around the table this holiday; my father, brother, and a family friend. And I’ll tell you what; they all cried, finding more inside, and reading it!  The kids wrote the sweetest things.

If you would like to add a more whimsical flair to your turkeys like these, for just the kids or for everyone, you could add some googley eyes on white cardstock, and an orange waddle with felt, foam or construction paper.  I just happened to love the more subtle indication of a little turkey.
–

Free Thanksgiving Place Cards Printable

O.k., here is the customizable/personalizable place cards printable I promised you, but you must get it using one of the links to the downloadable file (you choose) below . . . . . .

PSD FILE:  This version is still in layers.  If you use Adobe Photoshop or any other program that works with PSD files, you can add in each persons name, to personalize each card. The color for the font is hexcode #6f3014, and the font style I used is Cecily.  I forget the font size, but if all I just mentioned didn’t go over your head. I’m sure you’ll figure it out. Ha ha.
-or-
JPG FILE:  This version is flattened, and ready to print as is. You can simply write in each person’s name with a marker.
Specs:  8.5 x 11 printable – Use same size card stock; I’m suggesting a light and warm or compatible color, perhaps that goes with your table setting.

And now for a little Giddy-Diddy:

If you love this idea . . . . .
Just SHARE it however you do!
But most of all please know this year . . . .
We’ll be giving THANKS for YOU!

* * * * * *

Please come follow me here and there:


Filed Under: Crafts & Creations, FALL Crafts and Creations, FALL Home Decor, Free Printable/Downloadable, Holiday Crafts, Home Decor, Kids Arts and Crafts, Seasonal Crafts and Creations, Seasonal Home decor, The Homestead Tagged With: crafts, free-printables, holiday-crafts, November-crafts, pinecone-crafts, place-card-holder-idea, printable-Thanksgiving-place-card-holders, Thanksgiving, Thanksgiving-crafts, Thanksgiving-free-printable, Thanksgiving-place-card-holders, Thanksgiving-table-decor, Thanksgiving-table-setting-details, turkey-craft

Halloween Craft | A Dripping Paint Pumpkin

October 8, 2012 By Laura 42 Comments

000_

 Last year for the Halloween/Hallowtide season, I went bat **** crazy (no Halloween-pun intended ;), with the decorating, inside and out.  I did a huge photo-galore post on it, and it’s a popular one, come that time of year again. There is some real creativity there, for you to see. This year, however, I didn’t need to do much of anything, because I have all of last years stuff! So I’ve mostly just been doing little fall-fun crafts, and baking. I did however, decide I wanted to do a little pumpkin project I thought of, and I thought I would show it to you all, and tell you how I went about it.

001_faux-pumpkin
I started with a medium sized faux craft pumpkin.  You absolutely can use a real pumpkin if you’d like, but obviously it will not last beyond this season. So if you want your pumpkin craft for keeps, than faux is the way to go!

I also covered my table as always, to protect it, with a cheap party table cloth, of which I always have a bunch on hand from the Dollar Tree store.  Unless they get real messy (and it sure will this time), you can use them over and over.  Of course old newspaper or something else disposable will do.

002_halloween-faux-painted-pumpkin-craft I cut out an appropriate sized BOO! for my pumpkin, out of vinyl.  I don’t know why, but I have always loved the whole BOO thing, for this time of year. Probably because it’s so . . . . . . childish. Elementary. You know, not a serious scare kind of thing, because I’m really not into that.  Anyhoo, you can use any kind of graphic or word(s) you’d like for this project.  Use your imagination and put some of your own style into it. Or, you can copy my BOO, and I won’t BOO-HOO about it.

003_halloween-faux-painted-pumpkin-craft
So I properly positioned my vinyl design and applied it to my pumpkin. Now you’ll notice it’s got wrinkles in it all over the place. That’s ok!  My husband is a professional master with vinyl (for real), but I’m not so much.  Of course it’s harder to apply to curving surfaces but anyway, but also, I wasn’t extra careful either because this is just a mask! I am using the vinyl to protect the pumpkin for where I do not want paint, and will later be peeling the vinyl letters back off. So any wrinkles did not concern me.  I just made sure I went over every area of the vinyl with a lot of pressure with my squeegee.  (As seen in the next photo.)

004_halloween-faux-painted-pumpkin-craft
What I did want to be concerned with, was doing my best to close any gaping holes that formed at the edge of the vinyl where wrinkles were.  Because I didn’t want paint to get under there.  If you do this project, you really want to do your best to seal down the vinyl edges. Especially at the top!  Chances are paint is going to get under the vinyl somewhere, but the better you have those gaps closed off, the less clean-up on the pumpkin later.  You’ll see what I mean in a little bit.

005
Black was the only color paint I’d be using, and I had two partial bottles in my storage. So I just mixed them up together in a glass measuring cup, because the spout on the cup would be coming in handy.

006_halloween-faux-painted-pumpkin-craft To begin the painting process though, I used a flat brush and painting out the top.  I imagine a foam brush would work fine enough as well.

After I had painted out the top all the way around, it was time to get messy. Thank goodness for the table cloth.

007_halloween-faux-painted-pumpkin-craft
I just started pouring paint onto the pumpkin, right out of my cup, starting on the black where I had already painted black, and about the level where gravity would take over the paint. Because getting the paint dripping is the whole goal here.

008_halloween-faux-painted-pumpkin-craft
And it was working for me. : )  Now….depending on the consistency of your paint, you may want to add water to it just a drop or 2 at a time, to thin it a little of you need to at all. But really just a drop or 2 at a time, and test it, because you do not want it too thin and runny.  I really loved the look of my pumpkin right there in this photo!  lol. The 3 dimension of the paint was giving me new ideas!  But, for my original project plan here, I needed the paint to cover my lettering, and yet still have a drip look to it.

009_halloween-faux-painted-pumpkin-craft
So I really got the drip factor going. You see how messy this is getting? Oh . . . you haven’t seen anything, yet. LOL.  As cool as this looked, I knew peeling the letters off with even this amount of paint, would leave it unable to read.

010_halloween-faux-painted-pumpkin-craft
So I just kept adding paint, and helping it along to drip, with my brush when needed.  The paint tended to puddle on top of the pumpkin too, so I helped that out and down. And, as the paint dripped onto the table, I kept moving the pumpkin back out of the paint-puddle.  I really wanted the dripping to be evident after the word, which didn’t leave me a lot of room. So I was sure to have the drips starting from higher all around the word, on the sides of the pumpkin.

Basically at this point, I had to leave the paint to dry a little. Not bone-dry.  But dry enough to be able to peel out the lettering.

011_halloween-faux-painted-pumpkin-craft
Just awhile later, I did peel out the vinyl. I used the tip of an x-acto to do that.
Now, you can see it’s a bit of a mess.  It’s obvious where the paint did indeed get under the vinyl and onto my ‘negative space’ word.  But no worries:  I just used damp q-tips to clean it off.  It took a few q-tips in some areas, and sometimes a little scrubbing with it, but it worked well enough.

012_halloween-faux-painted-pumpkin-craft
Much
better, don’t you think? Not perfect, but cleaner lines.  There is still something that bugged me though . . .

013_halloween-faux-painted-pumpkin-craft This little spot is where the paint over-dried at the vinyl edge, so when I peeled off the letter B, a little paint peeled off right there.  So to fill that area in, I could have just touched it up with paint. But I didn’t. I just used a permanent black Sharpie marker to fill it in there.  And while I was at it, I went around any areas on the insides of the letters, where it could have used a cleaner line edge. I cheated. Oh yes I did.  All over the place.

And I had to paint the stem a better brown; because whatever that color was that it came as, was not working for me!

It never did become perfect, and that was o.k. with me. Because I am working on embracing imperfections since, let’s face it….I can be a hot mess some days. And there is only so much time in a week!

014_halloween-faux-painted-pumpkin-craft
So I called it DONE, and put it on simple display, with a little bale of hay and little sugar pumpkins from my mother-in-law, and I think it came out rather cute.
So BOO!
What say YOU?!


Save

Filed Under: Crafts & Creations, FALL Crafts and Creations, Holiday Crafts, Tutorial Tagged With: craft-pumpkin-craft-project, creative-pumpkin-ideas, Halloween, Halloween-crafts, pumpkin-decorating-ideas, pumpkin-painting

Rustic Autumn Wreath | A Simple Craft

September 24, 2012 By Laura 20 Comments

000_autumn-decor-150x150

 If you’d like to add a touch of crafted Autumn decor to your home, but don’t have a lot of time or energy right now, this wreath is for you! It is so very simple and quick to make.  I think it’s beautiful, and has a real rustic flair that fits right in here at our homestead.

002_autumn-decor-crafts
I hung our wreath in the sun room, on the wall directly in front of anyone coming in through our front door.

It’s so very simple to make, you really don’t even need to be shown how.
But I will tell to you how, and give you a couple of tips as well.

003_fall-wreath
Start with a stick/branch wreath, which can be found ready-made at your local craft store.

The pumpkins I also found at the craft store. They are very light in weight, made of a paper medium, and some kind of painted wire.  They are finished with a shellac, and they came as a bunch in a net bag, much like potpourri comes. So you may want to look in that area.

005_fall-home-decor-crafts To attach them to the wreath, I used a small piece of raffia! I simply slipped it under the wire on the bottom/underside of the pumpkin, and tied it onto a branch where I wanted the pumpkin placed. How easy is that? I cut any excess tails of raffia I didn’t need, but I don’t even care if it is seen, because it just adds to the simple rustic charm of  the wreath, in my opinion.

004_autumn-decor-accents
Then I added some nice looking faux fall leaves.  You can simply just tuck them under the intertwining sticks of the wreath. But if you want to be sure they stay, and/or plan to save the wreath to use year after year, I recommend using a dab of glue from a glue gun at the base of the leaf or stem area, and stick in between branches in an inconspicuous place.  The leaves don’t need to be any more attached than that, and keeping the leaves loose gives it a more natural look.

006_autumn-wreath-decor-crafts
Just follow that technique with leaves and pumpkins, all the way around.

007_autumn-crafts-decor The little birdie is just a clip on, and was also picked up at the craft store at some point. It was one we had, and it not only went perfectly with this wreath, with it’s warm tones, but added new interest.

008_fall-wreath
The wide ribbon is wired, which can be a little difficult to work with, when tying bows or making nice curls. But I found a trick I’ll share with you.
TIP:   When working with wired ribbon, use an aluminum can, cup, or any cylinder object to make nice curls for the tail of your ribbon, or uniform loops in your bows.  Simply choose an appropriately sized cylinder object, relevant to the size you’d like your curls or loops, and use it to shape your ribbon.  You can place the cylinder into the loops to make them nice and round where they curve around, and/or wrap the ribbon around the tails to make nice curls.

009_autumn-home-decor It’s really as easy as that! It can literally be done in 10 minutes.

010_rustic-autumn-wreath
It’s not only a simple and beautiful wreath for this awesome season, but you can say you made it yourself.

Save


Save

Filed Under: Crafts & Creations, DIY (Do-It-Yourself) Project, FALL Crafts and Creations, FALL Home Decor, Home Decor, Seasonal Crafts and Creations, Seasonal Home decor, The Homestead Tagged With: autumn home decor, autumn-crafts, Autumn-decor-ideas, autumn-wreath-tutorial, autumn-wreaths, fall-crafts, fall-decor, fall-home-decor, fall-wreath-tutorial, fall-wreaths, rustic-wreaths, seasonal-crafts, seasonal-decor, seasonal-wreaths

Tips, Tricks and How-To’s to Our Halloween Decor – Crafts

October 16, 2011 By Laura 2 Comments

09_-300x214

I hope you all had the chance to join us, for our Halloween Decor Tour, in which we shared with you all of the festive touches I made, to put a little Halloween in the air, indoors and outdoors!  The post tour naturally consists of a ton of photos, or else how else could I show you all?  That, and my small chit-chat, made the post plenty long enough.  So I promised to share how I made some of the decor, in a separate post in the Crafts & Creations section soon. And here we are.

So I’ll start with the fact that, all of the signage design work that you see in this post (and the tour), that is similar in style and all ties together so beautifully, is part of the Halloween Party Complete Collection, which I purchased from Frosting & Ink Social Designery’s Etsy Shop.  Please note that everything that I printed out, I did so on textured white card stock. That really adds a nice touch. I also was sure that my printer printed the actual colors, being sure my settings did not allow the printer to choose the colors. (Yes, I am a color snob. I demand accuracy. )


001_halloween-parking-sign

One of the features I was most excited to show, was indeed the biggest hit with our readers!  That would be my Witch Parking Sign.  ; )

–

02_
To start, I printed out the sign from my Halloween Party Complete Collection on a piece of 8.5″ x 11″ textured white card stock.  The actual design was 7.5″ x 10″, so there was an inch of white paper to trim off, all the way around. For anything rectangle or square, I want a perfectly clean straight edge.  So I always use this….

011_fiskar-trimmer

….my Fiskar Trimmer for cutting paper or card stock. But using scissors, or an x-acto blade and a metal ruler on a mat, would also work.

Now for the sake of saving you from having to keep scrolling up, I am going to show you the photo of this sign again. (Because I’m thoughtful like that. : )  You need to be able to refer to it and see it as I talk here.

001_halloween-parking-sign

I wanted to mount my paper sign on a piece of old looking wood, so I asked Michael to please cut a piece of thin plywood about 10.5″ x 13″, and to try and make the edges look jaggedy, like old broken wood. To get that effect that you can see above, he used a saber saw.  Then he stained it dark grey.

Now I needed to mount the paper sign, onto the wood sign.  I had every intention of really using the sign, right at the head of my parking space outside.  So it needed to not only be applied permanently, but the whole sign needed to be weather-proofed, sealed and protected, as well.

–
03_modge-podge-outdoor

To do both the job of applying the paper sign to the wood, and sealing and protecting the whole thing I used Outdoor Modge Podge!   I applied a layer of glue to the back of my paper, as well as a coat on the front of the wood sign.  Then I placed them together with the design perfectly in place, smoothed it all out being sure there were no bubbles, and let it all dry overnight.   When it wasn’t so tacky to the touch anymore, I applied another coat over the whole sign (front and back), and let dry completely, again.   When that dried, I applied one more coat, and let it all dry again.  I paid special attention to be sure I was sealing the edge of the paper, to the wood sign. Any moisture getting in between when outdoors, would ruin it.

*Note – With a past project quite similar to this one, where I was applying paper to wood, and then adding final coats, I did not allow the coats to dry enough in between applications.  I didn’t want to, you know… wait. It didn’t turn out well, People. The paper was bubbling here and there because it wasn’t dry enough in the first place, making the paper soggy and rolling up, and it was just a mess. So leaving it to dry even 24 hours or so between coats sometimes, is necessary. Having patience, or not, shows in the final piece.  Rushing things, and hoping for the best, may not end well. Don’t do it.

–

004_halloween-bottle-accent I had this bottle displayed on my garden potting bench already. It was a cool indigo blue, but had faded in the sun.  So I decided to spray paint it matte black, and make a little Halloween necklace for it, by stringing buttons in colors that together, say Halloween to me: orange, black, green, and purple.  Different button sizes, and no pattern, rhyme or reason. Just string them on. I’ve made these little wrap necklaces for bottles and vases before, using beads and other elements as well. In doing so, I have used different materials to string on. But one thing I have found especially handy to use, is stretchy fishing line.  It works nice for small necks of things especially, that you may want to wrap around more than once, because if it barely is going to fit, it stretches some to prevent the string from breaking. It’s easy to work with. Of course, for a different look for indoor pieces, you may choose to use raffia, suede string, ribbon, etc.  I put a dead stick in it, and it was perfect!  It’s a small thing, but I really had fun with it, and I like how it came out.
–

05_halloween-front-door-decor-bats

I think the swarming bats around the front doors around Halloween time, was an idea first featured in Country Living Magazine (?) last year, and lots of crafty home-owners all over the country were all over the idea, including me!  I just didn’t get to it until this year. There are bat templates you can download from the internet, if you do a search, and I would guess that others looked and found some to use, as I did.  They can be cut out and used to trace with white chalk onto black material, over and over. Then you simply cut them out.  I looked around for bats that looked right to me, a lot. So in the end, I can’t remember where I actually found one I liked. (Or I’d tell you.) But anyway, I did resize it to have 3 different sizes of bats.

06_

I made the bats out of stiffened felt. I think I got about 15 sheets or so, and got as may bats as I could out of them.  Instead of cutting the bats out of the paper and tracing them, I went about things a different way – because I could, and it just seemed easier.  Michael (my husband) has this perforation wheel, to create a pattern of holes through paper, and then you pounce that pattern onto another material, using chalk dust. So we just perforated the bat patterns on the paper, and then used our school chalk board erasers with chalk dust on them, to pounce the patterns onto the felt.

Scissors + Kids = Bats

Just so you know, my kids love cutting things out, and ask to help. I’m not into child labor. ; )

We stuck all of the bats on the house and door, using duct tape on the back.  Yes, one or 2 do blow or fall off now and then. Maybe there is a better way to adhere them, but duct tape works good enough for me. I don’t even notice if or when any are missing.  Michael does though. He tends to be the bat chaser I guess. LOL. But generally, they stay put pretty well.

–


07_halloween-wreath

This funky black feather wreath itself was wicked easy!
I simply bought it as is, at Michael’s Arts & Crafts! (Where I bought all of the materials I needed, but didn’t have on hand.)

08_halloween-indoor-wreath-decor

The circle sign in the middle, was another design in the collection I bought. Frosting & Ink customizes it with your own last name, before sending you the files! How cool is that?

The middle of the feather wreath was originally empty. Just a hole. So somehow, we needed to find a way to stabilize the sign in the front middle. The feathers were not going to hold it there.  So we simply cut a square out of some leftover stiffened felt, and mounted it on the back with hot glue, covering the wreath hole.  Then we just folded some pieces more stiffened felt and used them as spacers, connecting them with hot glue from the inside of the back support felt piece, to the back of the front design circle.  Simple fix!  It needed to be an indoor wreath, no doubt about that.  But thankfully, we have a glass front door, so we were still able to use it as a front door wreath that shows on the outside, when the brave ones come knocking.  ; )

We hung the wreath by hot gluing a piece of black sheer ribbon to the wreath itself on the back, and then to the top of the door frame. Yes, we did. lol. It comes right off, without damage.

09_cutting-perfect-circles
One might wonder how I cut out all of the circle designs.  There were many circle designs to be cut, and it would surely be no fun having to do so with scissors.  I want my circles perfect, so it was high time I got a good circle cutter. (With a 50% of coupon, of course.)  I got the Martha Stewart Circle Cutter, and I love it!! The blade pops on to the fit-in-your-hand cutter, and the blade swivels, so it makes circle cutting seamless and perfect.

10_halloween-french-doors-home-decor

For all of these little mini-signs (originally cupcake/cake toppers, table signs, etc.), I again used my Martha Stewart Circle Cutter for the round designs, and my Fiskar Trimmer for the square designs. Sticky tabs were used to stick them to the black sheer ribbon strands, that run from the top of the doors to the bottom. Simple and cute!
–

012_halloween-ghosts-fan-pull

Lastly I just wanted to mention how I created little ghosts on my Halloween Fan Pull. The heads themselves are simply formed by t-shirt material cut into squares, and forming it over the round beads. Then I used more clear fishing line to tie off the necks some to create the head better, and the kids drew on faces. This is all done while making the fan pull itself, which I also do using strong test fishing line, doubled. The spider element is at the bottom (center of the line), and then I used a fat needle and the fishing line to quickly string all of the beads on.  When it was time to make a ghost, I simply stuck the needle right through the middle of the square piece of material over the round bead, tied off the head with another piece of fishing line (trimmed down after knotted), and continued to string beads. When all of the beads are on for a fan pull, Michael ties on a little piece of wire and knots it up into a ball, to hook right into the ball chain clasp.  Works like a charm!  >  I hope you comprehend those directions. It’s late now. I was watching  X-Factor (2 hours this night) while doing this post too, on commercials.

I think a good thing to take from this post is, there can a lot of ‘winging it’ with crafting, with just a little fire-thought. Yes, sometimes you find one method works out better than another. But the process is simply figuring out what you are trying to create or do, and what kind of materials you may need or have on hand, to make it all work. (Whatever your project may be.). Just think about how you want something to look, and what you can use in terms of material, to achieve that vision. It’s not about doing everything perfectly, but learning as you go, and picking up a few tricks along the way. As you know by now, I have found fishing line to be pretty handy in my crafting!  There is some pretty strong test line that is durable, and it’s practically invisible, which can be a helpful for some projects too. There are so many tools out there that can make the more tedious parts of crafting (like cutting things out), faster and easier. And then there are lots of things right around your house, that you can use as well. Substitutions and preferences, are all part of the crafting game. If you have fun making what you do, and it makes you and/or others smile (even on the inside) when they see your creations around, then you are a successful crafter!

(Is there anything I missed?  Anything you wanted to know about our Halloween Decor that you had a question about, that I didn’t answer here? Please go ahead and ask, and I’d be happy to do my best to answer.)

* * * * * *


Save

Filed Under: Crafts & Creations, DIY (Do-It-Yourself) Project, Faith/ Catholic, FALL Crafts and Creations, Fan Pulls, Holiday Crafts, Holidays, Seasonal Crafts and Creations, The Big Picture, Tutorial Tagged With: creative-Halloween-decor-ideas, Fiskar-trimmer, Halloween-crafting, Halloween-crafting-tips, Halloween-decorations, holiday-crafting, holiday-decor, home decor, Martha-Stewart-Cutter, Michaels-arts-and-crafts, Modge Podge, Outdoor-Modge-Podge

Our Halloween Costume Ideas from the Past

October 30, 2010 By Laura 4 Comments

I don’t plan on having a big post on our Halloween/Hallowtide this year.  But last night I got to thinking about some of our past Halloween costume ideas we’ve come up with, and I went digging through photos. Putting together costumes, is a creative process of sorts, so we thought this section of the blog was a good place for this.

There is SO much I could share with you from our pre-blogging days, because I have always taken lots of photos.  But I haven’t always shot digital.  The scanning of old photos, and cleaning up dust particles, etc, is not a process I enjoy. At all.  But if I’m inspired enough to share with you some old stuff, I guess I will do it.  As I just did!

I thought it would be fun, to share with you some of {A}’s Halloween costume photos from when she was little, as well as the triplet’s second Halloween, but first in costume.  Naturally, we think they are all so cute.  But then, they are all our kids. Maybe we’re bias. But something tells us you might get a chuckle or 2 as well, looking at these.  Or we might at least get a smile out of you, and that’s good enough for us too.

kid-clown-costume
{A} in 1998, as a clown.   She was 1 year old.    I have to laugh at the ‘very best first walking shoes’ she has on.   No, we didn’t do that too, for babies 2, 3 and 4.  Turns out they are all walking and running just fine!
–

kid-genie-costume
In 1999, as a genie, and 2 years old.   Is she not the cutest thing?  My sister-in -aw made the costume for us.  I helped cut fabric and stuff though.  And I also made the bottle.  I have to admit, I’m not into allowing my girls to jaunt around with bare midriffs anymore.  But I wouldn’t give up this photo of her at 2 year old, in this costume, for anything.  What a doll she was.
–

kid-pediatrician
In 2000 at 3 years old, she was her own pediatrician, at the time. lol.  We have had a new pedi now since I was pregnant with the triplets, and the former one is no longer practicing, that I know of.  But she was beyond ecstatic to learn that {A} was her, for Halloween that year.  She (the pedi) showed everyone in the office that day, while {A} waited in her paper gown. lol I think this photo is still hanging in the office there.
–

kid-indian-girl-costume
In 2001, as an Indian, at 4 years old.    I really loved this costume.

kid-indian-girl-costume-2
But this head shot, is one of my all-time favorite photos of her when she was little.
–

baby-farm-animal-costumes-triplets And then we had our little farm animals, in 2003.   lol.  They were 1 year old.  Remember the Tom Armani costumes?  The kids were a riot in them.  We had so much fun this year.  {S}, on the far right, was just on the verge of another hysterical laugh.  He would always, get laughing so hard, he couldn’t compose himself.  He still does that.  He was a happy baby, all of the time, despite all he went through.
–

baby-cow-costume
Our big cow.  He was as heavy as one too.
–

baby-lamb-costume

Our sweet little lamb.
–

baby-goat-costume
Our Billy Goat – always smiling.
–

farmer-girl-costume
{A} (big sister) was their loving farmer, who tended her little farm animals with such care.
–

We just had to show them all off, and trick or treating is always out of the question for us (with {S}’s severe peanut allergy)….so we thought we’d take them to the mall, and just pull them around.  There was Halloween festivities going on there anyway, and it was warm, light, and safe.

And from that idea, our idea grew….

farmer-and-baby-farm-animals-triplets-big-sister We put a little picket fence around our farm animals, in their ‘choo-choo wagon’.   They were the biggest attraction.   People just stopped, and watched us, cracking up.

The funniest thing that night, that still gets us hysterical when we think about it, was that {S}, was the billy goat, and every time we looked back as we pulled him, he was chewing on the fence!!  I was always laughing too hard, to get a photo.

Then we heard there was a costume parade judging contest at the other end of the mall.  So we went down there and pulled them through.  There was a big crowd, and then we had to go by this whole panel of judges at a table. They were all so smitten with our farm.

farmer-and-baby-farm-animals-triplets-big-sister_2 We won 1st Place,  for Most Original Costume!

The judges thought our farm yard was very creative.  The farmer and her little animals had a fun night, and then they went back to the farm and went fast asleep in their barn.

If you have blogged your kids in some of your favorite Halloween /Hallowtide costumes, leave us a link so we can come see them!  If you haven’t, wouldn’t it be a fun post?

Thanks for stopping by.  We hope you enjoyed seeing our kiddo’s costumes from the past, as mush as we enjoy revisiting these wonderful family memories.

Wishing you all a Happy Halloween / Hallowtide!!

Save

Save

Save

Save

Save

Filed Under: Celebrations, Crafts & Creations, Faith, Faith/ Catholic, FALL Crafts and Creations, Holiday Crafts, Holidays, Seasonal Crafts and Creations, The Big Picture Tagged With: clown-costume, costume-contest-winners, farm-animals-costumes, farmer-costume, genie-costume, Halloween, Halloween-costume-ideas, Halloween-costume-ideas-for-triplets, kids-Halloween-costumes, triplets

  • « Previous Page
  • 1
  • 2
  • 3
  • Next Page »

We are wicked happy to have you here! We hope you find much inspiration, help, humor and enjoyment here.


Archives


POPULAR POSTS

* * * * * *

SUBSCRIBE to House of Joyful Noise blog! Every new post, delivered right to your email box!


Privacy Policy

Amazon Affiliates

Never at any additional cost to you, we may earn a small commission for our endorsement, recommendation, testimonial, and/or link to any products from our website. Your purchase through our links helps support our family, while sharing with you the products we authentically use and recommend, for various ideas, and letting you know where you can purchase them. Thank you for your support!

[footer_backtotop]

Copyright © 2025 HouseOfJoyfulNoise.com · Genesis Framework by StudioPress