• HOME
  • {A}’s Chipmunk Training Archives

 Homepage

  • The Homestead
    • Home Projects
    • Home Improvement
    • Home Decor
      • Seasonal Home decor
        • FALL Home Decor
        • WINTER Home Decor
        • SPRING Crafts and Creations
        • SUMMER Crafts and Creations
    • Our Chickens
    • Gardening
    • Organization
    • Re-Purposing
    • Furniture Refinishing
    • Budget
  • Crafts & Creations
    • Seasonal Home decor
      • FALL Crafts and Creations
      • WINTER Crafts and Creations
      • SPRING Crafts and Creations
      • SUMMER Crafts and Creations
    • DIY (Do-It-Yourself) Project
    • Kids Arts and Crafts
    • Homemade/Handmade Gift Ideas
    • Holiday Crafts
    • Fan Pulls
    • Free Printable/Downloadable
    • Sewing Projects
    • Giveaways
    • Business Features
  • Recipes/FoodFun
    • Breakfast
    • Lunch
    • Main Dish
    • Sandwiches
    • Appetizers
    • Slow Cooker
    • On The Grill
    • Side Dishes
      • Soups
      • Salads
    • Baking
      • Breads, Rolls and Muffins
    • Snacks
    • Treats
    • Desserts
    • Drinks
  • Homeschooling
    • Elementary Homeschooling
      • Elementary Homeschooling READING
      • Elementary Homeschooling MATH
      • Elementary Homeschooling LANGUAGE ARTS
      • Elementary Homeschooling SCIENCE
      • Elementary Homeschooling HOME ECONOMICS
      • Kids Arts and Crafts
    • Middle School Homeschooling
      • Middle School Homeschooling SCIENCE
      • Middle School Homeschooling HOME ECONOMICS
    • Language Arts
    • Math
    • History / Social Studies
    • Geography
    • Foreign Language
    • Field Trips
    • Games
    • Nature Study
  • The Big Picture
    • Life In General
    • Celebrations
    • Faith
      • Into the Light; The Series
    • Giveaways
    • Reviews & Sponsors
  • Photography & Lettering
    • Photography
    • truck lettering
    • vehicle graphics
    • Newborns
    • Kids
    • Engagement
    • High School Senior Pictures
    • High School Senior Pictures Sneak Peeks

Decorating with Autumn Leaves; Door Garland and Candle Jars

November 10, 2012 By Laura 26 Comments

I think you’d be hard-pressed to find anyone on God’s green earth, who appreciates the foliage that Autumn brings, more than I do.  I am mesmerized by the leaves, from beginning to end.  Ask my kids.  They are often amused at how taken I am, with the beauty of this season.  And they’ve certainly come to understand that I don’t want them to miss one bit of it, any more than I do. I get especially excited when we are driving here and there, which with 4 kids I can tell you, we do a whole lot of.  “Oh!! There’s a tree starting to change right there! Do you see it guys?” And as fall progresses., each week is more full of awe than the last. As we go along, I’ll burst out “LOOK!….at that GORGEOUS tree guys!! LOOK AT THE COLORS ON THAT THING!!”  I’ve startled them. And they’ll be like, “We know Mama! Watch where you’re going!”  It’s true. I probably shouldn’t be driving at all in the Fall. Certainly not during peak foliage week.  There is just a span of weeks in this season, where the trees are all I can talk about, everywhere we go. Sometimes, I feel God made Autumn, just for me. Perhaps not. But gosh, it sure feels like such a gift of love.

The peak beauty of the season, is really all too fleeting for me.  I want it to stay just as it is in those weeks, forever.  At least, I want to save as many beautiful leaves as I can.  But I’ve never found a great way to preserve them for a while, until this year. Oh yes, there was the waxed paper trick but, I heard that never worked all that well.  And besides…..Confession of Domestic Shame:  I really hate ironing.  So when I learned that using Glossy Modge Podge really worked well, I was so excited to try it.  And I immediately started dreaming up a very simple, very rustic leaf garland for my home.

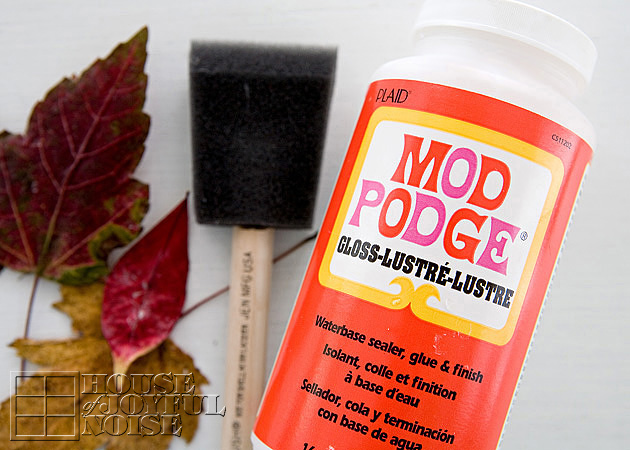
 The kids helped me Modge Podge countless leaves they had collected for me, over the weeks.  We had them drying and being pressed between the pages of newspapers and magazines all over the house. I’m willing to bet we’ll be finding several we missed finding again, well into spring.  But I found you can actually Modge Podge a fresh leaf right away, anyway.  I do recommend the Glossy medium. I tried the Matte finish just as a test, and it seemed to strip the color, and not look very impressive once it was dry either. Something about the Glossy really does enhance the color of the leaf, and add lustre.  To Modge Podge (MP) the leaves, we just poured some MP in a non-pourous bowl, and used foam brushes to apply it to our leaves, doing the back of the leaves first.  Then you can lay them on newspaper or whatever, until they dry. They don’t really stick anywhere as drying, because they are not flat or heavy.  MP is so easy to clean up anyway.


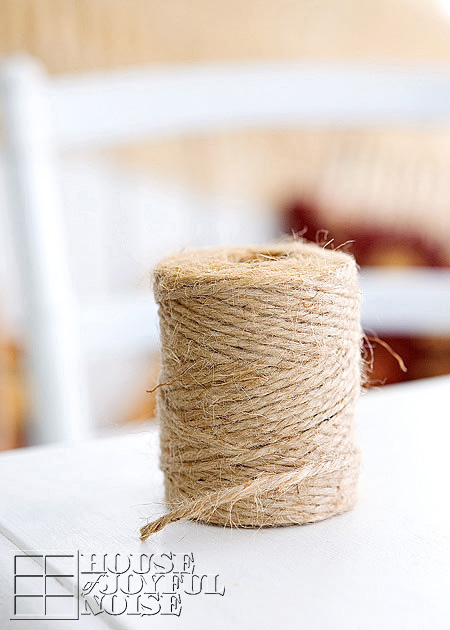
I wanted my garland extremely simple and rustic.  Jute was just the kind of string for the job. I love this stuff.

 I took 4 pieces of equal lengths of the jute, knotted the ends, and twisted the quadruple strand quite a bit before push-pinning it over the frame of our sun room french doors.

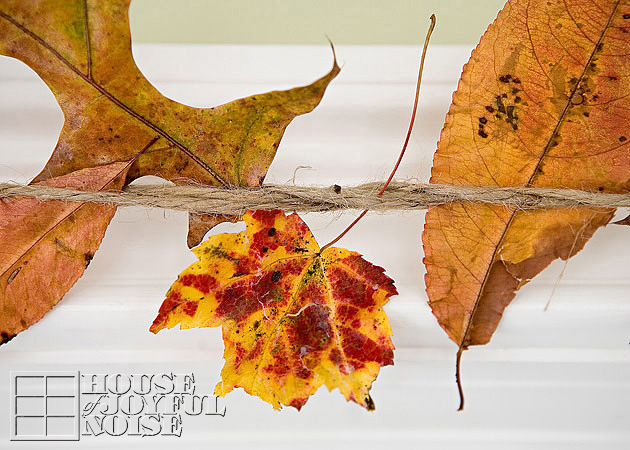
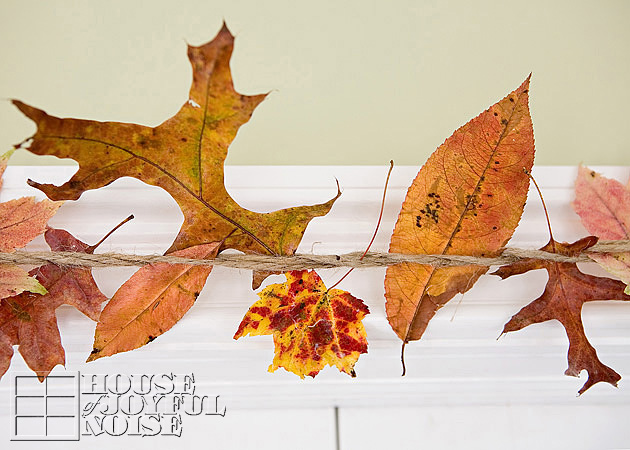
 Then, I just stuck my leaves in between the twisted jute string, arranging as I wanted to, all the way across.

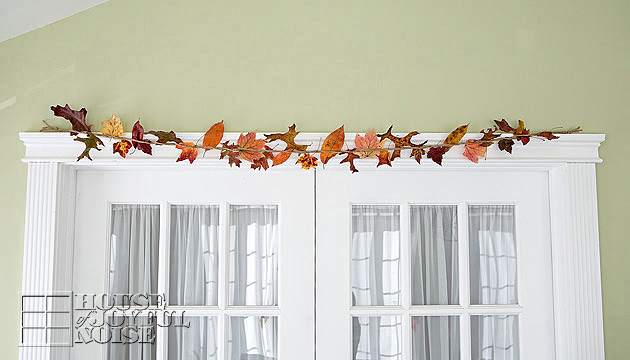
 There it is. Done in like, . . .a couple of minutes.
And I didn’t fall off while standing on the chair I had to keep moving, even once.
(Although I think I had my husband and kids nervous, because they kept reminding me to be careful. That might have to do with the many happenstances I have had. But not this time!)

 Look how pretty!  Honesty….my heart is racing a little bit right now, just looking at them.
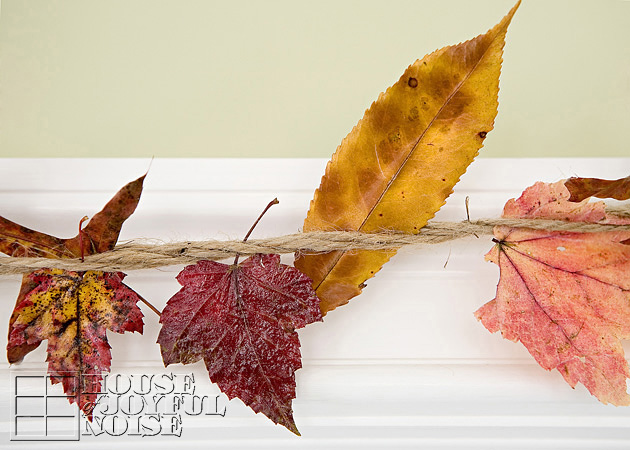
No two alike….such beautiful shapes and colors.

 Do you see that long pointy leaf? After being out and about collecting leaves, the kids came running in, so excited to give me that one. They call it my giraffe leaf.  I love giraffes, and they saw a giraffe skin pattern in it. I do too now.  I felt the love, and that leaf makes me smile even more than all the rest now.

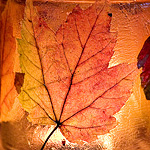
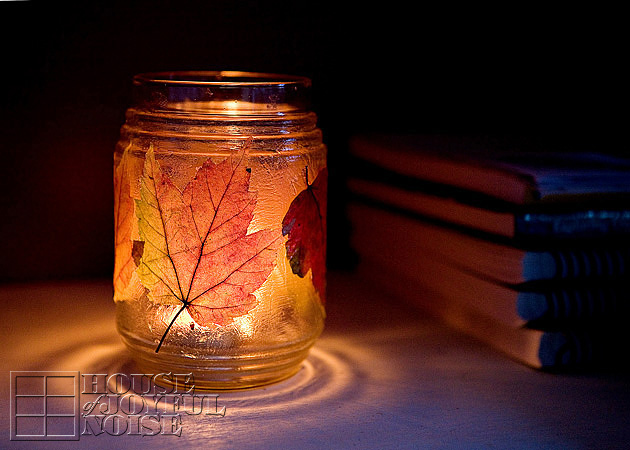
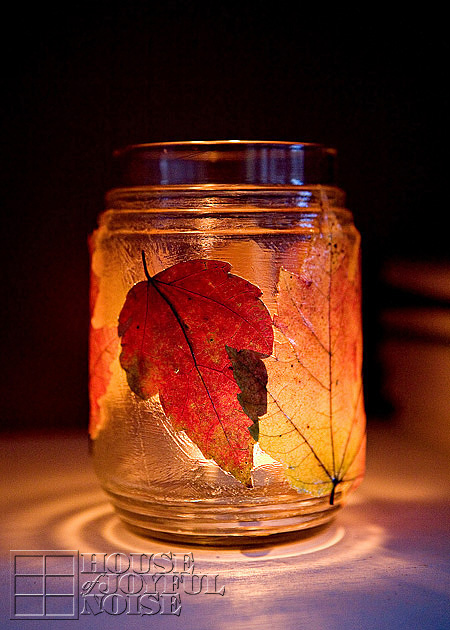
I also used the glossy Modge Podge to apply more leaves to jars.  I love that you can just slap that MP all over the jar with a foam (or flat bristle) brush, and everywhere it dries where there is not a leaf, it looks like frosted glass.

Isn’t it beautful?
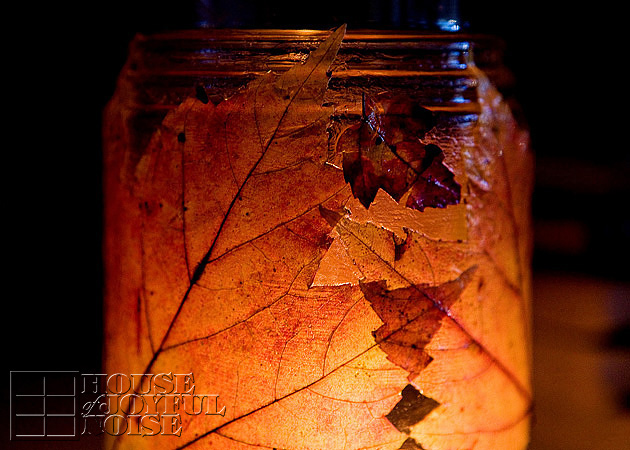
I’ll warn you that this project took a little more patience than I had anticipated. Certainly not as easy as my garland! It’s worth the little bit of trouble I think though! It’s just that the leaves, which I had MP’d the back of, as well as the jar, don’t want to lay down flat right away. It’s all kind of slippery. It’s only once the MP glue starts setting a little, that is starts sticking as you need it to.  You need to MP over the leaves too anyway, so I kept kind of poking the leaves down where they were sticking up. Once the whole jar was dry, I did one more final coat.  Oh and I just let stems hang free off the glued down leaf. I liked them that way anyway, if they didn’t want to stick.

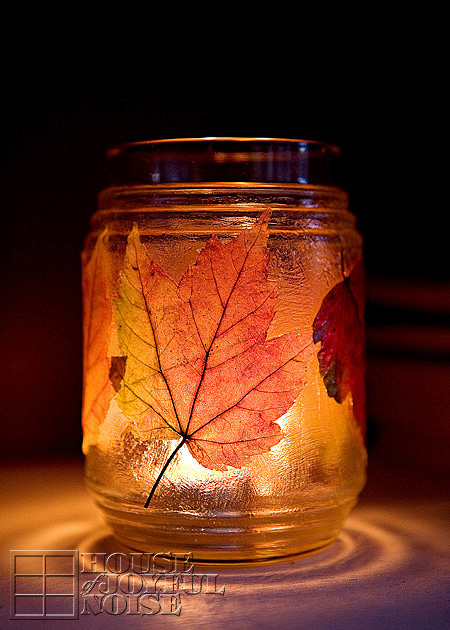
 They give such a warm glow of radiance.

 I can see myself doing these same projects with leaves every year, from now on. And other preserved leaf projects I’ll think of I’m sure now too.
I so enjoyed every minute of working with the leaves, and I am so very happy I found a way to preserve them, and let the beauty live on in my home, as the world around us outdoors drains colorless.

Thanks for coming by, and listening to me go on and on about my love for the colors of Autumn.
It sure was an amazing Fall season this year, and I thanked God for it every day.
Do you get a colorful foliage season where you live, in the Fall? And if so, have you done anything with the leaves?

Come follow me here and there:

Save

Save

Save

Save

Filed Under: Crafts & Creations, FALL Home Decor, Home Decor, Seasonal Home decor, The Homestead, Tutorial Tagged With: autumn decor, autumn-crafts, decorating-with-leaves, door-garlands, fall-craft, fall-decor, leaves-candle-jar, leaves-garland, Modge-Podge-crafts, modge-podge-projects, seasonal-decorating, simple-rustic-decorating

A Small Gift of Thanks | Thanksgiving Printable

November 5, 2012 By Laura 3 Comments

Thanks_

(2012)  We’ve had this blog going for over four and a half years now.  Some of you have been following from the beginning, some of you joined us somewhere in the middle along the way, and some of you are new friends.  It’s been slow-growing!  The number of our readers have probably grown more than ever this year, and that’s likely because I (Laura) have put more time into it.

No matter when you happened to join us, we want you to know we truly appreciate every one of you. For your friendships, your visits, your comments, your sharing, and your encouragement.  We just love creating, all kinds of things as you know.  It’s in our blood.  But being able to share it with you all, adds a whole new element of joy to it, for us.  Especially when any one of you find your own self inspired, and get doing some creating of your own!

With the Thanksgiving season upon us, we just thought it was another fine opportunity to say thank you. And to offer you just a little token of our thanks. It really is just a little thing, today. Still, we hope you love it.  I designed this printable with my photography, and a Scripture quite fitting for the season of gratitude.  There are two sizes, and many ways you are welcome to use it.  I’ll share some ideas below.

*Please note that to PRINT these, either with your high quality printer or at your photo printer’s, you’ll need to download the full resolution file from the links I provide you with below. To use the images for any web purposes, you can simply save the images below, right from the post. The image IN this post cannot be printed, as they are not sized accordingly. (In other words, they would be very poor quality printed.)  And if you don’t know these things and didn’t read this, you’ll be wondering why it came out so bad, and probably blame your printer.  ; )

WEBONLY-Thanksgiving-Scripture-quote
To Use on Web
: You can save the image above to your computer, for use on your Facebook to share, as your computer screen saver, to send to others as a Thanksgiving Card wish, or any other web use you can think of.
To PRINT or have printed as a 5×7 photo, download the high-quality image at the following link, and be sure to print at best quality as well:    5×7 Link for Full Resolution Image
(Use Download Button there, after clicking through the link.)
You can have it printed as 5×7 photo, frame, and place on your Thanksgiving table, or around your home as a Thanksgiving decor accent.  You can also use the photos to mount onto 5×7 blank cards, and send them as beautiful custom Thanksgiving cards in the mail, with your message written inside.  Or get crafty with it!

WEBONLY-SMALL_Thanksgiving-Scripture-quote2
To Use on Web
: You can save the small image above to your computer, for use as your phone background, to put in the sidebar of your blog as a Thanksgiving greeting/decor,  or any other web use as this small image that you can think of.
To PRINT or have printed as a 3″ x 2.143″ photo, download the high-quality image at the following link, and be sure to print at best quality as well:  3 x 2.143 Link for Full Resolution Image 
(Use Download Button there, after clicking through the link.)
You can have several of these small versions printed on one sheet, if you’d like.  Or print as a single small image, to create a magnet, or make tags to attach to Thanksgiving (host?) gifts such as baskets, or a bottle of wine.  Just punch a hole in the corner, and tie on with ribbon. Or come up with something crafty and creative with this small version.

Again, please go to the links provided to use the image for any printing purposes.
For web uses, you are welcome to save the images above to your computer.

They are all yours! Hope they help you spread the love and thankfulness in your hearts, this Thanksgiving season.

. . . . . .

Come follow me here and there:

Save

Filed Under: Crafts & Creations, Free Printable/Downloadable, Holiday Crafts, Photography Tagged With: Collosians-4:2, Thanksgiving, Thanksgiving-free-printable, Thanksgiving-gift-tag, Thanksgiving-Scripture-quote, Thanksgiving-table-decor

Pumpkin Shaped Cookies | Recipe

November 1, 2012 By Laura 14 Comments

00

It’s the first day of November, and we’re still riding high on the beauty of Autumn all around us! I think we’ve done more baking than ever this year as well.  I had an idea about trying to make some pumpkin shaped cookies, using a dough recipe I already had, and they came out so great!  These are beautiful cookies to have around on Thanksgiving, or anytime during the pumpkin/Autumn season, and they were fun to make, too.  It may seem like a lot of steps, but it is easy, and the dough recipe itself is very useful!

The dough is the same recipe from my God-Mother’s Italian cookies, found here in a post called Cookie Love.  It’s a very I am going to give you the recipe right here as well, but you really can see how it is made at the other post.  *Please note; you can mix the ingredients to make dough with a Kitchen Aid Mixer, but we did not have one at the time of the other post, so we did it by hand. For these pumpkin shaped cookies, we did use the mixer since we have one now. It’s just easier and faster with a mixer, but still doable by hand.

Ingredients

  • 4  C Bleached All Purpose Flour
  • 1  C Sugar
  • 2 Tbs. Baking Powder
  • 4 Eggs
  • 1/2C Land-O-Lakes Margarine
  • 4 Tsp. Vanilla Extract
  • 1/4 C Milk
  • Confectioners Sugar
  • A Little Extra Milk for Glaze
    . . . . . . and some kind of Coloring.

Which brings me to this stuff . . . . . .

01_icing_coloring

Wilton’s Icing Colors.
Even though it says for icing, it works for any food coloring. I love it, because it IS concentrated.  It gives a nicer color, and is more potent, so it gets the job done easily.  Food coloring drops to me are a pain. It takes too much to get the depth of color you want, and adds a water content at the same time that you may not want. So this stuff is the bomb for me. It’s what I used to color my cookie dough orange. It is also great for icing, and we use it for that in this recipe too. ; )

1. In a large bowl (or your Kitchen Mixer bowl),  put in flour, sugar, baking powder, eggs, margarine, vanilla, and milk.

2.    Mix it all together with fork at first. Once it starts to form, you can use your mixer or clean hands.

3. Flour a counter or big board.

4. Remove dough from bowl, and knead for several minutes, sprinkling the surface more if the dough starts sticking.

5. Grease baking sheets with vegetable oil. (You probably can use Pam Spray…if you’re a fan of that.)

02

6. Once your dough is formed, it’s ready to color. Using a toothpick, mix up the orange container of coloring gel, and just wipe the toothpick onto your dough.  Then fold it in and knead the dough some more until the color works through and is uniformly mixed into the dough. Add more color as needed to get the desired  density of color.

** Two Things to Note Here:  A) This gel will likely stain yours hands and/or clothing a little, so use kitchen gloves and an apron is your concerned with that.  B) The color will lighten/fade a lot after baking.  So keep that in mind. Although the dough may appear too dark orange, they won’t be when done. (See photos of baked cookies for reference.)

7.   Grab a piece of dough, and begin to roll into a ball between the palms of your hands.  You want it to be about the size of say….a large cherry tomato.  You can place them directly on the cookie sheet, or keep working on a floured surface, such as a cutting board.

8. Pre-heat your oven to 375 degrees.

03_how-to-make-pumpkin-shaped-cookies 9) First poke your finger down into the center of each orange dough ball.

10) Then, taking a toothpick, stand it up beside the dough ball, and press in your indentations for the pumpkin grooves, as seen above.

04_how-to-make-pumpkin-shaped-cookies Make the indentations deep!  Really lay that toothpick in there, and rock it to the top, so the grooves are made all the way to the top.  The cookies will puff while baking, and you will completely loose your groove indentations if you don’t make them deep pre-baked.

05_pumpkin-shaped-cookies They should look similar to this when the are done.   My little girl Olivia was a great help forming the pumpkins!

11) Now transfer to cookie sheets with  thin metal small spatula if need be.  (Try not to squich your pumpkins, as the dough is soft!) Place the dough pumpkins on the cookie sheets,  about an inch 1/2 apart, staggered.

**You will have more pumpkins waiting for their turn in the oven.  This dough makes at least a few dozen, depending on the size of your cookies.

12) Bake full sheets for 8-10 minutes.  You want them to be pale – not browned, but if you are wondering if they are cooked enough, open one with knife and see if it is baked through well. If not, put back in for 1-2 minutes more, depending on how doughy they still were.

13.  Remove from oven………and then place them each on a cooling rack.

  For cookie glaze:
14) In a small bowl, pour some confectioner’s sugar, and add a little milk.  I don’t really measure the sugar or milk here.  I recommend adding one tablespoon of milk at a time, and stir well. You want the glaze thick, as it will be much easier it will be to work with if it is not thin and runny.. You will be surprised at how much powdered sugar you need!

15) Add in green gel coloring and mix well.

16)  When cookies are completely cooled, transfer your green icing to a piping bag with a very fine point tip, or if need be, a zip-lock bag with the very tip of the corner snipped off.

17) Just pipe on a stem in the center top of the pumpkin, a leaf if you are really good, and maybe make some curly vines coming off.

06_pumpkin-shaped-cookies As you can see, my piping skills could use some practice.  But I thought they came out so adorable, and they are as delicious as the Italian Cookies recipe! It’s all the exact same ingredients, except for the tasteless coloring.  What I love about this dough recipe, is it is flexible to make many different looking cookies.

Alexis kept some of the dough before it was colored orange, and made these traditional cookies. . . . . .

07_italian-cookies Also quite Autumn looking!
The cookies can be sealed in an air tight container, or even put in the freezer the same way, for a coming holiday, or unexpected company.

We hope you try this recipe out, and have some fun making them yourself. Your mouth will surely thank you!

. . . . . .

 Come follow me here and there:


Save

Save

Filed Under: Baking, Desserts, Fun Food, Recipes, Treats Tagged With: Autumn-cookies, Baking, cookie-recipes, cookies, cute-cookies, Fall-cookies, italian cookies, pumpkin-shaped-cookie-recipe, pumpkin-shaped-cookie-tutorial, Thanksgiving-cookies

Ferris Wheel Photography

October 22, 2012 By Laura 12 Comments

00_

Ever since I can remember, I have been captivated by the vision of ferris wheels. In my adult years as a photographer, it has been a little heart’s desire of mine to get an amazing shot, of a ferris wheel.

So, in the third week of September when the kids and I were driving along the highway towards Buzzards Bay one beautiful day, and spotted a grand ferris wheel over the trees, we went on a mission to find our way to it! And that we did.  As it turns out, they were setting up for the annual Scallop Festival that weekend.  We hadn’t been in years, so we promptly put that on our agenda!  Come that Sunday after church, it was another beautiful day, and a wonderful family time together. Not only is this (annual) Festival an event in and of itself, it’s on Main Street, which is lined with a multitude of antique shops.  The owners put many of their items out on the sidewalk in front of their stores too, so it’s fun to stroll by, and pop in one or six. Added to this particular weekend on that street, was also a huge church craft fair going on.  It’s just a charming area to walk around anyway, and certainly the place to be on that weekend.  However, in the midst of all of the wonderful things to enjoy, there was one thing I was most excited about:
photographing the grand ferris wheel.

As we walked around with the kids, I kept looking for another angle that was better than the last.
In the end, I’m not sure I got that one amazing shot I’ve been after for years, but I’ll take them for now, because I do love the ones I did get. And it sure was fun taking them, and editing them with my own flair, as well.

01_ferris-wheel

02_ferris-wheel

03_ferris-wheel
I think this last one after dark fell, is my favorite . . . . . .(although I really love the first one as well…..)

04_ferris-wheel1
Which one is your favorite?
Please tell me in the comments.
. . . . . . .
Come follow me here and there:


Filed Under: Life In General, Photography, The Big Picture Tagged With: ferris-wheel-photography, ferris-wheels, photography

A Doodle Journal; Made with Love

October 15, 2012 By Laura 19 Comments

0_

Not long ago, I shared with you all the Customized Sketch Journals the kids and I made, and I mentioned in that post that the idea came to me while brainstorming a birthday gift for a special little someone else.  I said that I would share more about that in a coming post.  Well this post is about that special little someone, and the little birthday gift I made for her.

00_Ju
This is Julia, my Goddaughter. Feel free to tell me how beautiful she is, and I’ll tell you I know.  I took this photo of her, of course, but it’s a couple of years old.  That just means that she’s a little bigger-beautiful now.  She has a real creative soul, and in that way reminds me of myself at her age. So come special occasions, I like to gift her with little things that encourage that side of her. It’s not always artsy stuff, but often.  It is almost always late.  Thankfully, she is very forgiving, also.

     So for her birthday this year, I knew I wanted to give her some kind of book to seriously doodle in. I’ve been trying to doodle more myself, like I used to when I was younger. I think it really can get the creative juices flowing, and actually express a lot about yourself, if you let it.  You know . . . let your pen(cil) go free as it will.  Wanting her to have this actually has a backstory:  I’m a natural-born artist (don’tcha know), and when I was in 8th grade, I won an artist award. I had submitted a drawing for some city calendar contest made up of students artwork from all of our city’s schools. They chose 12, (for the months of course ; ), and I won October’s slot.  There was an award’s ceremony, and the award was a hard cover book, full of blank pages. I knew what it was for. But I could never bring myself to make a mark in it, and I always regretted that. I just imagine how cool it would be to have that book now, and see all of my sketches and doodles filling the pages, from when I was a kid. So the point is, . . . JULIA, DON’T DO THAT!! I want her to let her pen(cil) go fancy-free, and never have that same regret.  Ultimately, it was all of my thinking about that, that got me thinking I should do something similar with my kids. Thus, their sketch journals.

     For Julia’s though, which was to be made by me, and with love, I had a good vision of the finished piece in my head. I just wasn’t sure exactly how I was going to execute it all.  I did know I wanted to start with a hardcover book of blank quality pages, and I found some at the craft store.

jpg1

 This is the exact book I got.  Black leather hard cover, filled with good blank art paper pages.

     Now my vision from here, in order to make it special for her, was to personalize it with a fancy J. I decided to fill the J with my own doodling, incorporating little meaningful messages for her.  I also envisioned the J built up, like piled paper, with ragged edges.

wcp_edge
Much like the ragged edges of single sheets of soft or cold-press watercolor paper, as seen in the photo above. Except, I knew I was going to have to cut out, several J’s, to pile it up.  So I decided to figure that part out when I got to it, and hope I could!

01_strathmore-watercolor-paper-pad
So along with the journal book, I bought a new pad of cold press watercolor paper. I needed some more anyway. Because I wanted the surface to have some texture, but not too much to mess with the flow of my pen, and thus my doodle-control.

02_doodling      I started my artwork on a tracing paper. Because, although I do encourage just letting it fly when doodling, this was a special gift, and I wanted this artwork within this J a little more organized in design form. So, when it was finished on tracing paper, I transferred it to my art paper.  (For those wondering about that method-there are many. But I just laid my pencil down on the backside of the tracing paper, and made a layer of lead. Then I turned it back over, and traced the whole design with pressure onto my art paper. Surely you know of that trick. )   Then I got to work with my permanent pen.  Of course as I worked, my hand kept rubbing off what I had transferred, which was so light as it was. So I had to redraw much of it, or make some up as I went. But that was alright, even if it was different than what I originally drew.

03_doodling
And there it was.  A little bit of everything:  free-flowing strokes, cross-hatching, coloring in solid, and stippling. I used to love stippling. If you are not sure what stippling is, it is the technique of creating a whole image in dots. I have a couple of artwork pieces of stipple-work I could share with you too. I really need to photograph my old stuff, from the art-school days, and share it with you all. I keep saying that. But anyway . . . this J took some time! I think it was 5 or 6 inches tall. I did a lot of it in the car at the park, while my boys were at flag-football practice, and my girls were being otherwise active. (Which would have been a wise idea for me too. )

Now, there are some photos missing here for this step, so my text explanation will have to do. Do you see that light pencil outline about an inch or relief around the J? That is where I cut the J out of the paper, and then traced that several other times on the same art paper, and cut all of those out too. Because I wanted to pile them up! Like a stack of J’s. So, one J at a time, I applied glue between the J’s, but only in the middle/whereabouts that the artwork was on the top layer, staying away from the sides.  Reason being, somehow, I wanted to get it raggedy. And I didn’t know how much paper I would lose whilst trying to destroy the edges some.  The thing was, this cold press paper was pretty hard and sturdy! Even at the edges, it was just a hard edge. So the piled paper was even more so.  I had no idea how I was going to change the hard edge. I thought…sand paper? I went poking around my husband’s stuff, looking to find some sand-paper or….something, because I didn’t think sand paper would work either. When suddenly, I saw one of my boy’s first tool kit.

04_ I thought I’d give that bitty saw a try, and it worked!  Well, not quite the same as I had hoped. But I liked the effect well enough!  It did take a lot of sawing, and did make a fine mess (of fine paper fuzzies), but it worked!

05_doodled-letter-art
Finally, I was able to apply the whole piece to the book, with E-6000.
This baby was stiff, and slightly curved/curled up. So even with E-6000 I was/am still hoping it will hold down flat.

06_doodle-paper-art  Here’s a good look at the edge of my piled up J’s.

07_custom-doodle-journal
Julia’s Doodle Journal, all finished, and made with love.
On the first page, I wrote her a special message from me.
But the rest of the pages are hers to express herself, and I’m sure she will.
Revealing all of the beauty that is within her, as well.

******

Come follow me here or there:


Save

Save

Save

Filed Under: Crafts & Creations Tagged With: art, crafts, creative-journal, doodle, doodle-journal, doodlling, personalized-creative-doodle, personalized-creative-journal, sketch-journal, Zentangle-doodle

  • « Previous Page
  • 1
  • …
  • 20
  • 21
  • 22
  • 23
  • 24
  • …
  • 101
  • Next Page »

We are wicked happy to have you here! We hope you find much inspiration, help, humor and enjoyment here.


Archives


POPULAR POSTS

* * * * * *

SUBSCRIBE to House of Joyful Noise blog! Every new post, delivered right to your email box!


Privacy Policy

Amazon Affiliates

Never at any additional cost to you, we may earn a small commission for our endorsement, recommendation, testimonial, and/or link to any products from our website. Your purchase through our links helps support our family, while sharing with you the products we authentically use and recommend, for various ideas, and letting you know where you can purchase them. Thank you for your support!

[footer_backtotop]

Copyright © 2025 HouseOfJoyfulNoise.com · Genesis Framework by StudioPress