• HOME
  • {A}’s Chipmunk Training Archives

 Homepage

  • The Homestead
    • Home Projects
    • Home Improvement
    • Home Decor
      • Seasonal Home decor
        • FALL Home Decor
        • WINTER Home Decor
        • SPRING Crafts and Creations
        • SUMMER Crafts and Creations
    • Our Chickens
    • Gardening
    • Organization
    • Re-Purposing
    • Furniture Refinishing
    • Budget
  • Crafts & Creations
    • Seasonal Home decor
      • FALL Crafts and Creations
      • WINTER Crafts and Creations
      • SPRING Crafts and Creations
      • SUMMER Crafts and Creations
    • DIY (Do-It-Yourself) Project
    • Kids Arts and Crafts
    • Homemade/Handmade Gift Ideas
    • Holiday Crafts
    • Fan Pulls
    • Free Printable/Downloadable
    • Sewing Projects
    • Giveaways
    • Business Features
  • Recipes/FoodFun
    • Breakfast
    • Lunch
    • Main Dish
    • Sandwiches
    • Appetizers
    • Slow Cooker
    • On The Grill
    • Side Dishes
      • Soups
      • Salads
    • Baking
      • Breads, Rolls and Muffins
    • Snacks
    • Treats
    • Desserts
    • Drinks
  • Homeschooling
    • Elementary Homeschooling
      • Elementary Homeschooling READING
      • Elementary Homeschooling MATH
      • Elementary Homeschooling LANGUAGE ARTS
      • Elementary Homeschooling SCIENCE
      • Elementary Homeschooling HOME ECONOMICS
      • Kids Arts and Crafts
    • Middle School Homeschooling
      • Middle School Homeschooling SCIENCE
      • Middle School Homeschooling HOME ECONOMICS
    • Language Arts
    • Math
    • History / Social Studies
    • Geography
    • Foreign Language
    • Field Trips
    • Games
    • Nature Study
  • The Big Picture
    • Life In General
    • Celebrations
    • Faith
      • Into the Light; The Series
    • Giveaways
    • Reviews & Sponsors
  • Photography & Lettering
    • Photography
    • truck lettering
    • vehicle graphics
    • Newborns
    • Kids
    • Engagement
    • High School Senior Pictures
    • High School Senior Pictures Sneak Peeks

Jalapeno Jack and Cheddar Macaroni and Cheese Recipe

September 11, 2013 By Laura Leave a Comment

Do you have a recipe that you are known for?  You know…a recipe that others consider ‘yours’.  Maybe one that’s requested by others for family and friend gatherings, with such expressions as, “Oh, can you make and bring your ___________?”. 
My mother was known for her baked beans.  Some even called them “Jean’s Beans”.  My husband is already known for his homemade pizza; which is actually his family’s recipe, handed down.

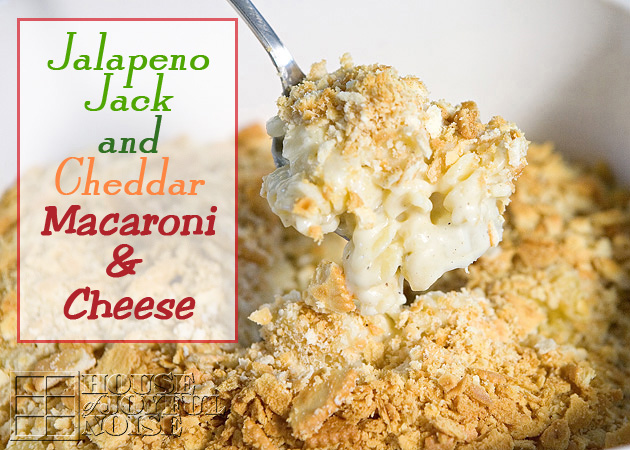
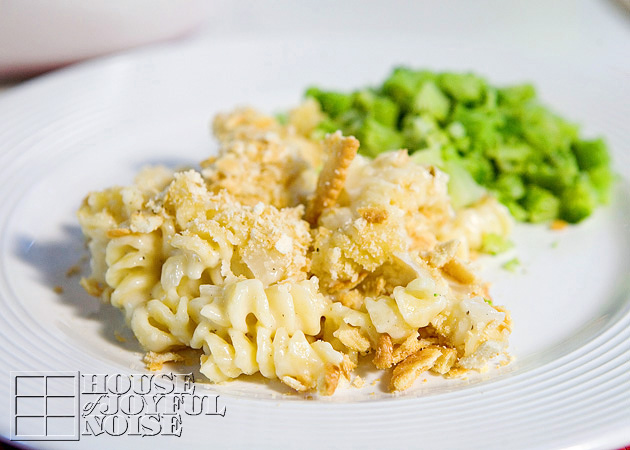
I wondered for some years if I would ever have a recipe others thought of as ‘mine’, until I did. My Jalapeno Jack and Cheddar Macaroni and Cheese!  Granted, I think it might only be my own little family here who knows of and requests my fabulous macaroni and cheese but hey….we all start small. And home is always a heartfelt place to start.   Oh wait, come to think of it, I did make a huge batch of this Macaroni and Cheese (double this recipe=LOTS) to our friend’s 4th of July bash this year; and not only were people eating it up, but she messaged me at 11 p.m. that night to tell me she was eating the leftovers.

But I’ve never given anyone the recipe until now. I’m happy to share it with you; our following-friends.

(You will want to save this recipe, so you might as well Pin this post with the photo above, now. 
There is a printable recipe at the bottom, that you can come and get anytime.)

Whether served for dinner after a brisk day, on a football Sunday afternoon, or just because you need some (it happens….right?), my recipe, Jalapeno Jack and Cheddar Macaroni and Cheese, is the epitome of comfort food. Mine has a little *kick* to it, because of the jalapeno jack cheese. (I also had extra black pepper to it. We love our black pepper.)
Make it once, and you may find your loved ones keep asking for it again and again, too.

I’m just going to walk you through the steps here as a visual aid, and then I’ll give you the printable recipe at the end of the post.

Participating Ingredients
1 box/lb. Rotini Pasta
1/2 stick or 4 Tbs. of Butter
1 medium. Onion, chopped
1 Tsp. of Salt
1/2 Tsp. of Black Pepper
1/3 C. of All Purpose Flour
3-1/2 C. of Milk
8 Oz. of Jalapeno Jack Cheese; rough into small blocks ~ 1-1/2″ or so
8 Oz. of Sharp Cheddar Cheese; rough into small blocks ~ 1-1/2″ or so

Also…..
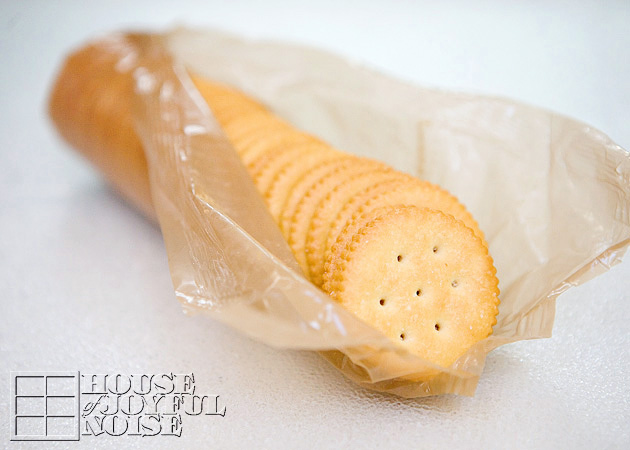
  . . . . a sleeve of Ritz Crackers.

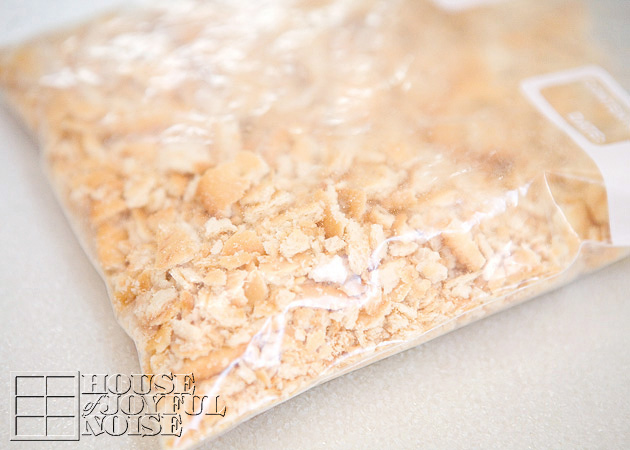
Place the crackers in a zip lock bag, and seal it, removing any air as best you can.
Then just crush the crackers all up.  Any bits of bigger pieces is fine. See photo above? Good enough.

Bring a sauce pan of water to a boil and cook pasta to al dente;  7 minutes, and drain.  Put pasta back in (same) rinsed pan.

But while you are waiting for the water to boil . . . .
In a skillet over medium heat (stove depending), stir butter, chopped onion, salt and pepper until the onion is tender, and appearing more translucent. 
 
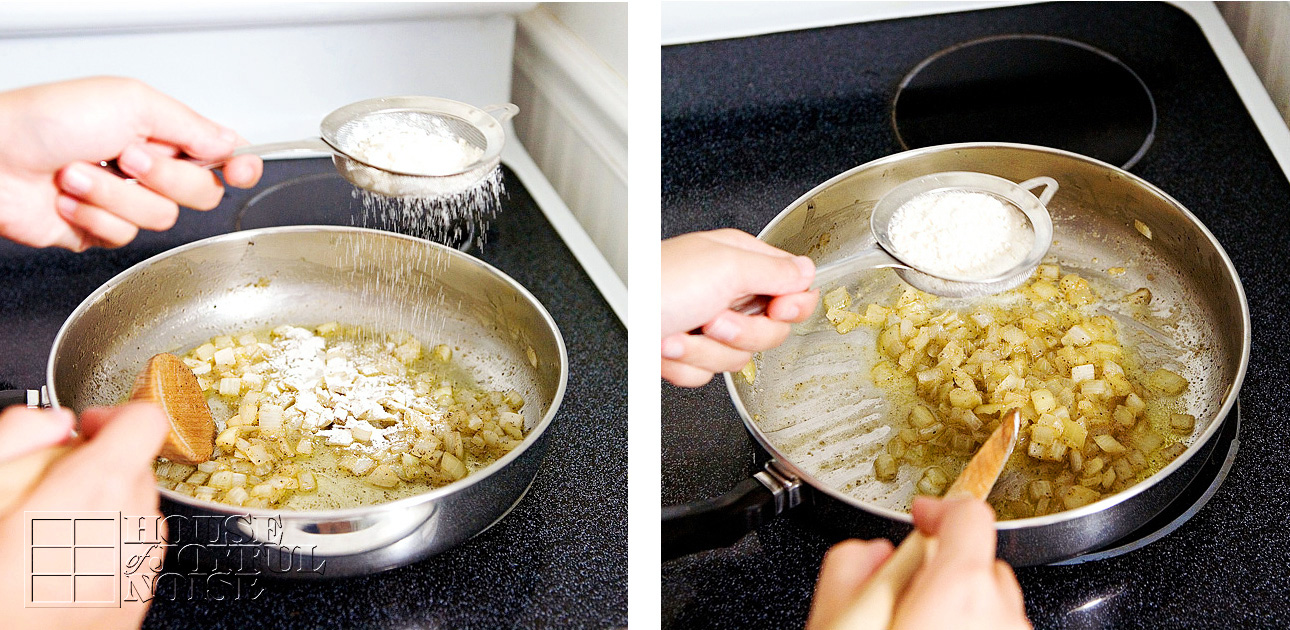
*Slowly sift in flour, blending it in to the mixture as you go. 
*This will be the hardest part, because the mixture gets dry and crumbly, and it’ll really seem like you don’t need any more flour, when you still have lots to sift in. Just keep working with it. Add a little more butter if you feel you need to, but use at least most of your flour. Because remember, this is the base of your cheese sauce you’re about to make, and the flour adds to it’s thickness.

Next, and not shown in photos, once the flour is all mixed in, remove from the heat and slowly pour in your milk, stirring as you do.
Place back on heated burner, stirring constantly, and bring just to a boil.

 Remove from heat again, and add all of your cheese cubes.  Stir immediately, and place back on heated burner.
Continue to stir until all of the cubed cheese is melted.  (Don’t confuse the other lumps with your onions. 😉

— This is a good time to preheat your oven to 375º. —

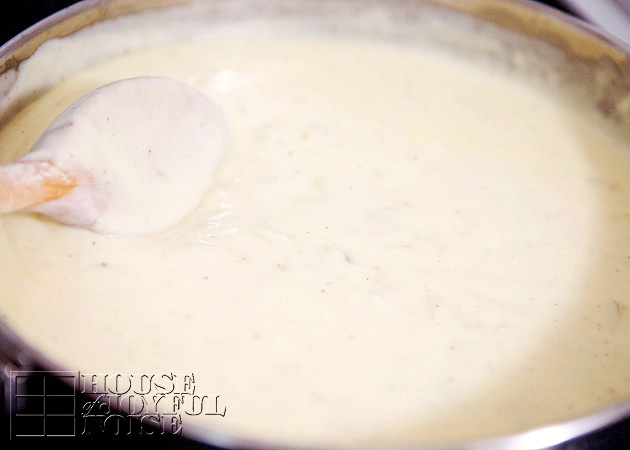
Cheese sauce will be nice and smooth.

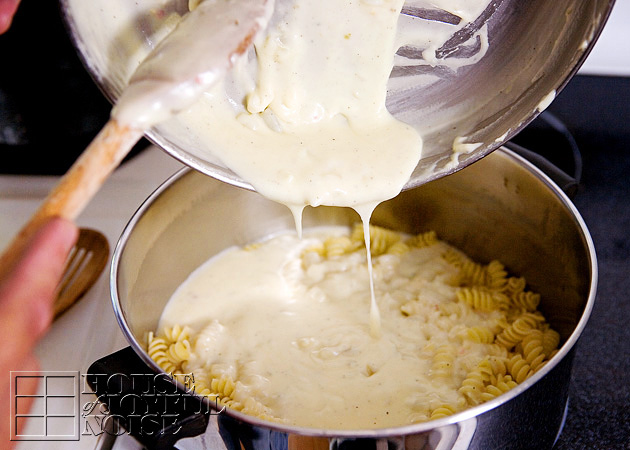
Pour all of your cheese sauce into your pan of pasta.
Scrape out every last bit, and mix with the pasta well.

Pour all of macaroni and cheese mixture into an ungreased 1-1/2 or 2 qt. casserole dish.

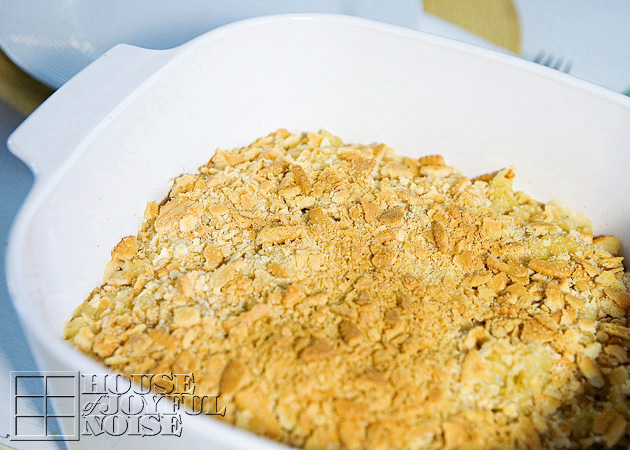
(Seen in photo above is a 2 qt. casserole dish.)
Then sprinkle the crushed crackers all over the top, covering it well.

Bake uncovered at 375º for 20 minutes.

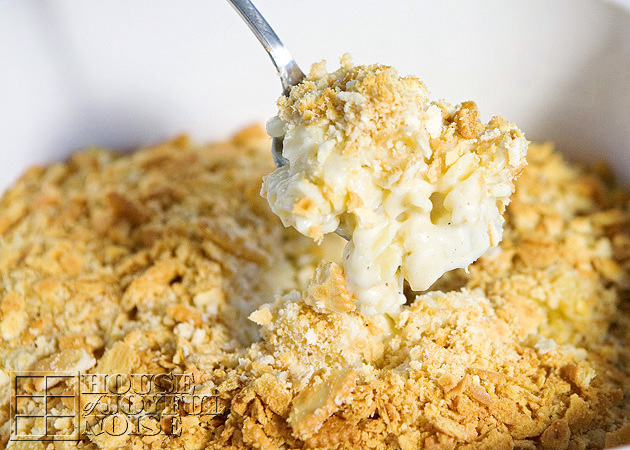
Look at that!  Creamy and cheesy and soooo good, you can only imagine, until you try it!
Serve, enjoy and be ready for rave reviews!
This dish also reheats well. (If you have any left.)

The buttery Ritz crackers have a slightly sweet taste in complimentary contrast to the slightly spicy macaroni.
The heat does build in your mouth some as you eat. But we don’t mind.  😉

Hope you love it as much as we do! 

CLICK HERE FOR PRINTABLE RECIPE

~ Laura

* * * * * *

Please come follow me here and there:

Save


Save

Filed Under: Main Dish, Recipes, Side Dishes Tagged With: comfort-food, homemade-baked-macaroni-and-cheese, homemade-macaroni-and-cheese, jalapeno-jack-and-cheddar-macaroni-and-cheese, macaroni-and-cheese-recipes, main-dish-recipes, pasta-dishes, recipes, side-dish-recipes, spicy-macaroni-and-cheese-recipe

Chicken and Salsa | Super Simple, Super Delicious | Slow Cooker Recipe

January 21, 2013 By Laura 1 Comment

I’m about to rave about this meal, and I have countless reasons why.  It’s been a favorite of our family’s for quite some time now.  We all really love it.  When we have a very busy scheduled day, this is most always what I plan for supper, because it’s that easy and fast, to prep any of it.  Like, ridiculous. Especially for the amazingly delicious meal that it is.  It can actually be made and ready in 2 to 2-1/2 hours cooked on high, if you’d like. Or, you can let it slow cook all day. Either way, it’s super quick, easy prep-work, and pretty much ready to eat when you are.

Here’s a few other reason why I love it:  You don’t have to handle raw chicken at all!  I don’t know about you, but I’m just not particularly fond of touching raw chicken.  I will, and I’m not real freaked out. But I’d rather not if I don’t have to. And with this meal, I don’t have to!  It  is sooooooo good, and it’s so healthy too!
It has 4 out of the 5 food groups in my book:  protein, vegetables, grain, and dairy.

You need a slow cooker of some kind. So I hope you have one.

This is the slow cooker we have. It’s a GE 6 Qt. Digital Slow Cooker, and I LOVE it. It holds enough to cook at least 2+ full meals for our family of 6.
The container lifts right out of the heating element, to be put on the table, and it’s super easy to clean as well.

So many different bursting flavors, with every bite.

Let me show you how easy this is to make.   Even the ingredients are minimal.
Chicken breasts, a jar of salsa, brown rice, and shredded cheese.

The pre-packaged chicken is our trick.  There are 2 breasts in each wrapper. Just cut open the end of each package with scissors, drain the excess water, and dump the chicken into the slow cooker pot. We make up to 8 breasts at a time, for a batch that last for at least 2 family (of 6) meals, and usually more still left over. The 2 breasts in each wrapper are sometimes attached to each other, so I just use a fork and make sure they are all open and spread well in the pot.


Then you just cover all of the chicken in salsa!
Now, just because I have my little ways of doing things, I actually put a little layer of salsa all over the bottom of the pot first, put in the chicken, and then pour the rest of the salsa over the top.
But that’s it!

Then I set the slow cooker.  I can set it to low, and let it cook for 5-6 hours or whatever. Or if it’s a last minute idea, the chicken will pretty much cook in 2 or 2-1/2 hours on high.
Now here’s an extra step that I personally do, because I want the chicken as flavorful as possible:  As soon as all of the chicken is cooked (it is so tender, it’s crazy), I take each cooked breast out at a time, cut it into chunks on a plate, and scrape it back in the pot.  Repeating for each breast until it’s all cut up.  Leaving it all simmering in there with the salsa just adds that much more tastiness.

We like to have this chicken and salsa over brown rice. (It’s healthier than white. We’re all about whole grains around here.) So here’s another speedy trick  . . .

Boil-in-Bag Brown Rice, in 10 minutes. No measuring!  We need 2 bags.
But gosh….could it be any easier? Take the bags of cooked rice out of the water, let drain for a sec, snip off the top, and dump it in a bowl. Done!


At the table, we each just sprinkle some cheese on top.  Because it’s just all so good together.

The chicken comes out so unbelievably tender, and so tasty with the salsa juices and bits of salsa vegetables. It’s perfect on top brown rice.
And the sprinkle of cheese on top makes a fabulous meal, even better.

I never really feel like I put any time worth mentioning, into making supper, when I make this meal.
And yet, we’re all around the table eating delicious food together, and talking about how good it is.
  Try it on your family, and let us know what the reviews are.
We’ll be surprised if you all don’t love it too.

* * * * * *

Please come follow me here and there:


Filed Under: Main Dish, Recipes, Slow Cooker Tagged With: brown-rice, chicken recipes, chicken-and-salsa, crockpot-recipes, easy recipes, easy-meals, healthy-recipes, main dishes, recipes, slow cooker recipes, supper-ideas

Recipe for Apple Pie Pops

October 2, 2012 By Laura 20 Comments

000_apple-pie-pop-recipe

 If you only knew the recipes I see in a day, a week, a month – that I have every intention of making!  I get to really making some, but most not, simply because there is really only so much time in a day, and so much food we can eat in it!  Granted some (little) people (my kids and husband), eat way more than others (myself.)  I actually am one of those with big eyes. I can be starving, and then eat 2 crackers, and I’m good. My kids cannot believe how little I eat. I just get full easy. Still, I consider myself a food lover, if only in my head. I love to find recipes, plan great food for my family, and photograph it too. And I really do enjoy eating. I’m just done sooner than everyone else.

Anyway, I first saw these pie pops almost 2 years ago at Bakerella’s site.  As soon as I saw them that first time, I immediately fell smitten.  She had seen them at yet another’s site. Since then I have seen them 100 times, all over the place.  Of course, you can make these pie pops with any kind of pie filling you’d like. But I have a particular fondness for apple pies, so that’s what I was planning to make.  We do a lot of baking in the Fall, so last year got away before we made them. But not this year! This past weekend we finally made them, as well as some cute cookies I’ll be sharing soon too!

So although these are not my idea, I thought I’d share how we made our Apple Pie Pops.

001_green-apples-red-colander

For any apple filling for baked goods, you want to start with good, firm apples, and a mix of the tart and sweet variety. Whether they are evenly mixed, or a little more of the sweet or tart, is all up to your preference.  I chose to keep it even, and used Granny Smiths (tart) and Golden Delicious (sweet).

002_antique-apple_peeler-corer-slicer One of the greatest parts of making any baked goods that call for apples, is using my Aunt Dot’s apple peeler-corer-slicer.  The peeler part actually needs to be replaced, but we have not been able to find it yet.  But that’s alright – so we peel the apples by hand for now, or forever. We still feel so blessed to have this antique of my beloved aunt’s, that is such a part of my most fondest childhood memories.

003_antique-apple-peeler-corer-slicer But I’ll admit, it’s damn handy!

Apple Pie Filling Recipe

6 C. peeled *apples, chopped small, and evenly sized as possible
3/4 C. sugar
2 T. all purpose flour
3/4 t. ground cinnamon
1/4 t. salt
1/8 t. nutmeg (Optional. I don’t like it.)
1 T. lemon juice

*Reminder: Use a mix of sweet and tart firm apples.

004_apple-filling Mix it all up well in a bowl.

005_dough-circles Pie Crust Dough: You can make your own, or use store-bought ready pie crust, such as Pillsbury.
On a flour dusted surface, roll out your dough.  If you are using ready pie crust that is already round, remember that the size of the circle of dough does not matter for our purpose with pie pops, as it would for a pie dish. So you can roll it out larger and thinner than as it comes, and get more out of it. (We wish we did roll ours out thinner, and will next time. I’ll tell you about that at the end.)

006_scalloped-cookie-cutter
Use a scalloped or plain circle cutter, or any other manageable shape that you would like, that is about 2 inches in diameter.  I like the idea of our pops looking like real little pies, but using shapes like an apple, or a maple leaf, or a pumpkin, etc., would also be cute.  Cut your shapes out of your crust dough as closely as possible, to get as many out of your dough as you can. Weed out the scraps of dough, re-roll, and use again. (As seen 2 photos up.)


007_apple-pie-pops-recipe

Put a good dollop (what a great word…dollop..) of apple filling in the center of half of all of your cut dough shapes, because you’ll need the other half as tops, of course. You want to put as much as possible on there, but remembering you’ll need to cover it with the other dough circles, and be able to seal it. Too much apple filling will be a problem, and too little will just be….sad.

008_making-apple-pie-pops Transfer your pie bottoms with the filling onto a greased or sprayed cookie sheet.
If it easier for you, you can transfer the dough shapes first, and then put the filling on.

009_how-to-make-apple-pie-pops Also add your pop sticks. These are found in the candy making aisle of the craft stores. Now, I have seen that some cover their sticks with aluminum foil, to prevent them from burning. That is too tedious for me, and I was sure they wouldn’t burn anyway, and they didn’t, except where they got a little juice on them. No biggie, and still not worth covering them in foil. But you do what you want!

010_how-to-make-apple-pie-pops You may want to pre-heat you oven at this point, to 375°

 Now put on your tops. We had a little dish of water, just to dip one finger in, and wet the under-edge of the top all the way around, just to help it stick the bottom better. It also helps to stretch the top piece out bigger, to better fit over your dollop : ) of apple filling.
To make the wavy edge like a real pie, just cut off the end of a pop stick, and use it to press grooves all the way around each pie. This is a a bit tedious too, but one that is worth it to me!

Lastly, just brush each pie pop top with a little egg white, and if you wish, sprinkle with a bit of sugar for sparkle. The egg whites really help the pie crust kind of blister and look nice.

When the oven is up to temperature, you can put your pie pops in for 12-15 minutes.

011_apple-pie-pops How’s that for a high cute factor?
We bagged each one, and tied them closed with a little red stitched ribbon. Presentation is everything, Folks!

As mentioned earlier, we did not roll out our dough as thin as we will next time. Our pops seemed to be a little more crust, and a little less apple filling than we would have liked. We must remember the filling soaks in just a bit, and the dough really puffs as it bakes into pie crust. Nonetheless, they were oh so good, and next time they’ll be perfect. : )

There are SO many Fall-time apple treats to enjoy – Apple Pie Pops, big Apple Pies, Apple Crisp, Caramel Apples, Apple Sauce, Apple Cake, Apple Cider…..it’s endless, and there are no complaints here! My favorites are Apple Crisp and Apple Pie, both with Vanilla Ice Cream, please.
Do you eat more apples this time of year? What are your favorite apple or Fall treats?

******

Come follow me here or there:

Save


Save

Save

Filed Under: Baking, Recipes, Treats Tagged With: apple-pie-filling, apple-pie-pops, apple-recipes, Baking, baking-recipes, fall-treats, how-to-make-pie-pops, recipes

Cherry Tomato and Cucumber Summer Salad | Recipe

August 12, 2012 By Laura 2 Comments

000_salad-fork

 When it is summertime, I want meals that are as simple and quick to make as possible. If we don’t have a tight schedule that day, then we’ve spent the day involved in some project or other. Especially on weekends, when Michael is home too. Usually it’s been it’s blazing hot out all day too, being summertime and all. And let’s face it, the heat and humidity really has a way of draining anyone’s energy and ambition that much more.

That’s exactly how I happened to come up with this simplest of salads. Dinner was not even planned, never mind started!  Michael threw some steaks on the grill, and I just grabbed the vegetables we brought in from the garden that day, off of the counter, and threw together a cold side dish. I was not going for anything grand.  And anyway, my kids pop cherry tomatoes in their mouth off of the vine, and they love cucumber spears, with or without a dash of pepper.

The big surprise was that it was far more delicious than I had even begun to anticipate, and it was the talk of dinnertime too.

Long term, it’s a fabulous dish for the whole family to love this much for another reason:
We need to have a variety of options, to use the abundance of certain vegetables we get out of our garden almost daily, in the summertime.

001_garden-tomatoes-in-skirt  Here’s one day’s picking, carried in my skirt.

It’s likely that the next day will harvest about same amount, ready for picking, again.
Especially given that Olivia has her own garden this year, too, and is also growing cherry tomatoes.

002_chopped-cucumber  She’s growing the cucumbers alone, but she shares with her siblings at lunch sometimes, or for a snack, and she’s happy to offer one for our dinner anytime, as well.

Those 2 vegetables, were the simple main staples for this recipe:

Quartered Cherry Tomatoes.
Cucumber, quartered the long way, and then chopped.

TIP: I always stripe my cucumbers with the peeler. It makes them a littler fancier looking, and even more enjoyable.

simple-summer-salad-recipe Throw in a dash of kosher salt, and drizzle all over with Balsamic Vinegar Salad Dressing.  We also add black pepper, because we love it, and put it on just about everything. The dressing, as opposed to straight up balsamic vinegar, has all kinds of little bits of seasoning goodness already in it.  Give it a quick toss.  I like to let it marinate just like that for a few minutes.

simple-summer-salad-recipe-1 When it’s time for dinner, I throw some shredded mozzarella cheese on top.

It’s done.  Does it sound plain, to you? Well I’ll tell you what . . . . . .

simple-summer-salad-recipe-3 It’s simple all right, but it’s sure not plain tasting!  The tang of the Balsamic Vinegar Dressing, really brings out the sweetness of the cherry tomatoes.  The combination of the two compliments each other so well. The fresh cucumber, and the soft and subtle flavor of the cheese adds a new texture, and another surprise taste.

We have also used this salad, rolled up in a tortilla, with grilled chopped chicken. Also simple, quick, and delicious.

simple-summer-salad-recipe-2 This is what summer tastes like.

It’s that simple.

What is your simplest summer dish?


Save

Filed Under: Recipes, Salads, Side Dishes Tagged With: cherry-tomato-cucumber-salad, cold-salads, light-salad-recipes, quick-salads, recipes, salad-recipes, salads, simple-summer-salad, summer-salads

Fresh Strawberries and Chocolate Nachos | Recipe

July 13, 2012 By Laura 1 Comment

strawberry-chocolate-nachos_0-300x214

If you love chocolate covered strawberries, this unique treat might be just for you.  I really do love them, but I also enjoy things that have CrUnCh!   So a few weeks ago, when I just so happened to have picked an abundance of fresh strawberries from our (garden bed) the day before, I stumbled across this very unique recipe treat from Our Best Bites.  The recipe was fresh strawberries, drizzled with dark melted chocolate (chips), over some cinnamon tortilla chips she had previously made.   Now, to me personally, eating cinnamon with chocolate and strawberries did not sound appealing.  But the idea of dessert nachos did! And besides, it’s not all about me. We’ve got a crew to feed around here, and I was sure my husband and kiddos would be amused if I surprised them with dessert nachos! So I decided to try the recipe, minus the cinnamon.

We had all of the ingredients I needed, except for the tortillas, which I asked my husband to pick up on the way home. Although I did tell him to get the small ones, because they be so much easier to cut into chips, pizza-style, he got the great big ones. So, I cut them as I had planned anyway, and they just came out as much bigger chips.

It’s a simple recipe. So here’s what you do . . . . .

Strawberries Prep:  Wash, drain, cull and slice.  Then I put them in a bowl, added just a little white sugar, and gave it a quick mix.

 Preheat Oven: 350 °

Baked Tortilla Chips:  Melt butter, and brush on both sides of tortillas. Sprinkle-dust sugar all over the top side. Cut the tortillas, pizza-style.  Arrange the tortillas triangles on cookie sheet(s), and bake for 10-12 minutes, or until they start to brown and the edges start to curl some.  When they seem done, remove from oven and let cool.

Arrange: tortilla chips over a large plate or platter, just prior to eating.

Melted Chocolate: We strictly use Hershey’s Chocolate Chips, because they are safe for our peanut-allergy son.  But Our Best Bites seemed to use some good high quality dark chocolate chips, and that’s an option too. Pour an adequate amount of chips in a microwave-safe bowl.  Microwave on high for 30 seconds or less the first time. Give it a good stir. *Tip: I always stir chocolate with the butt end of a wooden spoon, because silverware can alter the temperature of the chocolate. You will likely need to microwave the chocolate for 10-15 second intervals, and stirring after each time, until all of the chocolate is melted and smooth looking.

Spoon: Strawberries all over the sugared chips.  Then with the spoon, drizzle the chocolate all over the strawberries.  Add whip cream if desired.

Our Best Bites had much better visual presentation than I did. But ask my family if they cared.

NOT.
So there you have Fresh Strawberries and Chocolate Nachos . . . . .

strawberry-chocolate-nachos

Share & Enjoy!


Filed Under: Desserts, Recipes, Treats Tagged With: chocolate-strawberry-desserts, dessert-nachos, recipes, strawberry-and-chocolate-nachos, strawberry-desserts, strawberry-recipes, unique-desserts

  • « Previous Page
  • 1
  • 2
  • 3
  • 4
  • …
  • 6
  • Next Page »

We are wicked happy to have you here! We hope you find much inspiration, help, humor and enjoyment here.


Archives


POPULAR POSTS

* * * * * *

SUBSCRIBE to House of Joyful Noise blog! Every new post, delivered right to your email box!


Privacy Policy

Amazon Affiliates

Never at any additional cost to you, we may earn a small commission for our endorsement, recommendation, testimonial, and/or link to any products from our website. Your purchase through our links helps support our family, while sharing with you the products we authentically use and recommend, for various ideas, and letting you know where you can purchase them. Thank you for your support!

[footer_backtotop]

Copyright © 2025 HouseOfJoyfulNoise.com · Genesis Framework by StudioPress