• HOME
  • {A}’s Chipmunk Training Archives

 Homepage

  • The Homestead
    • Home Projects
    • Home Improvement
    • Home Decor
      • Seasonal Home decor
        • FALL Home Decor
        • WINTER Home Decor
        • SPRING Crafts and Creations
        • SUMMER Crafts and Creations
    • Our Chickens
    • Gardening
    • Organization
    • Re-Purposing
    • Furniture Refinishing
    • Budget
  • Crafts & Creations
    • Seasonal Home decor
      • FALL Crafts and Creations
      • WINTER Crafts and Creations
      • SPRING Crafts and Creations
      • SUMMER Crafts and Creations
    • DIY (Do-It-Yourself) Project
    • Kids Arts and Crafts
    • Homemade/Handmade Gift Ideas
    • Holiday Crafts
    • Fan Pulls
    • Free Printable/Downloadable
    • Sewing Projects
    • Giveaways
    • Business Features
  • Recipes/FoodFun
    • Breakfast
    • Lunch
    • Main Dish
    • Sandwiches
    • Appetizers
    • Slow Cooker
    • On The Grill
    • Side Dishes
      • Soups
      • Salads
    • Baking
      • Breads, Rolls and Muffins
    • Snacks
    • Treats
    • Desserts
    • Drinks
  • Homeschooling
    • Elementary Homeschooling
      • Elementary Homeschooling READING
      • Elementary Homeschooling MATH
      • Elementary Homeschooling LANGUAGE ARTS
      • Elementary Homeschooling SCIENCE
      • Elementary Homeschooling HOME ECONOMICS
      • Kids Arts and Crafts
    • Middle School Homeschooling
      • Middle School Homeschooling SCIENCE
      • Middle School Homeschooling HOME ECONOMICS
    • Language Arts
    • Math
    • History / Social Studies
    • Geography
    • Foreign Language
    • Field Trips
    • Games
    • Nature Study
  • The Big Picture
    • Life In General
    • Celebrations
    • Faith
      • Into the Light; The Series
    • Giveaways
    • Reviews & Sponsors
  • Photography & Lettering
    • Photography
    • truck lettering
    • vehicle graphics
    • Newborns
    • Kids
    • Engagement
    • High School Senior Pictures
    • High School Senior Pictures Sneak Peeks

Sewing Easy Pillow Shams – Tutorial

November 8, 2017 By Laura 4 Comments

“Someday, I’m going to learn how to do that.”
I’ve got a list of things I’ve said that about. Doesn’t everybody? Do you? As for me, some of those things I’m actually working on now and then, and some are still sitting on the mental ‘someday list’, completely untouched. But learning how to sew, and run a sewing machine, is something I’ve actually gotten to! Oh, there is always more to learn, and I will. But my main motivation was simple:  Pillow shams.

This girl loves throw pillows, as part of our home decor accents, as well as comfort. That include seasonal and holiday throw pillows. But seriously, I’m sure you could agree that there is only so much storage room available, for gads of interchangeable throw pillows. And the perfect solution to that, as far as I could figure, is pillow shams. I could just change up the shams on the pillows with the seasons and holidays!  They would take up virtually no space at all, just folded nicely in a pile somewhere.

But first, of course, I needed to learn how to sew.

Old Simger sewing machine
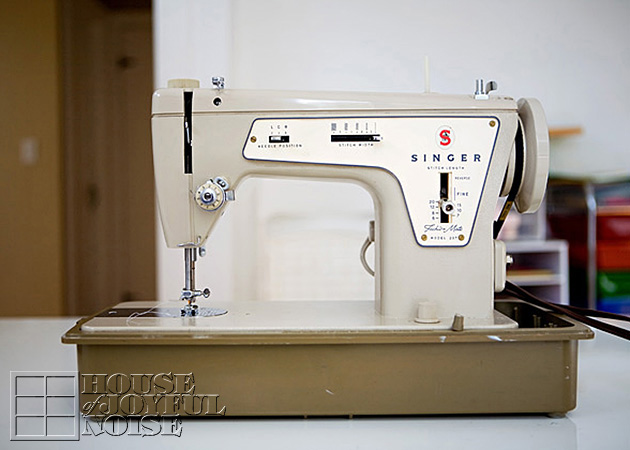
And I really wanted to learn how, using my mother’s Singer Fashion Mate (Model 237).  It’s old, it’s ugly, and I’m pretty sure [Read more…]

Filed Under: Crafts & Creations, Holiday Crafts, Home Decor, Homemade/Handmade Gift Ideas, Seasonal Crafts and Creations, Seasonal Home decor, Sewing, The Homestead, Tutorial Tagged With: easy-pillow-shams, home decor, home-accents, homemade-gift-ideas, how-to-sew-pillow-shams, pillow-shams-easy-tutorial, sewing, sewing-pillow-shams, sewing-pillows, sewing-projects, sewing-tutorials

Old Junk – A Big Old Rusty Clock Makeover & An Old Cabinet

April 7, 2016 By Laura 3 Comments

Are you an ‘old junk’ lover? Do you love going looking for old junk, and get butterflies at the opportunity to bring some of it home? That’s ME to a T! Sometimes, I don’t even have a clue what I’m going to do with the old junk I’m bringing home. But I know I’ll think of something! (That’s the other part of the fun! Right?!).

Well, previously I shared in a post on our Facebook Page, a few photos of some old junk I picked up the weekend prior, of a big old rusty clock, an old cabinet, and a little bird bath/feeder dish. I promised I’d let you know what I did with them.

Here I am, keeping my promise, with a post on it! (Well, 2/3 of the promise, anyway.)
Since I have the most to say about it, we’ll start with . . . . . .

The Big Old Rusty Clock


Here is the clock, the way I bought it. Now, knowing photos tend to really confuse actual scale of objects, I want you to realize that this clock is actually a foot tall! So it’s bigger than it may appear, if you imagined it to be a close-up of the size of a regular alarm clock this style.

I actually ‘settled’ for this clock, in the antique store. The first one I saw was that old-style 50’s turquoise-blue-teal (you know the one?), but extremely chipped, worn, with rust coming through everywhere. I loved the look of that one, more than this unpainted one. The problem was, it just went out the door, in someone else’s hand! Ha haha! So, we bought this one instead, with the plan that I could create the same look as the one I originally wanted, with a little creativity. Somehow. As soon as I figured out how. Because the thing was, I just didn’t care for the ‘finish’ of this one, which to me, really looks like it was almost manufactured to appear rusty. The rust is far too….uniform, to be convincing. So, my plan was to try and fix that.

It did end up being one of those projects where, as soon as I got started and past that moment of ‘too late to go back now’, I got that sinking feeling like, ‘Oh no, what did I just do? What am I doing? I’m ruining it!“. But in the end, I was happy with it.

But quickly, here was my thought process, getting to the happy point.

I got thinking about where it would ultimately be put, and, I realized that old teal color wasn’t the ideal color. I mean, I did have a choice at this point! I didn’t have to make it the same color as the one I originally saw. Considering where I knew I wanted to put it, the most ideal color would be a cream. I did the best I could to replicate the texture of the look of the original clock I saw.

And here is how it came out . . . . . . [Read more…]

Filed Under: Home Decor, Home Page, Refinishing, The Homestead Tagged With: antiques, home decor, junk-makeovers, old-cabinets, old-clocks, old-junk, refinishing

Back-To-School Mantels | Home Decorating Ideas

August 25, 2014 By Laura 1 Comment

There is something about the back-to-school season, that I have always loved.  With all of the fresh new supplies and clothes, and the whole new school year stretched out before us, with so much yet to be learned, it’s just always been an exciting time to me.  Even though we homeschool, and even school right through the summer, we (even the kids) still love the excitement that the start of a whole new school year brings!  All new books, fresh supplies, new experiences, and a new season to grow academically.

It’s that love for all things ‘back-to-school’ that inspired these mantels in our home! It’s a theme that fits just right, through the month of September!
I used [Read more…]

Filed Under: Home Decor, Homeschooling, Mantel Decorating (Ideas), The Homestead Tagged With: Back-To-School, back-to-school-decor, decorating-mantels, globe, home decor, mantel-decor, mantels, school-bell, school-supplies

Our Spring Mantels | Home Decorating Ideas

April 4, 2013 By Laura 15 Comments

So if you’ve been following along with us here, you’ll know that earlier this week we revealed my new double mantels in our sun room, which Michael custom built for me, and I finished in my own style, to give them the look that I was going for. 

As promised, today I am sharing lots of overall and detail photos of how I decorated those mantels (for the very first time) for the spring season, as well as some home decorating ideas, and tid-bits of other information you may find interesting. I can tell you that I had way too much fun, both decorating and photographing my new mantels, but I truly don’t mind! Mind you, I’m not a professional decorator, but I do feel comfortable relying on my artistic eye and education, and just what looks good to me. My ‘mantel envy’ that I spoke of, was as real as I thought it was, too, and my appeasing it is already as fulfilling as I knew it would be.  More than ever, I am looking forward to all of the seasons and holidays I can spend being creative in home decor, with these mantels. Even if it does mean more to dust!

So let me show you what I did:

 
This is the view straight ahead, when you walk in through our front door, into the sun room. 
There you see our mantels corner, over our wood stove.  We spend a lot of time in this room year round; and it’s a favorite of guests too.

Viewing left to right, here is the first and longest of the two mantels, I’ve decorated, measuring 4 feet long.

As I was gathering items I had hoped to use for this spring theme, from other places throughout our house, I realized I had two wonderful groupings for both mantels, where I could have a featured color for each mantel, but where also there were common colors that tied the two mantels all together. So I immediately started working off of that kind of color theory in my head. Also, I added some pieces of burlap as texture-accents with both mantels, but were used in different ways for each.  For this mantel, I simply took a long piece, and strewn it along he back of the mantel as a backdrop.


So if you refer to the entire first mantel above), I thought of the greens as much featured color, and then the browns as the common color, because it would be a part of both mantels. 
You’ll see that in a moment.  But first I’d like to share with you a little more about the details of this one.


Here we just have a simple couple of glass decorative bottles I had, and a cute set of little dishes, that I picked up at TJ Maxx. There is a fourth dish, the color of teal, which I actually bought the set for, because that one went well with the decor I was putting together for my bathroom cubby shelf, which can be seen in the first few photos of this post.

Here are the next few things I grouped sort of together.


This was one of my mother’s personal journals.  
The colors and the spring theme went well. And seeing it of course also reminds me of my mother, and makes me smile.

A really good pair of binoculars, in a very weathered leather case.  I thought they were once Michael’s parents, but, Michael just called and while I had him on the phone, I double checked with him. He says they were actually my grandmother’s. (We call her Nana.) Hmmm. I’m not sure how we got them, but I’ll guess my father brought them down. He’s always bringing us all kinds of things when he comes.


These items are all new little things I had just picked up, specifically for my spring decor.  There is an new, awesome, huge 3-floor place in town that is loaded with the most gorgeous inventory! From large furniture of all kinds, much clearly hand-crafted, to a wide array of small home-decor accent pieces, as well as signs, fashion accessories, etc. One could spend hours in this place, and this one has! My kiddos enjoy tagging along with me too.  Honestly, I should do a whole post on it for another day.  But in this photo above, notice the super rustic little chalkboard easel. The surface is merely wood painted with chalkboard paint, so it’s not the easiest to write on, but I love it anyway. I think it’ll be a versatile piece, and I’ll be using it a lot, on these mantels. 

Also there, I picked up this adorable little ceramic clay bunny, and tiny potted Grape Hyacinth bulb plant.


It was a tiny bit limp and dehydrated when I bought it that day, but I knew with some water and sunlight, it would quickly recover, and it has.

And that wraps up the first mantel.

On to the next . . . .

The second mantel is shorter, measuring just short of 3 feet long. I think it’s so cute!

The colors for this one are just a bit different, with a teal being the focus colors, and the green and brown being 2 common colors found in the first mantel as well, where the green was the featured color in that one.

Dressing the cake dish from my kitchen in burlap and jute string, I placed a beautiful bird’s nest, which I also finally found at the same big retail space I spoke of a minute ago.  I’ll give you a closer look at the next in a moment. But notice the mail against the back wall:  As I was looking pieces in my house that fit into my color theory, I spotted this mail that was so thoughtfully sent by our fan-friend Julie!  The envelopes to the kids’ Easter cards from her, happened to be teal. And then I had some mail for me that she had sent, for which she had made the envelope from a mao (LOVE!), that was made up of some of the warm browns I was working with too. So see…..anything can be used as decor. And it’s always nice to use the little things that give us warm fuzzies inside, and I think such things also add an element of really personal touch and warmth to your home setting.

I really had been looking for the supplies to make one of my own for weeks, but was having little success. I was even considering making one of my own, if I found the right materials. While I did find a little next at Michael’s Arts & Crafts, I wasn’t crazy about the way it was made, and the (blue) eggs I found were also not quite real enough for me. I’m really particular about that kind of thing. So when I spotted this bird nest, with much more realistic eggs already in it, I grabbed it.


A closer look at the base of the cake dish, wrapped purposely haphazardly, in burlap, and tied secure with jute.


This teal colored canister-jar was the first piece chosen for this mantel, and sort of kicked off the feature of the teal color.  So I purchased some faux apple blossom branches to go in it. Then I Googled for a little about arranging such things, and learned more than I knew I had to learn! I had no idea so many parts were meant to bend, and things could be moved around from one part to another, etc. Lots of little tips I found helpful, to help make the bloomed branches look more life-like, and compositionally pleasing and balanced to the eye.

The wagon wheel was elsewhere in our sun room, and I noticed it also fit in with the common color for this mantel, so I threw that in as well.

Taking a look at both mantels together, from a different angle, you can see how they are really different enough, and yet compliment each other well, in both theme of spring, as well as textures/materials with wood, glass, burlap, clays, and plants.

As well as in color theory, which is always fun to work with, no matter what the artistic project at hand is.

I really hope you enjoyed this in-depth discussion of decorating mantels, because there will be a lot more of it in the future, all throughout the year!
GOSH IT’S FUN!!
I’m happy you’re here! I’d be happy to continue this chat with you all, in a more two-way manner, in the comments!

Filed Under: Home Decor, Mantel Decorating (Ideas), Photography, The Homestead Tagged With: decorating-mantels, decorating-with-color-theory, decorating-with-textures, decorating-with-theme, home decor, home-decorating-mantels, mantel-color-themes, mantel-decorating-ideas, mantel-decorating-tips, mantels, spring-decor-ideas, spring-decorated-mantels, spring-mantel-decorating-ideas

“I Am Third” | A Wood Pallet Sign

December 5, 2012 By Laura 9 Comments

It’s always a great day, when I finally get something OUT of my head, and am able to find the time to bring it to life, and have it real and in front of me.  It makes me happy because, there’s a whole lot in my head, that never (ever) gets out!  I wish I could do all of the projects that I actually think of, but I have other joyful obligations too, than just being all artsy 24/7.  So only a small percentage of my notions ever actually come to be.
I’m really glad this one did though, because it’s a meaningful one in our home.

The vision was a wood pallet sign.  And we usually have no shortage of those, as this is what our driveway often looks like . . . . . .

. . . . and there’s more where those came from.  Michael is able to get them from work by the load anytime.  Many of them he chops up and we burn in our wood stove. Free wood is always good!  But they are great for many other things too.  And a pallet was perfect for my idea for the sign I wanted to make.

The theme of the sign is a phrase we are fond of in our family, and try to live by, and it is this:

 
I am third.

You may well guess all on your own.
Like all families with many kids, one of my tasks as a parent is to teach my children to always put God first, be compassionate of others, and make great efforts to be selfless whenever possible.  Having triplets, you can imagine we’ve had many teachable moments and conversations about this kind of thing from toddler-hood on up, while encouraging them to share, and not grow with any kind of mindset that our own wants and needs should always or ever be first. That’s just not how we roll, as Christians.  Of course, this philosophy of serving, goes far beyond the constraints of our family, and the walls of our home. It applies to our world and every day we live in it, and with all whom we interact with across the board, from absolute strangers, to acquaintances, to loved ones a part of our personal lives, and everyone in between whom we happen upon daily .  I want that to stick with my kids, as they grow older in their faith, and take on this world, with all of their plans and dreams before them. It can only help, for each one of us to be reminded often.


And so with another an extra piece of plywood, some old extra nails we had on hand, and some paint and a brush, the pallet sign I saw in my head for so long, was created:


Because of the list form of my idea, I saw the pallet as the perfect material for the sign.
It was cut down to a size of about 20″ x 27″.


I wanted it kept as simple as possible. Rustic, raw, and straightforward. Sure, it may not always be easy to live the message.
But God always forgives us, and we always have the opportunity to keep on trying.
It is a simple concept to remember, in terms of the priorities we want to strive to serve in our life:
God
Others
Self

For some reason, I always saw it in this darker red.  When it came time to paint, I stopped and considered other colors.
But I really needed to create it just as I had envisioned it for so long. Or else I could go crazy.

Michael hung it up the very same day. Right there where we all see it, again and again, every day.  He loves it as much as I do.
I suppose others may come into our home, start to read it, and be a little perplexed.  But one of the most cherished things about having a home to me, is making it a place that is meaningful to our family. It’s the little things, that are personal and of the heart, that make it feel like home.  And this sign….. and all it says….it means something to us.  It’s an awareness that we want to be reminded of, again and again. Not just the kids. But all of us. I know I can use such a gentle reminder, as often as anyone else.

There is lots more space on this particular wall in our open living space, up there with the clock. The wall is much bigger than it even appears in this photo, with the cathedral ceiling.  We realize the sign is so flush left, and leaves the wall as a whole quite unbalanced. But we’re ok with that for now.  Soon enough, the wall all around the clock will be filled with other things that mean something to us. Maybe more signs.  Who knows. But we have no desire to rush these things, just to fill up and balance the wall. It’s what is hanging there, that matters to us.
All of the space? Well, that’s what I call inspiration. Like a blank sheet of lined paper, or a canvas.  The possibilities are endless, and exciting.

The kids have really embraced the lesson, most days. But when they are together and it’s needed, because one, or some, or all are reverting back to looking out for themselves over little things,  I like to remind them:
“If everyone put everyone else second, you’ll always actually be second, too! Not third. Right? So just be a good example.”  ; )
I’m a tricky Mama. ; )


I wonder what I’ll be able to get out of my head, next.

* * * * * *

Please come follow me here and there:

Save

Save

Save

Save

Save

Save

Filed Under: Crafts & Creations, DIY (Do-It-Yourself) Project, Faith, Faith/ Catholic, Home Decor, Into the Light; The Series, Life In General, Parenting, Re-Purposing, The Big Picture, The Homestead Tagged With: Christianity, Faith, God-first, home decor, pallet-ideas, pallet-projects, Parenting, rustic-signs, signs, wall-signs, wood-pallet-signs

  • 1
  • 2
  • 3
  • Next Page »

We are wicked happy to have you here! We hope you find much inspiration, help, humor and enjoyment here.


Archives


POPULAR POSTS

* * * * * *

SUBSCRIBE to House of Joyful Noise blog! Every new post, delivered right to your email box!


Privacy Policy

Amazon Affiliates

Never at any additional cost to you, we may earn a small commission for our endorsement, recommendation, testimonial, and/or link to any products from our website. Your purchase through our links helps support our family, while sharing with you the products we authentically use and recommend, for various ideas, and letting you know where you can purchase them. Thank you for your support!

[footer_backtotop]

Copyright © 2025 HouseOfJoyfulNoise.com · Genesis Framework by StudioPress