• HOME
  • {A}’s Chipmunk Training Archives

 Homepage

  • The Homestead
    • Home Projects
    • Home Improvement
    • Home Decor
      • Seasonal Home decor
        • FALL Home Decor
        • WINTER Home Decor
        • SPRING Crafts and Creations
        • SUMMER Crafts and Creations
    • Our Chickens
    • Gardening
    • Organization
    • Re-Purposing
    • Furniture Refinishing
    • Budget
  • Crafts & Creations
    • Seasonal Home decor
      • FALL Crafts and Creations
      • WINTER Crafts and Creations
      • SPRING Crafts and Creations
      • SUMMER Crafts and Creations
    • DIY (Do-It-Yourself) Project
    • Kids Arts and Crafts
    • Homemade/Handmade Gift Ideas
    • Holiday Crafts
    • Fan Pulls
    • Free Printable/Downloadable
    • Sewing Projects
    • Giveaways
    • Business Features
  • Recipes/FoodFun
    • Breakfast
    • Lunch
    • Main Dish
    • Sandwiches
    • Appetizers
    • Slow Cooker
    • On The Grill
    • Side Dishes
      • Soups
      • Salads
    • Baking
      • Breads, Rolls and Muffins
    • Snacks
    • Treats
    • Desserts
    • Drinks
  • Homeschooling
    • Elementary Homeschooling
      • Elementary Homeschooling READING
      • Elementary Homeschooling MATH
      • Elementary Homeschooling LANGUAGE ARTS
      • Elementary Homeschooling SCIENCE
      • Elementary Homeschooling HOME ECONOMICS
      • Kids Arts and Crafts
    • Middle School Homeschooling
      • Middle School Homeschooling SCIENCE
      • Middle School Homeschooling HOME ECONOMICS
    • Language Arts
    • Math
    • History / Social Studies
    • Geography
    • Foreign Language
    • Field Trips
    • Games
    • Nature Study
  • The Big Picture
    • Life In General
    • Celebrations
    • Faith
      • Into the Light; The Series
    • Giveaways
    • Reviews & Sponsors
  • Photography & Lettering
    • Photography
    • truck lettering
    • vehicle graphics
    • Newborns
    • Kids
    • Engagement
    • High School Senior Pictures
    • High School Senior Pictures Sneak Peeks

A Love-Themed Watercolor Art Piece

February 1, 2016 By Laura 16 Comments

Being in my art studio, is way up there as one of my favorite places in my very small world, to be!
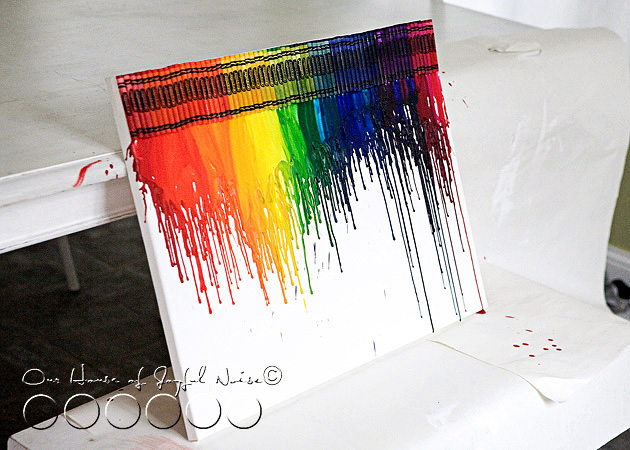
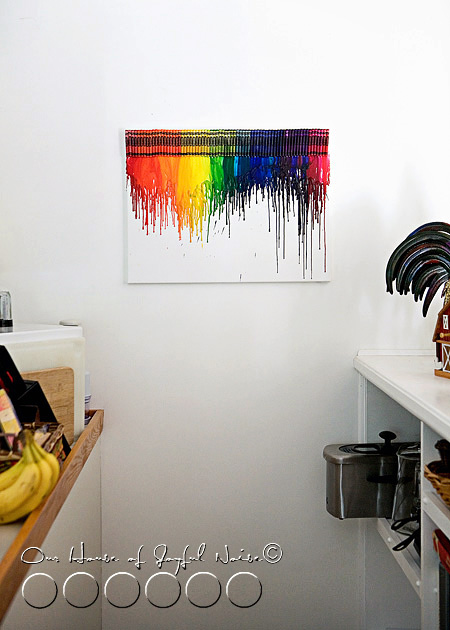
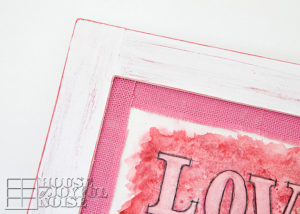
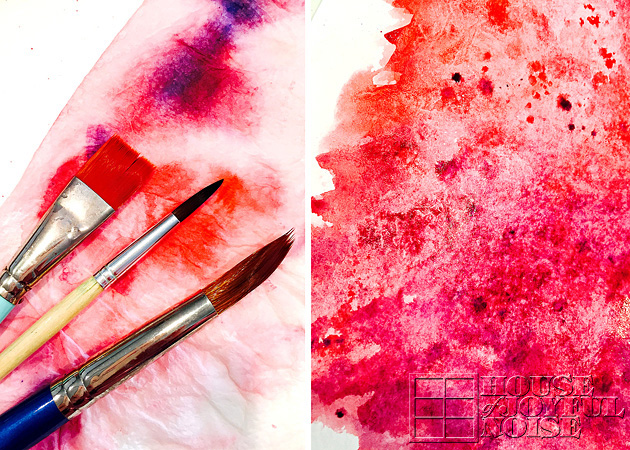
For the month of February, I was inspired to create something ‘love-themed’, to add as a decorative art piece for our home’s double-mantels. I was very much in the mood to get into a watercolor project, and I had some text in mind that I wanted to make a part of it, as well.
In this post I’m sharing the general concepts I used in creating this fun little piece, with a little chit-chat along the way. I hope you enjoy it.


Although I have sold several watercolor scenery or subject paintings in my earlier years, I still do not consider myself to be  [Read more…]

Filed Under: Crafts & Creations, FALL Crafts and Creations, Holiday Crafts, Home Decor, Home Page, Seasonal Crafts and Creations, The Homestead, Tutorial Tagged With: arts and crafts, crafts, creativity, decor, February-decor, love-decor, love-theme-decor, valentines-day-decor, watercolor-painting-techniques

Call Us Copy Cats! | Crayon Wall Art

September 13, 2011 By Laura 16 Comments

crayon-wall-art-tutorial-20


This crayon art thing that is happening….You know, the one that’s sweeping the nation?  It’s been pinned to death, and it’s invaded Blogland, like there is tomorrow.  And although I am hardly ever one to copy someone else’s ideas, or follow trends for the sake of everybody else doing it, I KNEW I was going to do this art-craft with my kids, the very-first-time I saw it.

Even at the risk, of being called ‘Copy Cats’.


crayon-wall-art-tutorial  So I picked up a 16″ x 20″ white canvas. I knew I was going to love this piece when it was done so I wanted it as big as I thought we could manage, without buying every store in town out of Crayolas.  Oh yes! It has to be Crayola Crayons for me. IS there another brand? Huh. Not in my world. I’ve been a Crayon-Brat since I could….well, color! It’s Crayola, or bust.

So we started with a box of 64, and two boxes of 24. And then…..we got a 3rd box of 24 after that.  Naturally, we couldn’t use ALL of the crayons in every box.  Every color we did use, we needed 4 or more of, to make it across the canvas.  Some colors were just not going to work.  And some, I just didn’t like.


crayon-wall-art-tutorial-1  We laid our colors in the exact order we wanted, along the top of the canvas on the table.  Then we got ready to glue them.


crayon-wall-art-tutorial-2 Our initial plan, was to hot glue the crayons down.  But we quickly decided that wasn’t working for us.  The hot glue cooled and hardened too quickly.   So we broke out the ‘Amazing E-6000’.


crayon-wall-art-tutorial-3 Amazing, is right.  I love the stuff!  It’s the Mac-Daddy of all super glues, in my crafting world.
It really stinks though. I recommend ventilation, because the fumes can’t be good for anyone.


crayon-wall-art-tutorial-4 We just put a couple of lines of glue for a few inches at a time, and the kids helped lay down the crayons in order, as we went.   Alexis helped make sure the tops of the crayons, were as even as possible, aligned with the top of the canvas.

I wanted to just get to melting them right away.  But Alexis, often my handy voice of reason, convinced me that it really would be best, to let the glue crayons set overnight, if we were going to apply high heat to them.

I knew she was right. So I stomped away, and pretty much pouted the rest of the day.


crayon-wall-art-tutorial-5 The next day, it was all set for sure! Those crayons weren’t budging.   So we stood the canvas up on the bench, and leaned it against the table.   We put large sheets of paper underneath the canvas, because we knew we were about to make a hot mess. (Like usual, but literally this time.)  I highly advise a drop cloth or paper of some sort! The wax is bound to get dripping.


crayon-wall-art-tutorial-6 Finally, we could start melting the crayons!  (Yyyipeeee!!)   I can tell you, we tried a hair dryer, for about….ohhh, a milli-second. I knew there was no way I’d have that kind of patience. If it ever got the crayons melting at all, the hair dryer would probably be over-heating by then. So we plugged in my heat gun, I have used for embossing powder, over the years. I KNEW that would work.

crayon-wall-art-tutorial-7 And boy did it ever.  We learned immediately that it could really blow some hot wax around!  Oops!


crayon-wall-art-tutorial-8 Very slowly, we worked our way across, watching what was happening as it was, and adjusting our distance and angle of the blowing hot air, as we did. I really didn’t want the colors blowing sideways!  But….more ‘control’ therapy for me.  Sometimes, one cannot control the way the wind blows, completely. (I’ve tried, on many-a-photo-shoot.) Furthermore, I wanted this to be more the kid’s masterpiece, than mine.


crayon-wall-art-tutorial-9 We were directing the heat onto the lower end of the crayons, and waving it around as needed.  The trick, is really to avoid getting too close to the top of the crayons, which we did not want to melt, and to not heat the middle either, as to have a crayon tip blob just fall out.  Sometimes, we started to see smoke, from the paper heating so much, so you want to be careful of that too.

We all took turns, while we all tried to verbally direct each other too. lol

crayon-wall-art-tutorial-10 WARNING though:   This is really NOT  a craft for a young child to do alone.  The heat gun is hot, and the melting wax is really hot too.  But, it’s a fun craft to do with your littles.


crayon-wall-art-tutorial-11 I really kept trying to go back, to try and perfect this, or fill in that, and the kids were like, “Mama, just leave it!!  It looks good. Don’t ruin it!”.   Excellent therapy for me, to just embrace the art that happened.   Because I have ALWAYS been the kind of technically sound type artist.  The kind that brings to life something I see, exactly as I see it in my head, down to the last detail.   My ‘let-loose’ therapy started in art school, the day I had to draw a nude model on paper, with a stick that had been dipped in ink, with my mouth. Talk about lack of control!  I think that exercise actually set me back a few years. lol


crayon-wall-art-tutorial-12 We all took a step back to take a good look at out artwork, and agreed to call it DONE.

Then we waited for Daddy to come home to see it. And of course, hang it up for us.  Somewhere.

But where?  That was the question.  I wanted it in every room I thought of!  It’s colorful, and happy!  And the kids and I made it together.   It had to be in a good place.


crayon-wall-art-tutorial-13
We decided on the wall over the stairwell in the kitchen, down to the lower levels, was a good place for awhile.


crayon-wall-art-tutorial-14  It was on the way down to what will at some point be the kids’ Rec Room.

It’s also on the way down to the Laundry Room.  And you all know, we ALL could use a smile, on the way to the Laundry Room!

crayon-wall-art-tutorial-13
Being over the stairwell there, it can be seen from about half the house on that level.  The kitchen, the school room, and the living room.


crayon-wall-art-tutorial-17 I have always said, “Colors make me happy.”  They really do.


crayon-wall-art-tutorial-18
Oh, the texture!
I wonder what the Crayola Corporation thinks about this craze.  Surely they’ve caught wind of it by now.  Probably not being able to keep their crayons in stock at stores, and all. I’d have to guess they should be pleased, with what must be a sudden and dramatic increase in sales. We helped with that!!


crayon-wall-art-tutorial-19 But again, it was not my idea.  I wish it was.  And although copying the latest craft happening will never be my style, I do not regret this once, for a minute.
I do want that thank, though, whoever did come up with this idea. Because we had so much fun doing it!

Have you, given this idea a try yet?  And if not, don’t you want to now?

******


Save

Filed Under: Crafts & Creations, DIY (Do-It-Yourself) Project, Kids Arts and Crafts, Tutorial Tagged With: arts and crafts, crafts, Crayola-crayons, crayon-art, crayon-wall-art, DIY-art, E-6000, melting crayons

How to Make Homemade Embossed Glycerin Soap Bars

January 30, 2009 By Laura 8 Comments

homemade-glycerine-soap-gifts_1
This was one of my personal favorite crafts we made;  Embossed Homemade Glycerin Soap Bars! It was so much fun choosing designs, colors and scents.  Yes, we know most people use soap pump bottles now.  Bars are sometimes considered too messy….but my kids make a pretty good mess with the bottles too, anyway! The thing drips all over the place.  Anyhoo…..if one MUST use the pump bottles, these are pretty enough to just sit in a bathroom and look nice!

So here are the EASY steps to making them.  I tried to combine the photos of steps, in a storyboard format.  So the steps are left to right, or top to bottom. I’ll do my best to explain the steps as well.

You will need:

  • 2lb glycerin soap block
  • soap molds
  • rubber soap embossers
  • soap scent oil
  • soap coloring
  • clear bags
  • bag ties

From Home:

  • a microwave
  • a glass measure cup

Many of these soap supplies can be found all together in the soap supply aisle at your craft store.  We always go to Michael’s Arts and Crafts.

Steps described below photos.

how-to-make-homemade-glycerine-soap_02

1) This is what a the package of the soap glycerin soap block might look like.

2)  It is scored so you can cut chucks easily, with a large knife.

3) You want to cut the chunky cubes into groups of 4.

Next….

how-to-make-homemade-glycerine-soap_03

4) Put 4 cubes of soap into a glass microwavable measuring cup.

5) Microwave for 40 seconds, take out carefully, stir, and see if it is all melted. If it needs to go in again, do so in 10 second intervals, until it’s all completely melted.

6) Stir again.

We used scents and coloring put out by Party Lite.  The oils are called Essential Oils.   They all come in little bottles, in hanging packaging. These are found with the soap supplies at the craft store as well.

So then……

how-to-make-homemade-glycerine-soap_04

7) Add 6 drops of your preferred scent. We used Green Apple.

8)  Add 3-5 drops of a chosen color. How much you add depends on how deep you want the coloring to be.

9) Stir again.

~~~

Embossing Your Soap Bars

They sell these rubber embossed designs, to lay into the bottom of your soap molds! Some soap molds come with a design embossed into the plastic mold as well.

Soap molds come in all kinds of shapes as well;  oval, octagon, rectangle, square, etc.  We went with the squares, as they fit these rubber embossers perfectly.

how-to-make-homemade-glycerine-soap_06

10) Rubber Embossers

11) With a spoon, put some dabs of the hot melted soap in the bottom of the mold.  This helps keep the rubber embosser in place.

12)  Place the embosser on the soap dabs, and gently press down well all over.

Next….

how-to-make-homemade-glycerine-soap_07

13) Start pouring the scented/colored/melted soap into the mold fairly slowly, but consistently.

how-to-make-homemade-glycerine-soap_08

14) Fill nearly to the top.  We just leave any bubbles. They mostly dissipate on their own.

how-to-make-homemade-glycerine-soap_09

As we filled each mold, we placed them on a cookie sheet lined with wax paper.

They need to set for….awhile?  lol.  We always just let them set for a day or so, or overnight, to be sure they were turned solid.  But we’re not sure how long it really takes.

how-to-make-homemade-glycerine-soap_10

how-to-make-homemade-glycerine-soap_11

As they do start to set, you will see the soap start to get less crystal clear.

~~~

The next day they’ll be set for sure.

All you need to do is work them out of the mold.  They don’t pop or slip right out, but it’s not that difficult with a little effort.  The goal is just to try and not mark up your beautiful soaps.

Once they are popped out, you just peel off the rubber embosser, and admire your COOL design on the soap! Try not to get finger prints all over them too. Especially the tops.

how-to-make-homemade-glycerine-soap_12

We just packaged the soaps with the proper size of clear bags, found in the candy aisle of the crafts store, and the fancy silver twist ties came with the bags.

how-to-make-homemade-glycerine-soap_13

“Made With Love”.  My favorite design.  Although the dragon fly and the ornate tile ones were close seconds.

how-to-make-homemade-glycerine-soap_

That’s it for this craft!!  Easy, huh?? And so PRETTY!  We think they made lovely gifts.

Trust me, they come out so nice, and smell so good!!  I love the clarity of glycerin soap, but there are other kinds of soaps you can make too. I am sure the directions are a little different though.  Naturally, with this soap making process we showed you here, there are certain steps you will not want your children to do alone;  such as any of the steps that involve the hot melted soap, or chopping with the big knife! But they can count out 4 soap cubes and load the measuring cup up, choose and add drops of scent and coloring, pop out the soaps and bag and tie them, etc.

We do hope you try making some yourselves sometime!!

STAY CLEAN NOW!  : )

Save

Save

Save

Save

Filed Under: Crafts & Creations, Homemade/Handmade Gift Ideas, Tutorial Tagged With: arts and crafts, crafts, easy-homemade-gift-ideas, embossing-glycerine-soap-bars, homeade-gift-ideas, homemade-glycerine-soap-bars, how-to-make-glycerine-soap-bars, soap-crafts

We are wicked happy to have you here! We hope you find much inspiration, help, humor and enjoyment here.


Archives


POPULAR POSTS

* * * * * *

SUBSCRIBE to House of Joyful Noise blog! Every new post, delivered right to your email box!


Privacy Policy

Amazon Affiliates

Never at any additional cost to you, we may earn a small commission for our endorsement, recommendation, testimonial, and/or link to any products from our website. Your purchase through our links helps support our family, while sharing with you the products we authentically use and recommend, for various ideas, and letting you know where you can purchase them. Thank you for your support!

[footer_backtotop]

Copyright © 2025 HouseOfJoyfulNoise.com · Genesis Framework by StudioPress