• HOME
  • {A}’s Chipmunk Training Archives

 Homepage

  • The Homestead
    • Home Projects
    • Home Improvement
    • Home Decor
      • Seasonal Home decor
        • FALL Home Decor
        • WINTER Home Decor
        • SPRING Crafts and Creations
        • SUMMER Crafts and Creations
    • Our Chickens
    • Gardening
    • Organization
    • Re-Purposing
    • Furniture Refinishing
    • Budget
  • Crafts & Creations
    • Seasonal Home decor
      • FALL Crafts and Creations
      • WINTER Crafts and Creations
      • SPRING Crafts and Creations
      • SUMMER Crafts and Creations
    • DIY (Do-It-Yourself) Project
    • Kids Arts and Crafts
    • Homemade/Handmade Gift Ideas
    • Holiday Crafts
    • Fan Pulls
    • Free Printable/Downloadable
    • Sewing Projects
    • Giveaways
    • Business Features
  • Recipes/FoodFun
    • Breakfast
    • Lunch
    • Main Dish
    • Sandwiches
    • Appetizers
    • Slow Cooker
    • On The Grill
    • Side Dishes
      • Soups
      • Salads
    • Baking
      • Breads, Rolls and Muffins
    • Snacks
    • Treats
    • Desserts
    • Drinks
  • Homeschooling
    • Elementary Homeschooling
      • Elementary Homeschooling READING
      • Elementary Homeschooling MATH
      • Elementary Homeschooling LANGUAGE ARTS
      • Elementary Homeschooling SCIENCE
      • Elementary Homeschooling HOME ECONOMICS
      • Kids Arts and Crafts
    • Middle School Homeschooling
      • Middle School Homeschooling SCIENCE
      • Middle School Homeschooling HOME ECONOMICS
    • Language Arts
    • Math
    • History / Social Studies
    • Geography
    • Foreign Language
    • Field Trips
    • Games
    • Nature Study
  • The Big Picture
    • Life In General
    • Celebrations
    • Faith
      • Into the Light; The Series
    • Giveaways
    • Reviews & Sponsors
  • Photography & Lettering
    • Photography
    • truck lettering
    • vehicle graphics
    • Newborns
    • Kids
    • Engagement
    • High School Senior Pictures
    • High School Senior Pictures Sneak Peeks

Our Open Farmhouse Kitchen Shelving | Before and After | Home Project

February 25, 2017 By Laura 3 Comments

The slow transformation of our kitchen continues, and this is another one we are so happy with how it turned out. What a great big difference it has made, getting rid of our cabinets, and building custom open farmhouse kitchen shelving!

A Bit of the Back Story

In this project, we were actually undoing a change we made many years ago.
One of the many reasons we bought this house in the first place, was because it had a lot of floor cabinets in the kitchen, and none on the walls! I really didn’t want a kitchen that felt closed in by a lot of cabinets mounted on the walls, that I would have a hard time reaching anyway.  However, it wasn’t long before we realized, the floor cabinets alone just didn’t provide enough storage for everything. 

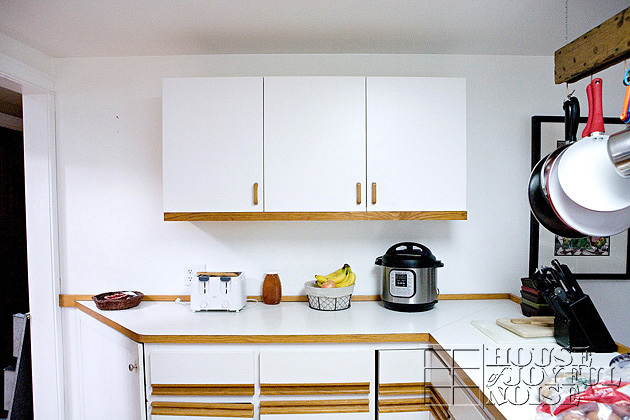
And so Michael bought basic ready-made cabinets at Home Depot, installed it on our one empty wall, and then added oak trim and handles to match the rest of the floor cabinetry . . . .

I really grew to hate it.

It’s been there for at least 20 years. As much as I grew to despise the look of it, it was necessary for storage, as far as I could figure, for far too long. The floor cabinets stored plates and bowls, glasses, pots and pans, and storage containers.  And the drawers stored what drawers do, of course: utensils, herbs and spices, a junk drawer, etc. So the cabinet on the wall stored cereal boxes, crackers, rice, and that kind of thing.

I began to dream about open cabinets, with dishes and all in there. And I had come up with a good plan of how to rearrange everything in the kitchen that still needed to be stored. (Just put all that was up in the wall cabinet – cereals, crackers, etc. – down in the floor cabinets, when all of the dishes, bowls, etc. came out.)
But I wasn’t sure open cabinets was what I really wanted. Then I started thinking about open shelves. But as much as I thought about it, I couldn’t see in my head exactly what it would look like, that would look right in our kitchen. Until I did.  However, explaining it to Michael was not painting a good picture for him. I was being clear enough in my description, but he just didn’t think it was going to look good.  As I gave him the details, he kept questioning me, like….“Really?”. 

It was unusual. Because you see, with any big or small home projects we have ever done, we have always planned the whole thing together. We most always have the same vision, the same expectations, and the same excitement. But this time….Michael didn’t see it, what he was expecting was not good, and he definitely was not excited. 
This time, I had to ask him to just trust me, and build it like I’m saying.

And he did.

plain white kitchen cabinets 
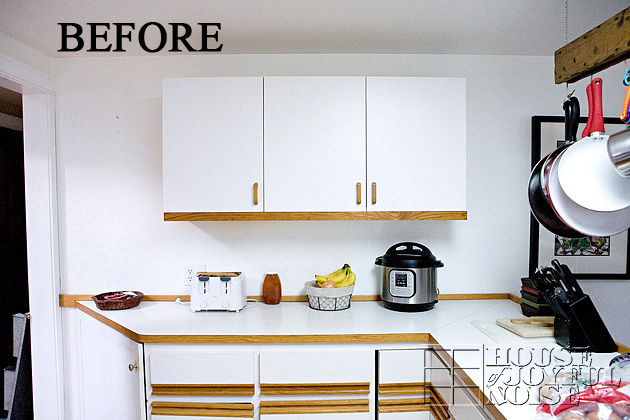
Good-bye, boring ordinary cabinets . . . .
.

.

.

.

[Read more…]

Filed Under: Home Decor, Home Improvement, Home Page, Home Projects, Organization, The Homestead Tagged With: custom-fit-shelving, farmhouse-kitchens, farmhouse-style, kitchen-organization, open-farmhouse-kitchen-shelves, open-farmhouse-kitchen-shelving, open-shelving-ideas, shelves, shelving

Our Rec Room Reveal

July 3, 2016 By Laura 5 Comments

We are pretty excited to reveal to you our new rec room, and show you around a bit! We’ve got to tell you, it’s been our plan to make a rec room downstairs for some time. But so many other projects of one kind or another just kept pushing it back. This is the story of our life. You know? But then, pretty suddenly, we decided we needed to get the rec room done. The kids and their friends just needed a big fun space of their own in the house to hang out in; especially on the hottest of summer days, or the bitterest and most miserable of winter days. Also, our oldest daughter’s college friends have been coming to stay here now, too. So one can stay downstairs on the futon that opens up to a bed. Anyway, once we did decide it was time to get the rec room done, Michael went at it and finished it in a flash!  [Read more…]

Filed Under: Home Decor, Home Improvement, Organization, The Homestead Tagged With: family-rec-room, family-recreation-room, game-room, rec-room, rec-room-inspiration, recreation-room, room-makeovers, wall-decor-ideas

Yet Another Pallet Mug Holder – How and Why

March 16, 2016 By Laura 2 Comments

Alright, so maybe you’ve already seen the pallet mug holder idea a good many times. But there is more than that to this post. And anyway, give us a little break here; you know most all of the time, we are sharing our own custom and very unique projects with you! Like the time we built our shoes-storage bench out of old doors! Or custom-designed and built our mac-daddy chicken coop! So we have no shame in being inspired by others ourselves now and then, and running with it! Creative people sharing their ideas is what it’s all about. Right? Being inspired by others is why we all share. And we’re not immune to loving other’s ideas! Anyway, today I’m going to share some how-tips about this popular project, and why I personally wanted a pallet mug holder (just like I’ve seen), so bad.

So yes, I’ve seen a few variations of the idea many times online before, (also). However, [Read more…]

Filed Under: Home Decor, Home Page, Organization, Re-Purposing, The Homestead Tagged With: kitchen-organization, kitchen-storage-help, mug-organizer, pallet-mug-holder, pallet-projects, pallet-recycling, recycling, recycling-projects, rustic-mug-holder

Pots and Pans – DIY Organization Hanger

October 20, 2015 By Laura 1 Comment

We have always made eating dinner all together around the table every night, a high family priority. But quite honestly, making yet another family meal/dinner, is not always Michael or I’s favorite thing to do around here, towards the end of the day. Especially when both or either of us are in the middle of work, or some project, and need to stop what we are doing to go cook in the kitchen. But our disgruntled state can go from bad to worse, by the time we get the pots and pans we need out!  Ugh!

I don’t know where you store your pots and pans. But we have had ours in a cabinet on the floor under the counter, for years. Forever, for as long as we’ve lived in this house, actually. So to start, we’ve had to bend way down there, or just go head and get on the floor, to get what we need out. Or, to put clean pots and pans away, for that matter!  They only pile and nest so well, with some being the same diameter as others, but deeper pots. So there’s always a real tipping-factor going on.  And then there are all of the covers!!  So if all of the clinging and clanging isn’t enough to frazzle the nerves, everything falling out of the cabinet onto the floor, or sometimes onto our toes, will!

It’s about that time I remember THE WINE.
I don’t know what it is about a glass of wine, or something a little alcoholic, that makes cooking so much more bare-able. Sometimes even enjoyable, if you drink enough!  Ha haha!

But I had gotten to the point where I had really had it, dealing with the pots and pans cabinet. And for years Michael and I had randomly mentioned getting one of those grand pots and pans racks, that suspend from the ceiling. But you know, time really gets away, when we both hate spending money.  So on a recent Saturday, as I was headed out shopping with my oldest girl, I eluded to our pile of pallets outside by the wood shed, and said, “Just whip out something, please! It doesn’t have to be beautiful! I love rustic.”  (Because this is most always a point of contention, between us.).

By golly, he did it! [Read more…]

Filed Under: Home Decor, Home Page, Home Projects, Organization, The Homestead Tagged With: diy, do it yourself, hanging-pots-and-pans, kitchen-ideas, kitchen-organization, kitchen-organization-ideas, kitchen-tips, organization, organizing-pots-and-pans, pots-and-pans-hanger

A Rustic Christmas Cards Display Idea

December 3, 2013 By Laura 1 Comment

 When the Christmas season arrives every year, and the cards start coming in the mail, what do you do with them?  Do you just put them in a pile and let them stack up? Or do you like to display them somehow, for all to see?  If you display them, how do you manage that? I bet you all have had some pretty creative ideas yourselves.

We’ve had a few solution ideas of our own over the years, for the Christmas cards we gratefully get in the mail. Way back, we just put them in a beautiful Christmas basket. That was kind of sad though, as we know many are really excited about their cards every year, and we’d hate for them to be hidden. Especially the ones with photos of kids and families, or the special notes.
We’ve also just tied a pretty ribbon across a beam in our main living area, and let them hang on that.
Getting more creative still, for a few years, we stood a white folding accordion door in the corner of the room, and the louvers (slats) worked beautifully for hanging cards. Of course, like with the string idea, the vertical cards hung horizontally. It was still a nice way to display everyone’s cards though. 

Last year though, I came up with a new idea, that I think we’ll stick with for some time. It’s very homemade and rustic, and I just love it.
Take a look . . . .


What do you think? 
It was actually just a long scrap of plywood we had on hand. (Repurposing at it’s best!).  
This one happens to be about 11″x 76″.   You can use any similar long board though.  You just want to be sure it is thin enough to be able to clamp clothespins on.


We also used some rough rope, in which I intertwined some thin satin rope around, just to add some pretty to the rough look.
The roping is mostly for decorative purposes, though. It will hold some horizontal cards well enough, but if it slides, it knocks other down. And that’s just frustrating.
I like the look of the clothespins, and it helps secure the cards of all sizes.


So this scrap board was painted white and then rough sanded. I didn’t put a lot of effort into that wood-finishing part at all, because really….I was hopeful that if enough people thought of us whilst filling out their Christmas cards, most of that board would be covered, anyway.  😉
The scrap blocks of wood (you see) on the back, at the top and bottom of the board, not only add stability to the board for it to sit well on the floor and lean against the wall.  There is a notch cut at the top and bottom of the board, for the rope to wrap around to the other side inset, and then there is hole through the block for the rope to go though and be secured to the other side. It sounds complicated, but it really is simple in design.  Sorry I forgot to get a pic of the back side for you. If you are confused and  have a question on this, go ahead and ask in the comments.


Completely optional tidbit: 
I soaked my clothespins in tea water overnight, to try and antique them some. It worked; but honestly, it’s too subtle for the effort in my opinion. Maybe I did it wrong?
I think at some point I will take these clothespins, and revert to what always works beautifully for me; a touch of my Annie Sloane Dark Wax. Love-that-stuff!

To really dress up the top, I added these large rusted-looking jingle bells, hung with twine. I love jingle bells! 

CONSIDER THIS: 
You could use this whole idea, and change the whole style of it depending on how you finish it and what you use as detail elements!
For example: paint a smooth new board with a clean white paint, omit the sanding, putty and paint your screw holes, and use a wide frilly ribbon down the board, with a big fancy bow at the top!
 But the rustic, farmhouse look suits us just fine.
–


Yes, just another crazy idea, from our house to yours! 
If you love it, bookmark it! You could try the idea yourself this year or some other coming year. Or simply share it with your friends who follow you on your social networks.  They’ll love you for it.
  And hey, while your here, say hello, and share your thoughts.

Hope your homes are feeling a little bit of your Christmas love!
These are the little things that make any house, a home, for the ones you love.
~Laura / The Richard Family

Save

Save

Filed Under: Crafts & Creations, DIY (Do-It-Yourself) Project, Holiday Crafts, Home Decor, Organization, Re-Purposing, The Homestead Tagged With: Christmas-card-display, Christmas-cards-display-solution, Christmas-cards-organization, Christmas-decor-ideas, Christmas-DIY, Christmas-organization-tips, how-to-display-your-Christmas-cards

  • 1
  • 2
  • 3
  • Next Page »

We are wicked happy to have you here! We hope you find much inspiration, help, humor and enjoyment here.


Archives


POPULAR POSTS

* * * * * *

SUBSCRIBE to House of Joyful Noise blog! Every new post, delivered right to your email box!


Privacy Policy

Amazon Affiliates

Never at any additional cost to you, we may earn a small commission for our endorsement, recommendation, testimonial, and/or link to any products from our website. Your purchase through our links helps support our family, while sharing with you the products we authentically use and recommend, for various ideas, and letting you know where you can purchase them. Thank you for your support!

[footer_backtotop]

Copyright © 2025 HouseOfJoyfulNoise.com · Genesis Framework by StudioPress