• HOME
  • {A}’s Chipmunk Training Archives

 Homepage

  • The Homestead
    • Home Projects
    • Home Improvement
    • Home Decor
      • Seasonal Home decor
        • FALL Home Decor
        • WINTER Home Decor
        • SPRING Crafts and Creations
        • SUMMER Crafts and Creations
    • Our Chickens
    • Gardening
    • Organization
    • Re-Purposing
    • Furniture Refinishing
    • Budget
  • Crafts & Creations
    • Seasonal Home decor
      • FALL Crafts and Creations
      • WINTER Crafts and Creations
      • SPRING Crafts and Creations
      • SUMMER Crafts and Creations
    • DIY (Do-It-Yourself) Project
    • Kids Arts and Crafts
    • Homemade/Handmade Gift Ideas
    • Holiday Crafts
    • Fan Pulls
    • Free Printable/Downloadable
    • Sewing Projects
    • Giveaways
    • Business Features
  • Recipes/FoodFun
    • Breakfast
    • Lunch
    • Main Dish
    • Sandwiches
    • Appetizers
    • Slow Cooker
    • On The Grill
    • Side Dishes
      • Soups
      • Salads
    • Baking
      • Breads, Rolls and Muffins
    • Snacks
    • Treats
    • Desserts
    • Drinks
  • Homeschooling
    • Elementary Homeschooling
      • Elementary Homeschooling READING
      • Elementary Homeschooling MATH
      • Elementary Homeschooling LANGUAGE ARTS
      • Elementary Homeschooling SCIENCE
      • Elementary Homeschooling HOME ECONOMICS
      • Kids Arts and Crafts
    • Middle School Homeschooling
      • Middle School Homeschooling SCIENCE
      • Middle School Homeschooling HOME ECONOMICS
    • Language Arts
    • Math
    • History / Social Studies
    • Geography
    • Foreign Language
    • Field Trips
    • Games
    • Nature Study
  • The Big Picture
    • Life In General
    • Celebrations
    • Faith
      • Into the Light; The Series
    • Giveaways
    • Reviews & Sponsors
  • Photography & Lettering
    • Photography
    • truck lettering
    • vehicle graphics
    • Newborns
    • Kids
    • Engagement
    • High School Senior Pictures
    • High School Senior Pictures Sneak Peeks

Pumpkin Shaped Cookies | Recipe

November 1, 2012 By Laura 14 Comments

00

It’s the first day of November, and we’re still riding high on the beauty of Autumn all around us! I think we’ve done more baking than ever this year as well.  I had an idea about trying to make some pumpkin shaped cookies, using a dough recipe I already had, and they came out so great!  These are beautiful cookies to have around on Thanksgiving, or anytime during the pumpkin/Autumn season, and they were fun to make, too.  It may seem like a lot of steps, but it is easy, and the dough recipe itself is very useful!

The dough is the same recipe from my God-Mother’s Italian cookies, found here in a post called Cookie Love.  It’s a very I am going to give you the recipe right here as well, but you really can see how it is made at the other post.  *Please note; you can mix the ingredients to make dough with a Kitchen Aid Mixer, but we did not have one at the time of the other post, so we did it by hand. For these pumpkin shaped cookies, we did use the mixer since we have one now. It’s just easier and faster with a mixer, but still doable by hand.

Ingredients

  • 4  C Bleached All Purpose Flour
  • 1  C Sugar
  • 2 Tbs. Baking Powder
  • 4 Eggs
  • 1/2C Land-O-Lakes Margarine
  • 4 Tsp. Vanilla Extract
  • 1/4 C Milk
  • Confectioners Sugar
  • A Little Extra Milk for Glaze
    . . . . . . and some kind of Coloring.

Which brings me to this stuff . . . . . .

01_icing_coloring

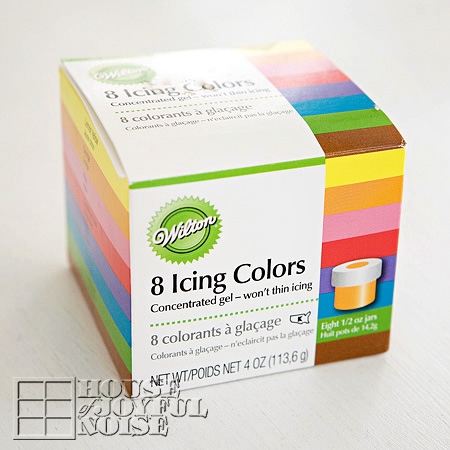
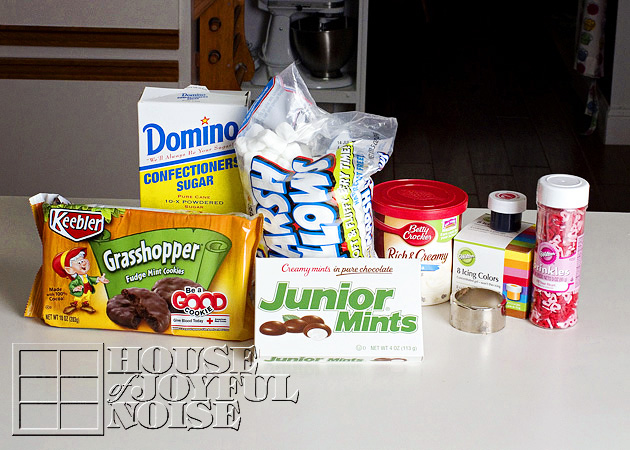
Wilton’s Icing Colors.
Even though it says for icing, it works for any food coloring. I love it, because it IS concentrated.  It gives a nicer color, and is more potent, so it gets the job done easily.  Food coloring drops to me are a pain. It takes too much to get the depth of color you want, and adds a water content at the same time that you may not want. So this stuff is the bomb for me. It’s what I used to color my cookie dough orange. It is also great for icing, and we use it for that in this recipe too. ; )

1. In a large bowl (or your Kitchen Mixer bowl),  put in flour, sugar, baking powder, eggs, margarine, vanilla, and milk.

2.    Mix it all together with fork at first. Once it starts to form, you can use your mixer or clean hands.

3. Flour a counter or big board.

4. Remove dough from bowl, and knead for several minutes, sprinkling the surface more if the dough starts sticking.

5. Grease baking sheets with vegetable oil. (You probably can use Pam Spray…if you’re a fan of that.)

02

6. Once your dough is formed, it’s ready to color. Using a toothpick, mix up the orange container of coloring gel, and just wipe the toothpick onto your dough.  Then fold it in and knead the dough some more until the color works through and is uniformly mixed into the dough. Add more color as needed to get the desired  density of color.

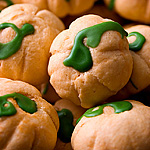
** Two Things to Note Here:  A) This gel will likely stain yours hands and/or clothing a little, so use kitchen gloves and an apron is your concerned with that.  B) The color will lighten/fade a lot after baking.  So keep that in mind. Although the dough may appear too dark orange, they won’t be when done. (See photos of baked cookies for reference.)

7.   Grab a piece of dough, and begin to roll into a ball between the palms of your hands.  You want it to be about the size of say….a large cherry tomato.  You can place them directly on the cookie sheet, or keep working on a floured surface, such as a cutting board.

8. Pre-heat your oven to 375 degrees.

03_how-to-make-pumpkin-shaped-cookies 
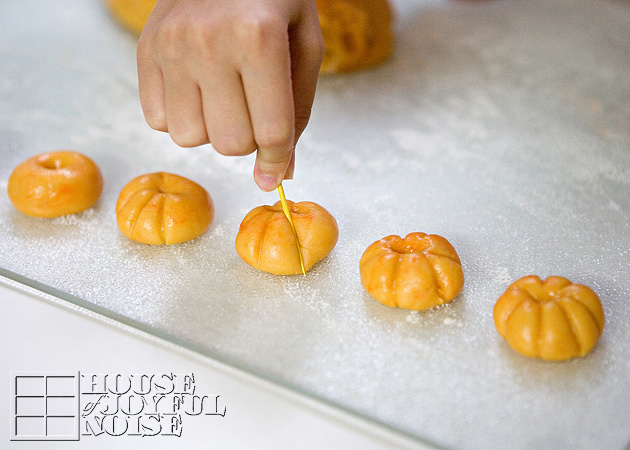
9) First poke your finger down into the center of each orange dough ball.

10) Then, taking a toothpick, stand it up beside the dough ball, and press in your indentations for the pumpkin grooves, as seen above.

04_how-to-make-pumpkin-shaped-cookies Make the indentations deep!  Really lay that toothpick in there, and rock it to the top, so the grooves are made all the way to the top.  The cookies will puff while baking, and you will completely loose your groove indentations if you don’t make them deep pre-baked.

05_pumpkin-shaped-cookies 
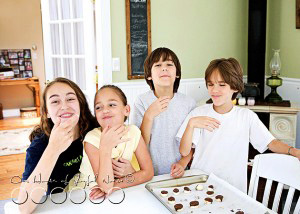
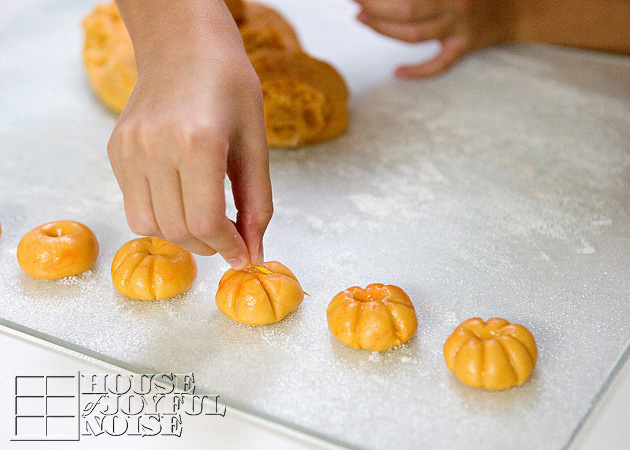
They should look similar to this when the are done.   My little girl Olivia was a great help forming the pumpkins!

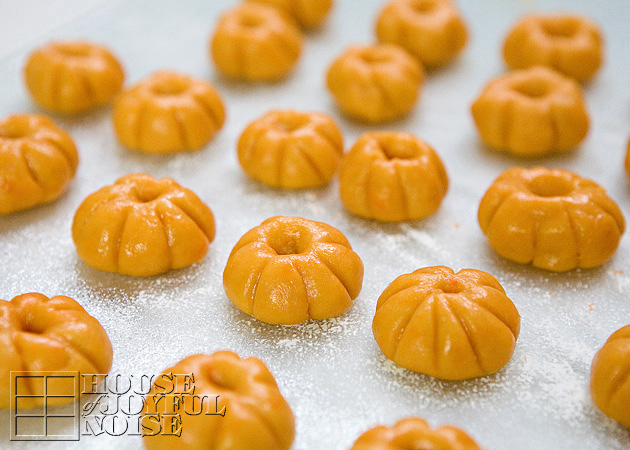
11) Now transfer to cookie sheets with  thin metal small spatula if need be.  (Try not to squich your pumpkins, as the dough is soft!) Place the dough pumpkins on the cookie sheets,  about an inch 1/2 apart, staggered.

**You will have more pumpkins waiting for their turn in the oven.  This dough makes at least a few dozen, depending on the size of your cookies.

12) Bake full sheets for 8-10 minutes.  You want them to be pale – not browned, but if you are wondering if they are cooked enough, open one with knife and see if it is baked through well. If not, put back in for 1-2 minutes more, depending on how doughy they still were.

13.  Remove from oven………and then place them each on a cooling rack.

  For cookie glaze:
14) In a small bowl, pour some confectioner’s sugar, and add a little milk.  I don’t really measure the sugar or milk here.  I recommend adding one tablespoon of milk at a time, and stir well. You want the glaze thick, as it will be much easier it will be to work with if it is not thin and runny.. You will be surprised at how much powdered sugar you need!

15) Add in green gel coloring and mix well.

16)  When cookies are completely cooled, transfer your green icing to a piping bag with a very fine point tip, or if need be, a zip-lock bag with the very tip of the corner snipped off.

17) Just pipe on a stem in the center top of the pumpkin, a leaf if you are really good, and maybe make some curly vines coming off.

06_pumpkin-shaped-cookies 
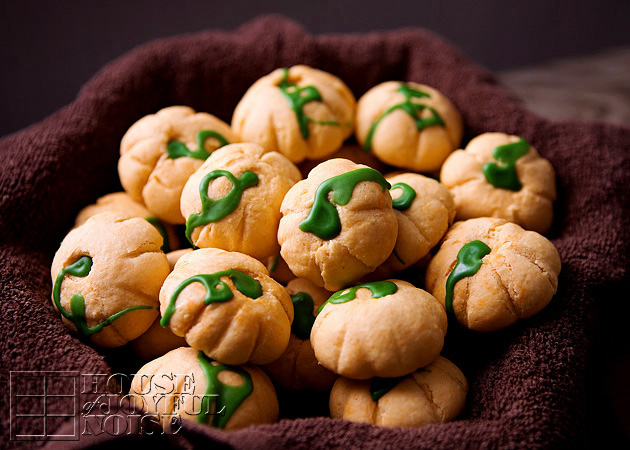
As you can see, my piping skills could use some practice.  But I thought they came out so adorable, and they are as delicious as the Italian Cookies recipe! It’s all the exact same ingredients, except for the tasteless coloring.  What I love about this dough recipe, is it is flexible to make many different looking cookies.

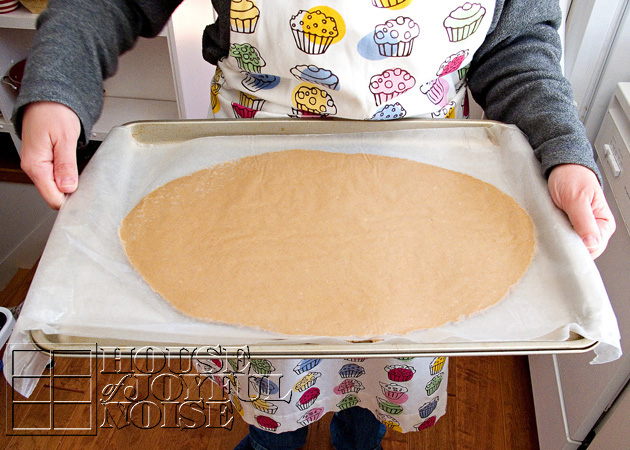
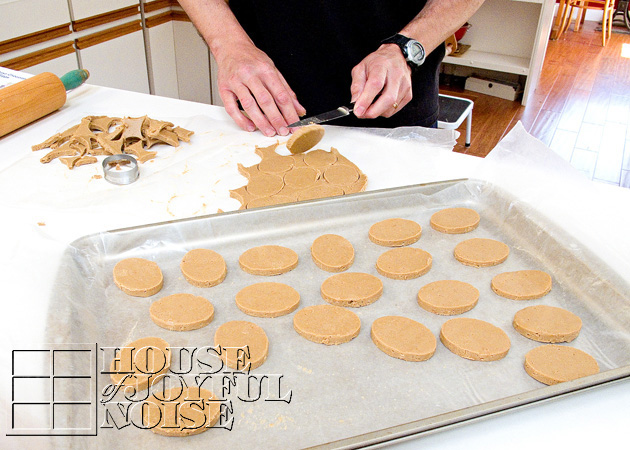
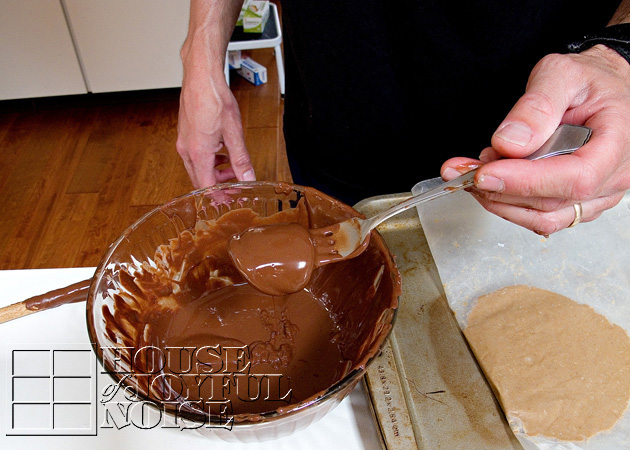
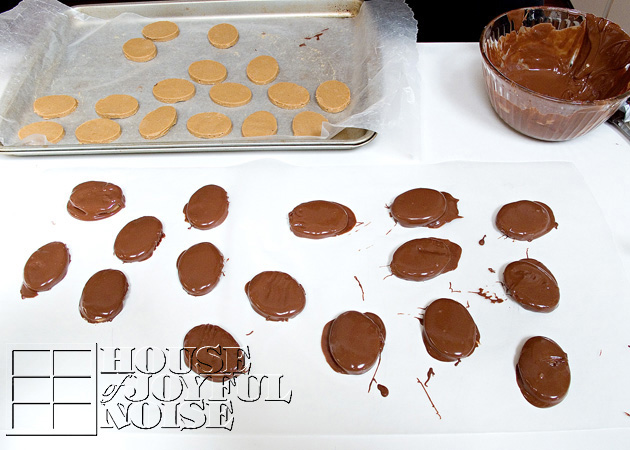
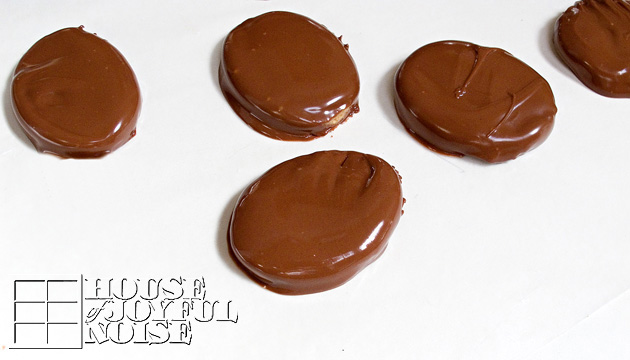
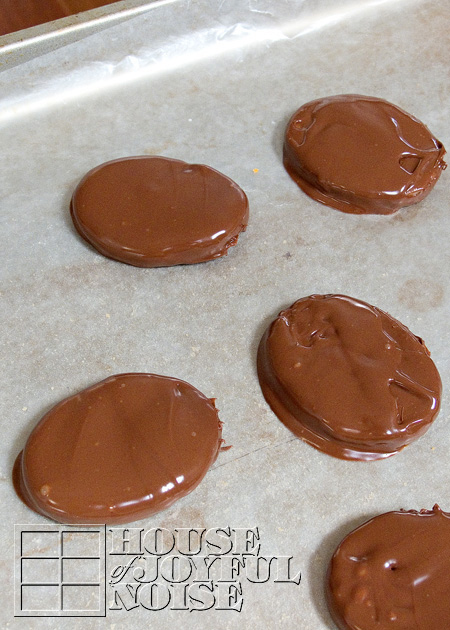
Alexis kept some of the dough before it was colored orange, and made these traditional cookies. . . . . .

07_italian-cookies 
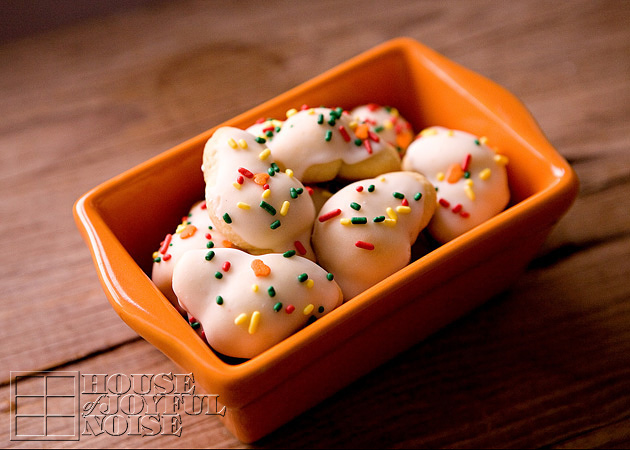
Also quite Autumn looking!
The cookies can be sealed in an air tight container, or even put in the freezer the same way, for a coming holiday, or unexpected company.

We hope you try this recipe out, and have some fun making them yourself. Your mouth will surely thank you!

. . . . . .

 Come follow me here and there:


Save

Save

Filed Under: Baking, Desserts, Fun Food, Recipes, Treats Tagged With: Autumn-cookies, Baking, cookie-recipes, cookies, cute-cookies, Fall-cookies, italian cookies, pumpkin-shaped-cookie-recipe, pumpkin-shaped-cookie-tutorial, Thanksgiving-cookies

Chocolate Covered Sunbutter Eggs Recipe| Peanut-Safe Alternative to Reese’s

April 2, 2012 By Laura 9 Comments

sunbutter-eggs-alternative-to-reeses-peanut-safe-alternative
Last week I was visiting one of my favorite blogs, TidyMom. (It truly is a place for everything! ; )  Cheryl over there was sharing a recipe for her Homemade Peanut Butter Eggs.  Ohhhh, how I wanted one!  In fact, I have been missing Reese’s Peanut Butter Cups, and the Reese’s PB Eggs that come out every Easter, for years now!  But peanut and peanut butter anything has been removed from our life, since we discovered our son has a severe, life threatening allergy to it.  It was a hard pill to swallow, for this life-long-die-hard-peanut-butter-lover.  But Sunbutter has helped me survive. And anyway, I love my son way more, and keeping him has been worth the sacrifice!   Sunbutter can be found in the organic section of most grocery stores.  We love it so much, we order it online by the case, and also because it is cheaper that way.

     Now, as anyone with a peanut-allergy child knows, Easter and Halloween especially, can be quite the challenge, when it comes to finding a few treats and candy for our kids!  This is because so much of anything with chocolate, has a real risky potential to be contaminated with peanuts, within the factory manufacturing. And most packaging even says so. 

     That being said, I have wondered right along, how well any recipe that calls for peanut butter, could be substituted with Sunbutter!  When I saw TidyMom’s Homemade Peanut Butter Eggs, I knew it was time to find out!  And guess what?  It was a delectable success!  Sunbutter tastes very similar to peanut butter, to us, and these eggs bring all of the joy to our mouths, that Reese’s Peanut Butter Cups/Eggs ever did.   This is how they came out lookin’!…..


sunbutter-eggs-alternative-to-reeses-peanut-safe-alternative-13      So, I thought I’d share how we did it with you all.  Now, if peanut allergies are not an issue for your family, and you’d like  to make your own peanut butter eggs, you are welcome to follow (Cheryl’s) TidyMom’s Recipe.  If you’d like to try the Sunbutter version, you can follow ours right here.  Our recipe using Sunbutter here, was experimental, but we were just switching out the peanut butter from Cheryl’s recipe.  (I  did make one little tweak I’ll mention.)  I got a little help from my husband, because I needed to take photos too.  But we might have done some things a tad differently, just trying to find to make it work for us. It did get messy as Cheryl said it does, but like any project, once we get going and figure things out, we find our groove.


sunbutter-eggs-alternative-to-reeses-peanut-safe-alternative-1 Participating Ingredients:

  • 1 1/4 cup of Sunbutter
  • 5 Tablespoons unsalted butter, softened
  • *1 Cup graham cracker crumbs

     (*-Cheryl’s recipe calls for 3/4 cups, but the Sunbutter seemed so sticky, we added a little more.)

  • 1 Cup powdered sugar
  • 1/2 Teaspoon Sea Salt
    **14 ounces of chocolate (milk, semi-sweet or chocolate)

   (**-We used the flat Hershey bars with the squares to break, and they worked perfectly!  The ones with the squares are peanut-safe!)

  • 1 Tablespoon shortening
  • an appropriately sized egg-shaped cookie cutter–

sunbutter-eggs-alternative-to-reeses-peanut-safe-alternative-2    
In a large bowl mix together peanut butter, butter, graham cracker crumbs, powdered sugar and salt until well combined. We used our Kitchen Aid, stopping it once and using a spatula scraper to get it all to the middle and off of the attachment.  It was while mixing that we decided to add that extra 1/4 cup of graham cracker crumbs, for a total of 1 cup, to make it a little less sticky.

      Next, put the whole (Kitchen Aid) bowl into the freezer for a few minutes, to get it easier to work with. Then we plopped the whole mix on a big piece of wax paper, covered it with another piece, and rolled it out.  Then we placed the whole rolled out dough between the wax sheets, on a cookie sheet.


sunbutter-eggs-alternative-to-reeses-peanut-safe-alternative-3 We then placed the whole cookie sheet back into the freezer, to help really firm it up. We left it in for maybe 15 minutes.

sunbutter-eggs-alternative-to-reeses-peanut-safe-alternative-4   After removing the tray from the freezer, we put the wax papered dough onto the counter, peeled off the top sheet, and got cutting with our little egg cutter, right away.  It’s important to work quickly, because the dough softens quickly, depending on how warm it is where you are working. We rubbed just a dab of shortening all over the cutter, and because the dough was really firm from the cold, and the eggs cut out really nicely.  We placed them on another cookie sheet lined with a fresh sheet of wax paper.

   Again (not shown), we put the cut eggs back into the freezer to firm up once again.

     Meanwhile, we broke up all of the Hershey chocolate bars into a bowl with a tablespoon of shortening, and melted it.  Using the microwave, put the bowl in on high for 20 seconds to start.  Remove, and stir with the handle of a wooden spoon. It’ll still be chunky at this point.  Put in for another 10 seconds, and another 10, always stirring in between intervals, until the chocolate is all smooth.


sunbutter-eggs-alternative-to-reeses-peanut-safe-alternative-5    By the time the chocolate is melted nicely, the eggs should be nice and cold.  So remove the tray, have another freshly lined tray ready, and get dipping!  Now remember, the chocolate is pretty warm, and you want your eggs to stay as firm as possible, so you need to get that egg in and out of the bowl quickly! We just let them belly-flop in one at a time, flipped it over and lifted it out with a fork, as seen in the next photo as well.


sunbutter-eggs-alternative-to-reeses-peanut-safe-alternative-6    Just tap the fork on the side of the bowl to remove the excess dripping chocolate off as best as you can, and then gently let the chocolate covered egg onto the cookie sheet.


sunbutter-eggs-alternative-to-reeses-peanut-safe-alternative-7 This photo is just to show you what happens if you don’t get the egg out of the bowl fast enough.  It goes soft very quickly.  If at any point you think your un-dunked eggs are getting too soft work with, it never hurts to pop them back in the freezer, again and again.


sunbutter-eggs-alternative-to-reeses-peanut-safe-alternative-8 As you can see here, putting them down without making them a mess, is not easy!  We felt like we were really making a mess of things, and wondered if we would even have something to be proud of or be worth sharing when finished, but we did! Just like craft projects and the like, when you keep going, you get better at it and quickly find what works better.   And we did get much better at it as we went along……


sunbutter-eggs-alternative-to-reeses-peanut-safe-alternative-9 Some we placed on wax paper directly on the counter for the time being…

sunbutter-eggs-alternative-to-reeses-peanut-safe-alternative-10  

...and other went on a lined cookie sheet. 

     Once they were all dipped, the first one’s chocolate was firming up enough, that we could decorate them a little.  We just used various sprinkles for some.  My oldest daughter is great at decorating. Such patience!  So she was in on the helping there.

     After we were done decorating them,  once again, we wanted to chill them again.  There was one more thing we wanted to do to ours, before taking some photos of them…..

sunbutter-eggs-alternative-to-reeses-peanut-safe-alternative-11   If you like to try and perfect anything you can, when you can (raising my hand..), we figured out a way to clean our egg’s edges up a little bit….

sunbutter-eggs-alternative-to-reeses-peanut-safe-alternative-12 Using a clean x-acto blade, just trim off the excess chocolate that dripped down and spread when placing the eggs down. 

     We didn’t do it to every single one.  Just the ones that really needed it.

sunbutter-eggs-alternative-to-reeses-peanut-safe-alternative-13    These are just some.  Some of the eggs we left as plain chocolate, and others we kind of drew in with a toothpick when the chocolate was just firming up.  Do you see the criss-cross one?  That one I used a french-fry cutter plate.  Just placed it down, and lifted!  Look around your utensil and kitchen tools drawers, and see what you can find to use, to make some neat designs!

 We were really happy with how well they came out.   Cute!

sunbutter-eggs-alternative-to-reeses-peanut-safe-alternative-16
…and OH-SO-GOOD! 

     The salty-sweet melty party in your mouth is just divine!  What I really love about them too, is the little crispy-crunch surprises, from the graham cracker!

sunbutter-eggs-alternative-to-reeses-peanut-safe-alternative-17  

      We have all already had some of these of course, and we’ll be enjoying and sharing the rest, right through Easter Day!  We’re also encouraged and inspired, to try more peanut butter recipes that we can substitute Sunbutter with!  One thing is for sure; we’ll be making these again with other holiday shapes and decorations! They are SO worth the mess. (Especially when your husband cleans it up for you. ; )

     Special thanks to TidyMom/Cheryl, for the inspiration, and allowing us to adapt your recipe!

—–

Love it? PIN it, or share it! And come join us on FACEBOOK! We’d love to have you.

  If you’d like to print this recipe, just cut & paste the whole thing to a document, and delete any photos or paragraphs you don’t need before printing.


Save

Save

Filed Under: Desserts, Fun Food, Recipes, Treats Tagged With: Easter, Easter-candy, Easter-desserts, Easter-menu, Easter-treats, homemade-candy, no-bake, peanut allergies, peanut-safe-candy, peanut-safe-Easter-candy, Reeses-peanut-butter-cups, Reeses-peanut-butter-eggs, Sunbutter, sunbutter-recipes, TidyMom

Valentine Chocolate Covered Spoons

February 8, 2012 By Laura 5 Comments

003_valentine-chocolate-covered-spoon-150x150
Chocolate covered spoons are something we have been intending to try making, for awhile now. There really needs to be no upcoming holiday to make them. But when there is a holiday coming up, it’s another good reason to go ahead and make them!
If you have never heard of chocolate covered spoons, they are just what they sound like they are:  spoons covered in chocolate!  And then prettied up.  They can be used to to stir your coffee, hot chocolate, warm milk, etc – to add some chocolatey flavor to your drink, or make licking your spoon that much more enjoyable!  Meanwhile, if you’ve made a whole batch, they just look pretty sitting in any container in your kitchen.
Chocolate covered spoons can be made as simply or fancifully as you’d like. You’re the designer, with each and every spoon, and that’s the fun of it!  I already had an idea of how we wanted to make some chocolate covered spoons for Valentine’s Day, so that’s what we’re sharing with you in this post.

005_valentine-chocolate-covered-spoons1 Here are a bunch of our spoons, already finished. I thought they looked nice in this simple white gravy boat. We made even more than this though.  We’ll be using some ourselves, but we really made them for the kids to give to their friends. And our oldest made some for her whole basketball team. lol.  I made a simple Valentine card printable, to go with each spoon, and you can get that for yourself HERE, if making these spoons is an idea you’d like to use for your kid’s friends or classmates, too.  It’ll make a unique Valentine, don’t you think?

I did not photograph the step-by-step process, but I think it is simple enough directions to explain.   All you need is some hard plastic spoons, *chocolate to melt, a tad bit of shortening (optional, I guess), and whatever you’d like to decorate the chocolate covered spoons with!   We used Valentine sprinkles and marshmallows for this batch.  But you can drizzle with white melted chocolate after, use sprinkles on other (holiday) colors, cover in nuts…whatever you’d like!

*Because we have a boy with a severe peanut allergy, we cannot use the chocolate melts (like Wilton’s) that are sold in stores in the baking / candy supplies aisles, because they are not guaranteed peanut-safe.  They are convenient though, and melt very nicely, if you can use them!  Since we cannot, we use Hershey’s Milk Chocolate Chips, and so the best we can with those. I believe we can find peanut-safe melts online though, if we planned ahead.

001_chocolate-covered-spoons We got everything out that we needed:  spoons, chocolate (chips), sprinkles and marshmallows, and shortening.  You can melt the chocolate in a mug or a glass measuring cup – just choose something deep. We got a few cookie sheets out, and covered them with some wax paper.  

We began melting about 1/2 cup of chocolate chips at a time, in a mug, in the microwave, with just a 1/2 teaspoon of shortening. (I normally avoid shortening for anything, but a tad bit does help the chocolate melt and stir up smoothly.)   We started at a minute, and then did 10-1secomd intervals, stirring completely in between, until all of the chocolate is melted and smooth. 

Two important tips:   1) You do not want to overheat the chocolate, or it will be ruined. Little by little is the way to go, and add a dab more shortening if you feel it needs it.  2)  I use the handle end of a wooden spoon, for stirring chocolate.  I saw that tip somewhere a long time ago, as it doesn’t heat and cool like metal does.  Stir rapidly, for smooth and shiny chocolate.

002_chocolate-covered-spoons When your chocolate is melted, dip a spoon!  It does take a little patience to wait for each spoon to stop dripping off excess, unless you want to make a big mess.  Then, over an extra the cookie sheet or wherever, sprinkle on your decorations!  For the ones we were adding marshmallows to, we pressed those in first, and then added the sprinkles.  We had fun with our little Valentine variety. Simply rest the handle of the spoon on the edge of a cookie sheet, and the wet chocolate end of the spoon on the wax paper to harden.  As soon as the sheet was full of spoons, we put the sheet in the refrigerator, to further harden.


003_valentine-chocolate-covered-spoon
A couple of other things we have learned:   The spoons really need to be kept in a cool place. Cold, is best. SOME of our spoons, developed white specs on the chocolate the next day.  We know that tends to happen sometimes when the chocolate is overheated any amount.   It could very well have something to do with our needing to use chocolate chips too.  (You know how milk chocolate chips have that white-ish coating sometimes?)  But we did notice, that they spoons we left int he coldest place, are still looking perfect!! Those are the ones we’re giving away! lol.  Regardless……the little change from the smooth chocolate you see will not hurt you or any different.  It’s just prettier to prevent it, if you can.


004_chocolate-covered-spoons To package nicely, we got some skinny clear bags sold in the baking/candy making aisles. They have some for chocolate covered pretzels, and that what we used!  We just cut them down to about 8 inches, and they were perfect!  Then we tied on curling ribbon, and curled!  As I said, I designed a Valentine for each spoon, for these.  But this is a fun project for you (maybe with our kids too!),  and it’s certainly a pleasant treat that will bring a smile to anyone’s face, when given away, or served with a hot drink!

ENJOY!

Save


Filed Under: Crafts & Creations, Drinks, Fun Food, Holiday Crafts, Homemade/Handmade Gift Ideas, Recipes, Seasonal Crafts and Creations, Treats, Tutorial, WINTER Crafts and Creations Tagged With: chocolate-covered-spoons, chocolate-covered-spoons-how-to, chocolate-spoons, edible-crafts, February-crafts, February-treats, kids-recipes, recipes, serve-with-coffee, treats-to-serve-with-hot-drinks, unique-valentines, valentine-ideas, valentines

Valentine Ladybug Mint Cookies

January 24, 2012 By Laura 4 Comments

valentine-ladybug-cookies-12

These adorable Ladybug Cookies I came up with, come right in time for Valentine’s Day, and I promise you, they couldn’t be easier to make! (There’s not even baking involved!) I think you are going to love what they are made with, too!  (You know…besides LOVE.)  I’m talking ingredients.  These cookies are also a sweet idea for a little girl’s birthday party, or to send in with your kids to school, to share with their class.  You’ll look so clever. (You don’t have to tell a soul it was my idea. ; )

Does the word fondant scare you?  Ever heard of the stuff? I know it makes more than a few nervous. But it can actually be a LOT of fun to play with! (Think Play Dough. ; )  Truth be told, in this recipe, we did make and dye our own marshmallow fondant, simply because we knew how, and we think it tastes a little better than store bought. But you don’t have to!  Rolled and ready fondant is available in craft and baking supply stores, and even comes in colors! I know Wilton sells ready-made fondant, but I heard a brand called Satin Ice, tastes better. I see that the Satin Ice brand is available to order online. I’ve seen it in a container so you probably roll that out yourself. I have not tried it yet, but I will.  But if you’d like to learn how to make your own marshmallow fondant like we did, we have a tutorial coming up on that.  For today, we’re just going to show you how simple it is to put together these cookies, with some light pink fondant all ready to go!

valentine-ladybug-cookies Participating Ingredients: 

      • Keebler Grasshopper Fudge Mint Cookies *(peanut safe)
      • Junior Mints Candy (*peanut safe)
      •  Fondant – in light pink (rolled and ready)
      • Any kind of icing (for piping glue)
      • Sprinkles in Valentine shapes/colors (*peanut safety varies with brands)
      • Confectionery Sugar
      • (Mini marshmallows and color dye seen are for making your own fondant, if you are.)

* One of our boys has a serious peanut allergy, so we are always checking ingredients carefully, for his safety.


valentine-ladybug-cookies-1 We rolled out our fondant on wax paper and a little dusting of confectionery sugar, making sure to roll it thin and even. 


valentine-ladybug-cookies-2 Next, we cut circles out of the fondant.  These will be the wings.  We started with this small cookie cutter, but it turned out to be a little bigger than we wanted the circles to be, as the cookies were smaller than this.  It was the smallest actual circle cookie cutter we had, so we needed to improvise. And so the search began throughout the house, to find something that will cut the circles smaller.


valentine-ladybug-cookies-3 Phew!  Good think we have a drink now and then! ; )  This shaker/mixer top turned out to be just right!


valentine-ladybug-cookies-4 Cut the circles in half, and the wings are done! 


valentine-ladybug-cookies-5 I told you! Easy, right? 


It’s mere assembly, from here on out, Friends.


valentine-ladybug-cookies-6 Put some of that icing in a piping bag, with the smallest tip, and just put a little on each side of the cookies.

(These cookies do tend to come a little stuck together in the packaging, so we made efforts to pipe on the messy sides, leaving the smoothest and nicest part of the cookie at the bottom, where it will show between the wings.)


valentine-ladybug-cookies-7 Put the wings on, as shown above. Like a ladybug’s wings, slightly spread.


valentine-ladybug-cookies-8 Pipe a little dab of icing on the back/flatter side of a Junior Mint candy…..


valentine-ladybug-cookies-9 ….and stick on the head.


valentine-ladybug-cookies-10 All that is left to do, is decorate the wings a little!  We tried to arrange them, like the dots usually on the wings of a ladybug, as we recalled.  You do want to be sure, that you press the decorative sprinkles down into the fondant.  You may even want to add a dab of water? (Didn’t try that).  If the sprinkles aren’t pressed down enough, they’ll fall off when the fondant sets up more.


valentine-ladybug-cookies-11 THAT’S IT!!  How CUTE are these?  How EASY are these? 


valentine-ladybug-cookies-13 You can make a whole bunch, in no time at all.  And it’s fun!


valentine-ladybug-cookies-14 Our kids all got in on the action!  They were on their own (the three younger ones are 9 years old here.).  But even younger ones can put these cookies together with a little help! 


valentine-ladybug-cookies-15

valentine-ladybug-cookies-16 We used the red cots from Confetti Sprinkles too.


valentine-ladybug-cookies-17 If you think about it, you could use some alternative ingredients, to make these cookies similarly as well. Oreo cookies could be cute. Dark brown M&M’s can be used as heads. (They are not peanut safe, for us.) Use your imagination!


valentine-ladybug-cookies-18 Just for fun, can you spot the ladybug, who’s wings were cut too big?


valentine-ladybug-cookies-19 We hope you liked this cute little idea. Share it.  🙂  And thanks for stopping by the House!

Stay tuned, for more thoughts and shares on the way!  Valentine’s Day related, and otherwise.

Save

Save

Filed Under: Baking, Fun Food, Holiday Crafts, Recipes, Treats, Tutorial Tagged With: Baking, ladybug-cookies, ladybug-theme-ideas, ladybugs, marshmallow fondant, Valentine-cookies

Frozen Banana Bites – Such a treat! | Recipe

August 22, 2011 By Laura 2 Comments

frozen-banana-bites-recipe-4

I don’t remember exactly the last time I had a frozen chocolate covered banana, but I do know that I had one or 2 when I was a kid, and I loved them.  I thought of making them many times since I’ve had kids of my own, but never quite got to that.  So when a reader linked us up with this simple recipe for ‘Frozen Banana Bites’, I knew we had to try them.  Not exactly the same as frozen chocolate covered bananas, but close enough.  They were absolutely delectable!

*The actual recipe called for peanut butter, but with one of our kids having a severe peanut allergy, we substitute everything that calls for peanut butter, with Sunbutter.

frozen-banana-bites-recipe Participating Ingredients: Bananas, Hershey’s Semi-Sweet Chocolate Chips, & Peanut Butter or *Sunbutter

Naturally, you can make as many Frozen Banana Bites as you would like. But for the sake of giving you a recipe to follow, just use the following measurements per 2 bananas, and then make as many batches as you would like. We made 2 batches, 1 at a time, considering not wanting the slices bananas to brown, or the sauce to cool too much as we worked.

  • 2 bananas
  • 1/4 Hershey’s Chocolate Chips
  • 1/4 Peanut Butter or Sunbutter

frozen-banana-bites-recipe-1 Cover a cookie sheet with some waxed or parchment paper.

Slice the bananas into bite sized pieces.

We have big mouths.   😀

Put the measured chocolate chips and Sunbutter in a microwave safe bowl, and microwave for 20 seconds or so, mix, and keep putting back in for 10-15 second interval until it’s all melted, combined & smooth.

Tip:  I stir with a wooden spoon handle, and I stir rapidly, just as you would tempering chocolate.

frozen-banana-bites-recipe-2
With your sauce all warmed and ready, take each chunk of banana, and dip the top of it into the sauce.  Let it drip off as much as possible.


frozen-banana-bites-recipe-3 Place on the cookie sheet, sauce side up.

Optional: If desired, you also can roll the chocolatey side in chopped nuts as well, and then place on sheet.

Repeat until they are all done.

~ It’s a bit of a messy process, and there isn’t much way around it. ~

Place the sheet of Banana Bites into the freezer, and let freeze completely.

Note:  Freezing time varies, depending on how many times you your kids open the freezer door, to see if they are frozen enough to eat, yet. : )

frozen-banana-bites-recipe-5 Once our first sheet was frozen, the kids and I just took them out, and had at them right away. 😛

  frozen-banana-bites-recipe-6

frozen-banana-bites-recipe-7

These guys’ expressions and sound effects are always so animated, when it comes to food.

Especially treats.

Any frozen leftovers, can be thrown in a ziplock-style freezer bag, for later enjoyment.

Hope you find them worth the small mess. ; )  We did!

***


Save

Save

Filed Under: Fun Food, Recipes, Treats Tagged With: banana-recipes, banana-treats, frozen treats, frozen-banana-bites, recipes

  • 1
  • 2
  • Next Page »

We are wicked happy to have you here! We hope you find much inspiration, help, humor and enjoyment here.


Archives


POPULAR POSTS

* * * * * *

SUBSCRIBE to House of Joyful Noise blog! Every new post, delivered right to your email box!


Privacy Policy

Amazon Affiliates

Never at any additional cost to you, we may earn a small commission for our endorsement, recommendation, testimonial, and/or link to any products from our website. Your purchase through our links helps support our family, while sharing with you the products we authentically use and recommend, for various ideas, and letting you know where you can purchase them. Thank you for your support!

[footer_backtotop]

Copyright © 2025 HouseOfJoyfulNoise.com · Genesis Framework by StudioPress