• HOME
  • {A}’s Chipmunk Training Archives

 Homepage

  • The Homestead
    • Home Projects
    • Home Improvement
    • Home Decor
      • Seasonal Home decor
        • FALL Home Decor
        • WINTER Home Decor
        • SPRING Crafts and Creations
        • SUMMER Crafts and Creations
    • Our Chickens
    • Gardening
    • Organization
    • Re-Purposing
    • Furniture Refinishing
    • Budget
  • Crafts & Creations
    • Seasonal Home decor
      • FALL Crafts and Creations
      • WINTER Crafts and Creations
      • SPRING Crafts and Creations
      • SUMMER Crafts and Creations
    • DIY (Do-It-Yourself) Project
    • Kids Arts and Crafts
    • Homemade/Handmade Gift Ideas
    • Holiday Crafts
    • Fan Pulls
    • Free Printable/Downloadable
    • Sewing Projects
    • Giveaways
    • Business Features
  • Recipes/FoodFun
    • Breakfast
    • Lunch
    • Main Dish
    • Sandwiches
    • Appetizers
    • Slow Cooker
    • On The Grill
    • Side Dishes
      • Soups
      • Salads
    • Baking
      • Breads, Rolls and Muffins
    • Snacks
    • Treats
    • Desserts
    • Drinks
  • Homeschooling
    • Elementary Homeschooling
      • Elementary Homeschooling READING
      • Elementary Homeschooling MATH
      • Elementary Homeschooling LANGUAGE ARTS
      • Elementary Homeschooling SCIENCE
      • Elementary Homeschooling HOME ECONOMICS
      • Kids Arts and Crafts
    • Middle School Homeschooling
      • Middle School Homeschooling SCIENCE
      • Middle School Homeschooling HOME ECONOMICS
    • Language Arts
    • Math
    • History / Social Studies
    • Geography
    • Foreign Language
    • Field Trips
    • Games
    • Nature Study
  • The Big Picture
    • Life In General
    • Celebrations
    • Faith
      • Into the Light; The Series
    • Giveaways
    • Reviews & Sponsors
  • Photography & Lettering
    • Photography
    • truck lettering
    • vehicle graphics
    • Newborns
    • Kids
    • Engagement
    • High School Senior Pictures
    • High School Senior Pictures Sneak Peeks

Creative Coloring Easter Eggs – Photos

April 13, 2009 By Laura 6 Comments

Just sharing with you today some photos from our creative coloring of Easter eggs tradition. Our family here LOVES to color and decorate eggs. Do you? We could do it every day.  It’s also one of my favorite things to photograph. We do hope you all had a lovely and blessed Easter!  Our entire Triduum was so focused and beautiful.  We especially enjoyed the services and Masses at our church throughout the Holy days, and our quiet Easter celebration together was  pleasant and relaxing.

We will have more Easter photos to share tomorrow or the next day, but have a heavier than usual work week, so we just may not be so chatty until later on in the week, if we are disciplined.  ; )  But we’ve got a long list of blog posts and plans on hand-so stick around! And Enjoy!

white-eggs-ready-to-dye

cups-of-dyeing-easter-eggs

white-eggs-ready-to-dye
cups-coloring-easter-eggs

red-colored-easter-egg

coloring-orange-easter-egg

cups-coloring-easter-eggs cups-of-dyeing-easter-eggs

few-colored-easter-eggs-in-carton

coloring-eggs

coloring-purple-easter-egg

love-colored-easter-egg

blue-colored-easter-egg

chick-easter-egg

bright-colored-easter-eggs-in-carton

god-easter-egg

bowl-beautiful-creative-colored-easter-eggs_2

bowl-beautiful-creative-colored-easter-eggs

Hope you enjoyed this fun photo collection of our family memories!
Thanks so much for visiting.

Save

Save

Save

Filed Under: Crafts & Creations, Faith/ Catholic, Holiday Crafts, Holidays, Kids Arts and Crafts, Kids Arts and Crafts, Photography & Lettering, The Big Picture, Traditions Tagged With: beautiful-colored-Easter-egg-photos, Catholic, Catholic-blogs, Catholic-family, Catholic-kids, creative-Easter-egg-coloring, decorating-easter-eggs, dyeing-Easter-eggs, Easter, Easter-egg-coloring-photos

Stained-Glass (looking) Tissue Paper Easter Cross – Kids Craft

April 7, 2009 By Laura 20 Comments

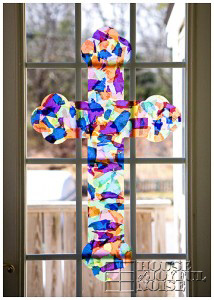
Today we have an Easter themed craft tutorial for you!  It is beautiful, and so fun to make!  It’s a stained-glass (looking) tissue paper Easter cross, for your home or school windows. Or glass door!

stained-glass-tissue-easter-cross-craft_mini

The kids have been working really hard with their school work, and will actually be done with their formal work in just a couple of weeks.  So in preparing our hearts and minds for this Holy week, we decided to do some more lengthy study of the Stations of the Cross, and then get creative today and make a big Stained Glass (looking) Easter cross decoration for our Easter celebration come this Sunday.  It will be fitting in faith and spring spirit, to leave it up as beautiful cheery decor, for several weeks following Easter.

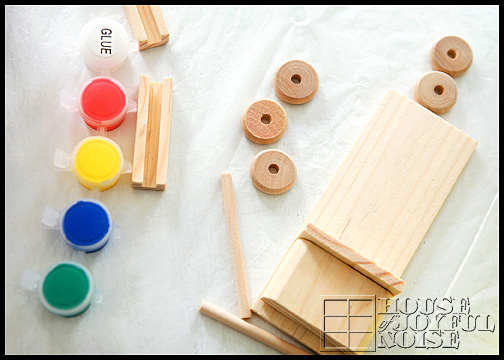
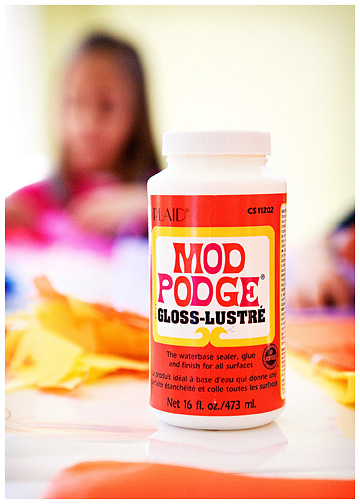
There were really only 5 things we needed:  a very large sheet of window cling, lots of colored tissue paper, a sponge brush, some Modge Podge and a pair of scissors.

colored-tissue-paper-layers modge-podge-gloss-lustre

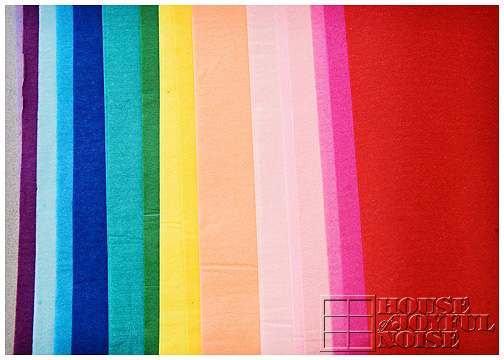
I didn’t take photos of this part, but, we first drew out a large cross on the back of the window cling material backing-paper, using a board for the straight edges, and a round container for the rounded decor ends of the cross.  Once that was done, the kids all grabbed sheets of the tissue paper, and starting ripping it into pieces 1-2 inches or so. (Might I add, the colors each of them go for are so predictable.  lol)

stained-glass-tissue-easter-cross-craft_6 stained-glass-tissue-easter-cross-craft_5

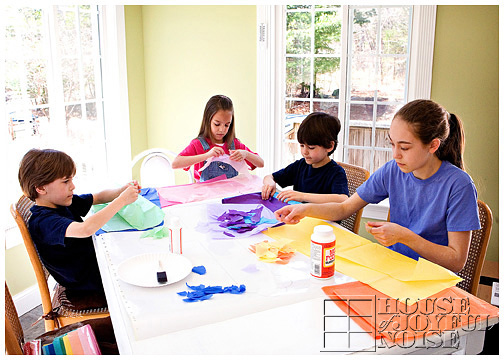
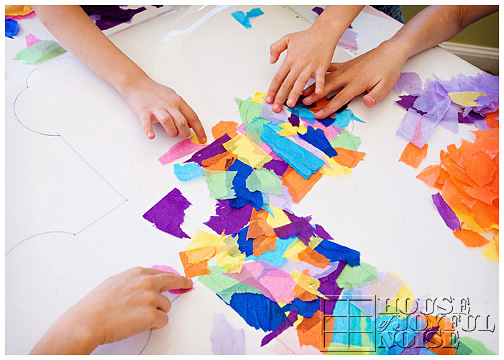
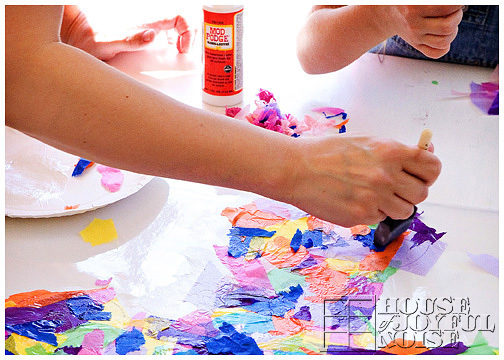
Once we had plenty of pieces ready to go, I started spreading some Modge Podge, with a sponge brush,  in small sections (on the front) of the cross at a time, going outside of the lines somewhat on purpose.  Then the kids got to work, putting down pieces, overlapping each other, and rubbing them down.

stained-glass-tissue-easter-cross-craft stained-glass-tissue-easter-cross-craft_3

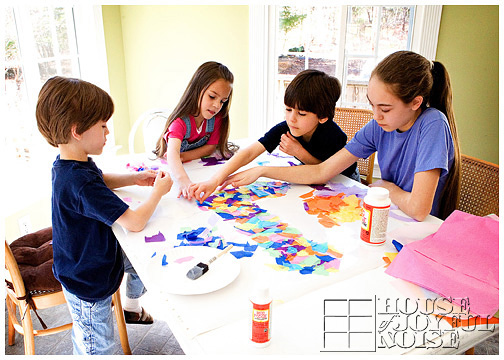
When the entire cross was almost done being covered with pieces of colored tissue, I started on one end, and went over any uplifted corners, or flappy pieces, of tissue, just Modge-Podging them down good with my sponge brush.  I LOVE Modge Podge-that stuff is great for so many projects!

stained-glass-tissue-easter-cross-craft_2 stained-glass-tissue-easter-cross-craft_4

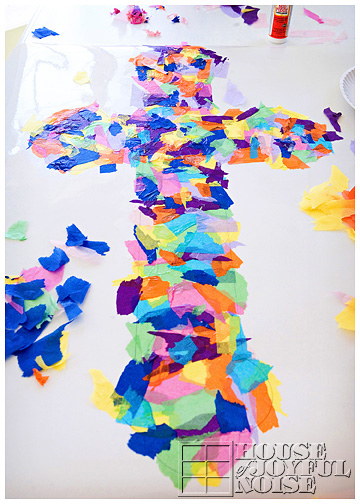
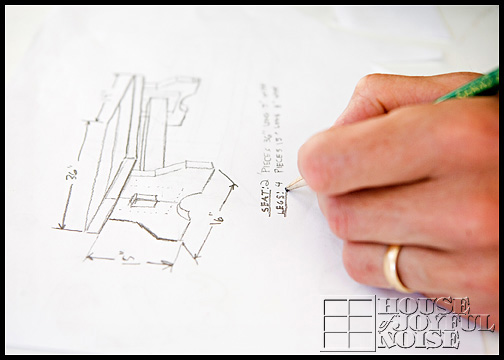
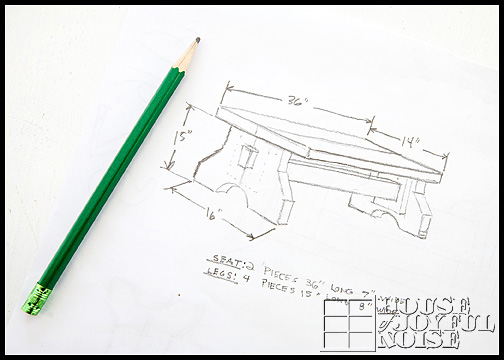
We made the cross 20″x34″.

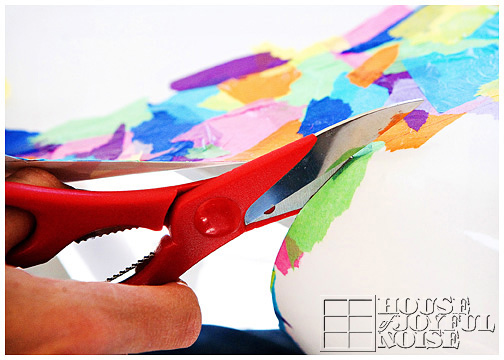
Once it was all dry, we cut it out!

cuttingout

It was a perfect fit for our front door, because we planned it that way. : )

stained-glass-tissue-easter-cross-craft_1

With the main events of Holy Week still before us, we anticipate the somber and difficult remembrance of the journey Jesus has yet before Him-and we will follow Him all the way to His last breath.

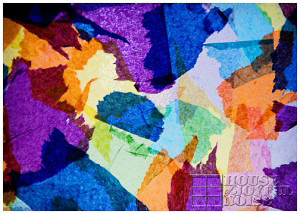
But the radiating colors of this cross, brought to life by the sunlight, reflect the state of our hearts come Sunday, when we will celebrate our risen Jesus Christ, in all of His dazzling and promising glory.

stained-glass-tissue-easter-cross-craft_1 cumosaic-300x214

We appreciate the 100’s of visits our blog has received in the past couple of days.  As we all take part in this holiest week of the year, and end our personal Lenten journeys, may you feel your hearts full of peace, prayer, and the undeniable presence of the Holy Spirit, and find yourself in a deeper, and more meaningful relationship with Christ.

Save

Save

Save

Save

Filed Under: Crafts & Creations, Faith, Faith/ Catholic, Holiday Crafts, Kids Arts and Crafts, Kids Arts and Crafts, The Big Picture, Tutorial Tagged With: beautiful-Easter-crafts, Catholic-blogs, Catholic-crafts, Catholic-family-activities, easter-crafts, Easter-home-decor-idea, faux-stained-glass-craft, faux-stained-glass-window-craft, kids-easter-crafts, kids-religious-Easter-crafts, paper, tissue, tissue paper crafts, tissue-paper-craft

How to Make a Beautiful Palm Cross – Tutorial with Directions and Photos

April 5, 2009 By Laura 3 Comments

Hi Friends!  Are you ready to make a beautiful Palm Cross, with your Palm Sunday palms? Well we are ready to show you, with this step-by-step tutorial, complete with directions and photos!

how to make a palm cross

Today has begun  Holy week, so as we move through it,  I am sure it’ll slow down around here a bit once again, as we help bring our children, in a mindful, prayerful and heartfelt way, through the most significant events of Jesus’ life, which led to the willing sacrifice of His own life, for us.

Last year on Palm Sunday, Michael took the fistful of palms we brought home from Mass, and created a big cross with them for our home.

Last Year’s Palm Cross

old-palm-cross

Our family has enjoyed it so much throughout the year, that the kids and I wanted him to make another new one with the palms we brought home today.  So as he did, I took photos, with the thought that maybe some of you may want to create one this way as well, with your own palms, for your own family home.  It is a difficult thing to explain in words only, so I am hoping the photos will help show you how to do it.

How to Make This Beautiful Palm Cross


how to make a palm cross

First, he takes 3 sets of 2 palms each, and at least one good palm whisp.

how to make a palm cross

In the area the intersection of the cross is, he put the ends of one set of palms alternately layered in between 2 of the others, going in the opposite direction of course.

how to make a palm cross
Then he takes the last set, and layers those for the other side.

how to make a palm cross
Pinching it all together at the intersection, he takes one side of the palms and makes a loop with them to the back.

how to make a palm cross
He secures that with his fingers to the middle as well, and then does the same with the other side.

With the formed cross in hand he takes the wisp and starts wrapping the intersection of the crossed pieces, to secure them tightly.

The below collage, to be viewed left to right in rows top to bottom, is not every single move. It just gives you a general idea of how he wraps it around, crisscrossing, and going up and down as well.

how to make a palm cross

how to make a palm cross
When he only has about 2 inches left, he turns the cross over, and places it on the table, and holding the wrap tightly, he takes the remaining end and feeds it under the wrap a couple of times, and then just pulls it tightly. The front of the middle of the cross then looks like the last square in the above collage.That’s it!

how to make a palm cross

new-palm-cross

We’re sure you all have found various ways to make your own beautiful crosses with palms as well, or perhaps you just stick them behind the crucifix of your home, as we have done for many years as well. We would love for you to share how you do display your blessed palms in your home, what you may make with them, or any traditions you may have for Palm Sunday in your family.

We hope you had a happy and peace filled Palm Sunday .
May God bless you all, this Easter season!

Save

Save

Save

Filed Under: Crafts & Creations, Faith, Faith/ Catholic, Home Decor, Kids Arts and Crafts, Re-Purposing, The Big Picture, The Homestead, Traditions Tagged With: Catholic, Catholic-blogs, Catholic-families, Catholic-holy-week, Easter, how-to-make-palm-crosses, palm-cross-tutorial, Palm-Sunday-project, sunday-palms

Wooden Toys

March 30, 2009 By Laura 6 Comments

Honestly, there are times I wonder, just a little bit, if our kids are actually pioneer children. They truly enjoy the simplest of wooden toys, games and activities.  But maybe that’s just a result of the simple life we live, that they can find such enjoyment in these simple things. Or maybe, the fact that they love such simple things, makes our life simple. Much like that age old question, of which came first: the chicken or the egg? Either way, we’re grateful.

wood-toys-lineup

But back to the wooden toys.  We were in one of our very favorite stores.  Not the ‘mercantile’ in town (I would LOVE it if there was one!), but Michael’s Arts & Crafts, when we spotted these little wooden toy kits…..for a $1 each!  Now, as parents, we don’t get our kids something every time we go into a store.  Or even 2% of the times we go into a store. We just find it unnecessary. (Because we’re simple people, I guess. They don’t even ask or expect anything, either.  But when I saw these toy kits, I knew they would truly LOVE putting them together, and painting them, for hours.  I also knew they would be happy with their work, and play with them after.  So,  sometimes, it’s nice just to surprise them.  When I told that them they could go ahead and all pick one out, they were very excited, and had almost as fun picking 0ne out, as they did building and painting it. Even our 11 year old can still enjoy such simple pass times, and she never passes up an opportunity to do a project with the little ones, anyway.  They just love to do stuff, together.

So….not much else to say. But we think they came out great, and I did have fun taking photos to share! LOTS!

wood toys

wood toys

wood toys

wood toys

wood toys

wood toys

wood toys

wood toys

wooden-toys-airplane

wooden-toys-birdhouse

wooden-toys-jeep

wooden-toys-jeep_2

wood toys

And boy are we down to the wire!! Tomorrow is the last day to get your name in that bowl again, and Wednesday we announce the winner of OUR FIRST GIVEAWAY!!  WHO’S name will we pull out of the bowl?  WHO will have a special package of home-made gifts, made by US, delivered to their home??  We can hardly take the anticipation!  Can you??

The kiddos thank you for coming to see their painted wooden toys.

Save

Filed Under: Crafts & Creations, Kids Arts and Crafts, Kids Arts and Crafts Tagged With: kids-arts-and-crafts, old-fashioned-toys, painting-wooden-toys, simple-toys, wooden-toys

How to Build a Wood Stove Bench – Part I

March 28, 2009 By Michael 5 Comments

Hi Everybody. I’m Michael, a.k.a. Mr. House Of Joyful Noise.
I’m excited to introduce my first project on the blog!  I’m going to teach you how to build a wood stove bench.

Michael - House of Joyful Noise blog

 I’ll be working this project in parts, and blogging as I go.  I’ll do my best to explain what I’ve done, along with what photos we took, but if you find you still have questions, you can let me know in the comments to this post, and I will try to answer as best I can.  So check the comments for replies if you leave me a question.

The other day, my bride mentioned that she was tired of our little stool in front of the wood stove.  She wants something larger, homier, and I had to agree.

1_l

So I asked her what she would like to have, and she described the type of bench she would like.  At this point, I sketched out something, as I always do when I start a project, just to have an idea of what direction I’m going in.

How to Build a Wood Bench

How to Build a Wood Bench

I came up with a height that would be best to sit and load the stove with wood, poke the fire, or clean the stove out, etc. My bride wanted it wide enough for 2 people to sit together. ♥♥  I also wanted a comfortable width so the bench would be stable on the floor.  I felt like I had a good enough plan on paper to start the project.

How to Build a Wood Bench

I set out to find some scrap stock around the house.  I ended up using two 6 foot pieces of 2″x10″ ‘s, left over from our sun room rafters.

I wanted the bench top 14 inches wide, and 36 inches long.  So I ripped one of the 2×10’s to 7 inches in width.

How to Build a Wood Bench

Once I had that ripped to size, it was time to cut it to 36 inches in length. This left me with 2 finished pieces 7″x36″.

How to Build a Wood Bench

Then it was time to start the legs. I knew I needed 4 pieces 8 inches wide, by 15 inches tall.  (Two pieces 8″x15″ per leg.)  So it was back to the table saw to rip my second 2×10 to 8 inches in width.

How to Build a Wood Bench

With that ripped to 8 inches wide, I then cut 4 pieces 15 inches long.  These would be the legs. I then sketched the pattern onto one of the legs.  I measured from the side in to 2.5 inches, and down from the top 5 inches, and marked it with a pencil.   Then from the bottom of that piece, on the same side, I measured up 5 inches, and marked that. Then I drew the angle connecting those 2 points.

How to Build a Wood Bench

How to Build a Wood Bench

I cut on that pattern, and then repeated this 3 more times with the 3 remaining pieces. This gave me 4 identical pieces to build 2 legs for the bench.

How to Build a Wood Bench

I also wanted an arch cut out of the bottom of the leg.  So I measured 2 inches up the side, and marked it. Then I measured 3 inches along the bottom, and marked it. I took a one gallon paint can, set it on the piece, so that the can touched on both of those marks, and traced the curve. I cut them out with a jigsaw.  (Don’t pay attention to the larger pencil arc. I was just figuring out how high I wanted it.)

How to Build a Wood Bench

Here is a finished half leg.

How to Build a Wood Bench

Putting 2 of these cut pieces together, this gives you an idea of the look of a finished leg.

How to Build a Wood Bench

Now, to secure these 2 pieces together, I cut a support piece for the inside of each leg. They are 9¼ wide by 12 inches high.  To dress these pieces up a little, I cut 2 45 degree angles off the bottom, and did 45 degree bevel all the way around, except for the top.

How to Build a Wood Bench

That piece will sit centered on the width and flush to the top of the legs.

How to Build a Wood Bench

In Part II of this project, we will finish the cutting, and get ready for assembly of this bench.  Later on, in Part III, we will prime, paint and finish the bench to a worn look, and show you how it looks  in front of the wood stove.

Something to think about:  In keeping with the general design of this bench, the measurements could be changed to build a bench for many different uses. For example, you could build a bench for your deck, your garden, a wall bench for in your home, or a bench for your kids to sit on in their playroom.

The projects I intend to blog about are anything I happen to be doing anyway, for our own home or needs. So as they come up in life, I will try to share in this manner here on our blog.  I think you will find that my projects are often rough and simple. Since I am not a carpenter by trade, I have limited tools to work with. But I make do ok.  My hope is that these projects will offer a jumping point for projects you may like to do, or inspire the men in your family in some way.

Please feel free to leave any suggestions or feedback about these project posts for me as well. I am new at blogging and explaining step by step. I just DO IT. So if there is anything I can do to clarify things for you, please let me know and I will do my best.   Meanwhile, I hope you enjoyed Part I of my first blogged project!!
Click Here >>>> for Part II

Save

Save

Save

Save

Save

Save

Save

Save

Save

Save

Filed Under: Crafts & Creations, DIY (Do-It-Yourself) Project, Home Improvement, Home Projects, The Homestead Tagged With: build-a-bench, build-it-yourself-wood-bench, how-to-build-a-wood-bench, wood stove bench, wood-bench-plans

  • « Previous Page
  • 1
  • …
  • 21
  • 22
  • 23
  • 24
  • 25
  • …
  • 28
  • Next Page »

We are wicked happy to have you here! We hope you find much inspiration, help, humor and enjoyment here.


Archives


POPULAR POSTS

* * * * * *

SUBSCRIBE to House of Joyful Noise blog! Every new post, delivered right to your email box!


Privacy Policy

Amazon Affiliates

Never at any additional cost to you, we may earn a small commission for our endorsement, recommendation, testimonial, and/or link to any products from our website. Your purchase through our links helps support our family, while sharing with you the products we authentically use and recommend, for various ideas, and letting you know where you can purchase them. Thank you for your support!

[footer_backtotop]

Copyright © 2026 HouseOfJoyfulNoise.com · Genesis Framework by StudioPress