• HOME
  • {A}’s Chipmunk Training Archives

 Homepage

  • The Homestead
    • Home Projects
    • Home Improvement
    • Home Decor
      • Seasonal Home decor
        • FALL Home Decor
        • WINTER Home Decor
        • SPRING Crafts and Creations
        • SUMMER Crafts and Creations
    • Our Chickens
    • Gardening
    • Organization
    • Re-Purposing
    • Furniture Refinishing
    • Budget
  • Crafts & Creations
    • Seasonal Home decor
      • FALL Crafts and Creations
      • WINTER Crafts and Creations
      • SPRING Crafts and Creations
      • SUMMER Crafts and Creations
    • DIY (Do-It-Yourself) Project
    • Kids Arts and Crafts
    • Homemade/Handmade Gift Ideas
    • Holiday Crafts
    • Fan Pulls
    • Free Printable/Downloadable
    • Sewing Projects
    • Giveaways
    • Business Features
  • Recipes/FoodFun
    • Breakfast
    • Lunch
    • Main Dish
    • Sandwiches
    • Appetizers
    • Slow Cooker
    • On The Grill
    • Side Dishes
      • Soups
      • Salads
    • Baking
      • Breads, Rolls and Muffins
    • Snacks
    • Treats
    • Desserts
    • Drinks
  • Homeschooling
    • Elementary Homeschooling
      • Elementary Homeschooling READING
      • Elementary Homeschooling MATH
      • Elementary Homeschooling LANGUAGE ARTS
      • Elementary Homeschooling SCIENCE
      • Elementary Homeschooling HOME ECONOMICS
      • Kids Arts and Crafts
    • Middle School Homeschooling
      • Middle School Homeschooling SCIENCE
      • Middle School Homeschooling HOME ECONOMICS
    • Language Arts
    • Math
    • History / Social Studies
    • Geography
    • Foreign Language
    • Field Trips
    • Games
    • Nature Study
  • The Big Picture
    • Life In General
    • Celebrations
    • Faith
      • Into the Light; The Series
    • Giveaways
    • Reviews & Sponsors
  • Photography & Lettering
    • Photography
    • truck lettering
    • vehicle graphics
    • Newborns
    • Kids
    • Engagement
    • High School Senior Pictures
    • High School Senior Pictures Sneak Peeks

Adorable Stretch Jewelry for Little Girls | Craft Tutorial

August 15, 2012 By Laura 12 Comments

little-girls-stretch-jewelry-craft-tutorial

My little girl, ‘O’, is always in a crafty mood. Her name is Olivia, but we call her ‘O’ almost as much.  She gets excited about any craft or project going on, and always (always) wants to help.  So she and I were chatting one day, and had come up with the plan to make her some cute stretch jewelry, possibly using buttons of some sort.  The next time we were in the craft store for other projects, we picked up the supplies for her jewelry too.  It’s a simple project, with adorable results, and practical for little active girls, too.

little-girls-stretch-jewelry-craft-tutorial-1 We found a whole section of all kinds of cute element buttons.  I would have had a hard time choosing, but ‘O’ is a pretty decisive girl, and decided the flowers with the rhinestone centers, and the flip flops, were what she wanted.  Interestingly, while they were all labeled buttons on their packaging, some did not have any hole or loop on the backs, to thread in any way! Such was the case with the flowers.  The flip-flops however, did have a loop on the backs.  No worries though. I was sure my Amazing E-6000 would do the trick. We also picked up stretchy elastic string.  I wanted to show you these supplies in their packaging (these bought at Michael’s Arts and Crafts), so that you would know what to look for, if you wanted to do this project yourself.

little-girls-stretch-jewelry-craft-tutorial-2
The string we got, as you can see, is all one long piece that changes colors.  So you can just choose an area of color you want, and cut it to the length you need.  Really fun matching up up with the buttons.  Aren’t they so cute?

So we had a plan to make some bracelets, anklets, and toe rings.

0031

Depending on if your piece will be for the wrist, ankle, or toe, just take a quick measurement using the string around that body part, and than add an adequate amount more, for tying.  Now buttons with a hole or loop to thread of course will just slide right onto your string.  But the flowers we needed to glue.  So after cutting the string to length, we found the center of the string by using a ruler we had nearby. But you can estimate by folding the string in half or whatever.  In the center, we put a dab of glue, and then set the flower on and held it for a second.  We were working on a piece of paper, to protect our table from the glue. But being that the glue dribbles right over the string, we didn’t want the string adhering to the paper. So when it was set enough . . . . . .

0041
. . . . . .we just taped them to the table’s edge, and let them hang, to completely dry.

little-girls-stretch-jewelry-craft-tutorial-3 ‘O’ really had fun, choosing different elements, and then choosing what colors of string to go with it.  We especially liked how this one came out. We chose to use three pieces of string, and knot each of them on their own, instead of all together. It really alters the look!  The E-6000 really works amazing.  After knotting the jewelry on for the proper fit, you can then trim any excess string end with scissors. You just want to be sure they are tied to be snug, but not tight or uncomfortable, cutting off circulation or leaves band marks.

TIP: You may also want to dab the string ends with some kind of nail polish top coat, just so they don’t unravel or get fuzzier. I did, and I also put a dab on the knots, for extra security.

little-girls-stretch-jewelry-craft-tutorial-4 Aside from these accessories just looking adorable and so age appropriate, they really are great for every day play wear, being that they are fitting, and not the kind that will get caught on anything. They are not likely to break in any way, or get lost.  But even if they did, none of it is valuable in any way, and they can so easily be made again.

little-girls-stretch-jewelry-craft-tutorial-5
So little girls can just HAVE FUN, as they should, and not worry about their *bling*.

little-girls-stretch-jewelry-craft-tutorial-6
So perfect, for a little pretty style at the beach.

little-girls-stretch-jewelry-craft-tutorial-7 And they can even get wet, without a problem.

little-girls-stretch-jewelry-craft-tutorial-8
The options really are endless, and I can already see us ending up with a larger collection.  Because how cute would it be to make holiday accessories?  We can find button elements like this for Christmas . . . . . .Halloween . . . . . .Easter . . . . . . and it would also look lovely with any kind of clothing, including dressy-dresses.

If you are hoping to make homemade gifts this year, this is a great inexpensive and quick idea, for any little girls on your list.  If you aren’t sure of their sizes, just leave them untied, and when you give jewelry to them, you can just tie it off on them, and trim the excess.  Just as we did it making these for ‘O’.

little-girls-stretch-jewelry-craft-tutorial-9 We did not make any choker style necklaces, or pony-tail holders, but those are a couple more ideas.

012
‘O’ is the kind of girl who enjoys fashion.
She likes shopping for clothes, and enjoys putting her outfits together every day, including any accessories for her hair or as jewelry.

little-girls-stretch-jewelry-craft-tutorial-10 Love it? Say it. Pin it! Share it. Make it!


Save

Filed Under: Crafts & Creations, Kids Arts and Crafts Tagged With: crafts, kids-anklets, kids-bracelets, kids-stretch-jewelry, kids-toe-rings, little-girl-crafts, little-girl-handmade-accessories, little-girls-home-made-jewelry, safe-stretch-jewelry-for-girls

Motor Vehicle License Plate Refurbishing | Before and After

August 9, 2012 By Laura 233 Comments

000

Many of you probably already know that my husband, Michael, letters company trucks, does vehicle graphics and makes business signs. If you’re curious to see some of the kind of work he does, you can click on ‘Photography & Lettering’ in the menu above, and look to the bottom of that drop down menu, for ‘Truck Lettering’ and ‘Vehicle Graphics.’

Well, an interesting sideline that he has gotten into over the years, is refurbishing older green Massachusetts license plates.

Our own state of Massachusetts here, is actually the very first state in the United States, to issue motor vehicle license plates.  It used to be that the plates only needed to be displayed on the back of the vehicle. Over the years, the state has been proactive in enacting laws regarding the registration and inspection of motor vehicles.  The vehicle’s license plate(s) are assessed as part of the required vehicle inspections, and if the plates are old and/or damaged and are deemed unreadable by at least 60 feet, the vehicle owner is required to get new plates, before it receives a passed inspection sticker.

If a motor vehicle has been issued front and rear license plates, which is typical, the vehicle must display both license plates issued by the Registry of Motor Vehicles on the front and rear of the vehicle.  Older plates that have the green lettering, which were the former standard and issued as a single plate, must only be displayed as that one plate on the back of the vehicles.  In 1988, Massachusetts began issuing red-lettered plates, which are issued as a set of two. If the newer red-letter plates are issued to the vehicle registrar, both must be displayed on both the front and back of the vehicle.  However, the single green-lettered plate is acceptable by law, for as long as it is readable.

It is for this reason, that Michael has refurbished an increasing amount of green-lettered plates. There are a host of reasons why some vehicle owners want to keep their older plate, for as long as possible. For some, it is just a somewhat sentimental reason. One 50-something year old man told Michael that he has had the same license plate since he was 18 years old, and he just doesn’t want to give it up.  Others own hot rods, antique vehicles, or other show cars, and there is no place for a front plate, nor do they want it to ‘blemish’ the look of their car.  Whatever the reason, if the plate is indeed salvageable, Michael is happy and capable of restoring them to their former beauty, if hired to do so.

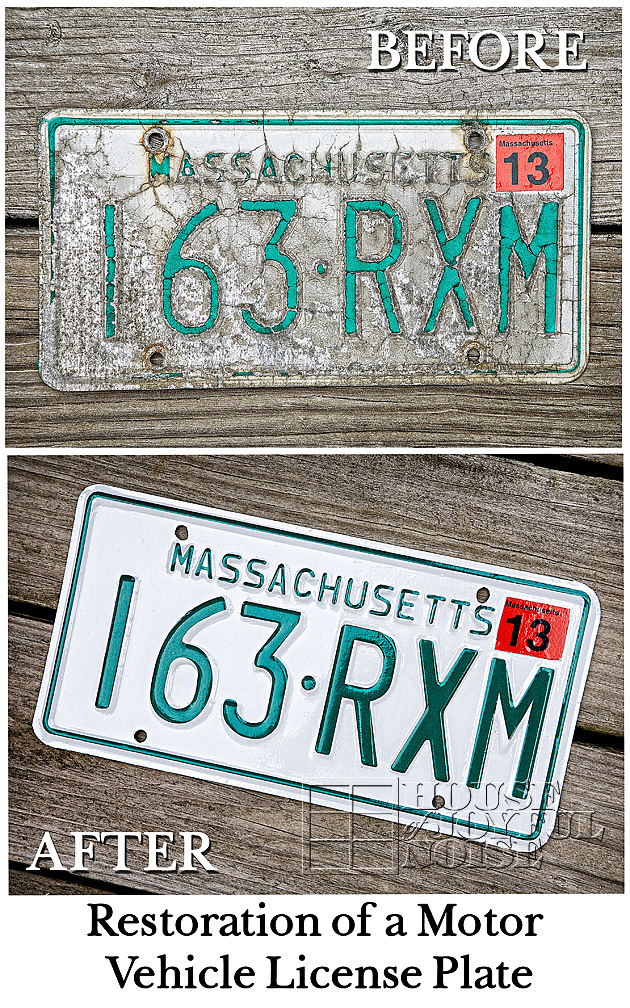
Because it is a service he provides to aid in providing income for his family, he asked that I not show the whole step-by-step process.  Still, I thought it might be an interesting little post, to share with you all the before and after of just one of his green-lettered Massachusetts license plate restoration jobs.

  001_massachusetts-green-license-plate-restoring

002_massachusetts-green-license-plate-retouching

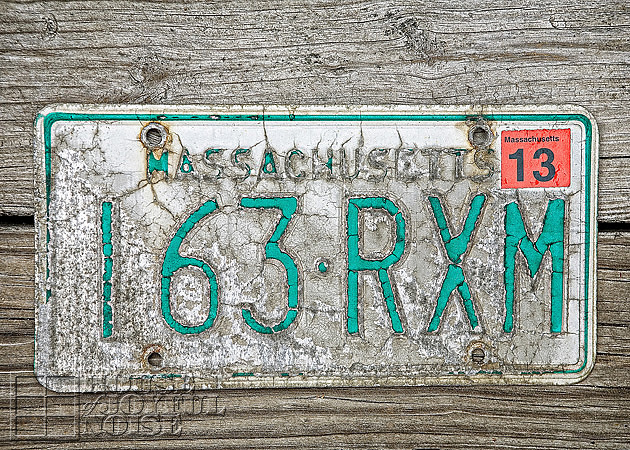
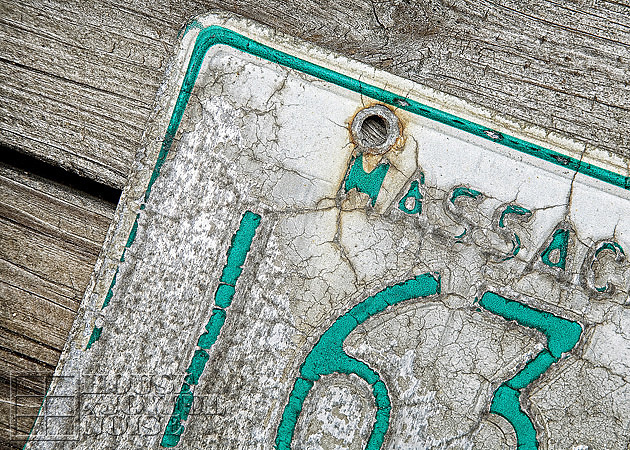
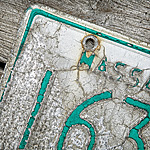
The condition of this particular plate when he received it, was a hot mess.

So the first thing he needs to do is strip the plate to bare metal and start from scratch.

003

004 
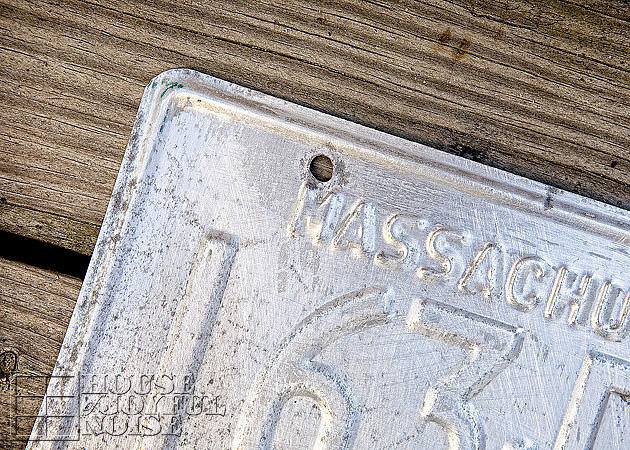
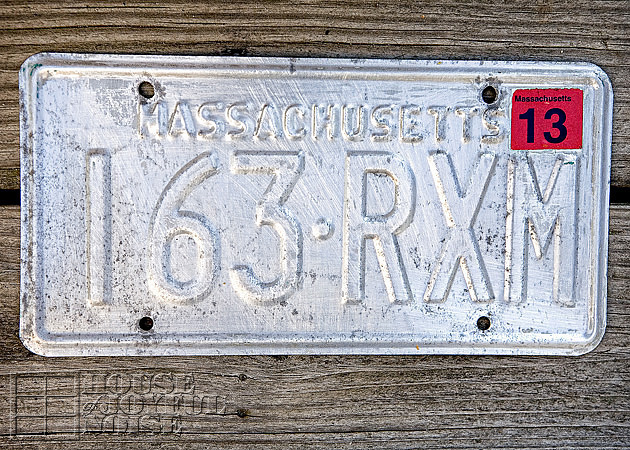
Here it is, stripped. It’s still a little beat up and whatnot, but a good new place to start.

006_massachusetts-license-plate-refurbishing

007_massachusetts-license-plate-refurbishing 
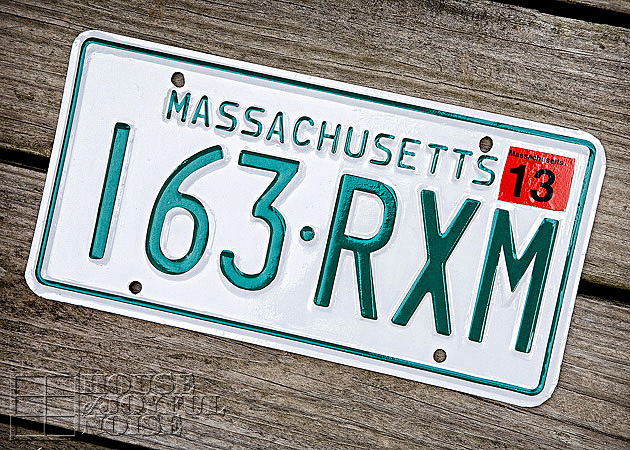
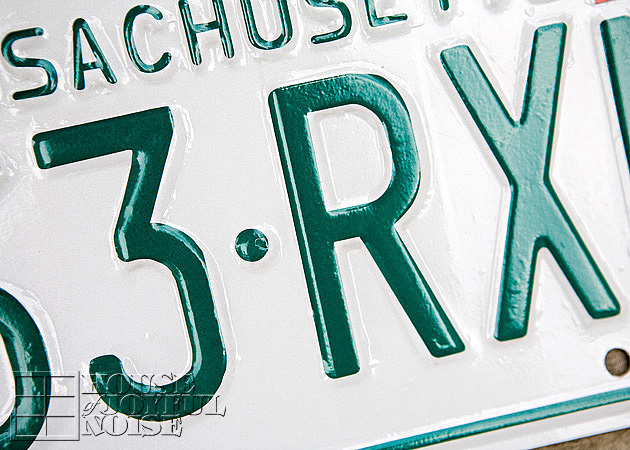
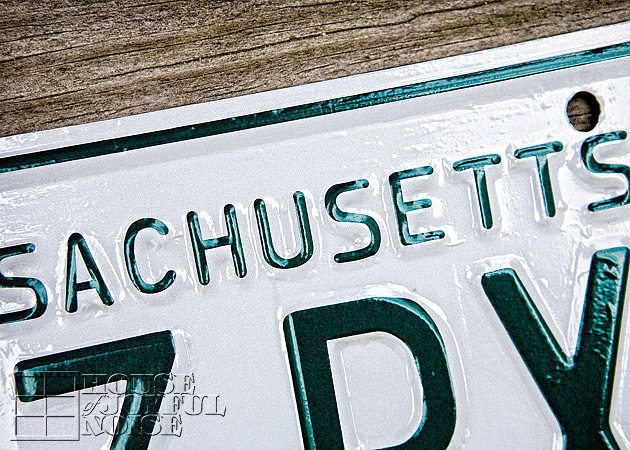
All restored.  It is 100% reflective as needed as well, just as they were originally.

What do you think?

008_massachusetts-license-plate-refurbishing

I am aware and amused, that he is often needing to clean things up and make them look like new, while I spend some of my days working to make things look old, beaten up and quite used.

009_restoration-massachusetts-motor-vehicle-license-plate-before-after Have you ever had license plates that meant something to you? Have you ever been sad for the to need to get new ones, or was it exciting? And what I’d really love to know, is do you like the look of your state’s plates?  I’m not going to name names (of states, that is), but I’ve seen some ugly ones!  I can’t much complain about ours.  You?
. . . . . .
UPDATE: Since the creation of this post, and as a direct result of it on the internet as well as constant referrals, Michael has refurbished thousands of plates to date.  Every one has expressed great satisfaction with their finished plate, upon return, and of course, every one has gone on to pass inspection.

Because this unique service he provides is in very high demand,
Michael was previously booked up for months ahead. However, due to being able to increase the number of plates he restores per week, the wait is no longer that long. If you are looking to have your license plate restored to it’s former beauty, and would like to know the current booking time, please contact Michael at his e-mail address: Alphbtman@aol.com

for further details and instructions.

Save

Filed Under: Photography & Lettering, Refinishing, truck lettering, vehicle graphics Tagged With: green-Massachusetts-licence-plate-restoring, license-plate-refinishing, massachusetts-license-plate-refurbishing-services, massachusetts-motor-vehicle-license-plates, vehicle-license-plate-refurbishing

Terracotta Flower Pot Wind Chime | Tutorial

July 22, 2012 By Laura 106 Comments

terracotta-flower-pot-wind-chime-craft-3

Making this flower pot wind chime was a fun and simple project to do with my kids. I was really looking forward to hanging out with them and painting, and I knew I would also love seeing the wind chime in my gardens, where I had every intention of hanging it, when it was done.
While I think we kind of ‘made it our own’, this flower pot wind chime was not at all my idea. I have seen them so many times at crafty website now, and so many style-versions of it, that I’m not sure which style I saw first, or where! Someone must have come up with this adorable idea first, but I’ll be darned if I know who! Whoever did, we thank them for the fun inspiration, to make something (else) to have around, that makes me smile inside, every day.

Here’s the basics on how we made our terracotta flower pot wind chime.

001_terracotta-pots
We started with 3 different sized terracotta plants, that have drainage holes in the bottom.
The smallest is tiny, at 1-1/2″ tall. Then the 2 next sizes up: 2-2/3″ and 3-1/2″.

002_synthetic-flat-brushes
Using our little collection of synthetic brushes, we got to painting our pots.

003_paint-palette
We used Martha Stewart Craft Paints, which are an acrylic paint. We also looked around and found what wooden beads we had in the house, which we wanted to use on our wind chime as well. After choosing our colors of paint and how we were going to paint the pots, we wanted the beads the same colors. One we had already was the correct color-green. The other 3 we had were not, so we painted them correct colors. If you can imagine, painting small wooden beads was not that easy. But we quickly figured out a helpful trick: We stuck 2 toothpicks in the bead holes, to hold them while we brush painted them the colors we wanted them to be. You can see them resting on the palette, drying.

004_painted-terracotta-pots I really wanted to take photos of the kids painting, for me! But they were done and back outside, on the other side of my window, swimming again, before I ever got photos of them painting. But, since they weren’t paying any attention to me anymore, I did clean up the edges of their pot-rim painting, just a little. ; )

005
Our original idea, was to decorate our pots with little garden bugs.  Like butterflies, ladybugs, dragonflies, etc. It would have been so cute! Don’t you think? But none of us felt we could paint them that well, that small, and we couldn’t find any stickers or decals of any sort, to kind of Modge Podge them on. So, when it came time to decorate the pots, the boys were busy playing something else, and Alexis was at work. So O (Olivia) and I decided to just polka dot them.  I love polka dots, so I was sure I’d love it as much as the garden bugs idea.

006
Applying the polka dots could not have been easier. Since we wanted the dots very small, on our small pots, we just used q-tips! We dipped the tip in the paint, and then dotted it right onto the pot! The hardest part was spacing the colors. I always drive myself crazy with that…..not wanting the same colors right near each other, and trying to get even spacing too. But we did a well enough job!

0071 O and I worked together, polka-dotting, and our q-tip trick worked like a charm.

Now, I didn’t take photos of the assembly. But it’s easy enough to explain:  We used jute twine, and strung it through the holes of the pots. We tied big enough knots on the string, to hang the pots on the string as we wanted.  So each knot was inside the pot underneath the drainage hole.

terracotta-flower-pot-wind-chime-craft
Now, some crafters who have made flower pot chimes, opted to have the string come down out of the pot, with a wooden bead on the string (held in place with a knot before and after the bead) to act as the ‘ringer’, that would hit the pot when the wind blows. So they designed it that way, spacing their pots out more.  We chose to use the pots themselves, to be the ringers, so that when the wind blows hard enough, the pots hit each other. That required (visually) setting the pots overlapping each other a little.

As an afterthought too, I decided I wanted to give the chime a quick UV protectant spray coat of clear acrylic.  Since my chime was all already assembled, I just put some tin foil over the spoon, and sprayed it anyway, getting some up into the pots as well. I do recommend spraying the painted pots before assembly, if you wanted to. But no big deal.  It’s an aerosol, so it worked easy enough afterwards.

terracotta-flower-pot-wind-chime-craft-1
Aside from the paint design, the other touch that made it more ‘our own’, was that we added a stainless steel baby spoon as the bottom ringer. It really is a special touch, to me, with the memories of giving Alexis her first baby food, and then the triplets coming along, and the 3 little mouths we were trying to keep up with come the spoon- feeding age, with them. We didn’t bother having 3 bowls and 3 spoons, or we’d spend as much time picking up and putting down bowls and spoons, as we did putting spoons in sweet little open-waiting mouths.  Go ahead. Imagine that for a moment. No…..1 spoon, 1 bowl of food….down line of sweet, messy mouths we went. And then started at the beginning again.  Gosh I miss those days.

Wait. How did I end up talking about feeding my babies? Oh yes….the baby spoon, and the happy memories it brings me.

terracotta-flower-pot-wind-chime-craft-2

 So, it was simple as that. Anyone can make an easy and whimsical wind chime, even if you’re not that crafty. It’s a breeze.
Anyway, we’re happy you caught wind of this little fun project, and came to take a look.  Even if you’re just blowing through.

Ok, I’ll stop now.

P.S. Feel free to chime in, in the comments.
(Oh my gosh! Somebody stop me!)


Save

Filed Under: Crafts & Creations, Kids Arts and Crafts, Re-Purposing, Tutorial Tagged With: baby-spoon-chimes, crafts, diy, flower-pot-wind-chime, garden-decor, homemade-wind-chimes, kids crafts, Martha-Stewart-Craft-Paints, Plaid-products, polka-dot-crafts, terracotta-pot-crafts

How Much Wood, Could a Woodpeck Peck? : (

July 18, 2012 By Laura 5 Comments

003_birdhouse-woodpecker-damage-150x150

This is the telling of a sad little tale.

001_hand-painted-birdhouse-before-after The refinishing of this birdhouse, has been one of my most favorite projects ever.  Between the excitement of using Annie Sloan paint for the first time, the color I fell so in love with, and the YouTube crash course video lesson I watched, on how to paint tiny roses in order to adorn my sweet new birdhouse with, it’s a project I truly enjoyed the process of.

002_hand-painted-birdhouse I have to say, it’s held up so well, out there in the weather of all kinds, too.  I did put it away for the winter, but otherwise, it has stood right over on the other side of my garden beds, under the apple tree.  I have  finished projects I’ve done all over my homestead, of course, and I love to see them around.  This birdhouse has truly been a piece that still plays a part in bringing me a bit of joy every day.

So imagine my sheer panic this one very (very) early morning this summer:  The kids and I were still in bed, and I was still pretty much sleeping.  All of our windows were open a little, and I began to stir out of my sleep with the sound of some repetitive rhythm sound on hard wood outside.  I was confused by it, being somewhere between asleep and awake, and so I tried to bring myself out of the grog I was in, wondering if I was dreaming, or what.  But next thing I know, I hear little feet hit the floor hard, and come booming across the house floor, and my son yelling, “Mama, there’s a woodpecker pecking your birdhouse outside!”

That woke me up! The idea of the damage a woodpecker could do, had me wide-eyes, out of bed, out the front door, down the deck steps and out to the gardens, in a flash.  My abrupt arrival scared the woodpecker, and I watched him fly away. The peaceful silence after the commotion, caught my attention.  Even the birds stopped chirping. As I stood there in my summer nightie, in front of my house beside the street, amidst my gardens, our neighbor friend drove by in his truck to leave for work, and gave me a wave. 
It occurred to me in that moment, that it was a good thing I wear pajamas to bed.

I sauntered over to the birdhouse slowly,  not sure I really wanted to assess the damage done.

003_birdhouse-woodpecker-damage  {SIGH}. It looked like the woodpecker figured a hole already there, was a good place to start.
I put a trash bag over the house for the day, not sure what I was going to do about the matter.  But as the day went on, I thought, “What a cool photo that would have been, to get a shot of the woodpecker at the birdhouse.”  That’s what photographers do.  Think through life in images we’d love to get, as moments frozen forever.  So I took that bag off, and had my camera with my 70-200mm 2.8 lens on it, waiting by the open window near my work area in my house. I listened, and I checked repeatedly, for that woodpecker. All day long. But he never came back.  I thought that was the end of it.

004_birdhouse-woodpecker-damage

 Until very (very) early the next morning, of course. While we were all still sleeping.  I jumped out of bed again, grabbed my waiting camera, and opened the window. But as soon as I did, he flew away.  My boy and I, having both gotten a good look at the bird, decided it was a Downy Woodpecker. They are the most common in this area, and the description and picture matched.  I was really hoping to catch him flying to the birdhouse, and get him when he just landed on it. Before he got to work again.  Preferably the day before, while I waiting and so ready-window open already and everything.  I should have known it would come back the next morning, at the same time.  So these after-damage photos I show you were taken after morning 2.  In the end, you can see the window opening was pecked on both sides, but it also did damage to the arched trim over the window, which is a much softer wood.

I put the bag back on it, and left it on for several days after that.  Then I took it off, thinking; even a woodpecked birdhouse looked better than a black trash bag on a post. If the woodpecker did come back yet again, I was going to have to consider taking the birdhouse in for good, or, I don’t know…..installing some kind of taser device on it. A security system of sorts. But the woodpecker has not been back since.  For which I’m thankful!

005_birdhouse-woodpecker-damage

 When I refinished this birdhouse, and it came out so pretty, it really was my little hope, that some sweet little birds would move in.
It just never occurred to me, a woodpecker would come along, and decide the window wasn’t big enough for him.  Silly me.

006_birdhouse-woodpecker-damage

So maybe none of us ever did find out the answer, to the question: How much wood, could a woodchuck chuck, if a woodchuck could chuck wood?
But now we know how much wood could a woodpeck peck, if a woodpeck, could peck wood.
Too much! : (

P.S.  In the last week or so, we’ve actually noticed 2 woodchucks waddling around our property, too.
So if we learn the answer to the first riddle, we’ll let you know. ; )

Filed Under: Crafts & Creations, Home Decor, Life In General, Photography, Refinishing, The Big Picture Tagged With: annie-sloan-chalk-paint, downy-woodpecker, hand-painted-birdhouse, hand-painting-roses, nature photography, woodpecker-pecks-birdhouse, woodpeckers

4th of July

July 4, 2012 By Laura Leave a Comment

1_painted-american-birdhouse

HaPpY 4th of JULY, Everyone!

Since I wanted some photos, to go along with our wishes for you,  I thought today would be a good day to show you where I put my painted American Birdhouse.  It’s out on the potting bench near the gardens!  So now you know! I’ve got a whole red-white and blue theme going on out there, and it’ll be there throughout the month of July.  Then I’ll likely change it up, to some other summer theme.

 The birdhouse has held up very well in weather, despite the sun and rain beating on it.  Again, I credit that to the wax finish. It seems to be a great protector for outdoor wood, in my experience.

2_hand-painted-american-birdhouse-on-potting-bench Have a safe and memorable celebration of our country, with your families and friends!

We’ll see you again soon.


Filed Under: Crafts & Creations, Gardening, Home Decor, Refinishing, SUMMER Home Decor, The Homestead Tagged With: 4th-of-july-decor, american-birdhouse, american-home-decor, fourth-of-july-decor, garden-decor, red-white-blue-decor

  • « Previous Page
  • 1
  • …
  • 8
  • 9
  • 10
  • 11
  • 12
  • …
  • 28
  • Next Page »

We are wicked happy to have you here! We hope you find much inspiration, help, humor and enjoyment here.


Archives


POPULAR POSTS

* * * * * *

SUBSCRIBE to House of Joyful Noise blog! Every new post, delivered right to your email box!


Privacy Policy

Amazon Affiliates

Never at any additional cost to you, we may earn a small commission for our endorsement, recommendation, testimonial, and/or link to any products from our website. Your purchase through our links helps support our family, while sharing with you the products we authentically use and recommend, for various ideas, and letting you know where you can purchase them. Thank you for your support!

[footer_backtotop]

Copyright © 2026 HouseOfJoyfulNoise.com · Genesis Framework by StudioPress