• HOME
  • {A}’s Chipmunk Training Archives

 Homepage

  • The Homestead
    • Home Projects
    • Home Improvement
    • Home Decor
      • Seasonal Home decor
        • FALL Home Decor
        • WINTER Home Decor
        • SPRING Crafts and Creations
        • SUMMER Crafts and Creations
    • Our Chickens
    • Gardening
    • Organization
    • Re-Purposing
    • Furniture Refinishing
    • Budget
  • Crafts & Creations
    • Seasonal Home decor
      • FALL Crafts and Creations
      • WINTER Crafts and Creations
      • SPRING Crafts and Creations
      • SUMMER Crafts and Creations
    • DIY (Do-It-Yourself) Project
    • Kids Arts and Crafts
    • Homemade/Handmade Gift Ideas
    • Holiday Crafts
    • Fan Pulls
    • Free Printable/Downloadable
    • Sewing Projects
    • Giveaways
    • Business Features
  • Recipes/FoodFun
    • Breakfast
    • Lunch
    • Main Dish
    • Sandwiches
    • Appetizers
    • Slow Cooker
    • On The Grill
    • Side Dishes
      • Soups
      • Salads
    • Baking
      • Breads, Rolls and Muffins
    • Snacks
    • Treats
    • Desserts
    • Drinks
  • Homeschooling
    • Elementary Homeschooling
      • Elementary Homeschooling READING
      • Elementary Homeschooling MATH
      • Elementary Homeschooling LANGUAGE ARTS
      • Elementary Homeschooling SCIENCE
      • Elementary Homeschooling HOME ECONOMICS
      • Kids Arts and Crafts
    • Middle School Homeschooling
      • Middle School Homeschooling SCIENCE
      • Middle School Homeschooling HOME ECONOMICS
    • Language Arts
    • Math
    • History / Social Studies
    • Geography
    • Foreign Language
    • Field Trips
    • Games
    • Nature Study
  • The Big Picture
    • Life In General
    • Celebrations
    • Faith
      • Into the Light; The Series
    • Giveaways
    • Reviews & Sponsors
  • Photography & Lettering
    • Photography
    • truck lettering
    • vehicle graphics
    • Newborns
    • Kids
    • Engagement
    • High School Senior Pictures
    • High School Senior Pictures Sneak Peeks

Early August Gardens, at Our House.

August 11, 2011 By Laura 6 Comments

00_

Just a quick update on how our gardens have grown. It’s August now.

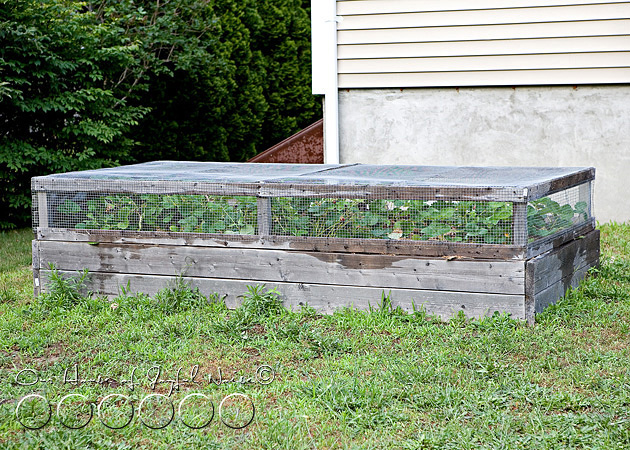
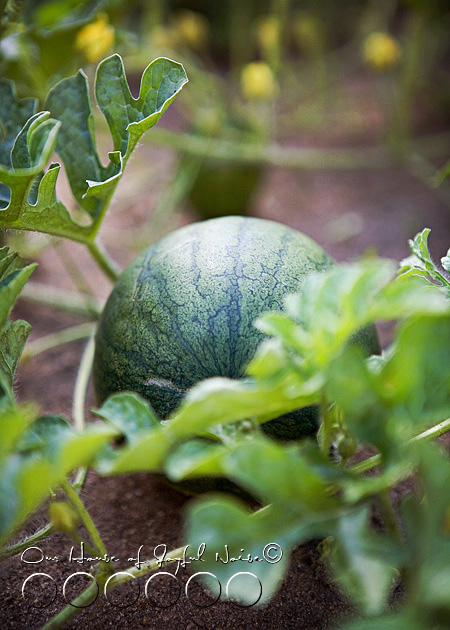
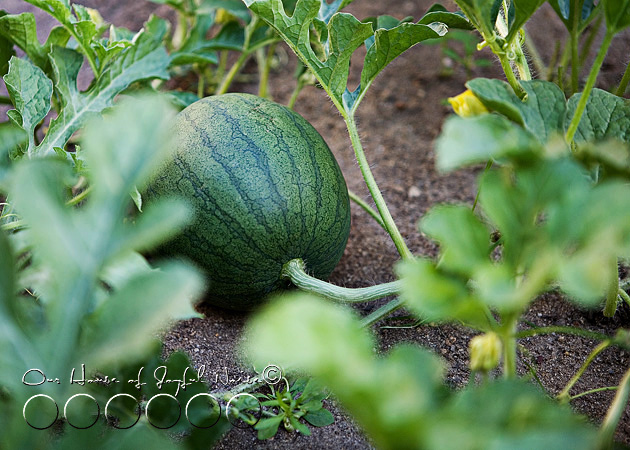
The most exciting recent development, is we finally have some watermelons growing!

001_watermelon-patch 
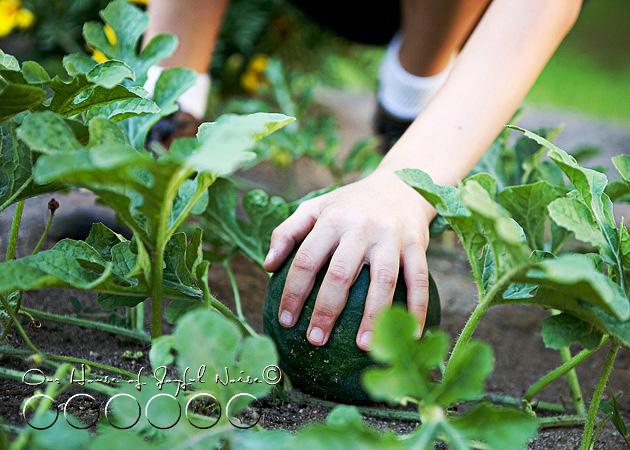
They are still fairly small. I forget what variety we planted, so maybe they won’t get much bigger.

002_watermelon-patch
I need to find the seed packet, and find out, because we’ve got a (passed due) deadline here!


003_watermelon-patch We need to use the ‘Watermelon Patch’ as our ‘Pumpkin Patch’ soon!  If not yesterday.  If you were with us last year, you may recall we planted our pumpkins way too soon.  We had to harvest them by early October, and so we didn’t have any WE grew, by Halloween.  : ( But apparently, it takes 120 days to grow pumpkins!

That leaves us with…..83 days. Oh dear. This year we’re late!

004 
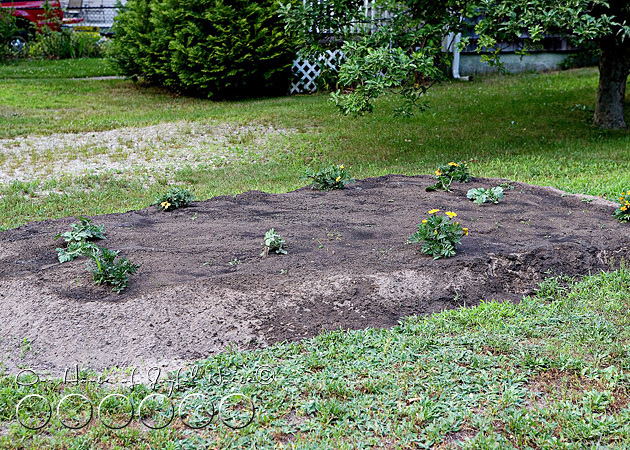
I think we’ll just plant pumpkin seeds tomorrow, right in there with the watermelon vines. There’s room!

005 
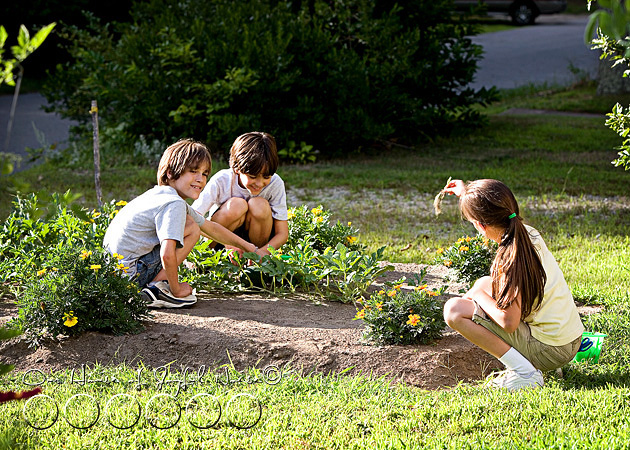
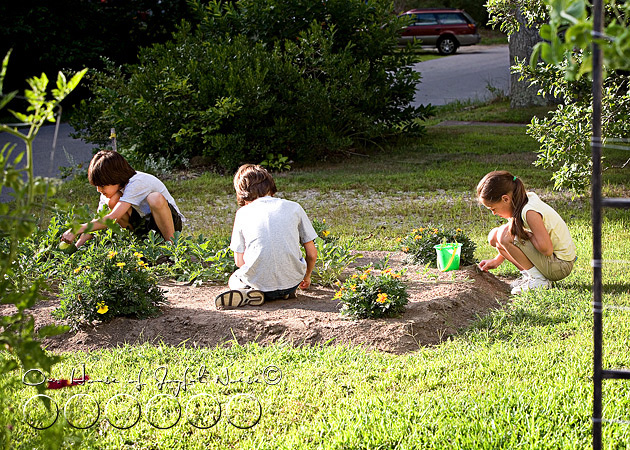
Are we blessed, with kids who LOVE to weed, or what?

I can answer that.

“Yes we are!”

006_cherry-tomatoes-on-vine 
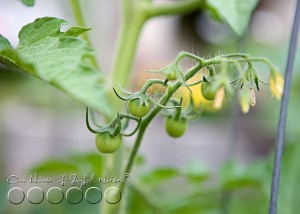
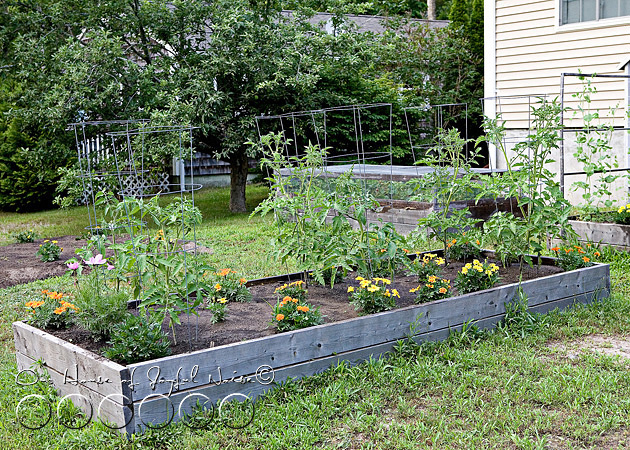
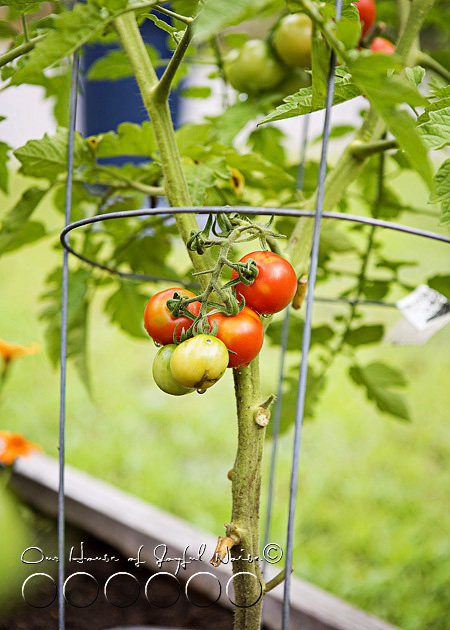
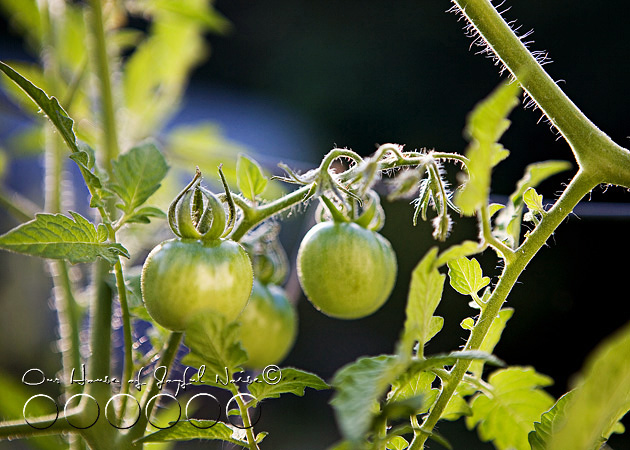
Cherry Tomatoes, on the vine.

(The bigger kind.)

007_cherry-tomatoes-on-vine 
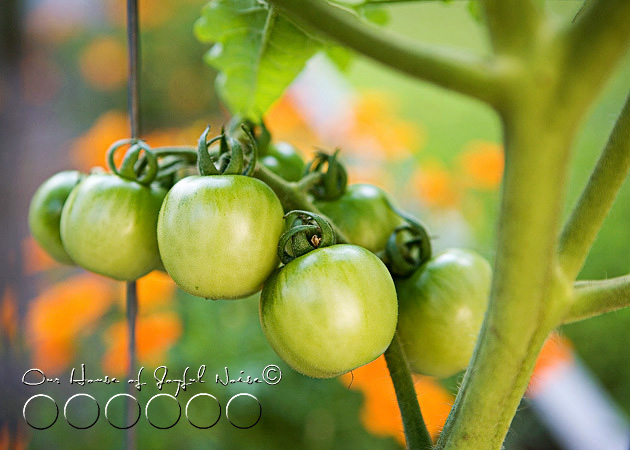
More Cherry Tomatoes.

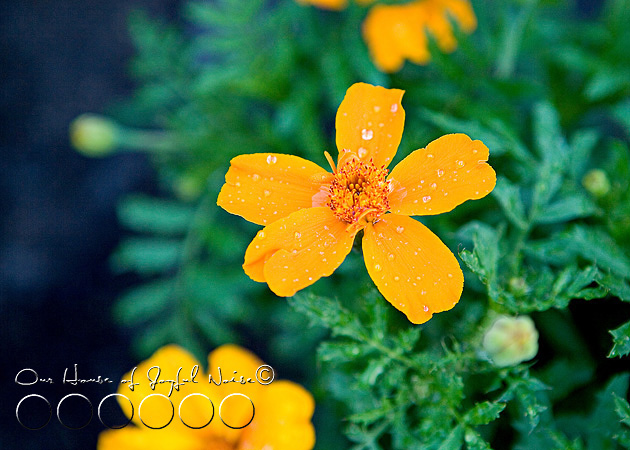
And some other varieties too….

008_cherry-tomatoes-on-vine

009_tomatoes-on-vine

010_cherry-tomatoes-gardening

011_tomato-gardening
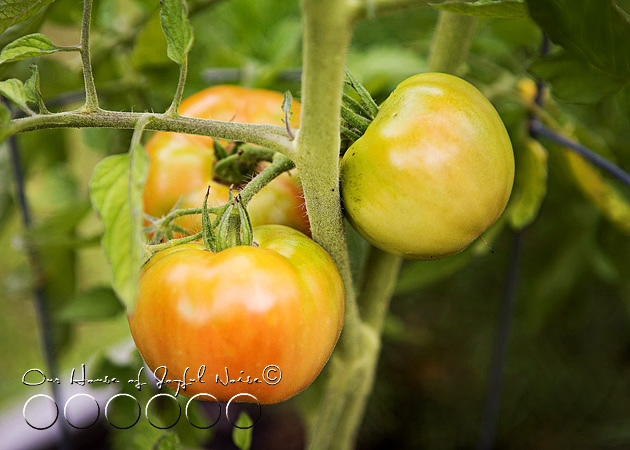
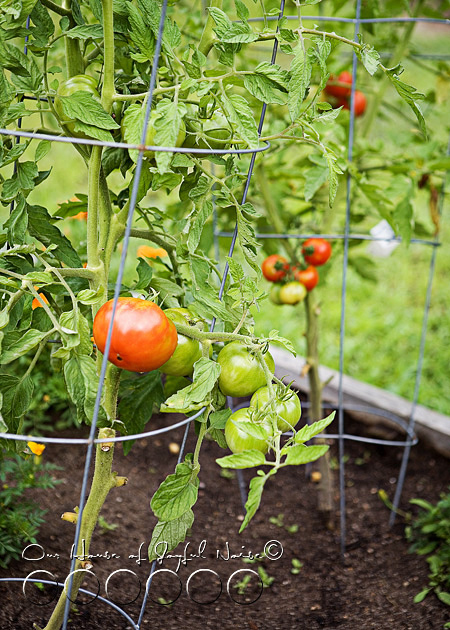
Soon, we’ll have Tomatoes to eat every day.  (LOVE tomato sandwiches.)  
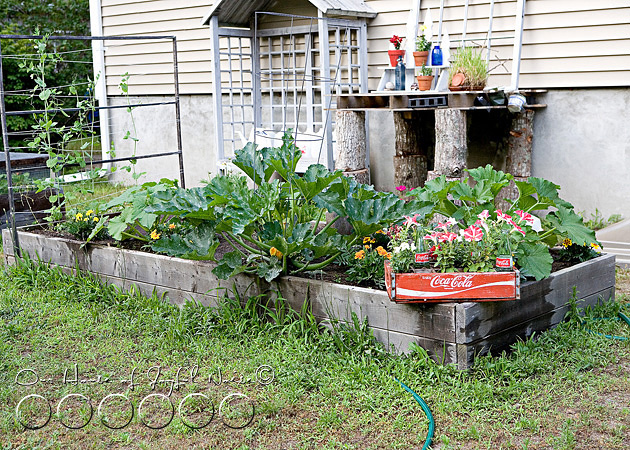
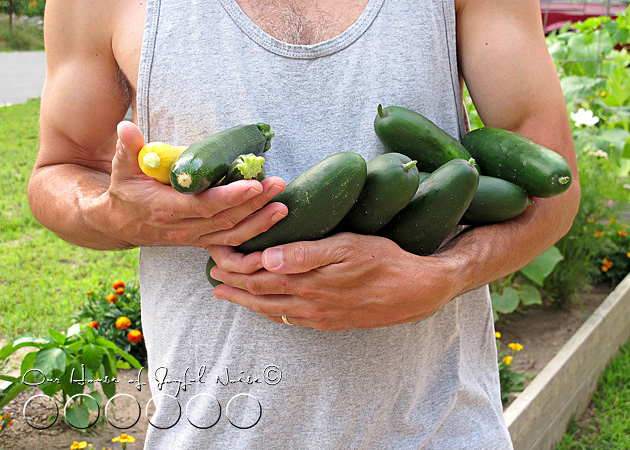
Right now, we are eating Cucumber spears every day, and we love it!! The kids eat tons.   The kids dip in Ranch Dressing. I like just Salt & Pepper.


012_green-bell-pepper-plant
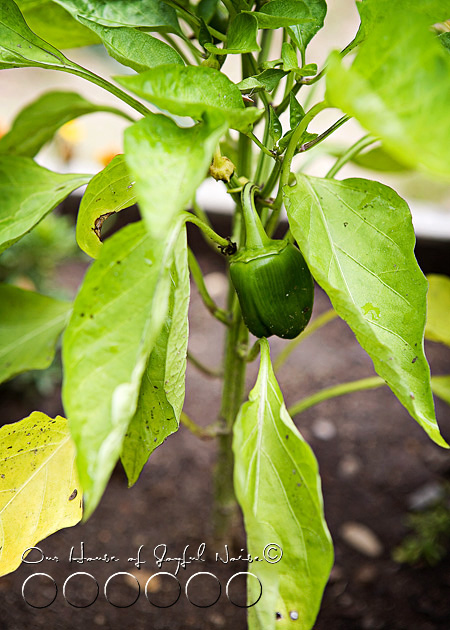
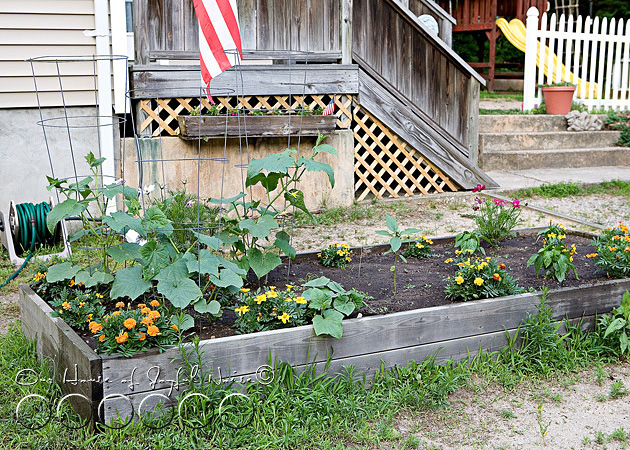
We’ve got just a few Green Bell Peppers growing.  My mother-in-law was right. We should had started earlier, when we started with seed in the house.

Always learning as we grow.

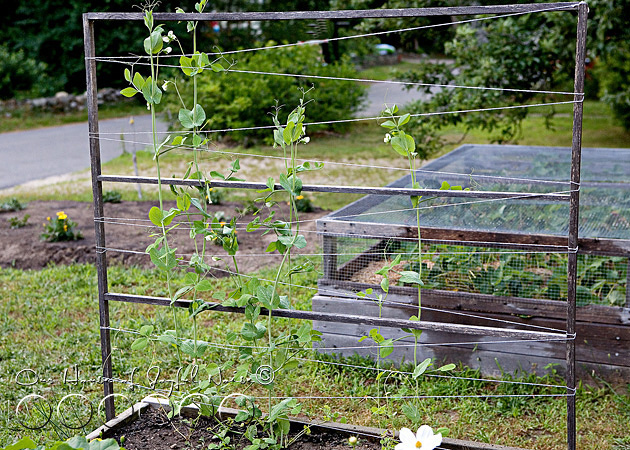
Oh my favorite this year….

013_sugar-snap-pea-trellis
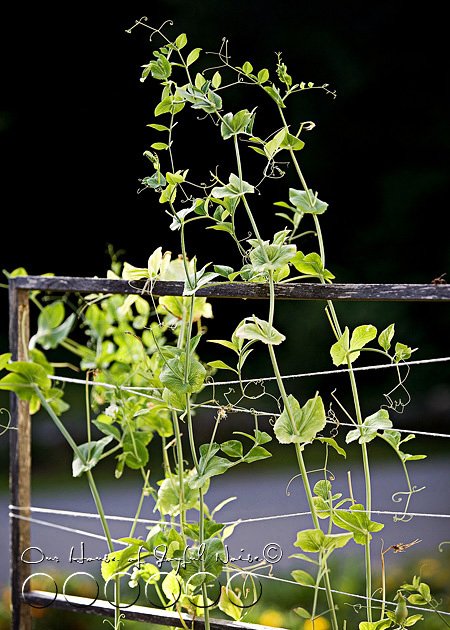
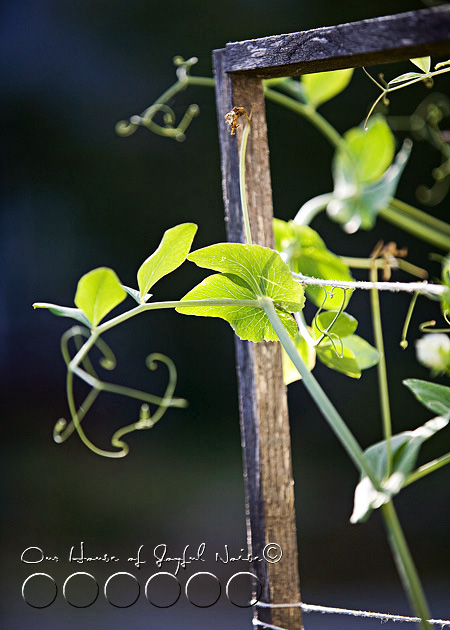
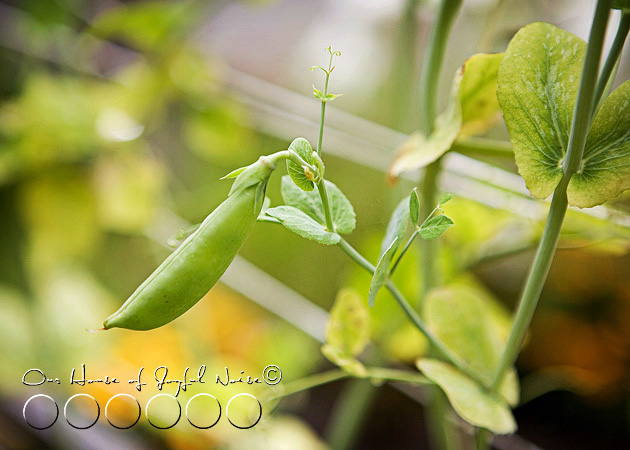
Our Sugar Snap Peas.

I just love even the SIGHT of them, growing up our trellis and twine.

  014_sugar-snap-peas

015_fresh-sugar-snap-pea It doesn’t seem we got as many as we should have?

016_sugar-snap-pea
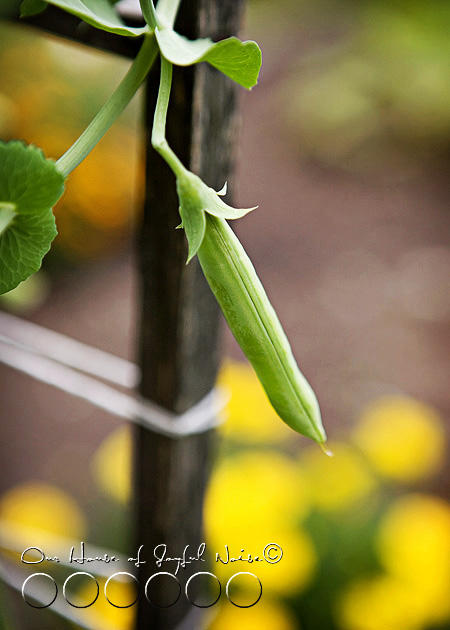
But maybe that is because we can’t stop eating them!  Never enough.

Can you believe we have not gotten as far as to even COOK some yet? They are simply sweet, crunchy, divine, and addicting, raw and right off the vines.

017_sugar-snap-pea-flower
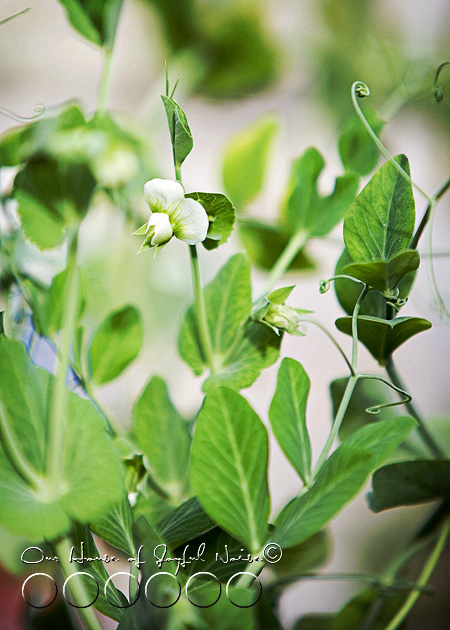
I love the sweet little flowers they put off, too.


018_hornet-on-wood1 
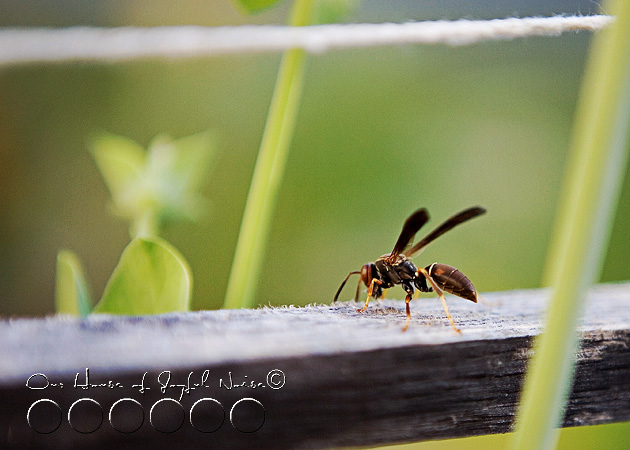
There are constantly wasps collecting wood grain, to make nests somewhere.  I’ve come not mind them around.  It’s actually interesting to watch them work.  So far, I still have a trellis so, it’s fine.


019_sunflowers
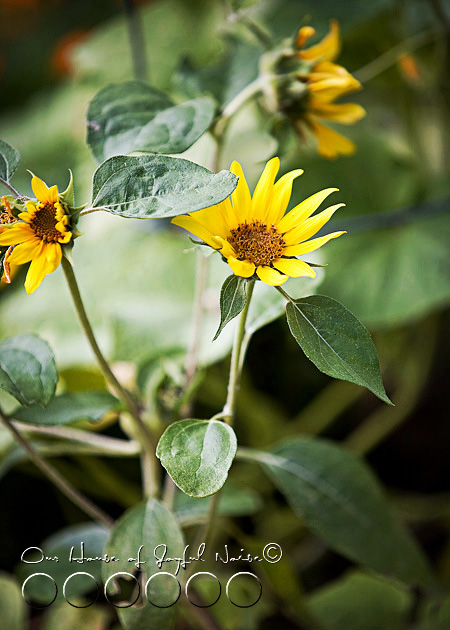
Lastly, we have some sunflowers, that the kids began to grow inside, and replanted in the gardens.  They make me smile.

And so do your visits here to our blog.  Thank you coming by. How are your gardens/flowers fairing?  Please take a moment to say hi, and invite us over to your place, if you’d like.  Most think we’re pleasant enough folks. : )


Save

Save

Filed Under: Gardening, Photography, The Homestead Tagged With: garden-bed, Gardening, gardens-in-August, gardens-in-early-August, green-bell-peppers, New-England-gardening, pumpkin patch, pumpkins, sugar-snap-peas, sunflowers, tomatoes, triplets, triplets-gardening, wasp, watermelon-patch, watermelons

Decorative Wall Initials | Craft Tutorial

August 8, 2011 By Laura 10 Comments

decorative-wall-art-initial-modge-podge-10

Every time I’ve gone to Michael’s Arts and Crafts, I’ve looked at these large white initials / letters you can purchase individually.  I knew I wanted to create something using these letters as personalization, for {O}’s room. But I was undecided if I wanted to do her whole name, or just her initial.

decorative-wall-art-initial-modge-podge

The letters have a nice flat white surface to work on.  But what to do on that surface, was another matter I was undecided on.  Those were the questions that kept me from purchasing any for while.  Finally, I decided just her initial would be cute, as we actually do call her “O” half the time.

To decorate the letter (or letters), I initially (no pun intended ; ), thought I’d probably paint a pattern. But then I took to the idea of picking out some cute scrap booking paper, and Modge Podging the surface.  Not a new concept by any means, but I wasn’t looking for a new invention.


decorative-wall-art-initial-modge-podge-1

I love working with Modge Podge.  There are so many varieties, but I knew the Matte finish, which I had on hand, was all I needed, as a glue and also a top finish.


decorative-wall-art-initial-modge-podge-2

We had had a family trip to Michael’s one evening, so {A} could spend her Gift Card she got from her Grandmother for her birthday.  In case you are wondering, {A} knew exactly what she wanted, as she had been wanting it for a long time:  a wood burning kit.  She’s been having fun with that, practicing, and getting ready to do a project. So while we were there at our favorite local craft store, I thought it would be nice to let {O} pick out the scrap booking paper to use, to finish to the initial for her room.

We chose 2, because I had the idea that we could finish both sides of the “O”, and make it reversible!  Naturally, you can’t do that with every letter of the alphabet, but it works for “O”.

decorative-wall-art-initial-modge-podge-3
The back side of the letter does have a hanger hole, and stickers, which were way too difficult to get off.  So I left them. The scrap paper is thick enough that I knew they wouldn’t show through. So my plan was to just paper and Modge Podge right over the hole and stickers.


decorative-wall-art-initial-modge-podge-4

I started by putting a good layer of Modge Podge on the front surface of the letter.

decorative-wall-art-initial-modge-podge-5

Then, I took my letter, and the apple green sheet of scrap booking paper, over to a window.  Placing the paper onto the window, with the backside facing me, I strategically placed the Modge Podged side of the letter, onto the paper.  The reason I did this at the window, was to be able to see the pattern on the other side of the paper, and get as many little blue birds onto the letter as I could, and not cut many or any in half, if possible.  The blue birds were the charm of the pattern to me, so I wanted them to be as much a part of the piece as possible.

decorative-wall-art-initial-modge-podge-6 I took the letter now stuck to the paper, back to the table, and on a self-healing mat, trimmed off the excess paper with an x-acto knife.  Please excuse my mother’s hands. ; )


decorative-wall-art-initial-modge-podge-7 Once the apple green paper was all trimmed to size, and rubbed down good,  I repeated the whole process for the opposite side:

1) Modge Podge the white surface of the letter 2) Bring the scrapping paper and the Modge Podged letter over to the window, and place the paper onto the window with the back side facing you 3) *Strategically place the letter onto the paper, considering the placement of the paper.  4) Trim off excess paper with an x-acto.

*Using striped paper, is even trickier! It’s a tad more difficult, with a rounded letter such as this, to place the letter in such a way to be sure that the stripes will be straight.  Of course the striped pattern could go horizontally, or even diagonally. With a letter with a straight edge, it is easier to line up with the stripes and get it straight.  If this is more than you’d want to bother with, be sure you choose paper that is a more random sort of pattern. Or, to be super safe, you could use solid paper, if that’s not too boring for you.


decorative-wall-art-initial-modge-podge-8 Once all of the paper is trimmed, Modge Podge the surfaces as a protective coating and finish. Allow one side to dry completely, before doing the other.   Then I sanded the edges, just to rough it up just a little.

I was undecided, it it really looked finished. I’m still not sure! I’d love your opinion, once you see it hanging.

Now, since I made this a reversible/2 sided letter, covering the hanger hole on the back side, I hung the letter with a coordinating satin ribbon. It took a little patience, to double tie the bows, and have them come out nice, so that the weight of the letter did not untie the bows!  With a few deep breathes, I managed.

decorative-wall-art-initial-modge-podge-9

decorative-wall-art-initial-modge-podge-11
Here it is, hung on {O}’s bedroom door.  The plan was actually to hang it inside her bedroom, but there was not adequate light in there (later in the afternoon) when I wanted to photograph it. So I hung it on her door. It may or may not stay there.

As a side note, Michael made this latch door, as he is (still in the process of) making all of the doors in the whole house. I-love-these-doors!  They will actually be a little distressed and made to look older, later on when they are all done, for a more old farmhouse look.

decorative-wall-art-initial-modge-podge-12
{O} loves that she can flip her letter over any time she wants, and change the look of it, “depending on what mood I’m in that day”, as she put it.


decorative-wall-art-initial-modge-podge-13

Here’s a closer look.  I like it, but I am still wondering:  Does it need some sort of trim? Or should I paint the inside edge of the letter, a color that coordinated both sides? Or is it cute as is?


decorative-wall-art-initial-modge-podge-14
Give me your opinion. This craft may or may not be officially complete.  Either way, I think it’s a quick & easy craft, and adds a little cute personalization to a room. Imagine the creative ways you could make a decorative letter.  Maybe using 3d elements, painting, or hanging with different materials like thin rope, twine, lace…the possibilities are endless.  I’m already thinking of the boys room.

See, we’ve been working on finishing and decorating our home for years. I have SO much to show you, in the near and distant future, as various parts of the kid’s rooms are finished and decorated.  The girl’s each have their own room, and the boys have a BIG room to share.  Very cool features. The kids have very different personalities, and we are creating their rooms in ways to reflect that, and their style. Such a fun process! We are so blessed with Michael’s carpentry skills too, and we ladies know how much fun interior decorating is!  (As money allows, which is why it’s taken us this long as it is.) So I hope you’ll follow us along through our home finishing journey.

But back to the “O”.  Done or not? And have you resubscribed, as you need to, and put yourself in the running for our current GiveAway?


Save

Filed Under: Crafts & Creations, DIY (Do-It-Yourself) Project Tagged With: craft-tutorial, crafting, crafts, decorative-letters, kids-bedroom-decor-ideas, Modge-Podge-crafts, modge-podge-projects, room-personalization, uses-for-scrapbook-paper

{A} is 14 / A Belated Birthday Photo Post

July 31, 2011 By Laura 10 Comments

004_birthday_pancakes-300x214
July always seems to get away from me!  I am having deja-vu, about blogging our oldest daughter’s birthday last year, quite after the facts.  But, it’s alright really, because these types of family-related blog posts I generally just put together for the sake of our own recorded family history, and if anyone else is interested, so be it.  So in brief, here is a glimpse into our day celebrating our oldest child’s birthday.

Her birthday is the 5th, and with the 4th making for a long weekend this year, we had an extra-extra long weekend.  All of the typical 4th of July celebrations & activities, and then her birthday too.

001

002

003

Our family’s tradition is to take birthdays as a family day, free of work or schooling. But one of {A}’s  wishes for her day this year, was to go to work with her Dad, at his morning part-time job at a local church.  He truly enjoys his work there, and the setting is in a real wooded area, making for lots of wild critter stories to tell, when he comes home. So naturally, that is very appealing to her as well, if you know her. ; )


004_birthday_pancakes  When they got home around noon, I had ready or usual birthday morning tradition: birthday number pancakes. That is usually Michael’s specialty, but since he was not home, I managed.  Did you notice the flower and butterfly, made of butter? And the “bee-line’ from the flower to the butterfly, with syrup. : )


005 Oh, don’t feel bad for her.  She ate several more pancakes, after her 14 was gone.


006 {JM} made this as a surprise at her place setting. And as usual, I was impressed.

{A} loved it too.

A few other surprises:

007

Football cards, from {JM, O and S}.  They were pretty excited to have gotten these for her with their own money, because she collects them. (Along with other collections she has going.)

008

009

010_homeskoolie-t-shirts 011-homeskoolie-t-shirts

A couple of cool t-shirts she wanted.

012

A package from Grandma. She got a purse, a cool pendant, and a gift card to Michael’s Arts & Crafts.  We also got her a gift card, to Borders Bookstore.  There are a slew of books there she wants badly, and ‘to keep’.


013

As a family activity, she wanted to go to the movies, to see Mr. Popper’s Penguin’s, with Jim Carey.  It was a welcome idea, with the extreme heat and humidity that day! Now, I’m really particular as a parent, as to what movies/television my kids see, but after looking into it, I decided this movie would be fine, and it was.  It was more than fine. (However, I was really glad with the decision, to keep them out of the theatreer until the previews were over!  That’s another story.).  But I have to say, this movie we saw was excellent. We all really, really enjoyed it.

Tacos was her dinner of choice, and then, before it got too dark out, we released our 5 butterflies we hatched.

Then of course, we sang, and had cake.

{A} has had a busier summer than she has ever had, with a temporary summer job, teaching 4th grade CCD for a couple of weeks, sports clinics to gear up for another year of sports (now high school), some schooling on the side, prepping for another new school year ahead, and just some sheer fun & relaxation hanging out with friends. We were happy to take this family day, to celebrate her and her life, and give thanks to God for the blessing she is.

Thanks for coming by.


Save

Save

Filed Under: Celebrations, Faith/ Catholic, The Big Picture, Traditions Tagged With: birthday breakfast, birthdays, Catholic-blog, Catholic-families, celebrations, family, triplets

The Metamorphosis of Butterflies – Photos, Our Experiment & Study | Homeschooling

July 27, 2011 By Laura 2 Comments

metamorphosis-butterflies-study-homeschoolig-10

Hatching butterflies is probably a pretty standard experiment and  study for students, in both formal and home school educations alike.  It’s one that can be used as a Science participation lesson more than once in the course of ones education, because the benefits of the lesson are different for various ages.

For very young students, such as toddlers-K, it’s a really fun & exciting process to watch every day. At this age, they are full of both intelligent, and sometimes humorous, questions.  They are able to grasp the basic understanding of the stages.  Some little ones may rather non-nonchalantly accept the transformation from a caterpillar to a butterfly, simply as magic, in a way.

Older students comprehend the cycle and the information of the lesson at hand, on a bit of deeper level. Their more mature experiences of curiosity and intake of the study of nature and Creation, throughout their ages of years, has led them to a wiser perspective.  They are more fascinated than ever, by the works of God, and the magnitude of His power.  They may also more readily make observations, younger ones may not pick up on, such as happened in our family, that I’ll tell you about shortly, further into this post.

metamorphosis-butterflies-study-homeschoolig

Our study was of the butterfly species, the Painted Lady.  We purchased what we needed at a lovely nearby place called The Butterfly Garden Boutique, in Bourne, MA.  The owner was very friendly, helpful and informative, and supplied us with live caterpillars in a container with their food, and a small net pavilion. (Larger pavilions are available as well.).

metamorphosis-butterflies-study-homeschoolig-1 We had 5 live caterpillars, and it wasn’t a day or 2 after getting them home, did a couple begin to make their way to the top of the container. Inside the lid of the container provided, is a fabric like piece of material, for the caterpillars to attach themselves to for their transformation process.  We learned they do this, by dispensing a thread from a hole beneath their mouths.

metamorphosis-butterflies-study-homeschoolig-2

By the following day, the rest followed.

metamorphosis-butterflies-study-homeschoolig-3

Once each of the 5 were hanging, the transformation begins rapidly.  They first shed their skin, revealing a the green casing that is their chrysalis.

metamorphosis-butterflies-study-homeschoolig-4

Once we had 5 chrysalises attached to the material, we carefully took off the lid of the container, and pinned the material to the inside of our pavilion near the bottom, as instructed.

metamorphosis-butterflies-study-homeschoolig-5

Here is a closer look.  It was evident which chrysalises attached first, and which were more recently formed.  It was absolutely fascinating to learn, that the inside of the chrysalises in this pupa stage, the caterpillar is turning into a complete liquid form, before forming into a butterfly.  In this photo, you can see the the patterns of butterflies, through the somewhat transparent casing.

metamorphosis-butterflies-study-homeschoolig-6

As a reference of sizes, this is our small tent-like pavilion, and you obviously can see the chrysalises pinned to the back bottom.  The door is only unzipped and open for the sake of this photo.  Throughout the entire study, the pavilion resided here on the shelving table-top, between our school room and kitchen.  The kids were allowed to look anytime, but not touch the tent, as to not disturb the chrysalises.  Of course, I carefully did open the door now and then, to take photos.

Some mornings later, there was all kinds of excitement in the house…..

metamorphosis-butterflies-study-homeschoolig-7

Michael got up (very) early for his morning church job, and discovered a butterfly had emerged sometime during the night!  He woke the little ones up to show them, and soon they were running through the house to spread the word.  To {A} and Mama. Darn! We missed it.

Right above the butterfly, you can see the empty casing the butterfly emerged from.

metamorphosis-butterflies-study-homeschoolig-8

Those who observe butterfly hatching for the first time, may be surprised to learn that the hatching process is somewhat of a messy business! The red staining you see, almost appears to be blood, but it is actually just the leftover liquid excreted from the formation of the butterfly, through the pupa stage. In other words, waste.

Just as mentioned before, it is even more noticeable now, which butterflies are likely to hatch next. Can you guess?  It would be the darkest one.

metamorphosis-butterflies-study-homeschoolig-9
Our first hatched butterfly of the 5.

As unfortunate luck would have it, we unbelievably missed the actual emerging of every butterfly from it’s casing!  Seriously. The 2nd one came out while we were not aware, because we were busy doing a math lesson.  2 others emerged while we were sleeping, once again. And the 5th was while we were not home.  So you know what this means! We need to do this again!

At the beginning of this post, I was talking about the benefits and differences of children doing a butterfly metamorphosis study.  Our oldest, {A}, hatched butterflies twice, consecutively, when she was very little, and an only child. This time, being much older and wiser teenager, was a whole different experience for her, such as the following occurrence:

It was fairly late at night, and the little ones were in bed, when I was in the kitchen and peeked in at the butterflies, and spontaneously exclaimed, “Oh my!”.  {A}, who was in the kitchen too,  looked in and, without surprise or question, said “Oh yeah, they’ve been doing that like, every night.”  Then gave me some wide eyes and a giggle. Butterflies waste no time, to get mating, once they are emerged!  They only live 2-3 weeks, so they have little time to get pro-creatin’! ; )  Over the course of our study, there was many observations she had had, as the oldest, and more in-depth facts she was aware of. So it’s a continual learning process as the kids grow, and still the fascination of the whole cycle, never wears off. Not even for me!

We decided that the evening of {A}’s 14th birthday, was the perfect time to release our butterflies.  We had had a wonderful family day together, and the time had come, and seemed right.

metamorphosis-butterflies-study-homeschoolig-11

Our gardens seemed to be the perfect place to let them go, as well.  We hoped perhaps they would stick around the garden beds for at least a few days, and do some pollination work for us!  But first, the kids took a few more minutes to just watch their Painted Ladies, and say goodbye.

metamorphosis-butterflies-study-homeschoolig-12
Then they opened the door, to set them free.
One flew out right away!

metamorphosis-butterflies-study-homeschoolig-13
The others needed some encouragement.

metamorphosis-butterflies-study-homeschoolig-14

metamorphosis-butterflies-study-homeschoolig-15

metamorphosis-butterflies-study-homeschoolig-16 Finally, out flew another.  {A} was reaching in to lift one that was determined not to move…


metamorphosis-butterflies-study-homeschoolig-17
….while out flew 2 more.

metamorphosis-butterflies-study-homeschoolig-18
This one seemed quite as hesitant to leave us, just as we have been to let them go.

metamorphosis-butterflies-study-homeschoolig-19

metamorphosis-butterflies-study-homeschoolig-20 Soon, it fluttered off the kid’s hands, to a nearby garden flower.

We really enjoyed this study, and plan to return to The Butterfly Boutique again very soon, to spend some time in their Butterfly House, which is a screen house guests can enter, full of plants, flowers, a water fountain, and you guessed it…..lots of live butterflies! There’s also a Gift Shop, with beautiful butterfly-related jewelry, home decor, and more. And the Hungry Caterpillar Snack Bar! The boutique as a whole is a small but charming and fun place, for kids and adults alike. If you live nearby, or find yourself visiting Cape Cod, The Butterfly Boutique is very near both the Sagamore and Bourne Bridges. Visit their web site to get more information, and their exact location, which is so easy to get to.

As you probably know, butterfly kids can be ordered online as well, such as from here. There is also numerous resources to assist you and your children with educational information and activities.  I have gathered just a couple of links for you today.  For your younger ones, this web site has simple and minimal basic information about the life-cyle of the butterfly.  Here is a print-out as well, to just review, or use as a guide with what to expect, as you are hatching your own butterflies.  For your older children (middle school +),  this link offers more in-depth information about the life of butterflies.

It’s important to remember, that children who have fun learning, will enjoy it and seek to learn more.  Case in point, our children have continued to use the butterfly pavilion, with self-launched studies all on their own.  Following the release of our butterflies, the kids found a HUGE furry, nasty-looking cocoon in our woods, and were excited to see what would emerge! (I was rather scared.  I thought maybe a bear….or one of those seemingly evil hummingbird-moth-things.)  I will share photos of what came of THAT pupa, on our Facebook Page, very soon! So be sure you are following us! At this very moment as I type, that pavilion now holds 11 moths, and 1 large grasshopper, as the kids study them.

The learning never ends, at Our House Of Joyful Noise. Thanks for visiting with us for this post, and please feel welcome to share your own experiences, studies and observations, with butterflies, or any other insects!


Save

Save

Filed Under: Elementary Homeschooling, Elementary Homeschooling SCIENCE, Homeschooling, Middle School Homeschooling, Middle School Homeschooling SCIENCE, Nature Study, Science Tagged With: butterflies, butterfly-hatching, cape-cod-places-to-visit, cape-cod-things-to-do, chrysalid, chrysalis, great-homeschooling-experiments, great-homeschooling-nature-studies, hatching-butterflies, homeschooling, learning, life-cycle-of-a-butterfly, metamorphosis-of-butterflies, Painted-Lady-butterflies, Science, The-Butterfly-Boutique

Garden Peek!> Early Summer 2011

July 20, 2011 By Laura 1 Comment

early-flower-vegetable-garden-photos-12

I believe we’ve been both gardening and blogging, for about 3 years.  Our life is filled with so many various passions, there is more than we are actually able to get to blogging.  I sure try to get it all in though!  But one area that is especially hard to keep you all updated with, is the gardening!  Good gosh. Things grow and change SO fast, by the time I photograph what I want, edit the photos, and start putting a post together (while you know, living my life and doing 1,000 other things in the midst of it all), the post report, explaining the photos I took, don’t seem very current by the time I get to typing it out! But my intent today, is really just to share with you all what we’ve got growing this year.

In that light, after the first photo, the photos in this post were taken in early July. As I type, it is the 20th of July. Still, while reporting with photos is unavoidably a little delayed, we like to try and give you the picture of the process as a whole, even if the photos are a little behind the 8-ball of the gardens in the moment.  I imagine it is all still relate-able for the interested gardeners (or wannabes) reading, and perhaps it opens a door for conversation, as you reflect back on the few weeks prior to your own gardening-status, and the subsequent changes.  So we’re going to roll with this delay-thing we have going on in the gardening blog-shares, and hope you all can too.

early-flower-vegetable-garden-photos

One thing we did differently this year, that we have not done in the past 2 years, is start our vegetable plants from seed!  Our experience with gardening has been that we learn a little more every year.  While we were somewhat successful in growing the plants from seed indoors, to transplant to the garden beds come Memorial Day weekend, I’m not sure our timing was right with everything. (?) For example, our pepper plants started out so tiny in the beds, that I couldn’t imagine them ever producing fruit this season!  But in sharing this with my Mother-in-law when she visited in early June, she mentioned those seeds probably should be planted in February or so.  She and my Father-in-law kept a beautiful yard full of gardens when they lived in this area. In the course of our conversation, I could not even remember the month we actually did start the seeds. But I was sure it was not that early!  The packaging of the seeds did not say, that I could tell, how long prior to replanting, that the seeds should be started. It only seemed to say how many weeks before they should bare their first fruits. So….I was winging it all. All of the seeds did sprout, grow plants, and were transplantable. In fact,  some grew too tall to keep the clear cover on, for the greenhouse effect.  What to do about that? And as I said, maybe different seeds should have started at different times. But when, for each variety, is my question. So, more researching to be done, and more lessons to be learned.  But as I have said all along, the learning as we go is half the fun!  Next year , also, I’ll keep a record of when the seeds were put in the soil. At least write the date on the containers!

Here is just a couple of other small points to note:  1)  As a reference, these photos were taken in early July. Things have grown and changed a lot since then.  So we plan to update you soon, but a little after the facts of course. : )  2) Please pay no mind to the very patchy crabgrass, in our sand-dirt, that needed mowing badly. It was done that evening.  But I am working on not procrastinating photos or a post, due to a likely irrelevant detail, so don’t call me out on that, or I may have a relapse with my self-therapy. ; )  Alrighty?

early-flower-vegetable-garden-photos-1

Here in Bed #1 we have little pepper plants on the far right, behind the Marigolds.There is Green Peppers, and Jalapenos.  Aside from the Marigolds, we also have Cosmos, and a sweet single Sunflower that {O} grew.  I plant the Marigolds and Cosmos in ever bed, to attract bees and butterflies, for assistance in pollination. But also, because I love bees and butterflies.  : )   On the far left, we have Cucumbers growing.


early-flower-vegetable-garden-photos-2

In Bed #2, we are growing Yellow Summer Squash and Zucchini.  We were adamant about the squash varieties growing in another bed this summer, after last year’s devastation!  Some of you may recall the sudden and devastating death of our squash bed last year, and eventual discovery of the culprit!  More on our remedy for this in just a bit.  But also in this garden bed is something new we are trying to grow Sugar Snap Peas! We had no idea what we were doing there at first, but I researched it and learned quickly. They started out ‘thin’, in my Mother-in-law’s word. That was her nice way of saying ‘puny’ I think. Made me giggle. But they are looking GOOD now. A closer look on that in just a minute as well. All else we have here, is the Marigolds, Cosmos, and still sitting there is our now-virtually-famous Coke Bottle Box and Candy-Cane Striped Petunias. There’s also a few Snap Dragon in that box.

early-flower-vegetable-garden-photos-3 Promising buds of  squash.

early-flower-vegetable-garden-photos-4

early-flower-vegetable-garden-photos-5 Squash Flowers.  No, we have not prepared them as a recipe in any way yet. Fried? Stuffed? It just sounds strange to me.  We’ll see who can convince me.

early-flower-vegetable-garden-photos-6 We were pretty excited to see these 2 pods!  I have fond memories of picking & gobbling peas in my aunt’s garden, when I was little.  I want our kids to be able to do the same.

early-flower-vegetable-garden-photos-7

So as I implied earlier, I wasn’t sure starting out, how we would do producing Sugar Snap Peas this first year. But regardless, I have loved watching them climb our wooden frame, and zig-zagging twine.  The hornets are ‘having at’ that wood frame, by the way.  I’ve found myself watching & studying their activity intently, both fascinated & irked at the same time.  I hope the frame holds up through the season anyway. It’s easy enough for Michael to whip another one up next year.  As an update, the peas are doing wonderfully, and I’ll show you more on that next garden post.

early-flower-vegetable-garden-photos-8 Garden #3 is the Strawberry Bed.

You are welcome to check out the post prior to this one, for lots of photos and chat on our Strawberries this year.

early-flower-vegetable-garden-photos-9 Another new learning experiment this year.  Since last year we learned that we planted our Pumpkin Patch too soon, this year we thought we’d try using the bed as a Watermelon Patch first!  The kids planted the seeds into this bed themselves. You can hardly see them well in this early photo, but let me point them out among the Marigold plants.  The Watermelon plants are in the upper far left, the one in the middle-ish, and far center-right.  There were just a couple others that the squirrels pulled out, before we got to spraying a Deer-Off border.  So I planted a row of 6 new Watermelon seeds in the soil vertically on the far right side. Updated photos of the plants will be coming up too.  We’re not sure if we’ll actually get Watermelons this year either, as my Mother-In-Law said those should have been planted earlier too.  But the plants are spreading like mad now, and I did catch a glimpse of a flower. So there’s a small chance we’ll get at least 1 melon. Heyyyy, we can split it!

early-flower-vegetable-garden-photos-10 Lastly, in Bed #4 we have 4 Varieties of Tomatoes:  Cherry, Early Girl, Big Boy & Beefsteak.

This is the bed that was our Squash Bed last year! First, we screened all of the soil, looking for any Vine Borers that were hibernated down into the soil, pupating, after the devastation they do in the year prior, waiting to reak new havoc again this year!  We learned that’s what they tend to do!  We didn’t really seem to find any, but we used a new bed for the squash this year just in case.  Besides, we try to rotate the beds every year or 2, so the soil is not depleted of any nutrients from one particular plant variety.

early-flower-vegetable-garden-photos-11 Some Cherry Tomatoes on the vine.

early-flower-vegetable-garden-photos-13 Marigolds.

early-flower-vegetable-garden-photos-14 Cosmos.

And lastly, a quick look at how our Mailbox Garden Tub has filled in….

early-flower-vegetable-garden-photos-15 I love how the Calibrachoa spill over.

early-flower-vegetable-garden-photos-16 And I have always loved Snap Dragons.

early-flower-vegetable-garden-photos-17 THIS, is not a photo from early July, but a more recent photo after some picking, last weekend. We have been enjoying Yellow Summer Squash, Zucchini, and Cucumbers, so far.

And that my friends, is your Late Garden Report!  Stay tuned for more Late Reporting, right here in the The Homestead ~Home & Gardens section, of Our House Of Joyful Noise.  Meanwhile, I’m open to some sharing and garden chat in the comments!


Save

Save

Save

Save

Filed Under: Gardening, Photography, The Homestead Tagged With: cosmos, cucumbers, early-gardening-season, flower photography, flower photos, garden beds, garden photography, garden photos, Gardening, gardens, green peppers, jalapenos, peppers, snapdragons, squash, strawberries, sugar-snap-peas, vegetable-plants, watermelon-patch, yellow-summer, zucchini

  • « Previous Page
  • 1
  • …
  • 33
  • 34
  • 35
  • 36
  • 37
  • …
  • 101
  • Next Page »

We are wicked happy to have you here! We hope you find much inspiration, help, humor and enjoyment here.


Archives


POPULAR POSTS

* * * * * *

SUBSCRIBE to House of Joyful Noise blog! Every new post, delivered right to your email box!


Privacy Policy

Amazon Affiliates

Never at any additional cost to you, we may earn a small commission for our endorsement, recommendation, testimonial, and/or link to any products from our website. Your purchase through our links helps support our family, while sharing with you the products we authentically use and recommend, for various ideas, and letting you know where you can purchase them. Thank you for your support!

[footer_backtotop]

Copyright © 2025 HouseOfJoyfulNoise.com · Genesis Framework by StudioPress