• HOME
  • {A}’s Chipmunk Training Archives

 Homepage

  • The Homestead
    • Home Projects
    • Home Improvement
    • Home Decor
      • Seasonal Home decor
        • FALL Home Decor
        • WINTER Home Decor
        • SPRING Crafts and Creations
        • SUMMER Crafts and Creations
    • Our Chickens
    • Gardening
    • Organization
    • Re-Purposing
    • Furniture Refinishing
    • Budget
  • Crafts & Creations
    • Seasonal Home decor
      • FALL Crafts and Creations
      • WINTER Crafts and Creations
      • SPRING Crafts and Creations
      • SUMMER Crafts and Creations
    • DIY (Do-It-Yourself) Project
    • Kids Arts and Crafts
    • Homemade/Handmade Gift Ideas
    • Holiday Crafts
    • Fan Pulls
    • Free Printable/Downloadable
    • Sewing Projects
    • Giveaways
    • Business Features
  • Recipes/FoodFun
    • Breakfast
    • Lunch
    • Main Dish
    • Sandwiches
    • Appetizers
    • Slow Cooker
    • On The Grill
    • Side Dishes
      • Soups
      • Salads
    • Baking
      • Breads, Rolls and Muffins
    • Snacks
    • Treats
    • Desserts
    • Drinks
  • Homeschooling
    • Elementary Homeschooling
      • Elementary Homeschooling READING
      • Elementary Homeschooling MATH
      • Elementary Homeschooling LANGUAGE ARTS
      • Elementary Homeschooling SCIENCE
      • Elementary Homeschooling HOME ECONOMICS
      • Kids Arts and Crafts
    • Middle School Homeschooling
      • Middle School Homeschooling SCIENCE
      • Middle School Homeschooling HOME ECONOMICS
    • Language Arts
    • Math
    • History / Social Studies
    • Geography
    • Foreign Language
    • Field Trips
    • Games
    • Nature Study
  • The Big Picture
    • Life In General
    • Celebrations
    • Faith
      • Into the Light; The Series
    • Giveaways
    • Reviews & Sponsors
  • Photography & Lettering
    • Photography
    • truck lettering
    • vehicle graphics
    • Newborns
    • Kids
    • Engagement
    • High School Senior Pictures
    • High School Senior Pictures Sneak Peeks

Rustic Makeshift Potting Bench | Gardening Solution

June 15, 2011 By Laura 7 Comments

potting bench

When you need a potting bench, and you don’t have one, you just have to make do. And that’s how this rustic makeshift potting bench came to be.

We’ve been blessed time and time again, with wood to burn in our wood stove through the cold seasons of the year.  Having a cozy fire going in our home, is definitely our preferred source of heat, and we’ve hardly had to invest much in keeping it going.  Oak pallets are dropped and stacked beside our driveway regularly through the winter, by Michael’s supply company, who is always looking to get rid of them.  They burn nice, hot & slow.

potting bench This load of tree wood is from the guy a few houses down, who was clearing off his lot behind his home. He had no need for it, so we took it.  Naturally, I knew we could burn a lot of it. It needs to be split & stacked still, of course, but there’s plenty of time for that.  There was some nice logs in there, and I had another idea for some of it. Explaining what I wanted to Michael, was the biggest trip.  Eventually, I had to just direct him through the process, because he was not getting ‘my visual’ so to speak.


potting bench

What I wanted, was a potting bench put together, using cut logs, and a pallet.   A rustic makeshift table of sorts, near our gardens, to re-pot plants on, work at, or place our fresh picked produce as we went along.

He got the visual, about the time it got done.

potting bench
Of course nothing looks like much of anything, without a little touch of decor pretty. I had a few things I had picked up here and there for next to nothing, that looked perfect on the table top.  Added a few of my smaller potted flowers, and I loved it. Just what I had pictured.  Even Michael loved it.


potting bench The bench has proven handy, indeed.   I use it all of the time.


makeshift-potting-bench-5
Country-ish, charming, and functional.

What’s not to love?

makeshift-potting-bench-6 I know the decor will change and evolve, over and over again. Because it’s just a great place to put the interesting little things we find, on our walks along the seashore, and stuff like that.  That rock you see in the back corner of the shelf, is like a perfect round ball. So cool.


potting bench
So what do YOU think of this set-up? 
We live on a dead-end road, with very few neighbors.

But if you were driving by, would you see it and think….“WHAT the HECK?”

potting bench Because I don’t know….I just love seeing it there.
Call us rednecks.

Maybe because it’s so simple.

makeshift-potting-bench-9
It’s really just the simple little details in life, that make me so happy inside.
Thanks or coming to check it out. Happy Gardening!


Save

Filed Under: Gardening, Home Decor, Re-Purposing, The Homestead Tagged With: diy, Gardening, makeshift-potting-bench-ideas, pallet-projects, pallet-recycling, potting-benches, repurposing

Eyeletted Paper Pennants | Room Decor | Craft Tutorial

June 13, 2011 By Laura 9 Comments

eyeletted-paper-pennants-room-decor-tutorial_0001

Sometimes, my crafts come about in all-backwards-sorts-of-ways. This craft, these pretty eyeletted paper pennants, is one of those.
I love how they came out. And lucky for you, I took photos of the whole process.

eyeletted-paper-pennants-room-decor-tutorial-12

See, I happened to be in one of my favorite crafts stores, Michael’s Arts & Crafts, and saw this pad of 12×12 scrapbooking paper, that was nothing short of stunning to me.

I had to have it.

The hesitation was, that I don’t much scrapbook these days.  I will again, one day, begin scrapping like mad very regularly, and catch up on the many years I am behind on.  But in the moment, it seemed foolish to buy the pad of paper to save, for years.   So I bought it with the promise to me, that I would find something to do with the beautiful papers, right away.

eyeletted-paper-pennants-room-decor-tutorial Are they not ever so lovely?  Please take a real moment, to look at that photo. Because on this particular day, it took a little more patience than I had, to arrange them in that perfect fan, you see.


eyeletted-paper-pennants-room-decor-tutorial-1 It’s The Sasha Paper Collection.

What I decided to do with some of the paper, was make paper pennants, with metal eyelets.  My original and only intention, was just to string them in my daughter(‘)s (plural & possessive, lol) rooms, like bunting. No big project, by any means, in the end. But the project will be expanded, as you’ll soon learn.

Now, I did get the pad of designer paper on sale. But still, I as always, I wanted to get the most ‘bang for my buck’.  So this is how I utilized the space of my paper:

eyeletted-paper-pennants-room-decor-tutorial-13

Remember asking yourself back in school, when in your life, you would ever need to use that math?  There it is, People. I figured it out rather quickly, and rather felt genius-like.  Of course, I’m practicing a lot with my 8 years olds triplets, these days.  ; )

I have good craft plans for the pale yellow scrap pieces, by the way.  So all you tree-huggers can be at ease.
(Nothing wrong with a tree-hugger. I’m just sayin’.)


eyeletted-paper-pennants-room-decor-tutorial-2 Oh how I *love* my Fiskar Trimmer, in times like these!!  Zip, zip!!

eyeletted-paper-pennants-room-decor-tutorial-3

Now because I was going to be putting eyelets through these paper pennants, I thought it wise to perhaps, re-enforce them, to prevent them ripping when pulled for any reason. So I just used some photo mounting stickers, and didn’t remove the the backing.

THEN, I added all of the metal eyelets. Which, you may or may not know, can be all kinds of fun!

Do you all know what metal eyelets are?  This is what they look like….see the corners of the pennants:

eyeletted-paper-pennants-room-decor-tutorial-4

Perfect to attach or strong ribbon.  This ferris wheel of patterns, are the ones my oldest daughter chose, for her room, which is a color I like to call ‘Spring Rain’.  (Because I forget the real name of the paint. lol).

eyeletted-paper-pennants-room-decor-tutorial-5

This wheel of designs my youngest daughter (the middle & only girl triplet) chose for her room, which is a soft pretty pink.


eyeletted-paper-pennants-room-decor-tutorial-6
Here are the tools needed for doing metal eyelets, in case you do not know anything about this technique. (I don’t know why I feel like there will be people who have never heard of this?  So perhaps I am over-explaining to a very crafty-wise crowd….)

eyeletted-paper-pennants-room-decor-tutorial-7 But just in case, I’m going to give you a little more info here.  Above, are the 2 main tools needed: the hole tapper, and the eyelet smasher.  A hammer is involved. <Eyebrows bouncing up and down.> Sounds like fun, huh?

I think it is.  : )


eyeletted-paper-pennants-room-decor-tutorial-8 This is what the eyelets look like, post-smashing.


eyeletted-paper-pennants-room-decor-tutorial-9 I was thinking I might do a little eyelet technique tutorial, step by step with photos, if there is anyone who would like to learn?  Eyelets can be used for a wide variety of crafts, including fabric!  It offers an awesome element to scrap booking and card making as well. Your imagination is the only limit. Let me know in the comments, if a tutorial would tickle your fancy.

I’ll do it for even 1 person.  I’m full of love like that.

I’ll even dedicate the tutorial to you, like a song.  ; )

eyeletted-paper-pennants-room-decor-tutorial-10 I used the same sheer ribbon I always have on hand, to string this paper bunting, and I just hung it across {O}’s Mirror for now.


eyeletted-paper-pennants-room-decor-tutorial-11 {A} chose the pale yellow ribbon.  Pay NO mind to the horrid curtain and window with no trim (in these photos).  She has an amazing room, hand-crafted by hubby, and I can’t wait to show you all sometime soon.

  eyeleted-paper-pennants-room-decor-tutorial_012

So, in closing, I have to tell you….with getting 6 pennants, out of multiple designs chosen out of this pad of paper, and the way I got carried away with my happy-hammer, I ended up with WAY more eye-letted pennants than I ever needed, for my original plan!  I have a horrible guesstimation gauge!  Ask my hubby – I can never figure out the appropriate sized container to store dinner left-overs in!  Either way too big, or way too small….never just right.Ever.

Anyway….the question is:

“WHAT TO DO WITH ALL OF THESE EXTRA EYE-LETTED PENNANTS?”

I have a few brainstorms brewing, but I would LOVE *YOUR* ideas!  It’s quite possible there are many of you who will have amazing ideas, I would never have thought of.  So give them to me!  What would YOU do with them?

*(Love this post? How about subscribing to our blog in the sidebar, ‘Liking’ our Page on Facebook, or following me (Laura) on Twitter? Or all 3? 😀 )


Save

Save

Save

Filed Under: Crafts & Creations, DIY (Do-It-Yourself) Project, Tutorial Tagged With: crafts, eyeletted-paper-pennants, eyeletting-tutorial, paper-pennants-tutorial, pennants, pennants-craft, pretty-pennants, room-decor-pennants

Camp Site Eclair | Getting Creative with Fondant

June 12, 2011 By Laura 22 Comments

fondant-art-fathers-day-dessert-14

I was brainstorming about a good dessert to have for Father’s Day coming up,

when I came up with this idea:  A Camp Site Eclair Dessert.

fondant-art-fathers-day-dessert I know the Daddy in our family, loves camping, fishing, and marshmallows! So this whole dessert was going to make him very happy, because there is a whole lot of marshmallow fondant involved! And as a bonus, there are other surprise treats everywhere!

I decided to make it ahead of time (with a little help from the Daddy in celebration, and our kiddos.)  Thankfully, we can save all of the decorations on top, make the dessert again next week, and redecorate.  Because I wanted to be able to share the idea with you all, our blog readers, in case you’d like to replicate the idea, or let it spark an idea of your own in some way.

So this decorated dessert is the pan variation of No Bake Eclair. You may remember we shared this recipe before, as individual cup servings, that looked like this:

fondant-art-fathers-day-dessert-2 
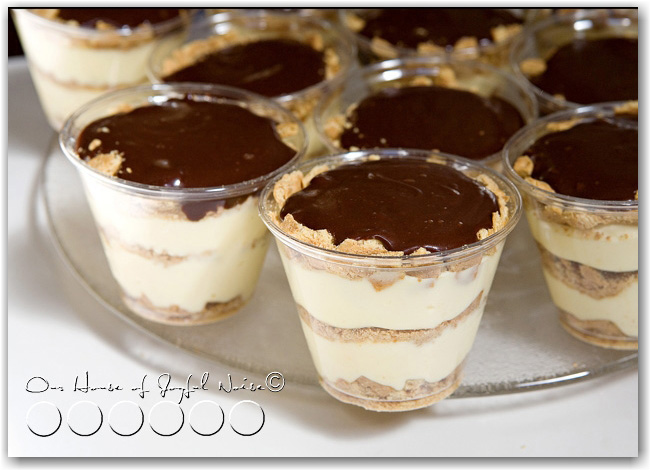
You can find that recipe and directions for the cups version here.

fondant-art-fathers-day-dessert-1 
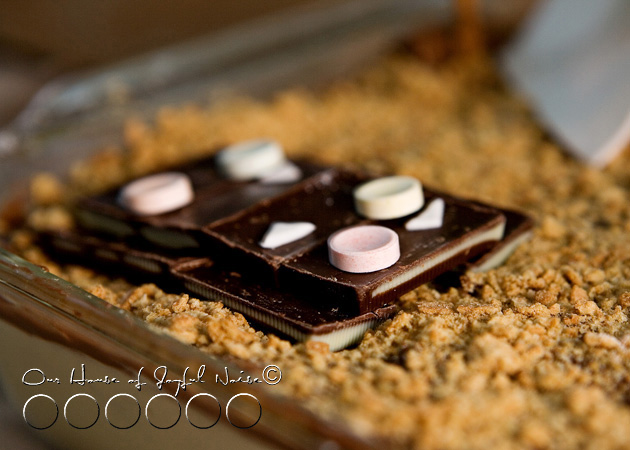
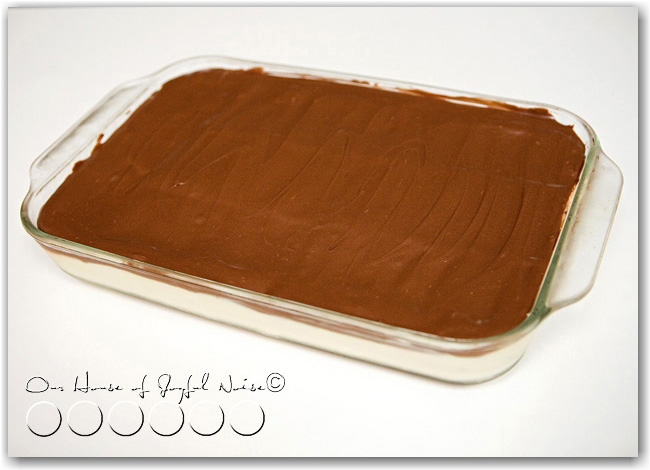
This is what our No Bake Eclair Dessert originally looked like, before covering with crushed

graham cracker, for a nice dirt ground effect, to set the scene for our camp site.  Here is the easy, no-bake

recipe for it. You can whip this part up ridiculously quickly!

::::::

No Bake Eclair

Participating Ingredients:

  • graham crackers
  • 2 boxes instant vanilla pudding
  • 8 oz. cool whip
  • 1 can of chocolate frosting and 2 tbsp. milk
  • 3   1/2  cups of milk

Directions:

Mix the pudding and milk with the blender- let it get a little thick. Add the cool whip in.

Butter a 9X13 in. cake pan. Place WHOLE graham crackers in the bottom of pan. You will need to break some though.

On top of graham crackers add 1/2 of the pudding/cool whip mixture.

Put on another layer of crackers and then the other half of the pudding mixture.

Place last layer of graham crackers on top.

In a separate bowl empty the frosting and add 2 tbsp. of milk. Mix so the frosting is creamy and easy to spread.

Frost the crackers and enjoy!

 ::::::

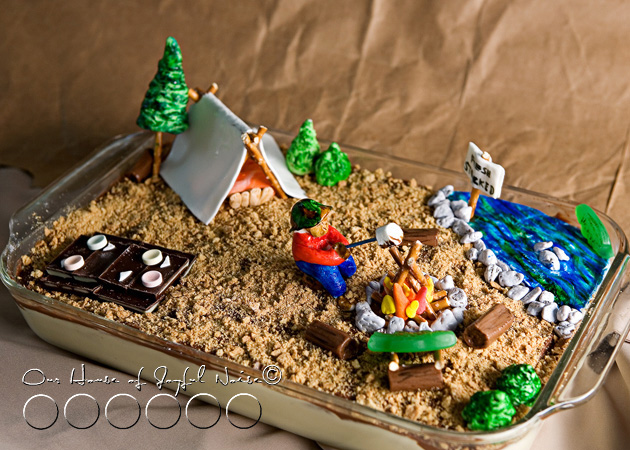
Now to share as much as I can, about how we decorated the pan of No-Bake Eclair:

fondant-art-fathers-day-dessert-5 The ground as I said, is the top frosting layer, covered in lots of very crushed graham cracker.  On top of that, everything is made out of marshmallow fondant, various kinds of candy, and little pretzel sticks.

Now please keep in mind, we are no fondant artists, yet! This is our very first time working with the stuff.  This is actually marshmallow fondant, which is made so easily with mini marshmallows, confectionery sugar, and water.   Then of course, we used some food dye. (Not food coloring, but food dye, used for coloring icing.)  I very easily found 2 videos on making marshmallow fondant, and coloring it, just by Googling. I will put them at the end of this post, for your convenience.

fondant-art-fathers-day-dessert-4 Don’t mind the father’s face, lol.  We really didn’t expect it to show much. It was just quickly smushed together. lol
But we’re not sure we could have done much better, if we tried. LOL

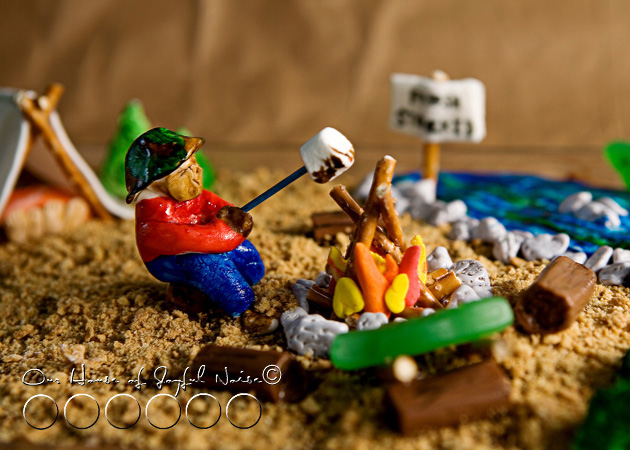
He is completely made of white/uncolored marshmallow fondant, and then painted with food dye and a brush.

fondant-art-fathers-day-dessert-5 The camp fire is made of colored fondant for the flames, pretzel sticks, and chocolate rocks that we found in the cake aisle of Michael’s Arts & crafts.

fondant-art-fathers-day-dessert-6  
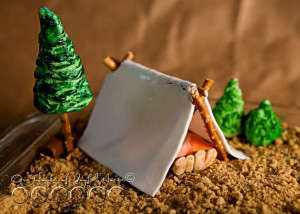
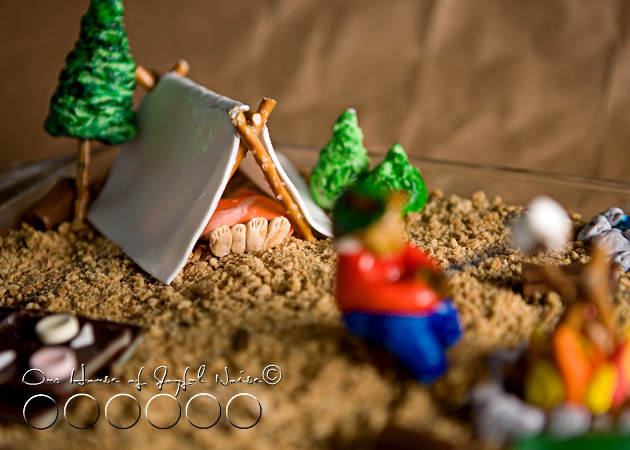
The tent and family feet are also all fondant, and pretzel sticks to hold the tent up.

fondant-art-fathers-day-dessert-7 
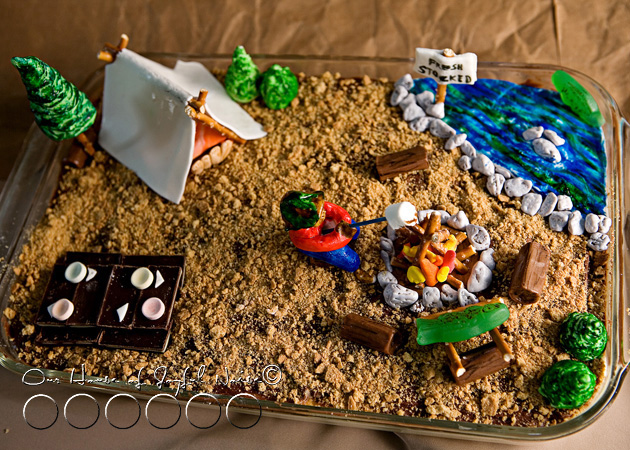
Here’s a helicopter view.

The trees and bushes are green dyed fondant, molded around Hershey Kisses, and then more green dye painted on the trees & bushes, for texture.  The pine tree uses a pretzel for the trunk.

fondant-art-fathers-day-dessert-8  This is a set picnic table.  The table top probably could have been another layer higher.  But the table and bench seats are made of Andes Candies, the plates are Smarties Candies, and the little triangle napkins is plain marshmallow fondant.

fondant-art-fathers-day-dessert-9 
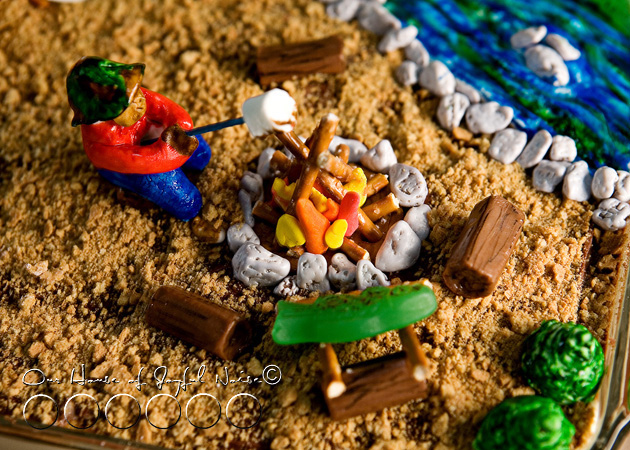
All of the logs you see here and there, are Tooties Rolls, with a little edible black writing pen to show some grooves and bark.

fondant-art-fathers-day-dessert-10 
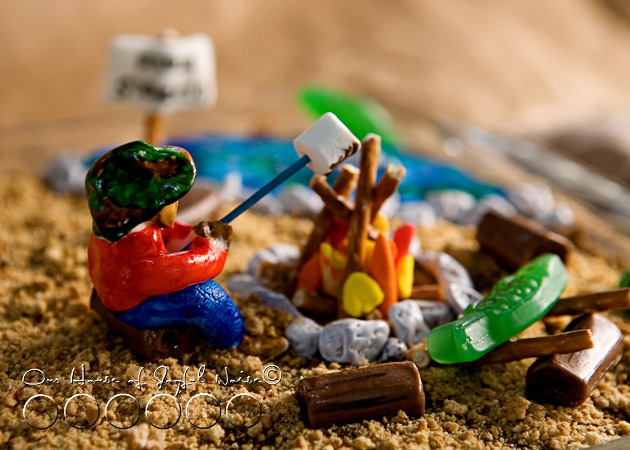
The 2 fish on the scene are Swedish Fish.

The marshmallow on a stick is actually fondant, but we could have just used a mini marshmallow, since we had plenty left from  making the fondant.

fondant-art-fathers-day-dessert-11

fondant-art-fathers-day-dessert-12 The water is plain fondant, painted with blue and green dye.

The sign face is fondant, with a pretzel stick, and more chocolate rocks. (Love those!)

fondant-art-fathers-day-dessert-13  
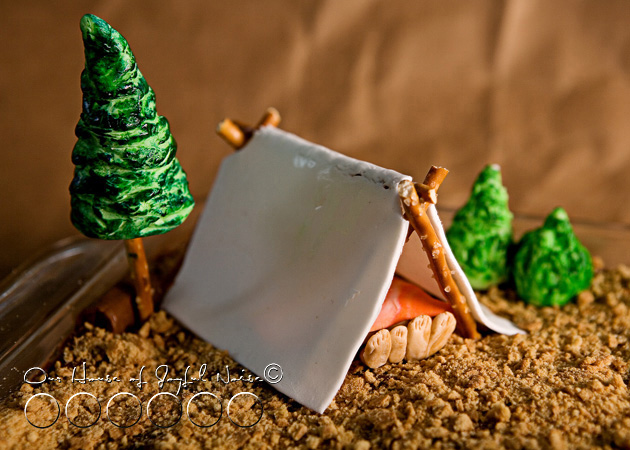
The tent, and the family dirty feet, is my favorite part!

It was so fun to make, and we thought it came out pretty good!!

Between shopping for the goods, and making it all, it was almost a day project, but a fun family one!

We wanted to note too that, while fondant and the colors are all edible, we don’t really eat artificial colors. But it is all SUPER fun to get creative with, as decorations.

Please tell us you are a at least little impressed with our work, even if you aren’t. 😉   Either way, hope you find yourself inspired to play with some fondant, and get creative with food, too!!

::::::

*(Love this post? How about subscribing to our blog in the sidebar, ‘Liking’ our Page on Facebook, or following me (Laura) on Twitter? Or all 3? 😀

Making Marshmallow Fondant

Coloring Fondant


Save

Save

Filed Under: Desserts, Fun Food, Holidays, Recipes, Treats Tagged With: cake decorating, coloring fondant, fathers-day-dessert, fishing-camping-scene-dessert, fondant ideas, fondant-art, getting-creative-with-fondant, marshmallow fondant, no-bake, no-bake-eclair

Chicken Italiano | Slow Cooker Recipe

June 8, 2011 By Laura 6 Comments

chicken-italiano-slow-cooker-recipe

 
As slow cooker meals go, this Chicken Italiano is definitely a family favorite!  We are sharing the complete recipe with you here today, and if it sounds good to you, we’ve got a printable recipe at the end that you can take with you. We are also sharing with you one of our favorite cookbooks, which is an affiliate link.

Chicken Italiano.

It may not be the most colorful meal, but don’t let that deter you from trying it, or you’ll be missing out! It’ll likely become a favorite of your families as well. It is creamy, rich, and so delicious, with the tender flavorful chicken chunks, and a rich cream cheese based sauce with mushrooms.  It’s a perfect slow cooker meal, that is easy to make, and makes the house smell wonderful! All slow cooker meals are fabulous in the colder months. But really, we are happy to make it & eat it year round! It’s that good. Everything we eat in the warmer months, can’t be cold food. Right? There are days year-round, that we need something super easy, super good, and ready at dinner time! So you get it going in the morning, and there is little to do before sitting down to eat.  This is one of those meals, and I got the recipe from one of my favorite slow cooker cookbooks:

fix-it-and-forget-it-cookbook

The Fix-It and Forget-It Cookbook
(*Now Revised and Updated)
(aff)

*The Updated and Revised version is all that is available now, and I have the original. Therefore I cannot guarantee that Chicken Italiano is in this one.
However, I imagine the collection of recipes is even better in this book now, and you can print out the Chicken Italiano recipe right from this post.
–

Here’s how easy it is to make this creamy, rich & delicious dinner, with such tender chicken chunks!  Most times, we double this recipe below, and have plenty left-overs another dinner or two!

Participating Ingredients:

  • 4 boneless, skinless chicken breast halves
  • 1 envelope dry Italian salad dressing mix
  • 1/4 cup water
  • 8 oz. pkg. cream cheese, softened
  • *10-3/4 oz. can cream of chicken soup
  • *(When we double recipe, the 2nd can of soup we use is cream of celery)
  • 4 oz. can of mushroom stems and pieces, drained
  • 1/2-3/4  1lb.bag of wide egg noodles

Directions:

1) Place chicken breast halves in slow cooker

2) Combine dry salad dressing mix and water.  Pour over chicken.

3) Cover.  Cook on low for 3 hours.

3a) As soon as the chicken is cooked through, if we’re home, I break up the chicken breasts into chunks, and return to the pot, so it can absorb the seasoned liquids. (I’ve just  broken it up while in the pot, with a wooden spatula too. The chicken is so tender, it’s no problem. Just be sure you’re not damaging the bottom of your pot.)

4) Combine cream cheese and soup until blended.  Stir in the mushrooms.  Pour over chicken, and mix it up.

5) **Cover, and cook 1 more hour.

**Note: If the chicken was cut into chunks much earlier, and so you are sure it is cooked through, it is ready as soon as all of the cheese & soup is heated, smooth and blended together.

6)  While the slow cooker contents is in it’s remaining time, cook egg noodles according to the package directions.

Serve the Chicken Italiano over hot egg noodles, and enjoy.

chicken-italian-slow-cooker-recipe_03
Be prepared to serve seconds.  : P

Chicken Italiano | Slow Cooker Recipe
 
Print
Prep time
30 mins
Cook time
4 hours
Total time
4 hours 30 mins
 
A creamy, rich, and delicious slow cooker meal, with the tender flavorful chicken chunks, and a rich cream cheese based sauce with mushrooms. It's the perfect savory slow cooker meal.
: Fix It and Forget It Cookbook / House of Joyful Noise blog
: Main meal | Slow Cooker
Cuisine: Italian
Serves: 5
Ingredients
  • 4 boneless, skinless chicken breast halves
  • 1 envelope dry Italian salad dressing mix
  • ¼ cup water
  • 8 oz. pkg. cream cheese, softened
  • *10-3/4 oz. can cream of chicken soup
  • *(When we double recipe, the 2nd can of soup we use is cream of celery)
  • 4 oz. can of mushroom stems and pieces, drained
  • ½-3/4 1lb.bag of wide egg noodles
Instructions
  1. Place chicken breast halves in slow cooker
  2. Combine dry salad dressing mix and water. Pour over chicken.
  3. Cover. Cook on low for 3 hours.
  4. - As soon as the chicken is cooked through, if we're home, I break up the chicken breasts into chunks, and return to the pot, so it can absorb the seasoned liquids. (I've just broken it up while in the pot, with a wooden spatula too. The chicken is so tender, it's no problem. Just be sure you're not damaging the bottom of your pot.)
  5. Combine cream cheese and soup until blended. Stir in the mushrooms. Pour over chicken, and mix it up.
  6. **Cover, and cook 1 more hour.
  7. **Note: If the chicken was cut into chunks much earlier, and so you are sure it is cooked through, it is ready as soon as all of the cheese & soup is heated, smooth and blended together.
  8. While the slow cooker contents is in it's remaining time, cook egg noodles according to the package directions, and strain.
  9. Serve the Chicken Italiano over the hot egg noodles, and ENJOY!
3.4.3177


******


Save

Save

Save

Save

Save

Save

Save

Filed Under: Main Dish, Recipes, Slow Cooker Tagged With: Chicken-Italiano-recipe, cold-weather-meals, crockpot-recipes, easy-slow-cooker-recipes, fix-it-and-forget-it-meals, Italian-recipes, main-meal-ideas, printable-recipes, recipes, recipes-with-chicken

Tissued Decorative Storage Tins | Craft

June 7, 2011 By Laura 7 Comments

tissued-storage-tins-craft-21

Sometimes, us creative people, have ideas that come out better in our head, than they do in real life!  Agree? But this project of tissued decorative storage tins was the opposite.  On the one hand, it may have been just a tad more difficult than I had imagined.  Only because I should have remembered how tissue paper and I, can go round and round and round.  We just don’t seem to get along. I normally do not have the patience for the stuff, and end up making the tissue a wrinkled mess. So much so, that I refer to my husband, to put the tissue in gift bags if I can, and he also is so kind, as to do all of my packaging for my portrait photography orders for my clients.   But on the other hand, these tissued tins actually came out way nicer than I expected!  I’d have to say the credit for that probably goes to Modge Podge. Love that stuff!

This idea is one I came up with as homemade gifts for our nieces & nephews, for Christmas 2010, as well as for my God-Daughter {Ju}. (You all know her by now, right?)   I thought they would be cool for them to keep little treasures & trinkets in, in their rooms, or even for my oldest nephew/God-Son to keep change or what-not in in his Jeep.

tissued-storage-tins-craft Here’s all you need!

As well as an x-acto knife or razor blade of some sort (not shown), and possibly a little patience, if you are like I am with tissue paper.  If you don’t need the patience…..well I’m happy for you!  : )

tissued-storage-tins-craft-1 I was so thrilled to find such bold & funky designer tissue paper, at The Dollar Store!…. that I thought was just perfect for the age range of the kids, from elementary school to teens, and for both the boys and the girls as well.  The silver sticky elements I got in the scrapbooking section of Michael’s Arts & Crafts.


tissued-storage-tins-craft-2 I found the tins shown, at Michael’s Arts & Crafts.

They had a variety of shapes and sizes to choose from.

tissued-storage-tins-craft-3

Modge Podge and foam brushes came from the same place.

So this is how this is done:

With your foam brush, you begin by Modge Podging the inside of one tin, and then layer it with the tissue design you would like on the inside.


tissued-storage-tins-craft-4 You really only want to Modge Podge up to the lip of the inside of the tin before laying on the tissue, but let the tissue overlap from there, for now.  Just carefully rip off or cut the excess with scissors.  Then leave to dry.  We’ll get to how to finish it off in a minute or 2.

Now I am telling you right now, there is no way for the tissue to come out perfectly smooth. Most especially on the inside, where you virtually have to stuff the tissue in there.  But do be careful not to tear the tissue or poke a hole in it. However, IF you do by accident, (as I did more than once (yes, the patience with tissue issue…..) it’s not that hard to cover it up, or manipulate the tissue to make the hole not show.  Honestly, it’s just the insides of the tins that are the hardest part of the whole project.

tissued-storage-tins-craft-5 Do the outside of the tin cover, in much the same way.  Again, only Modge Podge to the lip of the lid, then apply the tissue.  Now getting a little (Modge Podge) glue where it shouldn’t be, and the tissue sticking to it, is no big deal. It can be scraped off easily enough once dry.


tissued-storage-tins-craft-6 Just rough trim it with your x-acto blade, and then leave to dry.  If you are trimming first before it really sits to dry, just make sure you don’t drag-rip the tissue.  Your blade will get Modge Podge on it, so you’ll want to try to keep it clean too.

tissued-storage-tins-craft-7 Now you can do the outside of the tin container the same way:  Apply the Modge Podge, and then apply the tissue, smoothing it all as best you can.  Agai…wrinkled are going to happen here and there.


tissued-storage-tins-craft-8 It was really fun to have these co-ordinating designs to work with.  (Pay no mind to my BlackBerry over there.  Always nearby, and forever bLiNkInG!)

Now, in terms of cleaning them up, I found an x-acto knife to be a handy little tool!  I trimmed off the excess tissue, by running the sharp point of the blade, right in the groove of the lips.  If you aren’t sure exactly where or how I mean, just inspect the earlier photo above of the bare tins, and the ones coming up, and think about how the tin is put together.  You can’t have tissue anywhere, where the tin cover and container need to fit together.  Just a little common sense I dug up there. ; )

OK, so after each tissued piece is dry, and you have trimmed the excess tissue off everywhere, you then need to put a coat of Modge Podge over all of the tissue layers, inside and out!  I did second coats of Modge Podge too, letting them dry before coats, and I recommend doing that.  That is what gives the tins a finished look, once they are dried, and keeps the tissue surfaces protected.  Granted, now that the tissue is trimmed and there is tin lips exposed, you want to try and apply the Modge Podge a little more carefully, as to not get glue all over the naked tin parts .  But again, if any gets on the bare tin edges, once it is dry, it scrapes right off like any glue would. Modge Podging the inside of the tissued tins are probably the hardest to do with your foam brushes, only because you’ll see it puddles a little where folds and creases of the tissue are.  It looks a mess at first. But that is ok…..just spread it out best you can, because the Modge Podge really dries hard and clear.  You are using the foam brush to sort of stick down and smooth out any wrinkled tissue as well, as you work.  You’ll be amazed how good it starts to look as the Modge Podge dries clear.

I wanted to personalize them, so I had hubby cut their initials out of sliver mylar vinyl.  Then used the decorative sticky elements, to add a little extra bling.  Finally, I went right over the mylar and the elements on the covers, with another coat of Modge Podge.  Honestly, these came out slick & with a bit of sheen, seeing as though I used the glossy Modge Podge.

I LOVE how they came out, and I am about to show you a whole bunch more of photos, so you really can get the idea. (And, o.k., so I can show them off a little more.)

tissued-storage-tins-craft-9

Bold Black & white for the boys……bright happy colors for the girls.


tissued-storage-tins-craft-10

tissued-storage-tins-craft-11

tissued-storage-tins-craft-12

tissued-storage-tins-craft-13

tissued-storage-tins-craft-14

tissued-storage-tins-craft-15

tissued-storage-tins-craft-16

tissued-storage-tins-craft-17

tissued-storage-tins-craft-18

tissued-storage-tins-craft-19

tissued-storage-tins-craft-20

Like? Love? Let me know what you think!

******


Save

Filed Under: Crafts & Creations, DIY (Do-It-Yourself) Project, Homemade/Handmade Gift Ideas, Tutorial Tagged With: crafts, gift tins, handmade gifts, homemade-gifts, Modge-Podge-crafts, modge-podge-projects, storage-tins, tissue paper crafts

  • « Previous Page
  • 1
  • …
  • 35
  • 36
  • 37
  • 38
  • 39
  • …
  • 100
  • Next Page »

We are wicked happy to have you here! We hope you find much inspiration, help, humor and enjoyment here.


Archives


POPULAR POSTS

* * * * * *

SUBSCRIBE to House of Joyful Noise blog! Every new post, delivered right to your email box!


Privacy Policy

Amazon Affiliates

Never at any additional cost to you, we may earn a small commission for our endorsement, recommendation, testimonial, and/or link to any products from our website. Your purchase through our links helps support our family, while sharing with you the products we authentically use and recommend, for various ideas, and letting you know where you can purchase them. Thank you for your support!

[footer_backtotop]

Copyright © 2026 HouseOfJoyfulNoise.com · Genesis Framework by StudioPress