• HOME
  • {A}’s Chipmunk Training Archives

 Homepage

  • The Homestead
    • Home Projects
    • Home Improvement
    • Home Decor
      • Seasonal Home decor
        • FALL Home Decor
        • WINTER Home Decor
        • SPRING Crafts and Creations
        • SUMMER Crafts and Creations
    • Our Chickens
    • Gardening
    • Organization
    • Re-Purposing
    • Furniture Refinishing
    • Budget
  • Crafts & Creations
    • Seasonal Home decor
      • FALL Crafts and Creations
      • WINTER Crafts and Creations
      • SPRING Crafts and Creations
      • SUMMER Crafts and Creations
    • DIY (Do-It-Yourself) Project
    • Kids Arts and Crafts
    • Homemade/Handmade Gift Ideas
    • Holiday Crafts
    • Fan Pulls
    • Free Printable/Downloadable
    • Sewing Projects
    • Giveaways
    • Business Features
  • Recipes/FoodFun
    • Breakfast
    • Lunch
    • Main Dish
    • Sandwiches
    • Appetizers
    • Slow Cooker
    • On The Grill
    • Side Dishes
      • Soups
      • Salads
    • Baking
      • Breads, Rolls and Muffins
    • Snacks
    • Treats
    • Desserts
    • Drinks
  • Homeschooling
    • Elementary Homeschooling
      • Elementary Homeschooling READING
      • Elementary Homeschooling MATH
      • Elementary Homeschooling LANGUAGE ARTS
      • Elementary Homeschooling SCIENCE
      • Elementary Homeschooling HOME ECONOMICS
      • Kids Arts and Crafts
    • Middle School Homeschooling
      • Middle School Homeschooling SCIENCE
      • Middle School Homeschooling HOME ECONOMICS
    • Language Arts
    • Math
    • History / Social Studies
    • Geography
    • Foreign Language
    • Field Trips
    • Games
    • Nature Study
  • The Big Picture
    • Life In General
    • Celebrations
    • Faith
      • Into the Light; The Series
    • Giveaways
    • Reviews & Sponsors
  • Photography & Lettering
    • Photography
    • truck lettering
    • vehicle graphics
    • Newborns
    • Kids
    • Engagement
    • High School Senior Pictures
    • High School Senior Pictures Sneak Peeks

The Metamorphosis of Butterflies – Photos, Our Experiment & Study | Homeschooling

July 27, 2011 By Laura 2 Comments

metamorphosis-butterflies-study-homeschoolig-10

Hatching butterflies is probably a pretty standard experiment and  study for students, in both formal and home school educations alike.  It’s one that can be used as a Science participation lesson more than once in the course of ones education, because the benefits of the lesson are different for various ages.

For very young students, such as toddlers-K, it’s a really fun & exciting process to watch every day. At this age, they are full of both intelligent, and sometimes humorous, questions.  They are able to grasp the basic understanding of the stages.  Some little ones may rather non-nonchalantly accept the transformation from a caterpillar to a butterfly, simply as magic, in a way.

Older students comprehend the cycle and the information of the lesson at hand, on a bit of deeper level. Their more mature experiences of curiosity and intake of the study of nature and Creation, throughout their ages of years, has led them to a wiser perspective.  They are more fascinated than ever, by the works of God, and the magnitude of His power.  They may also more readily make observations, younger ones may not pick up on, such as happened in our family, that I’ll tell you about shortly, further into this post.

metamorphosis-butterflies-study-homeschoolig

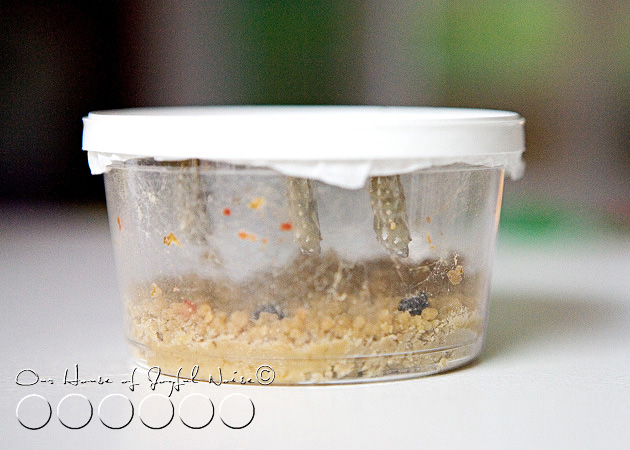
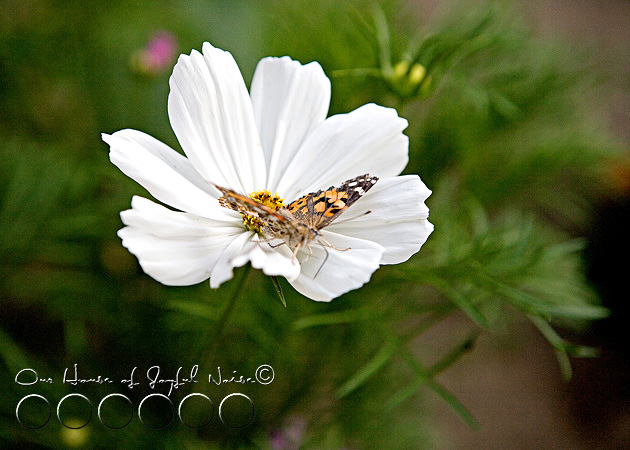
Our study was of the butterfly species, the Painted Lady.  We purchased what we needed at a lovely nearby place called The Butterfly Garden Boutique, in Bourne, MA.  The owner was very friendly, helpful and informative, and supplied us with live caterpillars in a container with their food, and a small net pavilion. (Larger pavilions are available as well.).

metamorphosis-butterflies-study-homeschoolig-1 
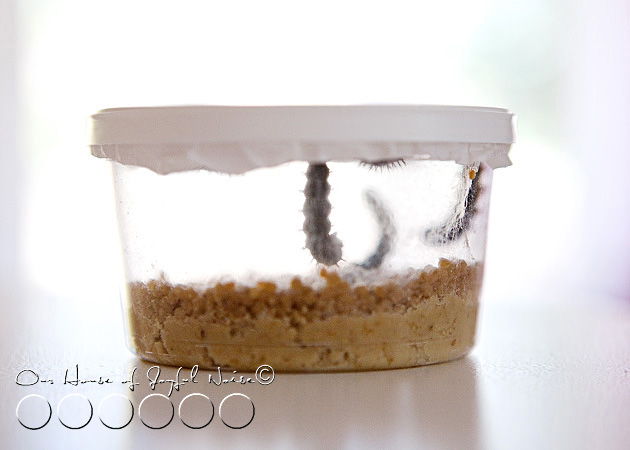
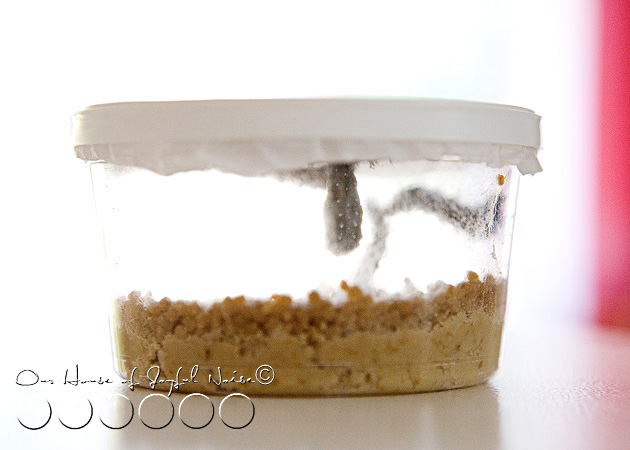
We had 5 live caterpillars, and it wasn’t a day or 2 after getting them home, did a couple begin to make their way to the top of the container. Inside the lid of the container provided, is a fabric like piece of material, for the caterpillars to attach themselves to for their transformation process.  We learned they do this, by dispensing a thread from a hole beneath their mouths.

metamorphosis-butterflies-study-homeschoolig-2

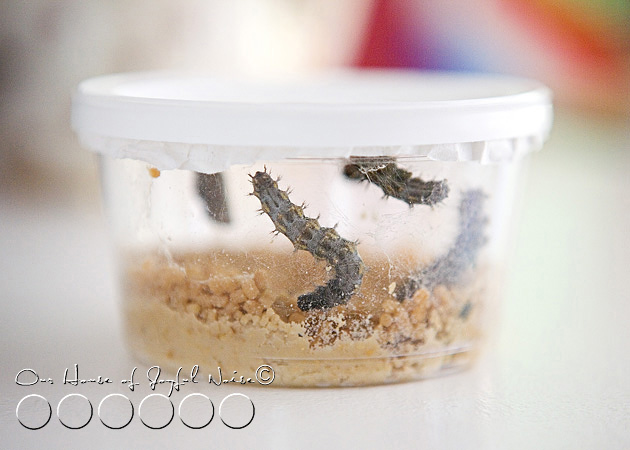
By the following day, the rest followed.

metamorphosis-butterflies-study-homeschoolig-3

Once each of the 5 were hanging, the transformation begins rapidly.  They first shed their skin, revealing a the green casing that is their chrysalis.

metamorphosis-butterflies-study-homeschoolig-4

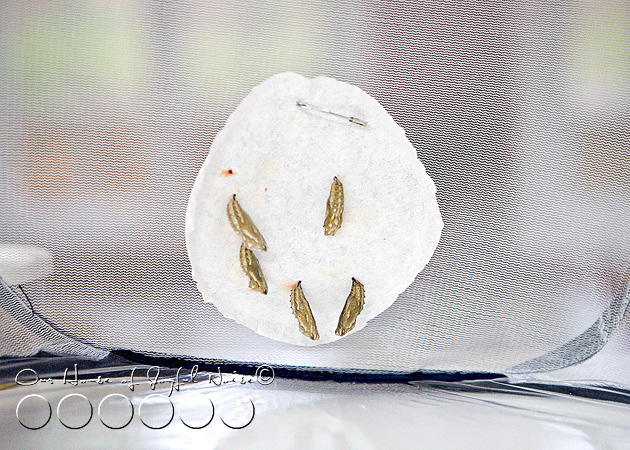
Once we had 5 chrysalises attached to the material, we carefully took off the lid of the container, and pinned the material to the inside of our pavilion near the bottom, as instructed.

metamorphosis-butterflies-study-homeschoolig-5

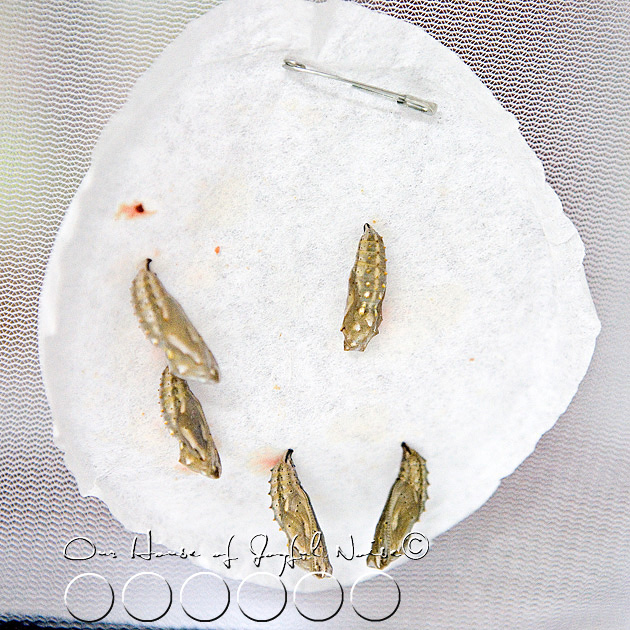
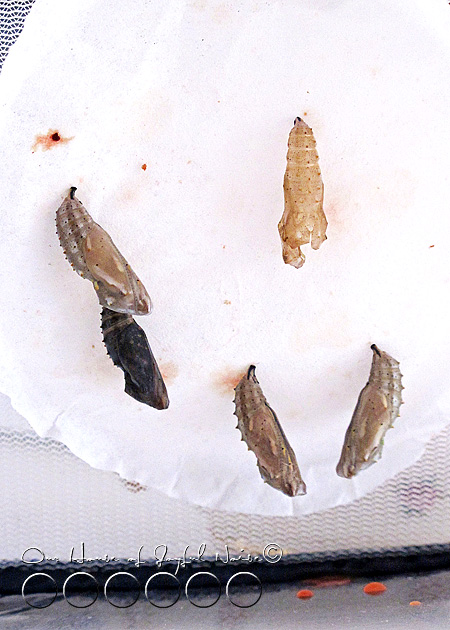
Here is a closer look.  It was evident which chrysalises attached first, and which were more recently formed.  It was absolutely fascinating to learn, that the inside of the chrysalises in this pupa stage, the caterpillar is turning into a complete liquid form, before forming into a butterfly.  In this photo, you can see the the patterns of butterflies, through the somewhat transparent casing.

metamorphosis-butterflies-study-homeschoolig-6

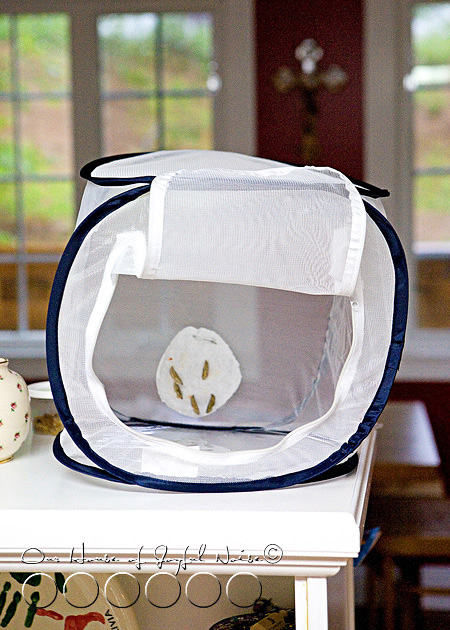
As a reference of sizes, this is our small tent-like pavilion, and you obviously can see the chrysalises pinned to the back bottom.  The door is only unzipped and open for the sake of this photo.  Throughout the entire study, the pavilion resided here on the shelving table-top, between our school room and kitchen.  The kids were allowed to look anytime, but not touch the tent, as to not disturb the chrysalises.  Of course, I carefully did open the door now and then, to take photos.

Some mornings later, there was all kinds of excitement in the house…..

metamorphosis-butterflies-study-homeschoolig-7

Michael got up (very) early for his morning church job, and discovered a butterfly had emerged sometime during the night!  He woke the little ones up to show them, and soon they were running through the house to spread the word.  To {A} and Mama. Darn! We missed it.

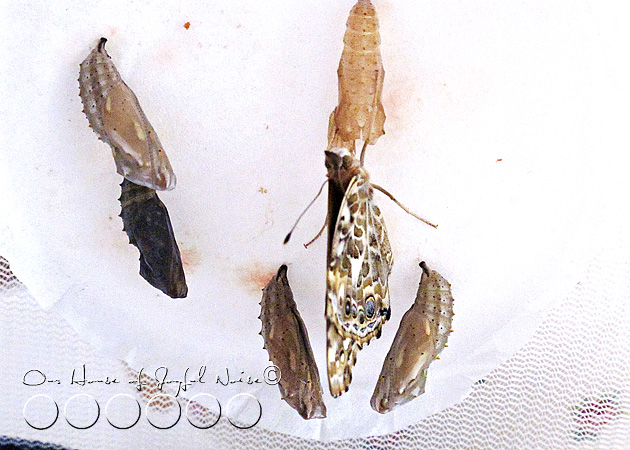
Right above the butterfly, you can see the empty casing the butterfly emerged from.

metamorphosis-butterflies-study-homeschoolig-8

Those who observe butterfly hatching for the first time, may be surprised to learn that the hatching process is somewhat of a messy business! The red staining you see, almost appears to be blood, but it is actually just the leftover liquid excreted from the formation of the butterfly, through the pupa stage. In other words, waste.

Just as mentioned before, it is even more noticeable now, which butterflies are likely to hatch next. Can you guess?  It would be the darkest one.

metamorphosis-butterflies-study-homeschoolig-9
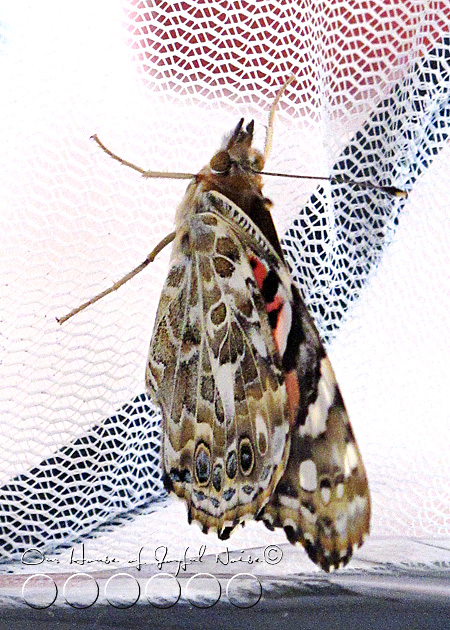
Our first hatched butterfly of the 5.

As unfortunate luck would have it, we unbelievably missed the actual emerging of every butterfly from it’s casing!  Seriously. The 2nd one came out while we were not aware, because we were busy doing a math lesson.  2 others emerged while we were sleeping, once again. And the 5th was while we were not home.  So you know what this means! We need to do this again!

At the beginning of this post, I was talking about the benefits and differences of children doing a butterfly metamorphosis study.  Our oldest, {A}, hatched butterflies twice, consecutively, when she was very little, and an only child. This time, being much older and wiser teenager, was a whole different experience for her, such as the following occurrence:

It was fairly late at night, and the little ones were in bed, when I was in the kitchen and peeked in at the butterflies, and spontaneously exclaimed, “Oh my!”.  {A}, who was in the kitchen too,  looked in and, without surprise or question, said “Oh yeah, they’ve been doing that like, every night.”  Then gave me some wide eyes and a giggle. Butterflies waste no time, to get mating, once they are emerged!  They only live 2-3 weeks, so they have little time to get pro-creatin’! ; )  Over the course of our study, there was many observations she had had, as the oldest, and more in-depth facts she was aware of. So it’s a continual learning process as the kids grow, and still the fascination of the whole cycle, never wears off. Not even for me!

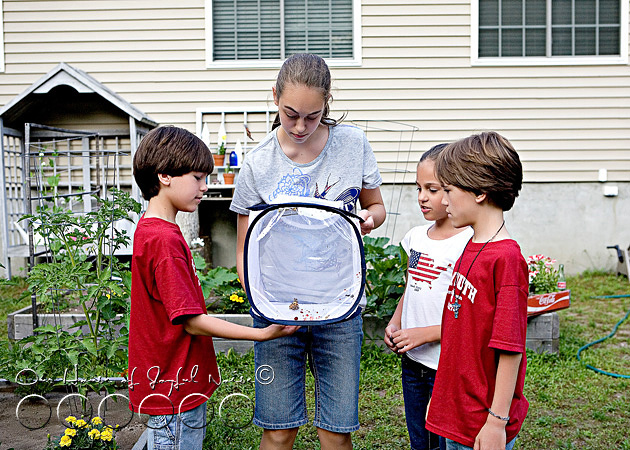
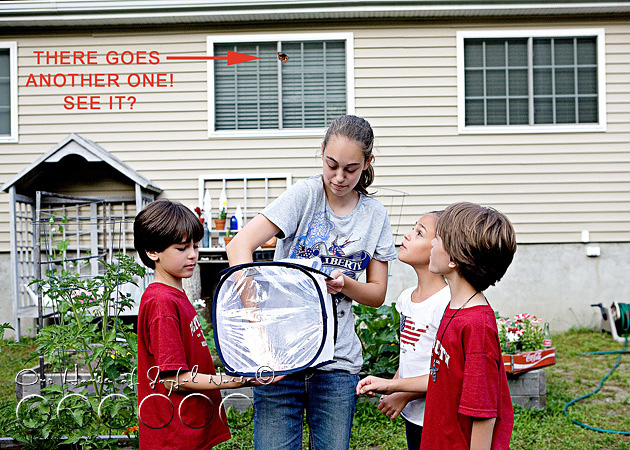
We decided that the evening of {A}’s 14th birthday, was the perfect time to release our butterflies.  We had had a wonderful family day together, and the time had come, and seemed right.

metamorphosis-butterflies-study-homeschoolig-11

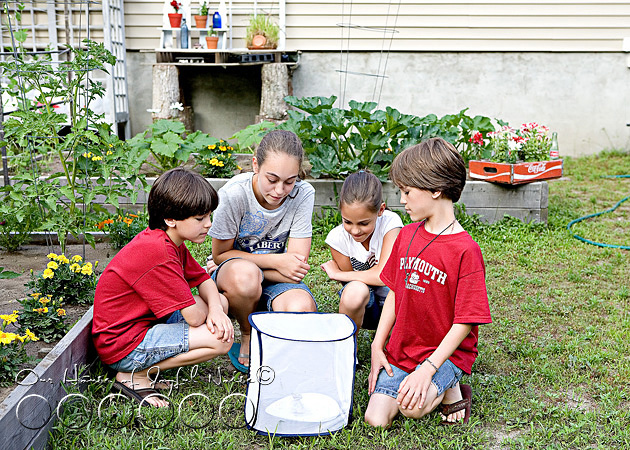
Our gardens seemed to be the perfect place to let them go, as well.  We hoped perhaps they would stick around the garden beds for at least a few days, and do some pollination work for us!  But first, the kids took a few more minutes to just watch their Painted Ladies, and say goodbye.

metamorphosis-butterflies-study-homeschoolig-12
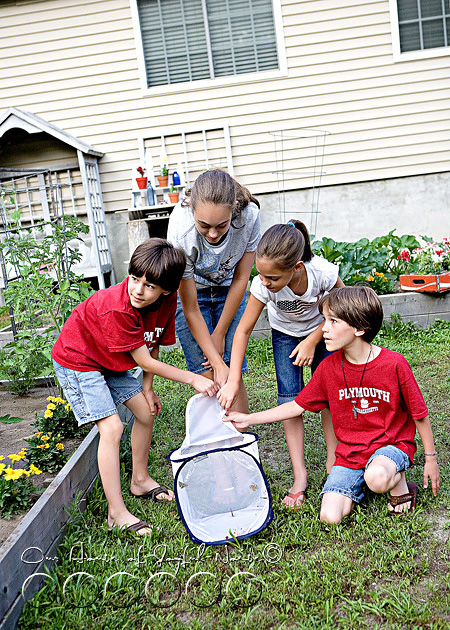
Then they opened the door, to set them free.
One flew out right away!

metamorphosis-butterflies-study-homeschoolig-13
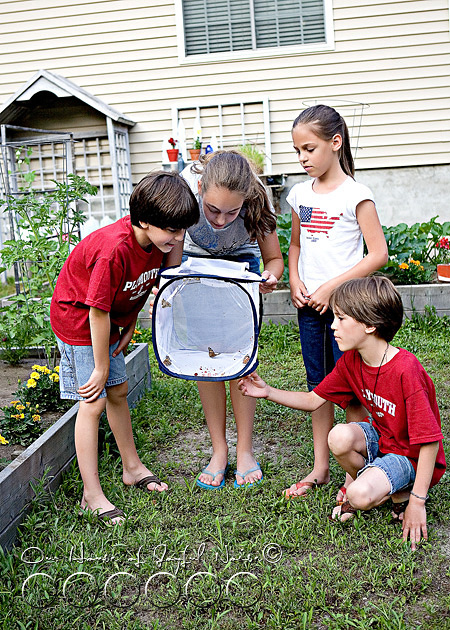
The others needed some encouragement.

metamorphosis-butterflies-study-homeschoolig-14

metamorphosis-butterflies-study-homeschoolig-15

metamorphosis-butterflies-study-homeschoolig-16 
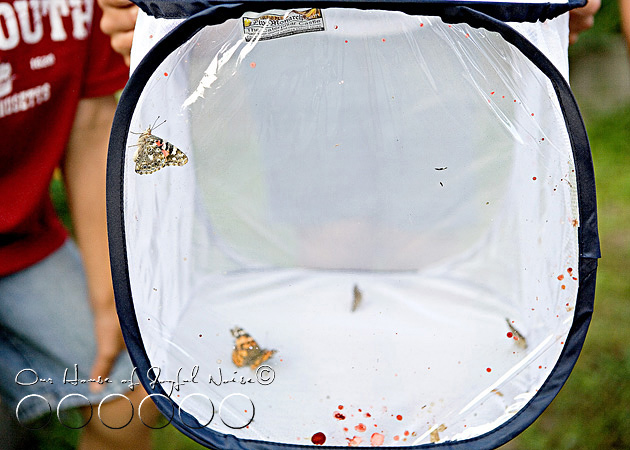
Finally, out flew another.  {A} was reaching in to lift one that was determined not to move…


metamorphosis-butterflies-study-homeschoolig-17
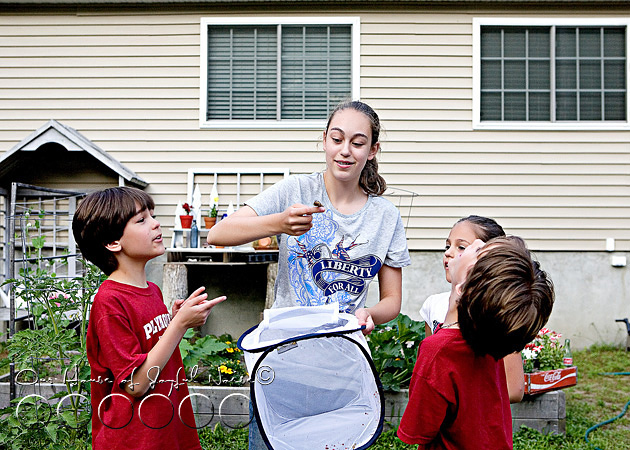
….while out flew 2 more.

metamorphosis-butterflies-study-homeschoolig-18
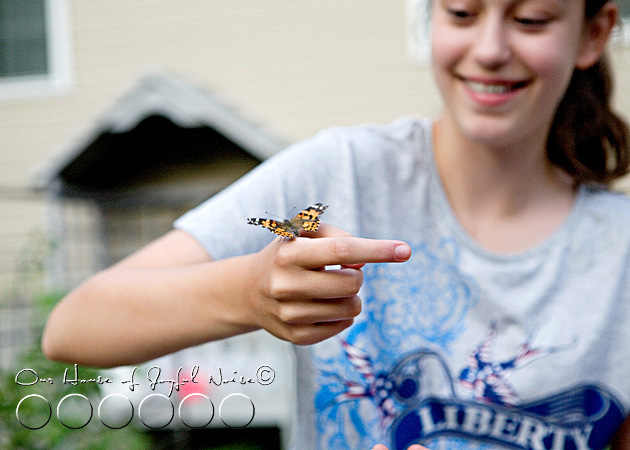
This one seemed quite as hesitant to leave us, just as we have been to let them go.

metamorphosis-butterflies-study-homeschoolig-19

metamorphosis-butterflies-study-homeschoolig-20 
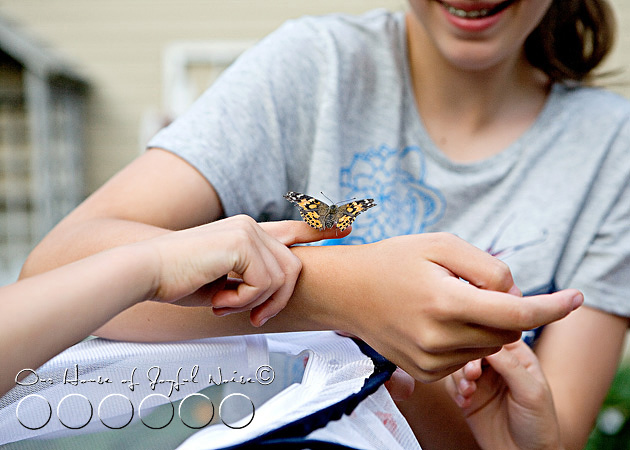
Soon, it fluttered off the kid’s hands, to a nearby garden flower.

We really enjoyed this study, and plan to return to The Butterfly Boutique again very soon, to spend some time in their Butterfly House, which is a screen house guests can enter, full of plants, flowers, a water fountain, and you guessed it…..lots of live butterflies! There’s also a Gift Shop, with beautiful butterfly-related jewelry, home decor, and more. And the Hungry Caterpillar Snack Bar! The boutique as a whole is a small but charming and fun place, for kids and adults alike. If you live nearby, or find yourself visiting Cape Cod, The Butterfly Boutique is very near both the Sagamore and Bourne Bridges. Visit their web site to get more information, and their exact location, which is so easy to get to.

As you probably know, butterfly kids can be ordered online as well, such as from here. There is also numerous resources to assist you and your children with educational information and activities.  I have gathered just a couple of links for you today.  For your younger ones, this web site has simple and minimal basic information about the life-cyle of the butterfly.  Here is a print-out as well, to just review, or use as a guide with what to expect, as you are hatching your own butterflies.  For your older children (middle school +),  this link offers more in-depth information about the life of butterflies.

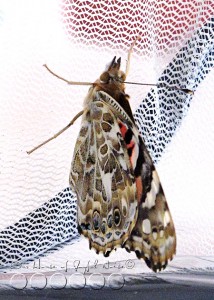
It’s important to remember, that children who have fun learning, will enjoy it and seek to learn more.  Case in point, our children have continued to use the butterfly pavilion, with self-launched studies all on their own.  Following the release of our butterflies, the kids found a HUGE furry, nasty-looking cocoon in our woods, and were excited to see what would emerge! (I was rather scared.  I thought maybe a bear….or one of those seemingly evil hummingbird-moth-things.)  I will share photos of what came of THAT pupa, on our Facebook Page, very soon! So be sure you are following us! At this very moment as I type, that pavilion now holds 11 moths, and 1 large grasshopper, as the kids study them.

The learning never ends, at Our House Of Joyful Noise. Thanks for visiting with us for this post, and please feel welcome to share your own experiences, studies and observations, with butterflies, or any other insects!


Save

Save

Filed Under: Elementary Homeschooling, Elementary Homeschooling SCIENCE, Homeschooling, Middle School Homeschooling, Middle School Homeschooling SCIENCE, Nature Study, Science Tagged With: butterflies, butterfly-hatching, cape-cod-places-to-visit, cape-cod-things-to-do, chrysalid, chrysalis, great-homeschooling-experiments, great-homeschooling-nature-studies, hatching-butterflies, homeschooling, learning, life-cycle-of-a-butterfly, metamorphosis-of-butterflies, Painted-Lady-butterflies, Science, The-Butterfly-Boutique

Homeschooling in the Kitchen | Food for Thought; Literally!

November 14, 2010 By Laura 7 Comments

homeschooling-kids-in-the-kitchen-6

I’m sure I’ve been forthright about this before, as much as it makes me feel a little bad to say out loud.  (Figuratively speaking.)  But there always moments in time when these things come up, and there is some purpose in being truthful in the matter. Right?

Well, this is one of those times.

So the truth is, <whisper> my mother was just not very domestic in the kitchen. Nor was her mother. <end of whisper> Which says something not good.  Doesn’t it?

I’ll answer that.  Yes it does.

It says that the chances of me being one, was slim to none.

Unless of course, I broke the cycle, and took responsibility for myself.  Made different choices. And God-willing, began a new cycle for my children, and grandchildren, to carry on.

(I’m not really that smart.  I read something like that in a book once.)

I have to say, I did know plenty about cleaning, weeding gardens, and working hard coming into this holy-Sacrament-of-marriage-thing.  I worked for a little old lady from the time I was 11 years old until I was14, every Saturday.  Her name was Mrs. Flahive, (pronounced with long vowels.)  I cleaned her house top to bottom, kept up her gardens, weeded her stone patio, changed the sheets on the beds, did laundry, etc.  I even polished her silver with some grayish-brown, horrid-smelling stuff. I learned a lot from her.  Although I didn’t really appreciate the value in the tasks, at the time.  I never even thought about how they would serve me well someday, in my own home-keeping years.

Some things, she was very particular about how it was done….such as the fine techniques of folding sheets, or making a bed.  It’s funny that I insist on these same techniques in my own home now. lol   She was a nice old lady, made me a fine lunch which we enjoyed together, and later had an afternoon tea as well.  And then she paid me too! She paid me well, I might add. For a kid. Of course, I was also risking my life twice a day, every Saturday, as this 80 year old woman who peered through the hole of her steering wheel, picked me and and brought me home.   I’ll never forget that time we were heading for the side of the bridge…..

But admittedly, I was slow coming around as a new bride-to-be, in the cooking and baking area.  I think becoming a mother sort of kicked me into domestic-gear. Somewhat. Until then, my husband and I did o.k., together. He did have more of a domestic mother, all the way around.  From what I could tell, anyway.  So he had watched, learned, and praise God, was not helpless himself when we married.

Yes, all of this story-telling has everything to do with homeschooling.
In particular today: Homeschooling in the Kitchen

I don’t know if they even have Home Economics in school anymore.  Do they?  But I heard they did, back when I was in school.  Problem is, I went to a private Catholic high school, where the guidance counselor, was also the Geometry teacher sometimes, and the principal was sometimes the Religion teacher. (That was a bad run.). The gym teacher helped in areas he should have never been helping, with the senior girls, if you know what I mean. (But I won’t go there today.)  In other words, we were just a small school, without any extras.  We didn’t even have a football team. Or a field of any sporty-kind.


homeschooling-kids-in-the-kitchen My mom was a wonderful mother in many ways, so don’t get me wrong.  But seeing as though I was not learning much in the kitchen at home, it would have been nice to learn about some of the cooking and baking stuff, especially, somewhere.  In retrospect, I mean. (Because I am quite sure I could have cared less at the time.)   And so seeing as though my kids are not in school, and won’t be going to high school either, where they may or may not have gotten Home Ec classes, I feel it is up to me to be sure they get some!!  Otherwise, they could end up as a floundering bride or groom some day.  And if they marry the same, there is going to be a big problem.  Like. . . . a travesty. Know what I’m saying?

homeschooling-kids-in-the-kitchen-1 So I need to be sure, my kids get a domestic bone from me, some way, some how, some day.   Hopefully before they are married, or are out on their own.  Even if they are single, I don’t want them resorting to fast foods and whatnot!

And so it was that mindset that I was in, when I got my kids (happily) helping out in the kitchen, since they were about ohhhh….so tall. (Use your imagination.  It’s pretty short.)

But it was in having them help, that I realized just how much schooling can happen in the kitchen!  And the more we do it, the more I see the lessons happening.

It’s a whole lot more than Home Economics!

Let’s see…….

homeschooling-kids-in-the-kitchen-2

First, there is READING…..the directions.  I have them do it out loud. It’s such an opportunity for new kitchen-related VOCABULARY words, SPELLING words, and PROPER PRONUNCIATION.

On this particular day in the kitchen, we were making an ordinary box of  cinnamon streusel cake, and making the apple version.

homeschooling-kids-in-the-kitchen-3 Then, comes FOLLOWING DIRECTIONS, of what was just read, very carefully.


homeschooling-kids-in-the-kitchen-4 MATH is a biggie!  (age depending.)  There is counting, adding and subtracting, and measuring. (Especially when halving or doubling a recipe.)  Reading numbers, and temperatures!

homeschooling-kids-in-the-kitchen-16

SCIENCE is everywhere, in the operating kitchen.  How does one ingredient react, when another is added to it?  Why must we temper some ingredients first, before adding to the big batch.  (There’s another new word!  So what does it mean, and how do we do it?)

What happens with various temperatures set in the oven, and what is the difference between baking, and broiling?

homeschooling-kids-in-the-kitchen-5

Enjoying our time spent together counts for something too! For some, it truly is a learned behavior!

(Not for my kids, of course.  I’m just sayin’ ; )

homeschooling-kids-in-the-kitchen-7

How about the ins and outs of KITCHEN SAFETY?   We are using sharp knives, reaching into hot ovens….

homeschooling-kids-in-the-kitchen-8

…..and operating heavy machinery!

(After you read this post, you may want to find out how this sweet piece of machinery hummed it’s way into our lives, and MiXeD everything up, HERE. ; )

Uhh, by the way…….Where’s the fire extinguisher, just in case?  And how do you use that?

We don’t want to learn that Science, in an emergency. You want to know how to use that thing if you need to!  And if all else fails,< insert the family fire drill skills here>, and we’ll meet at the telephone pole across the street!

Back to the lessons at hand…

homeschooling-kids-in-the-kitchen-9

Learning how to WORK AS A TEAM, and also ……..

homeschooling-kids-in-the-kitchen-10 …….admitting when you need help, and allowing others to help you.


homeschooling-kids-in-the-kitchen-11

All of these lessons I mentioned, are just the topping of the cake.

I am sure you could think of plenty more, in addition to mine.

Think on it.

homeschooling-kids-in-the-kitchen-12
OH OH OH!! I just thought of another one!!  The one I think we all like to forget!:

The RESPONSIBILITY of cleaning up the mess!

homeschooling-kids-in-the-kitchen-13

But most times, we can do so, while we enjoy the mouth-watering smell we’ve created in the air.

homeschooling-kids-in-the-kitchen-14
Ahhhhhh……smells…..SO…….good!!!   We can hardly wait to cut into it, indeed!

homeschooling-kids-in-the-kitchen-15

Of course the best lesson of all:, our mouths and our bellies, REAP THE REWARDS OF our HARD WORK.

***

All kids, home schooled or not, can benefit from the lessons to be learned in the kitchen.

What lessons have I missed mentioning?  Help me out here.

I’ll be hoping you can you add to my list, because I know there is a lot more.  And you’re smart cookies.

While I wait, if you’ll excuse me, I need to head down to the laundry room, transfer clothes from the washer to the dryer, sort some piles, and start a new wash load.

And you can bet I’ll be taking a kiddo down with me.  And believe it or not, they’ll be excited to come and help! (And secretly learn.)

Hopefully, I’m cutting my chances here of them coming home on weekends from college, accompanied by several loads of laundry.  If they do, we’ll be repeating those lessons, that weekend.  ; )

Save

Save

Save

Save

Save

Save

Save

Save

Save

Save

Save

Save

Save

Save

Save

Filed Under: Elementary Homeschooling, Elementary Homeschooling HOME ECONOMICS, Elementary Homeschooling SCIENCE, Homeschooling, Math, Middle School Homeschooling, Middle School Homeschooling HOME ECONOMICS, Middle School Homeschooling SCIENCE, Science Tagged With: Catholic-blogs, Catholic-families, elementary-homeschooling, homeschooling, homeschooling-in-the-kitchen, kids-in-the-kitchen, kitchen-lessons-for-kids, middle-school-homeschooling, teaching-following-directions, teaching-kids-home-economics, teaching-kids-measuring, teaching-kids-responsibility, teaching-kids-science-in-the-kitchen, teaching-math-in-the-kitchen, triplets

Boston Museum of Science | Field Trip | Homeschooling

October 12, 2010 By Laura 3 Comments

One of our first field trips of this new homeschool year, was to the Boston Museum of Science!

001_boston_museum_of_science-214x300
{JM, O & S} are at that age now, where I knew they would really benefit from going, on an educational level.
{A}, of course, has been an appropriate age for some time, and she found many areas of interest that she enjoyed learning more about.

We left home early in the morning.  I have to add, that I had decided I was not going to lug my big camera equipment around…because that was one of the reasons why we got {A} the Canon point and shoot for her birthday, right? But I have to tell you…it was hard!  I felt like I was leaving one of my children behind! I was walking to the car in the drive-way as we left, asking myself…can I really do this?  I made myself leave it home, and I worked on learning how to work this little thing better.  And I’m still working on it. I’m an all manual girl for sure.

Anyway, we were there until late afternoon.  This museum really is a place where you could spend at least2, maybe even 3 days at, to really enjoy it to the fullest, and not miss anything. Thankfully, we live close enough that we’ll be going again soon.  The planetarium here at the Boston Science Museum, is currently under construction until early 2011.  So we’ll be returning to see that when it re-opens. Especially because the little ones are studying Astronomy this year.  But we certainly filled our day taking in all we could, enjoyed every moment expanding our knowledge on a variety of subjects, and having fun while we learned!

boston-museum-of-science-field-trip boston-museum-of-science-field-trip-1

This very large scale grasshopper model displayed the internal parts of the insect, and their function.  It was interesting to see the muscles of their legs, which are quite powerful in relation to their size.  They can jump up to 20 times the length of their own body.

boston-museum-of-science-field-trip-2

A real highlight of our trip, was this educational exhibit on electricity.  The scientist was extremely knowledgeable and held our attention for sure.  His ‘science lab’ was intriguing, as he explained a variety of facts.

boston-museum-of-science-field-trip-3

We were often advised to protect our ears for certain demonstrations where the electrical currents were very loud.  The kids were getting a little upset with me, because I kept uncovering my ears in order to take photos. But I got a shot with an electrical current like I wanted! Cool, huh?

boston-museum-of-science-field-trip-4

These 2 guys were sure they were stronger than a AA batteries.  But this demonstration proved them wrong. They were sorry they volunteered their manhood strengths, because the magnetic force that was created here, won in the end.

I was talking to my cousin’s middle school boy this past weekend (smart little fella), who took a field trip here when he was in 5th grade.  He mentioned one of the highlights for his class was the electricity demonstration here too.  They saw a couple different demos than we did this day.

The kids very all excited for this space exhibit, since they are currently learning all about astronomy.   So this area in the following photos was very educational for them, and really brought to life so much of what they have been studying.

boston-museum-of-science-field-trip-5

boston-museum-of-science-field-trip-6

boston-museum-of-science-field-trip-7

boston-museum-of-science-field-trip-8

boston-museum-of-science-field-trip-9

Inside the spaceship capsule, watching an educational video about the space shuttle.

boston-museum-of-science-field-trip-10

boston-museum-of-science-field-trip-11

boston-museum-of-science-field-trip-12

This contraption was something else.  There was so much it did.  Engineering at it’s best.  It was so much fun to watch it work.

boston-museum-of-science-field-trip-13

As we looked at it, and watched the intricate and clever functions of it all, I thought to myself, “I can see {JM} building something like this, someday.”

boston-museum-of-science-field-trip-14

No sooner did I think that, did he ask me to take his photo in front of it.  He was grinning from ear to ear, and I could see his wheels turning.  I think he was inspired.

boston-museum-of-science-field-trip-15

boston-museum-of-science-field-trip-16

I loved this wall.
–

But this was the highlight of the trip, for ME, at the Boston Museum of Science!  When I ever came around the corner, and saw this…..my heart was all a-flutter!….


boston-museum-of-science-field-trip-17 An old school house!  I know they around here and there..like at Sturbridge Village, my cousin reminded me.  I haven’t been there since I was very little, and I don’t remember anything there. (That’s another planned trip for us!).  But I was very excited to be able to see this one, and GO IN!!

boston-museum-of-science-field-trip-18

boston-museum-of-science-field-trip-19

boston-museum-of-science-field-trip-20

I was smitten, with every nook, cranny, and detail.

boston-museum-of-science-field-trip-21

And I couldn’t resist playing teacher!

boston-museum-of-science-field-trip-22

Thankfully I even had willing students, to play along and amuse me!!  Their clothing was all wrong, but I didn’t care.

boston-museum-of-science-field-trip-23

So was mine.  But I was having fun.  Michael was taking photos of my antics, left and right.  I was glad I had on one on his shirt for this shot….so no one could see my mom jeans.  ; )

Just kidding.


boston-museum-of-science-field-trip-24 {O}, pretending to write.
–


boston-museum-of-science-field-trip-25 Check out the desk.  Michael reminded me that we have an old school desk his parents gave him, when they moved from this area some years ago.  I forgot about that!!  I’m going to find it, and maybe bring it upstairs and put it in our school room. : )
–


boston-museum-of-science-field-trip-26 THERE’S the pencil sharpener I remember.
–

boston-museum-of-science-field-trip-27


boston-museum-of-science-field-trip-28 I didn’t easily leave the school house area!  As we stepped out and I looked at it from a little ways, I started to have crazy thoughts.  Out loud.  Like…”You know Michael, I bet you could build me one of these fairly easily.”  And to my surprise, he didn’t even chuckle.  He asked me where we would put it.  Huh.  Oh…..I guess I’ll find a spot then!
–


boston-museum-of-science-field-trip-29 I loved this display.  It slowly turned.

Behind it was a whole room of taxidermied animals!  As we explained to {JM, O & S} about what taxidermy is, the process, and when and why it is done, they were wide-eyed!!  We couldn’t help but laugh.  I remember being about their age, and trying to wrap my brain around it all, when I learned this little fact of life, too.  They were so cute.

{A} knew about taxidermy, but she said she found seeing the stuffed animals here very interesting anyway, because it gave her an accurate scale of the size of the animals.  For example, we saw a Grizzly Bear and a Black Bear side-by-side, and she was surprised to see how much larger the Black Bear was.  She always assumed Grizzly Bears were the larger.

boston-museum-of-science-field-trip33

It was a great trip, to a really great museum, for all of us.  We look forward to returning there within this school year again, to see the planetarium, and have another day studying the world of science (all of God’s Creation), history, mathematics and social studies.

Have you ever visited the Boston Museum of Science?  If so, what part of your visit did you like best?

Thanks for reading along and following some of our home schooling adventures we chronicle here.  We’re glad you stopped by.

Save

Save

Save

Save

Save

Filed Under: Elementary Homeschooling, Elementary Homeschooling SCIENCE, Field Trips, Homeschooling, Middle School Homeschooling, Middle School Homeschooling SCIENCE, Science Tagged With: Boston Museum of Science, Boston-area-places-to-visit, Boston-museums, homeschooling, homeschooling-field-trips, museums, Science, science-field-trips

The Math and Science of OOBLECK! | Elementary Homeschooling

June 9, 2010 By Laura 14 Comments

oobleck goop

It wouldn’t be surprising, if many of you have already heard of and made some ‘Oobleck’, with your kids.  Some may know this crazy-fun concoction by another name.  My sister says they call it ‘Goop’.

My kids have indeed made and played with Oobleck before.  I first heard about it at least a few years ago, from my friend Maria, over at Very Blessed Mommy. It’s a downright fun little activity, that will keep your little ones  happy and busy for quite awhile!  It’s appropriate for ages 4-42 (at least ; )

We’ve made it several times since that first, but this time, we looked closer at the educational aspects of math and science, that come with this very intriguing activity!  If we were going to keep playing with the stuff, it just seemed like a good idea to get a little more intellectual about it.    So here we share the recipe for Oobleck, what we learned or reviewed, and as always, too many photos.   (Thanks for understanding.)

Necessary ingredients:  corn starch, water, food coloring, bowl(s), wooden spoon(s), and measuring cups.

The Recipe for one batch:   2 cups of corn starch, mixed with 1 cup of water.  Then a few drops of food coloring.

Now, the recipe calls for 2 parts corn starch to 1 part water.    So the recipe is adequate for two little kids to play with.  But you could make 2 separate batches so they have their own bowl, whether you half the recipe for them or not.

This day, we literally quartered the recipe for each kid that day, because we were running low on corn starch!  But it still worked out alright.    What’s great is, it was an opportunity for the kids to practice their measurement math.

Since the recipe calls for 2 cups, what is 1/4 of that?   How about 1/4 of 1 cup?

Not only is measuring ingredients a great exercise for their math skills, but it’s great for them to follow directions, and do it all themselves!

This is such a perfect summer time activity for kids of all ages.  Mom can make a batch for little ones, just to play in. There is no need to worry about a mess outside! Everything washes very easily away, with water!  I take the hose and just spray off the table and deck.  Once the food coloring is mixed in, there is no worry about color staining either.

My kids had their play clothes on, so I let them put their own color drops in too.


{JM} made his Oobleck blue.

  05_yellow_oobleck
{S} wanted his yellow.

But {O} wanted hers orange.  But there is no orange food coloring, right?  Here was more opportunity to learn; reviewing color mixing of primary colors, to create secondary colors.

So I asked {O}……if the only colors we have, are red, green, blue and yellow, how can we make orange?

She knew, that red + yellow = orange.

Of course……using just a few drops, in relation to the amount of corn starch and water, we got a very light orange.  Similar to peach or orange sherbet.

{JM} decided he wanted to try making his blue Oobleck,  purple.  So I asked him what color he would need to add to his blue, to make purple?

blue + red =  purple

Again….in relation to the amounts of ingredients, we had lavender.

{S} wanted to change turn his yellow Oobleck, green.  Well, he knew that yellow was already a primary color, but so was green. So what would happen if he put green in his yellow?

yellow + green = lime green.

But the most interesting thing about Oobleck, is the constant change in consistency, depending on it’s state. This is where we get into the scientific study.

On appearance, it seems to be a liquid form.  If you run your fingers through it, it is still a liquidy form.  But any act of compression, suddenly turns the liquidy state of substance, more solid.    If you look at the photos below, in frame 1, {S} is just holding a puddle of it in his hands.  But as soon as he starts to squeeze it, in frames 2-4 it turns to a more solid mass.

But left when the compression is relieved, it begins to return to it’s liquid state again.

It’s amazing, isn’t it?

Here is a more specific explanation, taken from this link, which also has different Oobleck activities, for different ages, if you’d like to check it out after.

Water and starch do something unusual when mixed together. The substance they form pours like a liquid, but when squeezed with your hands, becomes solid. When a substance acts like both a liquid and a solid, scientists call it a discrepant substance.     Two things commonly cause this type of change—temperature and pressure.  We will see that temperature has no effect on Oobleck and that its solid or liquid state is influenced only by pressure (or lack of pressure). Squeezing it in our hands turns Oobleck into a solid. But if we hold it without squeezing, it drips through like a liquid. You can roll Oobleck into a ball, but when the rolling stops, it will become a liquidy mess!

It really is a great deal of fun to play with!  And I promise you it is not as impossibly messy as it looks.  And trust me…it looks it! But it washes away with such ease, it’s enough to make any mother smile. A REALLY BIG GRIN!!

The thrill of it it does not wear off, any time soon.

Oh, we never tried shaking hands before!!  How do you do??  <giggles> <giggles>

And the fun goes on and on and…..

…..on.   AND on.

We hope you enjoyed this post.  Have YOU made Oobleck before?  Do you call it something else?  Will you let your kids make some (again) soon?   Oh and, can YOU play with them?

Yes you can.  I sure do.

Save

Save

Filed Under: Elementary Homeschooling, Elementary Homeschooling HOME ECONOMICS, Elementary Homeschooling MATH, Elementary Homeschooling SCIENCE, Homeschooling, Math, Science Tagged With: color-mixing-lessons-for-kids, goop, goop-recipe, homeschooling-elementary-science, measuring-fun-for-kids, oobleck, oobleck-recipe

Your Kids Might Dig This, Too! | Archeology Digging Fun for Kids | Homeschooling

May 22, 2010 By Laura 2 Comments

If your kids love archeology, digging in the dirt, or finding treasured, they are really going to dig this!
(This post contains an affiliate link.)

archeology for kids

My cousin and her daughter (my God daughter) came down a couple of months ago, for a girl’s overnight with myself and my own 2 girls, and so thoughtfully, she had brought some great gifts for the kids! It was so sweet.  It was unexpected and unnecessary, but I do love gifts that are both project-like, fun and educational.

archeology for kids

This is one of those gifts,…. which was for {JM}:  Dig & Play Treasure Island.

Some may not think of it as educational, initially, but many of us homeschoolers, tend to quickly identify the learning aspects that are truly in just about anything, and everything.

Dig and Play Treasure Island brings out the excavator in your child.  The kit contains a plaster block, which contains buried treasures and coins. Using the specially designed digging tool, they must dig at the plaster little by little, to find the treasures.

It takes hard work, determination and ambition, but is ultimately rewarding.  To me, this helps instill the life lessons, that nothing worth having, comes easy.  What’s more, {JM} spent hours having fun, was excited about what he had found, and inspired to keep going to see what else was still yet to be discovered.

By reading and following the directions (such a necessary skill in life), {JM} learned that wetting the plaster, would make the digging easier, because the plaster would soften. (Science).

Soon he could see the edge of something!  He dug more ambitiously around the treasure, so that he could get it out.

Gold and silver coin treasures were being exhumed all over the place.  Because the plaster digging was a dusty job, {JM} wore a face mask that Daddy had on hand.  But a bandana would do as well.

{JM} also learned that the more water he sprayed on the plaster, the easier the job got!

What’s this?  It looks like a treasure chest!  He wondered what was inside.

Wow!!  Look at the beautiful gems!  And a die?

Dig and Play Treasure Island, also comes with a game board. and game directions.   Game pieces are also exhumed while digging in the plaster block.

So once the digging is all done, the fun doesn’t end!
What a great gift idea, for your kids, or other kids in your life.

Save

Save

Filed Under: Elementary Homeschooling SCIENCE, Games, Homeschooling, Science Tagged With: archeology-for-kids, archeology-projects-for-kids, dig-and-play-treasure-island, educational-games, educational-gifts, elementary-homeschooling-science, homeschooling, homeschooling-archeology

  • 1
  • 2
  • 3
  • …
  • 5
  • Next Page »

We are wicked happy to have you here! We hope you find much inspiration, help, humor and enjoyment here.


Archives


POPULAR POSTS

* * * * * *

SUBSCRIBE to House of Joyful Noise blog! Every new post, delivered right to your email box!


Privacy Policy

Amazon Affiliates

Never at any additional cost to you, we may earn a small commission for our endorsement, recommendation, testimonial, and/or link to any products from our website. Your purchase through our links helps support our family, while sharing with you the products we authentically use and recommend, for various ideas, and letting you know where you can purchase them. Thank you for your support!

[footer_backtotop]

Copyright © 2025 HouseOfJoyfulNoise.com · Genesis Framework by StudioPress