• HOME
  • {A}’s Chipmunk Training Archives

 Homepage

  • The Homestead
    • Home Projects
    • Home Improvement
    • Home Decor
      • Seasonal Home decor
        • FALL Home Decor
        • WINTER Home Decor
        • SPRING Crafts and Creations
        • SUMMER Crafts and Creations
    • Our Chickens
    • Gardening
    • Organization
    • Re-Purposing
    • Furniture Refinishing
    • Budget
  • Crafts & Creations
    • Seasonal Home decor
      • FALL Crafts and Creations
      • WINTER Crafts and Creations
      • SPRING Crafts and Creations
      • SUMMER Crafts and Creations
    • DIY (Do-It-Yourself) Project
    • Kids Arts and Crafts
    • Homemade/Handmade Gift Ideas
    • Holiday Crafts
    • Fan Pulls
    • Free Printable/Downloadable
    • Sewing Projects
    • Giveaways
    • Business Features
  • Recipes/FoodFun
    • Breakfast
    • Lunch
    • Main Dish
    • Sandwiches
    • Appetizers
    • Slow Cooker
    • On The Grill
    • Side Dishes
      • Soups
      • Salads
    • Baking
      • Breads, Rolls and Muffins
    • Snacks
    • Treats
    • Desserts
    • Drinks
  • Homeschooling
    • Elementary Homeschooling
      • Elementary Homeschooling READING
      • Elementary Homeschooling MATH
      • Elementary Homeschooling LANGUAGE ARTS
      • Elementary Homeschooling SCIENCE
      • Elementary Homeschooling HOME ECONOMICS
      • Kids Arts and Crafts
    • Middle School Homeschooling
      • Middle School Homeschooling SCIENCE
      • Middle School Homeschooling HOME ECONOMICS
    • Language Arts
    • Math
    • History / Social Studies
    • Geography
    • Foreign Language
    • Field Trips
    • Games
    • Nature Study
  • The Big Picture
    • Life In General
    • Celebrations
    • Faith
      • Into the Light; The Series
    • Giveaways
    • Reviews & Sponsors
  • Photography & Lettering
    • Photography
    • truck lettering
    • vehicle graphics
    • Newborns
    • Kids
    • Engagement
    • High School Senior Pictures
    • High School Senior Pictures Sneak Peeks

Call Us Copy Cats! | Crayon Wall Art

September 13, 2011 By Laura 16 Comments

crayon-wall-art-tutorial-20


This crayon art thing that is happening….You know, the one that’s sweeping the nation?  It’s been pinned to death, and it’s invaded Blogland, like there is tomorrow.  And although I am hardly ever one to copy someone else’s ideas, or follow trends for the sake of everybody else doing it, I KNEW I was going to do this art-craft with my kids, the very-first-time I saw it.

Even at the risk, of being called ‘Copy Cats’.


crayon-wall-art-tutorial  
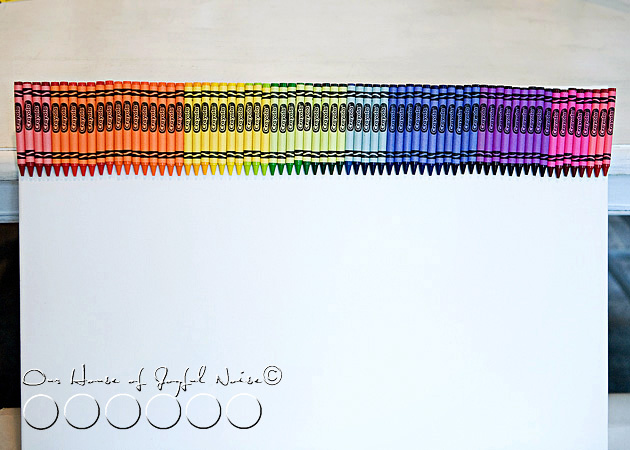
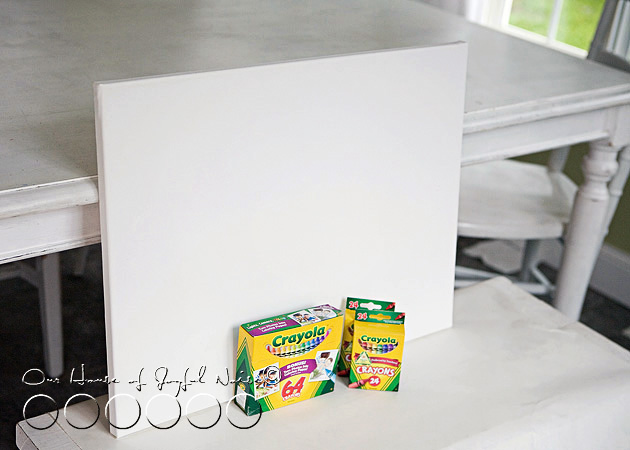
So I picked up a 16″ x 20″ white canvas. I knew I was going to love this piece when it was done so I wanted it as big as I thought we could manage, without buying every store in town out of Crayolas.  Oh yes! It has to be Crayola Crayons for me. IS there another brand? Huh. Not in my world. I’ve been a Crayon-Brat since I could….well, color! It’s Crayola, or bust.

So we started with a box of 64, and two boxes of 24. And then…..we got a 3rd box of 24 after that.  Naturally, we couldn’t use ALL of the crayons in every box.  Every color we did use, we needed 4 or more of, to make it across the canvas.  Some colors were just not going to work.  And some, I just didn’t like.


crayon-wall-art-tutorial-1  
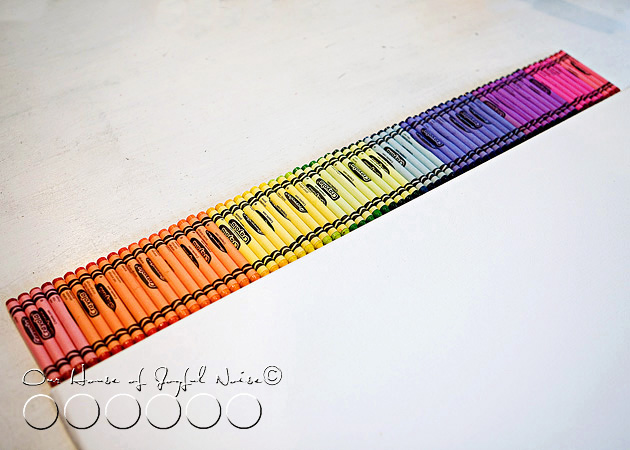
We laid our colors in the exact order we wanted, along the top of the canvas on the table.  Then we got ready to glue them.


crayon-wall-art-tutorial-2 
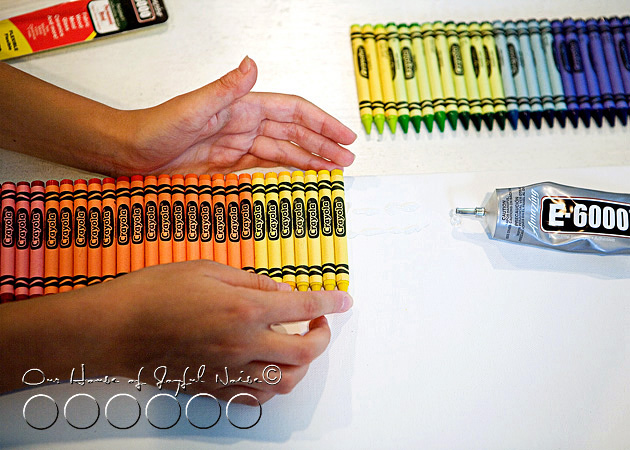
Our initial plan, was to hot glue the crayons down.  But we quickly decided that wasn’t working for us.  The hot glue cooled and hardened too quickly.   So we broke out the ‘Amazing E-6000’.


crayon-wall-art-tutorial-3 
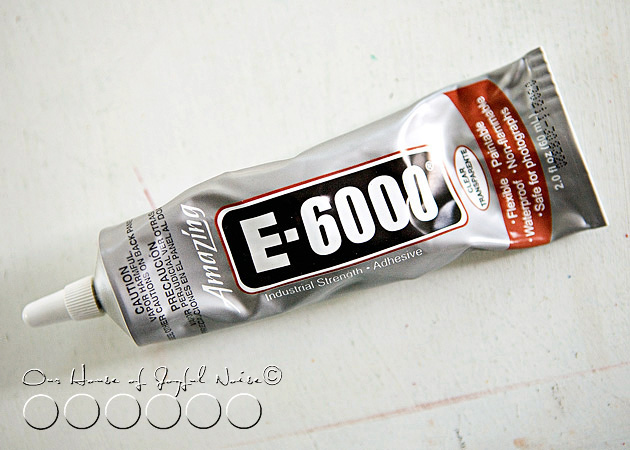
Amazing, is right.  I love the stuff!  It’s the Mac-Daddy of all super glues, in my crafting world.
It really stinks though. I recommend ventilation, because the fumes can’t be good for anyone.


crayon-wall-art-tutorial-4 
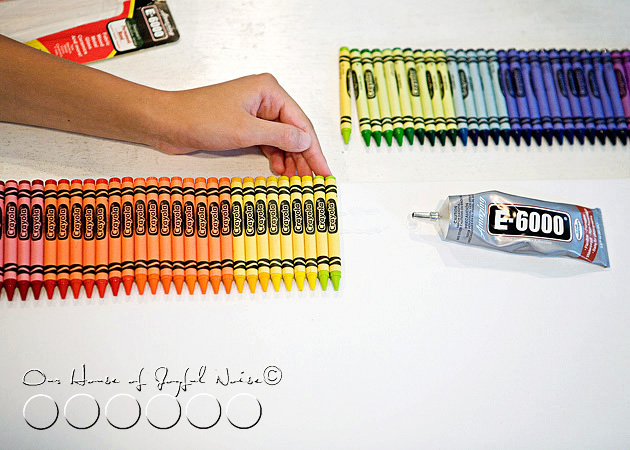
We just put a couple of lines of glue for a few inches at a time, and the kids helped lay down the crayons in order, as we went.   Alexis helped make sure the tops of the crayons, were as even as possible, aligned with the top of the canvas.

I wanted to just get to melting them right away.  But Alexis, often my handy voice of reason, convinced me that it really would be best, to let the glue crayons set overnight, if we were going to apply high heat to them.

I knew she was right. So I stomped away, and pretty much pouted the rest of the day.


crayon-wall-art-tutorial-5 The next day, it was all set for sure! Those crayons weren’t budging.   So we stood the canvas up on the bench, and leaned it against the table.   We put large sheets of paper underneath the canvas, because we knew we were about to make a hot mess. (Like usual, but literally this time.)  I highly advise a drop cloth or paper of some sort! The wax is bound to get dripping.


crayon-wall-art-tutorial-6 
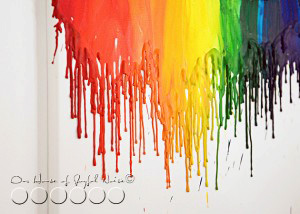
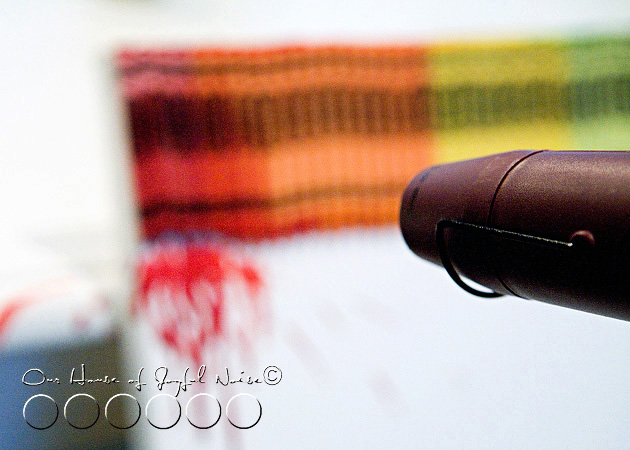
Finally, we could start melting the crayons!  (Yyyipeeee!!)   I can tell you, we tried a hair dryer, for about….ohhh, a milli-second. I knew there was no way I’d have that kind of patience. If it ever got the crayons melting at all, the hair dryer would probably be over-heating by then. So we plugged in my heat gun, I have used for embossing powder, over the years. I KNEW that would work.

crayon-wall-art-tutorial-7 And boy did it ever.  We learned immediately that it could really blow some hot wax around!  Oops!


crayon-wall-art-tutorial-8 
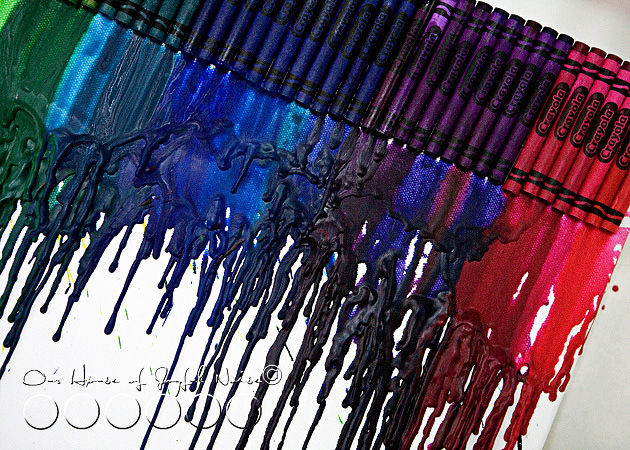
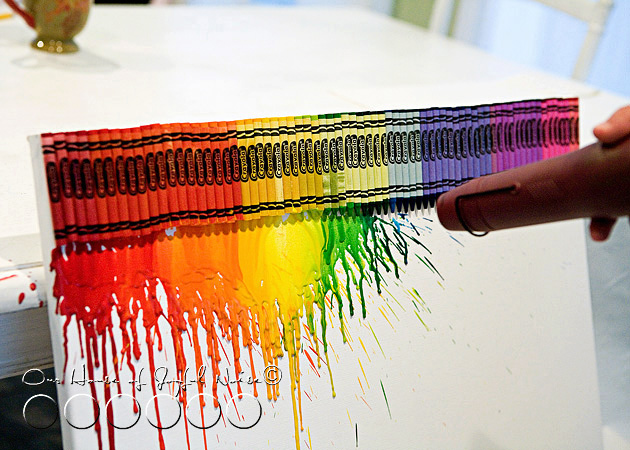
Very slowly, we worked our way across, watching what was happening as it was, and adjusting our distance and angle of the blowing hot air, as we did. I really didn’t want the colors blowing sideways!  But….more ‘control’ therapy for me.  Sometimes, one cannot control the way the wind blows, completely. (I’ve tried, on many-a-photo-shoot.) Furthermore, I wanted this to be more the kid’s masterpiece, than mine.


crayon-wall-art-tutorial-9 
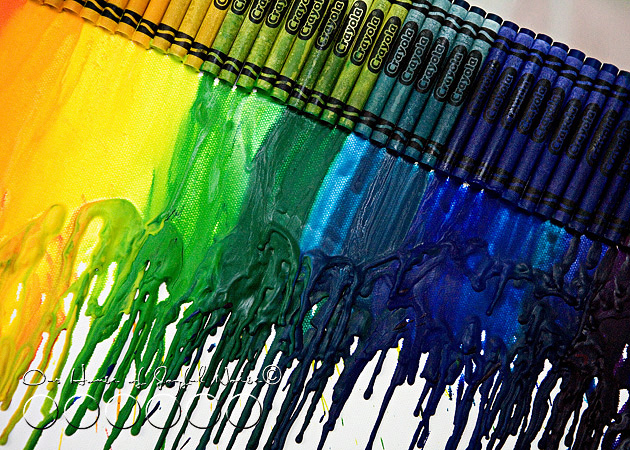
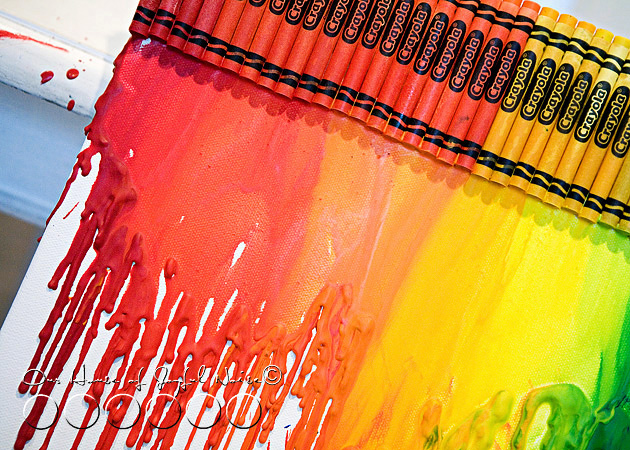
We were directing the heat onto the lower end of the crayons, and waving it around as needed.  The trick, is really to avoid getting too close to the top of the crayons, which we did not want to melt, and to not heat the middle either, as to have a crayon tip blob just fall out.  Sometimes, we started to see smoke, from the paper heating so much, so you want to be careful of that too.

We all took turns, while we all tried to verbally direct each other too. lol

crayon-wall-art-tutorial-10 WARNING though:   This is really NOT  a craft for a young child to do alone.  The heat gun is hot, and the melting wax is really hot too.  But, it’s a fun craft to do with your littles.


crayon-wall-art-tutorial-11 I really kept trying to go back, to try and perfect this, or fill in that, and the kids were like, “Mama, just leave it!!  It looks good. Don’t ruin it!”.   Excellent therapy for me, to just embrace the art that happened.   Because I have ALWAYS been the kind of technically sound type artist.  The kind that brings to life something I see, exactly as I see it in my head, down to the last detail.   My ‘let-loose’ therapy started in art school, the day I had to draw a nude model on paper, with a stick that had been dipped in ink, with my mouth. Talk about lack of control!  I think that exercise actually set me back a few years. lol


crayon-wall-art-tutorial-12 
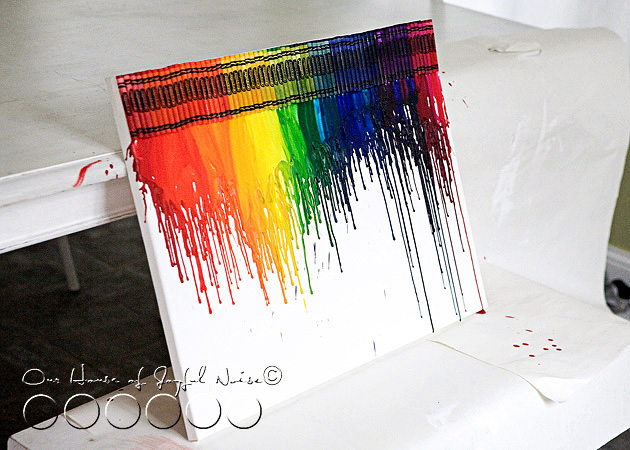
We all took a step back to take a good look at out artwork, and agreed to call it DONE.

Then we waited for Daddy to come home to see it. And of course, hang it up for us.  Somewhere.

But where?  That was the question.  I wanted it in every room I thought of!  It’s colorful, and happy!  And the kids and I made it together.   It had to be in a good place.


crayon-wall-art-tutorial-13
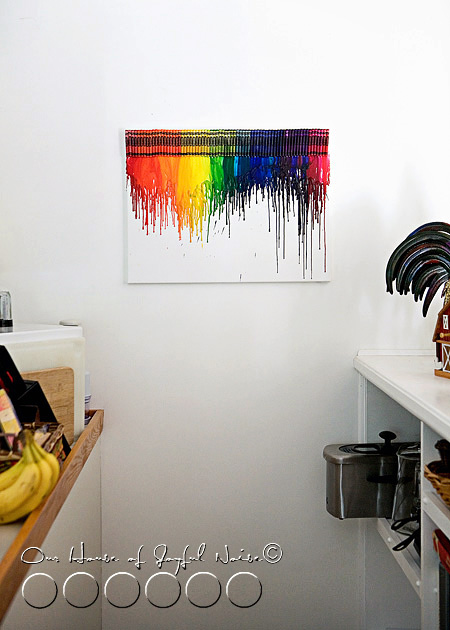
We decided on the wall over the stairwell in the kitchen, down to the lower levels, was a good place for awhile.


crayon-wall-art-tutorial-14  It was on the way down to what will at some point be the kids’ Rec Room.

It’s also on the way down to the Laundry Room.  And you all know, we ALL could use a smile, on the way to the Laundry Room!

crayon-wall-art-tutorial-13
Being over the stairwell there, it can be seen from about half the house on that level.  The kitchen, the school room, and the living room.


crayon-wall-art-tutorial-17 
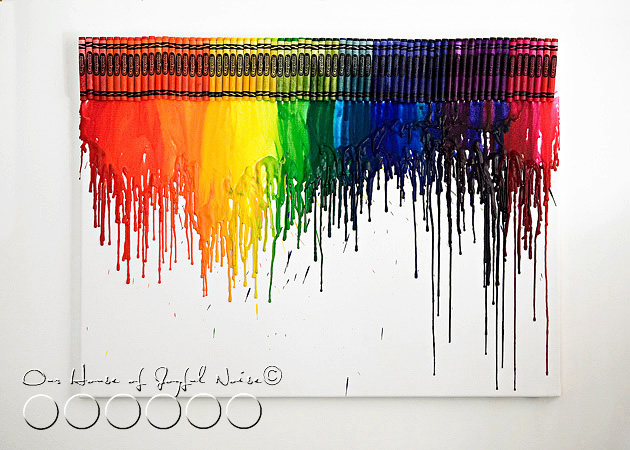
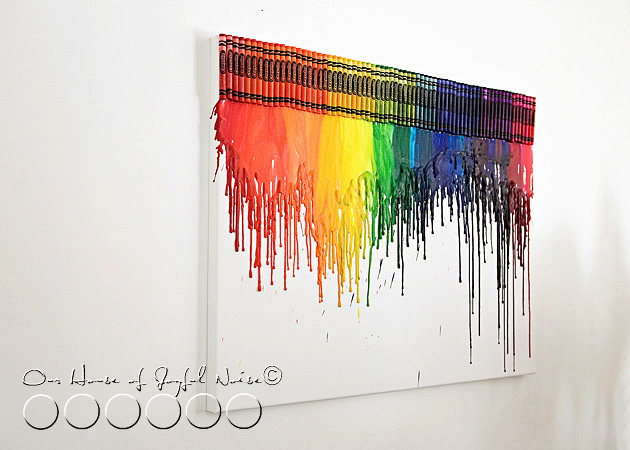
I have always said, “Colors make me happy.”  They really do.
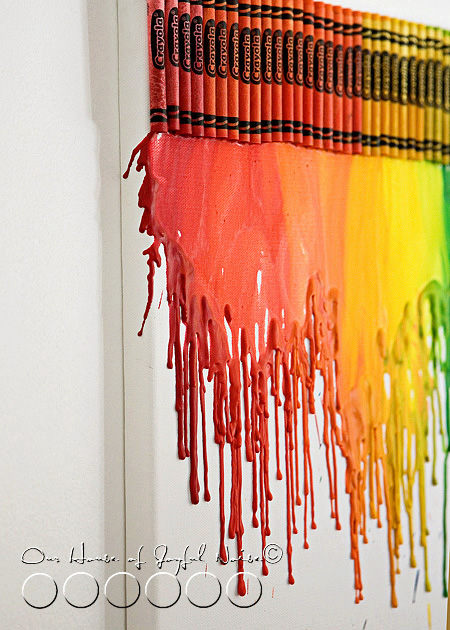
 

crayon-wall-art-tutorial-18
Oh, the texture!
I wonder what the Crayola Corporation thinks about this craze.  Surely they’ve caught wind of it by now.  Probably not being able to keep their crayons in stock at stores, and all. I’d have to guess they should be pleased, with what must be a sudden and dramatic increase in sales. We helped with that!!


crayon-wall-art-tutorial-19 But again, it was not my idea.  I wish it was.  And although copying the latest craft happening will never be my style, I do not regret this once, for a minute.
I do want that thank, though, whoever did come up with this idea. Because we had so much fun doing it!

Have you, given this idea a try yet?  And if not, don’t you want to now?

******


Save

Filed Under: Crafts & Creations, DIY (Do-It-Yourself) Project, Kids Arts and Crafts, Tutorial Tagged With: arts and crafts, crafts, Crayola-crayons, crayon-art, crayon-wall-art, DIY-art, E-6000, melting crayons

My First Annie Sloan Chalk Paint Project / Before & After

August 31, 2011 By Laura 21 Comments

annie-sloan-chalk-paint-project-7

I have been SO ridiculously excited about this post. And you all know what happens when I get excited! I babble! But I’m going to make great effort in not doing that, this time. (Deep breath. I can do it! I know I can!).  I’ve just had to focus on getting our current $100 Gift Card Give Away together (located in The Big Picture ; ).

So, we’re talking Annie Sloan Chalk Paint.  If you visit many creative-type blogs, surely you have heard of it by now. It’s ‘all the rage’ right now, as they say. And frankly, I was believing it.  So we ordered 5 cans of paint, and both the clear and dark waxes.   Now, I’m not going to get into exactly what colors we ordered right now because, we have a very long list of refinishing projects we plan on doing with this paint, and I feel like each one will be more of an exciting surprise for you all as we blog those ‘Before and After’ projects, if you don’t even know the colors we have to work with.  Am I right? I even went so far, as to digitally cover the paint colors, the day our order came in, and I was so excited I had to share a photo on our Facebook Page.  I know.  The lengths that I will go to.

But anyhoo, that’s the preliminary chat!

annie-sloan-chalk-paint-project-5

I have never worked with chalk paint before, or waxes.  So because I expected this to be a whole new experience than any I’d had before when painting, I wanted to start with a small project.  You know, something fun, but o.k. to experiment with, so I could get a real feel for how this paint worked, and practice waxing, etc.  I know that sounds wise.  ; )  But in other words, I was scared to just jump in with this stuff, and re-do some important family furniture piece for our home when, frankly, I wasn’t sure I’d know exactly what the heck I was doing.

Now, as a little related side-story, there is an elderly couple who are very dear friends of ours, and almost a couple of months ago, {A} helped their daughter move them to a more suitable and helpful place for folks their age. Not a rest home. It’s a lovely community. But in the process of packing up one place to move to the next, they were down-sizing and getting rid of a whole  lot of great stuff.  They were bringing it all to a consignment place, but before they did, they gave us dibs to go through it all, and take whatever we wanted.  We didn’t take a whole lot, but what we did take is pretty cool stuff.

One of those things, was this bird house.

The daughter believed it was really an indoor home-decor piece. But I told her, “That’s o.k. I’m still putting it outside.” Because I new just where I wanted to put it. Under the apple tree, near our gardens.  And I have to tell you, every time I have caught glance of it over there, it has made me smile, and bubbles up joy inside me. I just love to see it standing there. It’s charming, isn’t it?

0011

0021

But I also new, it was the perfect kind of piece, to take the wrath of my experimental Annie Sloan endeavors. I couldn’t imagine I could possibly ruin it, really.  Could I?  My challenge was, what color should I paint it? Because  I actually really liked the color it was, already. And I knew A.S. (Annie Sloan) had a color called Versailles, that is like a tannish-green, of sorts? Pretty similar to this. But if I was going to paint it, I wanted it to be look different enough in the end, to be worth the work!  So as much as I loved the color it was, I was going to veer in another direction.

0031
I can’t tell you how pleased I was to learn, that every little piece of window framework, and even the door, came off!  Gosh, how could I possibly screw this up, right? The way I saw it, I’d hardly even need any brush control, now.  This was going to be a breeze.


0041
Because I had intentions of seriously sanding and distressing the piece when I was done, to make it look somewhat old and weathered,  I felt like I needed to paint a new color, under the top new color. So I painted the entire house Paris Grey first.

0051
As well as the entire stand.

Then it was time, to really get down to the fun parts.  And because of that, I completely got lost in my own world. Completely. If you know me, you know, that once I get into my creative projects, I’m in a zone of my own. Time FA-LIES.  I feel so much joy inside as I work, being creative, and frankly, I’m oblivious to much else going on around me, or what else I should be doing.

Like….taking photos as I go.  I mean, the project was over the course of a few days, because I have lots of responsibilities and priorities, with my family, that need tending to. But I was right back to my project, every-chance-I-got.  Like…”Let me back at it!”.  I was also pretty much a mess while I was doing it too, so touching my camera was really not in the forefront of my mind. Still, I will tell you all about my process to the final piece.

Ready to see a little transformation?

0061

For the body of the house, I went with the Annie Sloan paint color Province, which I think is so beautiful. Even in the can. I was a little concerned that it would clash with the greens of the outdoors. And yet, I wanted it to stand out too. In the the end, I was just dying to paint with this color. So it’s what I went with.  All of the window trims, house trim, and roof, was painted in Annie’s Old White.  As was the stand.  I did use 2 coats, because I knew I’d be sanding like the dickens, and I really wanted some contrast there. So once it was all painted and dry (it dries super fast, which is a good thing for impatient me), I waxed the whole thing with the Clear Wax, doing the little pieces individually, and put it all back together. The wax took some getting used to, to work with. There’s a ‘good time’ to wipe it down, after applying, when it’s no longer wet, and not too dry either. But just touching it, I got a feel for it quickly. After the clear wax coating, I sanded the dickens out of it with 100 grit sandpaper, really attacking the edges of pieces, and even the downward strokes on the roof and house walls.

Then, I applied the dark wax, and when ready, rubbed it in or off where I wanted. The dark wax is messy stuff. But FUN!!

Waxing and sanding, is not a glamorous job. I was a HOT MESS, while working at this point. It was hot and humid out anyway, so I was sweating, putting out such physical labors. The sanding of this piece was a messy job, that I decided needed to be done on the deck, from the paint dust.  The wax has a wicked strong odor too, as some mediums do, but I did that in my sunroom where the whole project was, with all of the (surround) windows open.  So imagine me: trickling sweat, hair stuck to my head, paint dust stuck to me everywhere, hands and nails a wreck with paint and wax, and possibly stinkin’.  But having the freakin’ time of my life!!

0071 This is what I love, about creativity.  It’s contagious!!  Just look at the hot mess on this table, that looked just like this for days. But I’m NOT the only one who made it!!  The ‘other’ kids helped! Once one in our family starts getting creative doing one thing or another, someone else gets a hankering to do something of their own too, and so another does, and so on. We had coloring, painting, and even wood burning going on here in this room! Thank goodness we have other places to eat dinner together in the house. Because this was the sight in this one for a good 3 days.

But the birdhouse was not done. Did you notice the pink paint around in a couple of photos up?  ; )  All along, if I was going to paint my house Province, I envisioned tiny painted pink roses, and little green vines and leaves on it. I’d use acrylic paints for this part. Not Annie Sloan.  The problem was, I had never painted little flowers in this kind of paint before. I’ve been more of a watercolorist.

But….there is always my very best friend to turn to:  GOOGLE!  I was sure I could search up some quick how-to videos and get myself a quick lesson or 2. And so I did.  Then I squirted some pinks, greens and white plops of paint on a coated paper plate, got out some brushes, practiced a few roses on the plate, and then just winged it!!   With a pencil, I lightly traced the door and attic window on the house (for placement) and then removed them (to put back on after painting the roses & vinery), and then….I went ahead and painted the roses and vinery right on the house.  (This is huge for me, People! I don’t spontaneously wing things like this, with no real experience. Because I’m a serious perfectionist! Normally, I would want 100% confidence first because, this wasn’t going to come off the chalk paint!  But, because I am also working on this need-for-perfectionism-part of me, I challenged myself to do it anyway. Fearing….I came so far with loving my birdhouse, only to possible ruin it in a moment. Yikes! But that’s the assignment, you know? Looking fear dead in the eyes, and saying,

“You won’t take me down!! I won’t LET you!”

annie-sloan-chalk-paint-project

And there she was.  All done.
I felt like I won.

Once the acrylic dried, I did rub some clear wax over the flowers and vines, just for protection.

annie-sloan-chalk-paint-project-1

I really, really, really loved the original door. Especially that rusty nail door knob!  So I really did not want to mess with it much. All I did with it, was give it an Old White wash (part water), let it dry, clear waxed it, distressed it good, and then used some dark wax on it too.

In the end, I distessed it so much that in parts, I went right down to the original wood.  So again, the whole process was:

1) Undercoat of paint. 2) Painting of top coat. 3) Clear wax application and rubbing in or off. 4) Distressing. 5) Dark wax.

And for this project, the added steps of the acrylic floral painting and clear waxing.

annie-sloan-chalk-paint-project-2
I could not wait, to put her outside, back under the apple tree.


annie-sloan-chalk-paint-project-3
I love the whole piece. But the door is still my favorite feature.

Do you forget what it used to look like?

With any kind of refinishing projects, I personally just love to see the side-by-side “Before & Afters”, so I’ve got one for you, with this project….

annie-sloan-chalk-paint-project-6

I loved it before. And thankfully, I still love it.

What do YOU think?  Would you have left it alone? Or do you like my refinish?  I’d love to know your preference. You won’t hurt my feelings much. ; )

The important thing is two-fold:

1) I got a really good feel for this paint, and waxes, and a certain new (healthy!) addiction.

annie-sloan-chalk-paint-project-4

And 2) I have to tell you, every time I have caught glance of it over there, it has still made me smile, and bubble up joy inside me.

I just love to see it standing there. It’s charming, isn’t it?

I’m telling you. If some little birds don’t move in to this sweet little pad, I just might!

******

Filed Under: Crafts & Creations, Home Decor, Re-Purposing, Refinishing, The Homestead Tagged With: annie-sloan-chalk-paint, annie-sloan-chalk-paint-projects, before-and-after-refinishes, before-nd-after-Annie-Sloan-projects, bird-house-make-over, bird-houses, home-and-garden, refinishes, refinishing, refinishing-bird-houses

A T-Shirt Craft / Wicked Cool, Fun, Easy, & Not Messy!

August 17, 2011 By Laura 35 Comments

cool-fun-kids-t-shirt-craft-21

This just may be the coolest and most fun craft, I have ever done with our kiddos.  If that wasn’t awesome enough, it is super easy, and it doesn’t make a mess either!!  I know, right? It’s perfect for kid’s birthday parties, scouts, camps, etc.  Our kids didn’t want to stop.  They even made a couple of shirts for their friends.  But all of you mothers, as we show you how simple this project is,….think outside the box, for yourselves, or other projects, too. I am!

awesome fun t-shirt craft All you need is:

  • some white t-shirts (in your sizes)
  • sturdy plastic cups
  • rubber bands
  • bottled rubbing alcohol
  • a (liquid) dropper
  • and Sharpie Permanent Markers in colors!

Easy supplies to gather, right? Here’s how you get creative with them.

awesome fun t-shirt craft Lay your t-shirt on the flat surface you are working on, front side up. Take the cups, and arrange them upright in different places inside the t-shirt, one at a time.  As you do this, consider that where ever you have a cup, that’s where a design will be put on your shirt. Secure each cup as you go, with a rubber band. (You can do more later, on the sleeves or backside of the shirt.)

awesome fun t-shirt craft Using your colored Sharpie Permanent Markers, get creative and make some designs or simple line drawings on t-shirt fabric that is over the opening of the cups. My kids even played a game of Tic-Tac-Toe on one.  In a moment or 2, I’ll get to what colors or techniques you may want to avoid, and which ones worked best. We learned from little mistakes so you don’t have to, and figured out some tips and tricks that I’ll share with you too.

You’ll be able to see them for yourself, too. ; )


awesome fun t-shirt craft Each designer can personalize them in their own style, symbols, colors, or simple line drawings that they like, or mean something to them.  Or if it’s a gift, think of the recipient. Simple words may be able to be used as well.

Here’s where it gets even more fun.

awesome fun t-shirt craft

Working on one design at a time, slowly drop drops of alcohol in the *center of the circle/design.  As you do, you will see the marker ink start to spread.  You don’t want to drop too much alcohol though…..you need to do this slowly, and watch what is happening. The spreading will slow down, but if you watch carefully, it is often still spreading. If it does seem that it stopped, add more drops, one at a time, and keep watching.

*TIP:  It’s important, to only drop the alcohol drops in the center. Reason being, it pushes the ink from the center, outward, spreading it evenly and nicely, for the right effect. Also, if the fabric becomes too saturated with alcohol, the drops drip into the cup beneath, which pretty much evaporate. But that is why it’s important to keep the cups pretty upright, as to not spill any colored alcohol that may be sitting in the bottom of the cup.

awesome fun t-shirt craft Once you get the feel for it, you can do more at once. As one design is spreading, you can start another (and another) beside it.

Do you see the multi-color burst? That one is still spreading very slowly.  Do you see the little purple swirly one? That’s a little shot glass, instead of a bigger plastic cup.  Perfect for the side of a sleeve too.


awesome fun t-shirt craft

Here, {O} had finished drawing out her designs, and she’s now dropping alcohol on them.  It’s really so exciting, to watch them and see how they are going to turn out.


awesome fun t-shirt craft

As you can see, black can get pretty messy.  In the case of the smiley face, I like how it turned out. It reminds me of a record. Remember those? ; )  But if the black were in the center of the design, it really would have blotted out the rest of the colors.

Now look at the rainbow and clouds. Because she was dropping alcohol under the last color of the rainbow, where the center is, all of the color above that pushed up. Because again, it spreads from the center. So that’s a good thing to keep in mind with your designs.   Blue reeeeaaallly spreads, so be mindful with that color, too.  It may seem like it’s a lot to remember, but really, once you are working with the colors you, you get it quickly.

*TIP:  We actually did a test t-shirt before we began our own t-shirts, and played a bit, just to see how it was going to work. But the colors’ chemistry is something we learned on the real ones.  So you may want to consider 1 practice t-shirt for everyone to do a practice design on collectively.  Or, you all can just live on the edge, and go for it!

Here, the boys draw out their designs…..


awesome fun t-shirt craft

awesome fun t-shirt craft

awesome fun t-shirt craft

Sometimes, the ink will spread so much, that you can’t hardly tell what it was anymore, such as with the blue and yellow one above. It was a thunder cloud, with lightening coming out. But that’s ok! The designer knows what it was, which makes it fun!  Other times, you can vaguely still see the deign, like a subliminal message. ; )  In the photo above, the very top two designs in the photo are not alcoholed yet. So let’s take a look at how those came out….


awesome fun t-shirt craft See, I was concerned that that “J”, so colored in and outlined so darkly like that, might turn into a hot mess. Using dark colors and solidly coloring in something, is going to turn out much like that J. But the flag turned out pretty cool! Again….see how it spread from the center? It creates it’s own design.


awesome fun t-shirt craft

Drop…..drop…………….drop…..we don’t really want to stop!

Here are some of my favorite designs…..

awesome fun t-shirt craft
Antony…..get it? ; )


awesome fun t-shirt craft

awesome fun t-shirt craft Have a nice day.


awesome fun t-shirt craft Love this one. It’s {S}’s design.


awesome fun t-shirt craft Dragonfly.

awesome fun t-shirt craft

Here’s how the kid’s own t-shirts turned out.  WHICH, they are loving wearing. We have not washed them yet. I think I will just hit them with an iron before throwing them in the wash, to kind of ‘heat-set’ them first. Even though, it IS permanent marker, and shouldn’t come out.

Also…the shirts dry very fast, because it’s just alcohol, which evaporates.

Next time……because there will be a next time, very soon……we’re going to try not securing the rubber bands so tightly, and try to make a less defined circle.  Because it’s the fabric pulled tight over the edge of the cup, that really keeps the ink from spreading much more.  I bet it would look cool to let it go, too.

awesome fun t-shirt craft Our kids ‘signed’ the shirts to their friends, on the back side, bottom left, of the shirt.  Here, the shirt is secured over a square vase container.

Check out how cool it spread…..


awesome fun t-shirt craft I have more designs in mind, that will be fun trying.

Other Ideas: This technique can be used in the more traditional way that tie-dyed shirts are done, by twisting and rubber banding the shirt, coloring it with markers, and applying the alcohol.

I’m going to try making my own shirt, with a design just in the center, on a women’s t-shirt. Maybe a little something cool on the sleeve cuff too.

Another idea: white bandanas!!

Hope you loved this easy, fun crafts, that’s (not just) for kids!!

You may also be interested in another t-shirt craft we did years ago: T-Shirts with Sole!

* SPREAD the craft idea with others!  Facebook it, Twitter it, or Pinterest it for yourself.*

Have fun with it!

If you and your kids do this craft, take photos, and blog it….come back and leave the link in the comments of this post, so we can see how yours came out!

******


Save

Filed Under: Crafts & Creations, DIY (Do-It-Yourself) Project, Kids Arts and Crafts, Kids Arts and Crafts Tagged With: best-t-shirt-crafts, Catholic-blogs, Catholic-families, crafts, fun-not-messy-kids-crafts, kids-arts-and-crafts, sharpie-markers-craft, t-shirt-art, t-shirt-craft, t-shirt-project

Our Daughter’s Handmade Rosary

August 15, 2011 By Laura 7 Comments

We just wanted to share with you this beautiful rosary our daughter {A} > Alexis Grace made. She is 14.


as-first-rosary_web
She made it as a gift for her friend, Fr. Bob Reed.  The Rosary center is a metal of St. Therese of Lisieux, who is Fr. Reed’s favorite saint, also known as ‘St. Therese – The Little Flower’, thus the roses for the Our Father Beads.  Yellow roses, as many of us know, are symbolic of friendship. But yellow is also one of Fr. Reed’s favorite colors, as well as blue, in the Swarovski crystals, which serve as the Hail Mary prayer beads. So suffice it to say, being a Catholic priest, who loves saying the Rosary, Fr. Reed was very happy to receive this gift from {A}, that consisted of so many of his favorite things.

From a creative standpoint, I am sure many of you can also appreciate the tedious work that went into this project, as well. {A} selected all of the beads, and special pieces of the Rosary in an eclectic manner, through Etsy searches as well as the craft stores, until she had all she needed to begin her project. Then using eye pins and crimping pliers, she created the Rosary.  We were really impressed with her handiwork, and are grateful for her giving heart as well.

Thanks for coming to see.

Update: Fr. Reed was very touched by the gift.  He frequently leads praying the daily rosary on CatholicTV, and {A} has noticed a time or 2 that he was using her rosary she made him.  He likely has many, many sets, and many as special gifts, too. He continues to be such a powerful witness of faith in countless ways to our children, and us as well, through his life and vocation, and his beautiful and authentic commitment to the power of daily prayer to our Lord, and Blessed Mother Mary. We are grateful to God for his friendship and example, all of which has blessed our lives.

Save

Filed Under: Crafts & Creations, Faith, Faith/ Catholic, Homemade/Handmade Gift Ideas, Kids Arts and Crafts, The Big Picture Tagged With: Catholic-blogs, Catholic-families, CatholicTV, handmade-rosary, rosaries, St-Therese-of-Lisieux, St-Therese-The-Little-Flower

Decorative Wall Initials | Craft Tutorial

August 8, 2011 By Laura 10 Comments

decorative-wall-art-initial-modge-podge-10

Every time I’ve gone to Michael’s Arts and Crafts, I’ve looked at these large white initials / letters you can purchase individually.  I knew I wanted to create something using these letters as personalization, for {O}’s room. But I was undecided if I wanted to do her whole name, or just her initial.

decorative-wall-art-initial-modge-podge

The letters have a nice flat white surface to work on.  But what to do on that surface, was another matter I was undecided on.  Those were the questions that kept me from purchasing any for while.  Finally, I decided just her initial would be cute, as we actually do call her “O” half the time.

To decorate the letter (or letters), I initially (no pun intended ; ), thought I’d probably paint a pattern. But then I took to the idea of picking out some cute scrap booking paper, and Modge Podging the surface.  Not a new concept by any means, but I wasn’t looking for a new invention.


decorative-wall-art-initial-modge-podge-1

I love working with Modge Podge.  There are so many varieties, but I knew the Matte finish, which I had on hand, was all I needed, as a glue and also a top finish.


decorative-wall-art-initial-modge-podge-2

We had had a family trip to Michael’s one evening, so {A} could spend her Gift Card she got from her Grandmother for her birthday.  In case you are wondering, {A} knew exactly what she wanted, as she had been wanting it for a long time:  a wood burning kit.  She’s been having fun with that, practicing, and getting ready to do a project. So while we were there at our favorite local craft store, I thought it would be nice to let {O} pick out the scrap booking paper to use, to finish to the initial for her room.

We chose 2, because I had the idea that we could finish both sides of the “O”, and make it reversible!  Naturally, you can’t do that with every letter of the alphabet, but it works for “O”.

decorative-wall-art-initial-modge-podge-3
The back side of the letter does have a hanger hole, and stickers, which were way too difficult to get off.  So I left them. The scrap paper is thick enough that I knew they wouldn’t show through. So my plan was to just paper and Modge Podge right over the hole and stickers.


decorative-wall-art-initial-modge-podge-4

I started by putting a good layer of Modge Podge on the front surface of the letter.

decorative-wall-art-initial-modge-podge-5

Then, I took my letter, and the apple green sheet of scrap booking paper, over to a window.  Placing the paper onto the window, with the backside facing me, I strategically placed the Modge Podged side of the letter, onto the paper.  The reason I did this at the window, was to be able to see the pattern on the other side of the paper, and get as many little blue birds onto the letter as I could, and not cut many or any in half, if possible.  The blue birds were the charm of the pattern to me, so I wanted them to be as much a part of the piece as possible.

decorative-wall-art-initial-modge-podge-6 I took the letter now stuck to the paper, back to the table, and on a self-healing mat, trimmed off the excess paper with an x-acto knife.  Please excuse my mother’s hands. ; )


decorative-wall-art-initial-modge-podge-7 Once the apple green paper was all trimmed to size, and rubbed down good,  I repeated the whole process for the opposite side:

1) Modge Podge the white surface of the letter 2) Bring the scrapping paper and the Modge Podged letter over to the window, and place the paper onto the window with the back side facing you 3) *Strategically place the letter onto the paper, considering the placement of the paper.  4) Trim off excess paper with an x-acto.

*Using striped paper, is even trickier! It’s a tad more difficult, with a rounded letter such as this, to place the letter in such a way to be sure that the stripes will be straight.  Of course the striped pattern could go horizontally, or even diagonally. With a letter with a straight edge, it is easier to line up with the stripes and get it straight.  If this is more than you’d want to bother with, be sure you choose paper that is a more random sort of pattern. Or, to be super safe, you could use solid paper, if that’s not too boring for you.


decorative-wall-art-initial-modge-podge-8 Once all of the paper is trimmed, Modge Podge the surfaces as a protective coating and finish. Allow one side to dry completely, before doing the other.   Then I sanded the edges, just to rough it up just a little.

I was undecided, it it really looked finished. I’m still not sure! I’d love your opinion, once you see it hanging.

Now, since I made this a reversible/2 sided letter, covering the hanger hole on the back side, I hung the letter with a coordinating satin ribbon. It took a little patience, to double tie the bows, and have them come out nice, so that the weight of the letter did not untie the bows!  With a few deep breathes, I managed.

decorative-wall-art-initial-modge-podge-9

decorative-wall-art-initial-modge-podge-11
Here it is, hung on {O}’s bedroom door.  The plan was actually to hang it inside her bedroom, but there was not adequate light in there (later in the afternoon) when I wanted to photograph it. So I hung it on her door. It may or may not stay there.

As a side note, Michael made this latch door, as he is (still in the process of) making all of the doors in the whole house. I-love-these-doors!  They will actually be a little distressed and made to look older, later on when they are all done, for a more old farmhouse look.

decorative-wall-art-initial-modge-podge-12
{O} loves that she can flip her letter over any time she wants, and change the look of it, “depending on what mood I’m in that day”, as she put it.


decorative-wall-art-initial-modge-podge-13

Here’s a closer look.  I like it, but I am still wondering:  Does it need some sort of trim? Or should I paint the inside edge of the letter, a color that coordinated both sides? Or is it cute as is?


decorative-wall-art-initial-modge-podge-14
Give me your opinion. This craft may or may not be officially complete.  Either way, I think it’s a quick & easy craft, and adds a little cute personalization to a room. Imagine the creative ways you could make a decorative letter.  Maybe using 3d elements, painting, or hanging with different materials like thin rope, twine, lace…the possibilities are endless.  I’m already thinking of the boys room.

See, we’ve been working on finishing and decorating our home for years. I have SO much to show you, in the near and distant future, as various parts of the kid’s rooms are finished and decorated.  The girl’s each have their own room, and the boys have a BIG room to share.  Very cool features. The kids have very different personalities, and we are creating their rooms in ways to reflect that, and their style. Such a fun process! We are so blessed with Michael’s carpentry skills too, and we ladies know how much fun interior decorating is!  (As money allows, which is why it’s taken us this long as it is.) So I hope you’ll follow us along through our home finishing journey.

But back to the “O”.  Done or not? And have you resubscribed, as you need to, and put yourself in the running for our current GiveAway?


Save

Filed Under: Crafts & Creations, DIY (Do-It-Yourself) Project Tagged With: craft-tutorial, crafting, crafts, decorative-letters, kids-bedroom-decor-ideas, Modge-Podge-crafts, modge-podge-projects, room-personalization, uses-for-scrapbook-paper

  • « Previous Page
  • 1
  • …
  • 12
  • 13
  • 14
  • 15
  • 16
  • …
  • 28
  • Next Page »

We are wicked happy to have you here! We hope you find much inspiration, help, humor and enjoyment here.


Archives


POPULAR POSTS

* * * * * *

SUBSCRIBE to House of Joyful Noise blog! Every new post, delivered right to your email box!


Privacy Policy

Amazon Affiliates

Never at any additional cost to you, we may earn a small commission for our endorsement, recommendation, testimonial, and/or link to any products from our website. Your purchase through our links helps support our family, while sharing with you the products we authentically use and recommend, for various ideas, and letting you know where you can purchase them. Thank you for your support!

[footer_backtotop]

Copyright © 2026 HouseOfJoyfulNoise.com · Genesis Framework by StudioPress