• HOME
  • {A}’s Chipmunk Training Archives

 Homepage

  • The Homestead
    • Home Projects
    • Home Improvement
    • Home Decor
      • Seasonal Home decor
        • FALL Home Decor
        • WINTER Home Decor
        • SPRING Crafts and Creations
        • SUMMER Crafts and Creations
    • Our Chickens
    • Gardening
    • Organization
    • Re-Purposing
    • Furniture Refinishing
    • Budget
  • Crafts & Creations
    • Seasonal Home decor
      • FALL Crafts and Creations
      • WINTER Crafts and Creations
      • SPRING Crafts and Creations
      • SUMMER Crafts and Creations
    • DIY (Do-It-Yourself) Project
    • Kids Arts and Crafts
    • Homemade/Handmade Gift Ideas
    • Holiday Crafts
    • Fan Pulls
    • Free Printable/Downloadable
    • Sewing Projects
    • Giveaways
    • Business Features
  • Recipes/FoodFun
    • Breakfast
    • Lunch
    • Main Dish
    • Sandwiches
    • Appetizers
    • Slow Cooker
    • On The Grill
    • Side Dishes
      • Soups
      • Salads
    • Baking
      • Breads, Rolls and Muffins
    • Snacks
    • Treats
    • Desserts
    • Drinks
  • Homeschooling
    • Elementary Homeschooling
      • Elementary Homeschooling READING
      • Elementary Homeschooling MATH
      • Elementary Homeschooling LANGUAGE ARTS
      • Elementary Homeschooling SCIENCE
      • Elementary Homeschooling HOME ECONOMICS
      • Kids Arts and Crafts
    • Middle School Homeschooling
      • Middle School Homeschooling SCIENCE
      • Middle School Homeschooling HOME ECONOMICS
    • Language Arts
    • Math
    • History / Social Studies
    • Geography
    • Foreign Language
    • Field Trips
    • Games
    • Nature Study
  • The Big Picture
    • Life In General
    • Celebrations
    • Faith
      • Into the Light; The Series
    • Giveaways
    • Reviews & Sponsors
  • Photography & Lettering
    • Photography
    • truck lettering
    • vehicle graphics
    • Newborns
    • Kids
    • Engagement
    • High School Senior Pictures
    • High School Senior Pictures Sneak Peeks

Our Daughter’s Handmade Rosary

August 15, 2011 By Laura 7 Comments

We just wanted to share with you this beautiful rosary our daughter {A} > Alexis Grace made. She is 14.


as-first-rosary_web
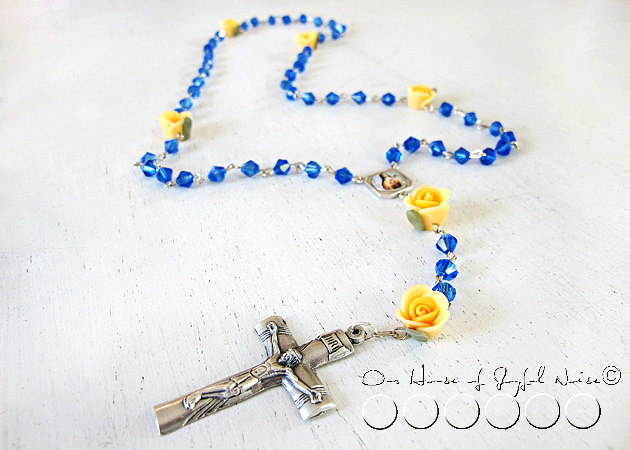
She made it as a gift for her friend, Fr. Bob Reed.  The Rosary center is a metal of St. Therese of Lisieux, who is Fr. Reed’s favorite saint, also known as ‘St. Therese – The Little Flower’, thus the roses for the Our Father Beads.  Yellow roses, as many of us know, are symbolic of friendship. But yellow is also one of Fr. Reed’s favorite colors, as well as blue, in the Swarovski crystals, which serve as the Hail Mary prayer beads. So suffice it to say, being a Catholic priest, who loves saying the Rosary, Fr. Reed was very happy to receive this gift from {A}, that consisted of so many of his favorite things.

From a creative standpoint, I am sure many of you can also appreciate the tedious work that went into this project, as well. {A} selected all of the beads, and special pieces of the Rosary in an eclectic manner, through Etsy searches as well as the craft stores, until she had all she needed to begin her project. Then using eye pins and crimping pliers, she created the Rosary.  We were really impressed with her handiwork, and are grateful for her giving heart as well.

Thanks for coming to see.

Update: Fr. Reed was very touched by the gift.  He frequently leads praying the daily rosary on CatholicTV, and {A} has noticed a time or 2 that he was using her rosary she made him.  He likely has many, many sets, and many as special gifts, too. He continues to be such a powerful witness of faith in countless ways to our children, and us as well, through his life and vocation, and his beautiful and authentic commitment to the power of daily prayer to our Lord, and Blessed Mother Mary. We are grateful to God for his friendship and example, all of which has blessed our lives.

Save

Filed Under: Crafts & Creations, Faith, Faith/ Catholic, Homemade/Handmade Gift Ideas, Kids Arts and Crafts, The Big Picture Tagged With: Catholic-blogs, Catholic-families, CatholicTV, handmade-rosary, rosaries, St-Therese-of-Lisieux, St-Therese-The-Little-Flower

Tissued Decorative Storage Tins | Craft

June 7, 2011 By Laura 7 Comments

tissued-storage-tins-craft-21

Sometimes, us creative people, have ideas that come out better in our head, than they do in real life!  Agree? But this project of tissued decorative storage tins was the opposite.  On the one hand, it may have been just a tad more difficult than I had imagined.  Only because I should have remembered how tissue paper and I, can go round and round and round.  We just don’t seem to get along. I normally do not have the patience for the stuff, and end up making the tissue a wrinkled mess. So much so, that I refer to my husband, to put the tissue in gift bags if I can, and he also is so kind, as to do all of my packaging for my portrait photography orders for my clients.   But on the other hand, these tissued tins actually came out way nicer than I expected!  I’d have to say the credit for that probably goes to Modge Podge. Love that stuff!

This idea is one I came up with as homemade gifts for our nieces & nephews, for Christmas 2010, as well as for my God-Daughter {Ju}. (You all know her by now, right?)   I thought they would be cool for them to keep little treasures & trinkets in, in their rooms, or even for my oldest nephew/God-Son to keep change or what-not in in his Jeep.

tissued-storage-tins-craft Here’s all you need!

As well as an x-acto knife or razor blade of some sort (not shown), and possibly a little patience, if you are like I am with tissue paper.  If you don’t need the patience…..well I’m happy for you!  : )

tissued-storage-tins-craft-1 I was so thrilled to find such bold & funky designer tissue paper, at The Dollar Store!…. that I thought was just perfect for the age range of the kids, from elementary school to teens, and for both the boys and the girls as well.  The silver sticky elements I got in the scrapbooking section of Michael’s Arts & Crafts.


tissued-storage-tins-craft-2 I found the tins shown, at Michael’s Arts & Crafts.

They had a variety of shapes and sizes to choose from.

tissued-storage-tins-craft-3

Modge Podge and foam brushes came from the same place.

So this is how this is done:

With your foam brush, you begin by Modge Podging the inside of one tin, and then layer it with the tissue design you would like on the inside.


tissued-storage-tins-craft-4 You really only want to Modge Podge up to the lip of the inside of the tin before laying on the tissue, but let the tissue overlap from there, for now.  Just carefully rip off or cut the excess with scissors.  Then leave to dry.  We’ll get to how to finish it off in a minute or 2.

Now I am telling you right now, there is no way for the tissue to come out perfectly smooth. Most especially on the inside, where you virtually have to stuff the tissue in there.  But do be careful not to tear the tissue or poke a hole in it. However, IF you do by accident, (as I did more than once (yes, the patience with tissue issue…..) it’s not that hard to cover it up, or manipulate the tissue to make the hole not show.  Honestly, it’s just the insides of the tins that are the hardest part of the whole project.

tissued-storage-tins-craft-5 Do the outside of the tin cover, in much the same way.  Again, only Modge Podge to the lip of the lid, then apply the tissue.  Now getting a little (Modge Podge) glue where it shouldn’t be, and the tissue sticking to it, is no big deal. It can be scraped off easily enough once dry.


tissued-storage-tins-craft-6 Just rough trim it with your x-acto blade, and then leave to dry.  If you are trimming first before it really sits to dry, just make sure you don’t drag-rip the tissue.  Your blade will get Modge Podge on it, so you’ll want to try to keep it clean too.

tissued-storage-tins-craft-7 Now you can do the outside of the tin container the same way:  Apply the Modge Podge, and then apply the tissue, smoothing it all as best you can.  Agai…wrinkled are going to happen here and there.


tissued-storage-tins-craft-8 It was really fun to have these co-ordinating designs to work with.  (Pay no mind to my BlackBerry over there.  Always nearby, and forever bLiNkInG!)

Now, in terms of cleaning them up, I found an x-acto knife to be a handy little tool!  I trimmed off the excess tissue, by running the sharp point of the blade, right in the groove of the lips.  If you aren’t sure exactly where or how I mean, just inspect the earlier photo above of the bare tins, and the ones coming up, and think about how the tin is put together.  You can’t have tissue anywhere, where the tin cover and container need to fit together.  Just a little common sense I dug up there. ; )

OK, so after each tissued piece is dry, and you have trimmed the excess tissue off everywhere, you then need to put a coat of Modge Podge over all of the tissue layers, inside and out!  I did second coats of Modge Podge too, letting them dry before coats, and I recommend doing that.  That is what gives the tins a finished look, once they are dried, and keeps the tissue surfaces protected.  Granted, now that the tissue is trimmed and there is tin lips exposed, you want to try and apply the Modge Podge a little more carefully, as to not get glue all over the naked tin parts .  But again, if any gets on the bare tin edges, once it is dry, it scrapes right off like any glue would. Modge Podging the inside of the tissued tins are probably the hardest to do with your foam brushes, only because you’ll see it puddles a little where folds and creases of the tissue are.  It looks a mess at first. But that is ok…..just spread it out best you can, because the Modge Podge really dries hard and clear.  You are using the foam brush to sort of stick down and smooth out any wrinkled tissue as well, as you work.  You’ll be amazed how good it starts to look as the Modge Podge dries clear.

I wanted to personalize them, so I had hubby cut their initials out of sliver mylar vinyl.  Then used the decorative sticky elements, to add a little extra bling.  Finally, I went right over the mylar and the elements on the covers, with another coat of Modge Podge.  Honestly, these came out slick & with a bit of sheen, seeing as though I used the glossy Modge Podge.

I LOVE how they came out, and I am about to show you a whole bunch more of photos, so you really can get the idea. (And, o.k., so I can show them off a little more.)

tissued-storage-tins-craft-9

Bold Black & white for the boys……bright happy colors for the girls.


tissued-storage-tins-craft-10

tissued-storage-tins-craft-11

tissued-storage-tins-craft-12

tissued-storage-tins-craft-13

tissued-storage-tins-craft-14

tissued-storage-tins-craft-15

tissued-storage-tins-craft-16

tissued-storage-tins-craft-17

tissued-storage-tins-craft-18

tissued-storage-tins-craft-19

tissued-storage-tins-craft-20

Like? Love? Let me know what you think!

******


Save

Filed Under: Crafts & Creations, DIY (Do-It-Yourself) Project, Homemade/Handmade Gift Ideas, Tutorial Tagged With: crafts, gift tins, handmade gifts, homemade-gifts, Modge-Podge-crafts, modge-podge-projects, storage-tins, tissue paper crafts

No-Sew, Double-Sided Fleece Blanket | Tutorial

November 6, 2010 By Laura 4 Comments

The kids and I were recently brainstorming for ideas, to put together a very special package for a certain little boy.  It was very special circumstances, that called us to put something together very special, just for him. I wanted to share with you all this idea our oldest, {A}, came up with:  Making a no-sew, double-sided fleece blanket for him.

no sew double sided fleece blanket
It was the perfect idea for this little boy.

The kids had received fleece blankets like this before, as gifts, and as single layer blankets.  But I wanted to see if we could make a double-sided blanket, so that it would have a different pattern on each side. How FUN, right? And it would be double warm and cozy!

It’s really quite easy, and well worth the effort!   Maybe this is a home-made gift idea you can use sometime, for Christmas gifts, or birthdays.


They are great for anyone, at any age.  From babies to grandparents, and anyone in between.  Just change up the patterns to be more suitable for the recipient, and it’s perfect. Who doesn’t use blankets? It can be a single layer too, and would take even less time. It just wouldn’t have a different pattern on the reverse side.  They are great as throws for beds, getting all wrapped up and cozy to watch a movie, as a lap blanket while you read, or even traveling in the car.  Just choose the appropriate patterns, and a suitable size for whom ever it is for.

Here’s How Easy it is to Make a No-Sew, Double-Sided Fleece Blanket

no-sew-double-sided-fleece-blanket-tutorial We found this set of 2 different patterns, at Joann Fabrics!  I didn’t know there was such thing, and had planned on having to choose 2 patterns separately, and have them cut off the roll to size.   So we were pleased to find these available!  (I also unexpectedly got it at half price!!)  There are a few sizes available in sets. This one was 48″ x 60″.  Perfect width and height for a little boy.  But you can buy any patterns you want off the rolls, and just cut them to matching size.

no-sew-double-sided-fleece-blanket-tutorial-1

I was tickled with this 2-in-1 fleece fabrics of chocolate brown with colored polka dots, and bugs!

Again, perfect for a little boy.

  • The first thing we did was lay it out on a clean table, layering the 2 pieces, one on top of the other, as perfectly lined up as possible.

Then we chose a side to start on, and laid a heavy board several inches away from, but along that edge, to keep the fabric from moving too much.

no-sew-double-sided-fleece-blanket-tutorial-2

We were prepping to cut fringes through both layers.   So using a snapline chalk, we measured up 5 inches from the edge, and snapped a chalk line across from one end to the other, to indicate where to stop cutting, so the fringes would all be the same length. This would create 5 inch long fringes, minus what is taken up when we knot them. Then we measured in from each corner 4 inches,  and cut 1 inch wide fringes, all the way across in between.   In other words, we stopped cutting fringes 4 inches from each end.   This would leave you a squarish block piece on all of the corners, for now.   We’ll get to why we did that, in a bit.

Now, if you don’t have a chalk-line to mark things off, you can use a ruler and chalk per usual.  But this was faster.

no-sew-double-sided-fleece-blanket-tutorial-5 Then, we just started tying each top layer of fringe piece, to the bottom layer fringe piece.

no-sew-double-sided-fleece-blanket-tutorial-6 Now because this blanket is 2 layers, the fringe pieces need to be double tied. Or else it would just un-tie.

But if it was a one-layer blanket, you would just knot the one piece of fringe, and once, would do.

You get me? ; )

no-sew-double-sided-fleece-blanket-tutorial-3
This is how it starts looking.
–

There can be a cool little technique here, where the print of the same side can show most. or the other side.  While tying it (like the beginnings of shoe tying), I found whichever side you stuffed through the whole, is the side that ended up on top. I wanted the opposite side showing, so I made sure to stuff that piece and pull it through to on top.

Now you even get that, or you don’t.  Either way will not ruin your blanket.  This project is virtually fail-proof!

no-sew-double-sided-fleece-blanket-tutorial-4
This is done all the way down, to your 4 inch corner piece.

The same process is done on every side of the blanket.  Again, stopping 4 inches for each corner.

Now what to do with the 4 inch corners:  We just cut 1 inch fringes, on angles, to go around the corner. I think it was 3 cuts, creating 3 more fringes.  Just make then 1″ -ish wide, like the others. This was to create a rounded corner blanket.   It IS an option, to just make fringe cuts one inch apart, all the way to the end, on 2 ends, to make the whole blanket more rectangular.  If you do it that way, I would do one whole side first, and then the opposite side, so they are the same.  Then work on the other 2 sides.

no-sew-double-sided-fleece-blanket-tutorial-7

Cutting 2 layers of fleece at once was a little hard for the kiddos, but they were very helpful for tying!    They took a lot of care with their work.

no-sew-double-sided-fleece-blanket-tutorial-8

Look how cute!   I just loved the colors.  And the bugs.  And the polka dots!

We were really happy with how it came out.

no-sew-double-sided-fleece-blanket-tutorial-10

The kids were really excited to send it out to our special gift, to this special little boy, along with some other gifts. It was a big package.

We hope our home made blanket warms his heart, as much as it warms him, head-to-toe.

It was certainly made with love!

Save

Save

Save

Save

Save

Filed Under: Crafts & Creations, DIY (Do-It-Yourself) Project, Holiday Crafts, Homemade/Handmade Gift Ideas, Kids Arts and Crafts, Tutorial Tagged With: birthday gift ideas, blankets, Christmas-gift-ideas, gift-ideas-for-anyone, gift-ideas-for-kids, handmade-gift-ideas, homemade-Christmas-gift-ideas, how-to-make-a-fleece-blanket, how-to-make-an-easy-blanket, no-sew fleece blanket, no-sew projects

Grandma’s Crafty-Christmas Giving | Homemade Gifts

January 11, 2010 By Laura 5 Comments

I already shared the beautiful Advent Calendar Michael’s mother gave us for Christmas, and mentioned in that thread there were a couple of other homemade gifts she sent us as well.

One is this apron she made for {A}.  When {A} talked to Grandma on the phone on Christmas Day, {A} said, that Grandma said, that she was inspired by our gifts to them last year, including their aprons.   She rather enjoyed making gifts too!  We rather enjoyed receiving them, and they mean a lot to us.

grandmas-handmade-gifts-1
She took an already made apron, and ‘made it her own’.  (And then gave it away. lol). She added the cute wavy trim, a 2-section pocket on the front with the ADORABLE cupcake pattern, and her and Grandpa’s hand-prints!

–

grandmas-handmade-gifts-3
I really love the pocket…..because I LOVE cupcakes.  Everything about them – not just eating them.

–

grandmas-handmade-gifts-2

Besides loving the whole apron, that was made just for her with love, Grandpa’s hand-print means the most to her.  Reason being, ever since she was a little-bitty thing, she has been fascinated by the size of her Grandfather’s hands. Even still. And her own hands are not that small anymore, nor are her feet!! But she gets a giggle, to see that hand-print on her apron, every time.   Of course, she loves Grandma’s too.
–

grandmas-handmade-gifts

The boys got some customized t-shirts, that they are CrAzY about.  It looks like Grandma picked up some cool stencils, and got to painting with fabric paint!  Can I tell you how many days in a row the boys would wear their t-shirts?  I’ll let them go 2, before I want them to throw the shirts down to the laundry.  MUST we wait until they get something on them, or worse yet, SMELL, before we call them dirty?

{O} got an adorable stenciled shirt too, that is a long-sleeve shirt with a collar.  I can’t locate a photo of it right now, but I’ll be on the look-out for it, or catch her in it, and take a photo.

Knowing the time, effort, thought and love that is put into homemade gifts, we appreciate them from others more than ever.  They truly are some of the most meaningful kind of gifts.  For Christmas, or for any reason at all.

Save

Filed Under: Crafts & Creations, Homemade/Handmade Gift Ideas Tagged With: homemade-gift-ideas

Christmas Gift Jars and Baked Good Ideas

January 1, 2010 By Laura 4 Comments

For those who have been visiting our blog long enough, you’d probably know that we usually get very crafty for Christmas gifts for loved ones.  But unfortunately, some years we were low on both time and money, to really craft as much as we would like to for gifts.  Still, we prefer to show our love to our loved ones at Christmas, with more homemade sort of gifts, if we can.  So we had the idea this year of sending some Christmas gift jars and baked goods.   It would be simple, inexpensive, yet appreciated we were sure.  Who doesn’t love food…right?

You should know, this post is not sharing the actual recipes we used. We are just sharing with you the idea of gift jars, and some presentation ideas, as inspiration, for your own gift giving.  Gift jar recipes are very easy to find though! You can just do a web search, or….check Pinterest for a wealth of jar recipe ideas!  Here though, we just want to show you what we came up with.

gift-jars

So some jars we made up with most of the ingredients to make Oatmeal Raisin Cookies.
All they needed to add was the butter, egg and vanilla!

gift-jars-1

Most of our gift recipients got a jar just like this, with the measured dry ingredients and directions.  But we knew my 2 bachelor brothers, and my Dad, were not going to be baking anything.  lol.   So…..we baked theirs for them, and filled up the jar with the cookies.  Cookies in a jar! So there is another idea for you!

gift-jars-2 We also gave some people the dry ingredients for this Curried Lentil Soup.  What a big project THIS turned out to be.  Because the recipe calls for red and yellow lentils.  After visiting 6 stores all over town, over the course of a week, we settled for red and green.  Maybe you know better where to get them? If not, don’t toss the idea all together, if you like the idea of soups. Again, search for recipes, and you’ll find more than you can shake a . . . . . . a . . . . . . spoon at. 🙂

gift-jars-3

Initially, we could only find tan, and made some soup ourselves to test the recipe.  Not being lentil experts, we thought only the color was different.  But ummm….not so much.   We HOPE the red & green works out alright for everyone.

We also made loaves of fresh homemade bread (not pictured) , and included those in most packages.

And homemade donuts!  : D

homemade-donuts We got calls and messages from everyone, and they all seemed to really enjoy our tasty gifts! We think they probably ‘tasted the love‘.  But one did tell us the bread and donuts were kind of hardish, or heavy, when they arrived.  Now….the bread crust is.  You can knock on the loaf, but it’s soft on the inside.  It makes excellent toast, it’s great for sandwiches, and it goes well with soup, too!

But the donuts, being fried, we really weren’t sure HOW they would fair in shipping.   So I guess they arrived….a little dense.  Now, we take these things very seriously.  So, we asked ourselves what we may have learned from that outcome, and this is what we came up with:

homemade-donuts-1
Don’t share our donuts anymore!!
No, seriously, we’ll be working on our recipe, to make them a little lighter.  😀  For the rare occasion we make them again, because they aren’t the healthiest regular food to eat. But they are a real treat, and that’s in part what make the holidays so special.

Some pretty ribbon on your jars, with an attached tag that shares the recipe or directions, is a very warm and thoughtful gift, for anyone who eats!
Your tag can be hand-written as well. It actually makes it all the more handmade-appeal.

We hope these ideas make your Christmas gift-giving season fun, delicious, and budget-friendly.

Save

Filed Under: Baking, Breads, Rolls and Muffins, Crafts & Creations, Holiday Crafts, Homemade/Handmade Gift Ideas, Recipes, Seasonal Crafts and Creations, Soups, Treats, WINTER Crafts and Creations Tagged With: Christmas-gift-ideas, cookies in a jar, easy-cheap-Christmas-gift-ideas, gift-ideas-for-hostess-host, gift-jars, homemade-gift-ideas, homemade-gifts, homemade-gifts-from-kids, recipe-gift-jars, soups-in-a-jar

  • « Previous Page
  • 1
  • 2
  • 3
  • 4
  • 5
  • Next Page »

We are wicked happy to have you here! We hope you find much inspiration, help, humor and enjoyment here.


Archives


POPULAR POSTS

* * * * * *

SUBSCRIBE to House of Joyful Noise blog! Every new post, delivered right to your email box!


Privacy Policy

Amazon Affiliates

Never at any additional cost to you, we may earn a small commission for our endorsement, recommendation, testimonial, and/or link to any products from our website. Your purchase through our links helps support our family, while sharing with you the products we authentically use and recommend, for various ideas, and letting you know where you can purchase them. Thank you for your support!

[footer_backtotop]

Copyright © 2025 HouseOfJoyfulNoise.com · Genesis Framework by StudioPress