• HOME
  • {A}’s Chipmunk Training Archives

 Homepage

  • The Homestead
    • Home Projects
    • Home Improvement
    • Home Decor
      • Seasonal Home decor
        • FALL Home Decor
        • WINTER Home Decor
        • SPRING Crafts and Creations
        • SUMMER Crafts and Creations
    • Our Chickens
    • Gardening
    • Organization
    • Re-Purposing
    • Furniture Refinishing
    • Budget
  • Crafts & Creations
    • Seasonal Home decor
      • FALL Crafts and Creations
      • WINTER Crafts and Creations
      • SPRING Crafts and Creations
      • SUMMER Crafts and Creations
    • DIY (Do-It-Yourself) Project
    • Kids Arts and Crafts
    • Homemade/Handmade Gift Ideas
    • Holiday Crafts
    • Fan Pulls
    • Free Printable/Downloadable
    • Sewing Projects
    • Giveaways
    • Business Features
  • Recipes/FoodFun
    • Breakfast
    • Lunch
    • Main Dish
    • Sandwiches
    • Appetizers
    • Slow Cooker
    • On The Grill
    • Side Dishes
      • Soups
      • Salads
    • Baking
      • Breads, Rolls and Muffins
    • Snacks
    • Treats
    • Desserts
    • Drinks
  • Homeschooling
    • Elementary Homeschooling
      • Elementary Homeschooling READING
      • Elementary Homeschooling MATH
      • Elementary Homeschooling LANGUAGE ARTS
      • Elementary Homeschooling SCIENCE
      • Elementary Homeschooling HOME ECONOMICS
      • Kids Arts and Crafts
    • Middle School Homeschooling
      • Middle School Homeschooling SCIENCE
      • Middle School Homeschooling HOME ECONOMICS
    • Language Arts
    • Math
    • History / Social Studies
    • Geography
    • Foreign Language
    • Field Trips
    • Games
    • Nature Study
  • The Big Picture
    • Life In General
    • Celebrations
    • Faith
      • Into the Light; The Series
    • Giveaways
    • Reviews & Sponsors
  • Photography & Lettering
    • Photography
    • truck lettering
    • vehicle graphics
    • Newborns
    • Kids
    • Engagement
    • High School Senior Pictures
    • High School Senior Pictures Sneak Peeks

Terracotta Flower Pot Wind Chime | Tutorial

July 22, 2012 By Laura 104 Comments

terracotta-flower-pot-wind-chime-craft-3

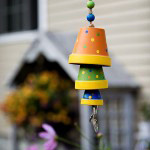
Making this flower pot wind chime was a fun and simple project to do with my kids. I was really looking forward to hanging out with them and painting, and I knew I would also love seeing the wind chime in my gardens, where I had every intention of hanging it, when it was done.
While I think we kind of ‘made it our own’, this flower pot wind chime was not at all my idea. I have seen them so many times at crafty website now, and so many style-versions of it, that I’m not sure which style I saw first, or where! Someone must have come up with this adorable idea first, but I’ll be darned if I know who! Whoever did, we thank them for the fun inspiration, to make something (else) to have around, that makes me smile inside, every day.

Here’s the basics on how we made our terracotta flower pot wind chime.

001_terracotta-pots
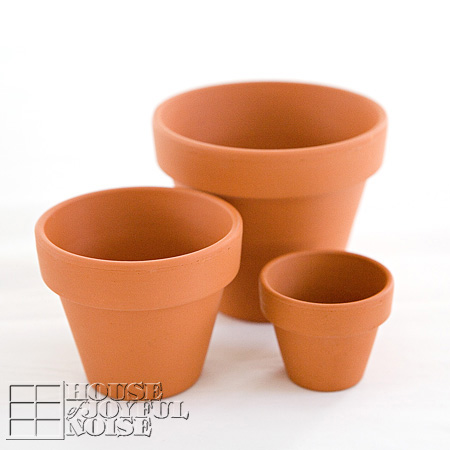
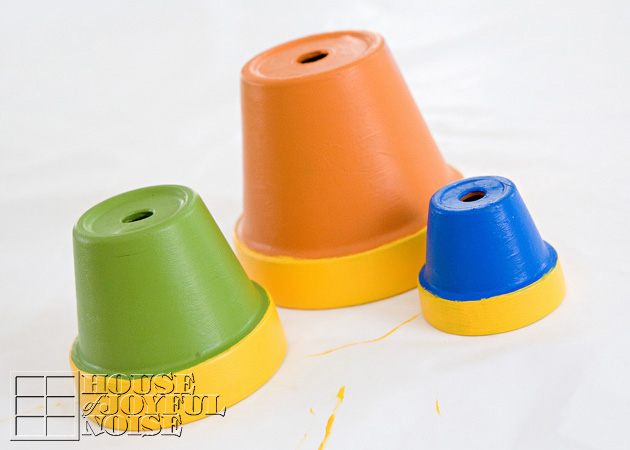
We started with 3 different sized terracotta plants, that have drainage holes in the bottom.
The smallest is tiny, at 1-1/2″ tall. Then the 2 next sizes up: 2-2/3″ and 3-1/2″.

002_synthetic-flat-brushes
Using our little collection of synthetic brushes, we got to painting our pots.

003_paint-palette
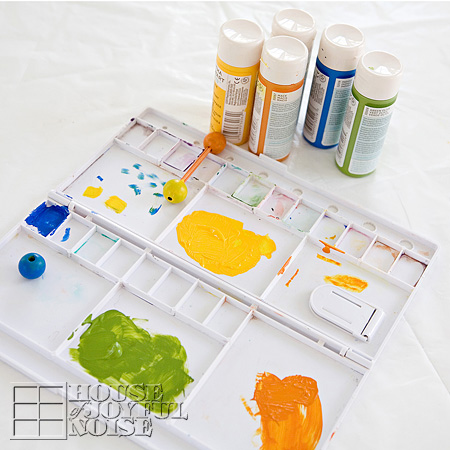
We used Martha Stewart Craft Paints, which are an acrylic paint. We also looked around and found what wooden beads we had in the house, which we wanted to use on our wind chime as well. After choosing our colors of paint and how we were going to paint the pots, we wanted the beads the same colors. One we had already was the correct color-green. The other 3 we had were not, so we painted them correct colors. If you can imagine, painting small wooden beads was not that easy. But we quickly figured out a helpful trick: We stuck 2 toothpicks in the bead holes, to hold them while we brush painted them the colors we wanted them to be. You can see them resting on the palette, drying.

004_painted-terracotta-pots I really wanted to take photos of the kids painting, for me! But they were done and back outside, on the other side of my window, swimming again, before I ever got photos of them painting. But, since they weren’t paying any attention to me anymore, I did clean up the edges of their pot-rim painting, just a little. ; )

005
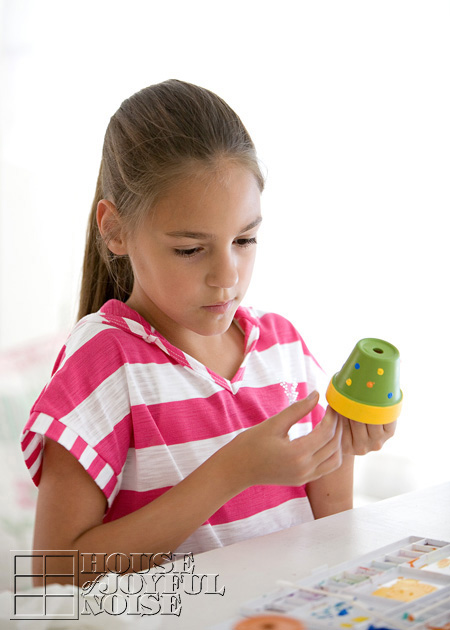
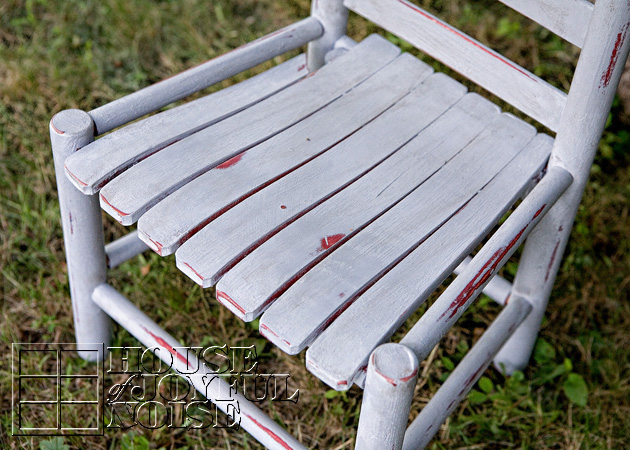
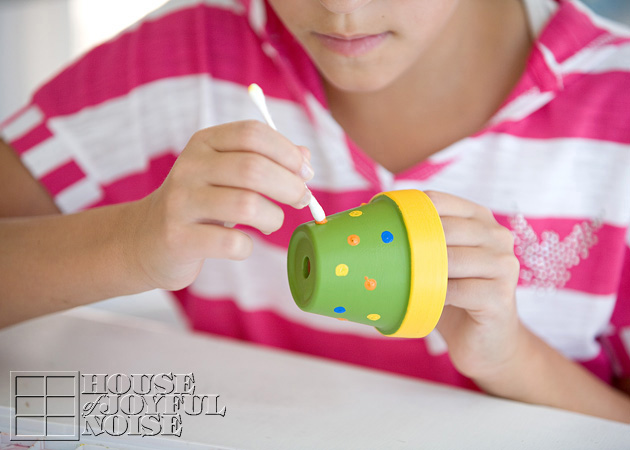
Our original idea, was to decorate our pots with little garden bugs.  Like butterflies, ladybugs, dragonflies, etc. It would have been so cute! Don’t you think? But none of us felt we could paint them that well, that small, and we couldn’t find any stickers or decals of any sort, to kind of Modge Podge them on. So, when it came time to decorate the pots, the boys were busy playing something else, and Alexis was at work. So O (Olivia) and I decided to just polka dot them.  I love polka dots, so I was sure I’d love it as much as the garden bugs idea.

006
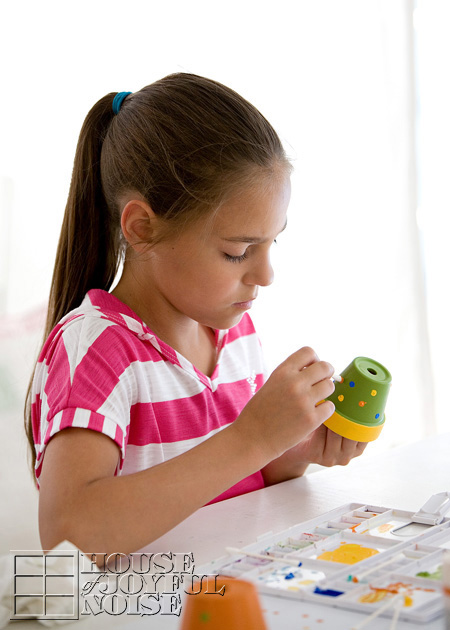
Applying the polka dots could not have been easier. Since we wanted the dots very small, on our small pots, we just used q-tips! We dipped the tip in the paint, and then dotted it right onto the pot! The hardest part was spacing the colors. I always drive myself crazy with that…..not wanting the same colors right near each other, and trying to get even spacing too. But we did a well enough job!

0071 O and I worked together, polka-dotting, and our q-tip trick worked like a charm.

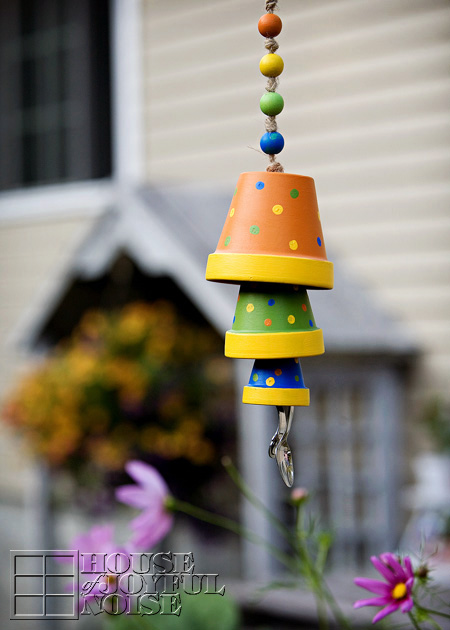
Now, I didn’t take photos of the assembly. But it’s easy enough to explain:  We used jute twine, and strung it through the holes of the pots. We tied big enough knots on the string, to hang the pots on the string as we wanted.  So each knot was inside the pot underneath the drainage hole.

terracotta-flower-pot-wind-chime-craft
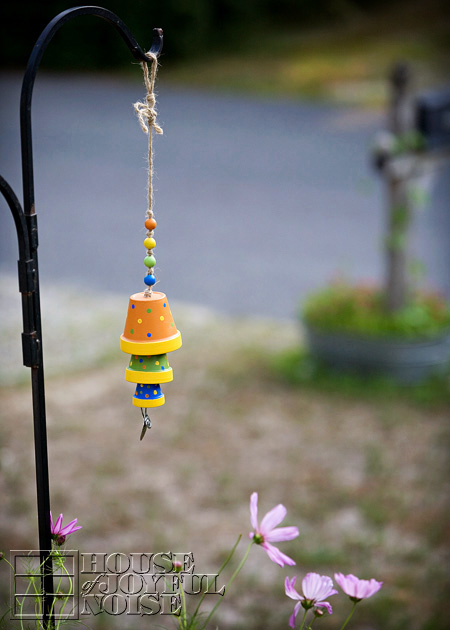
Now, some crafters who have made flower pot chimes, opted to have the string come down out of the pot, with a wooden bead on the string (held in place with a knot before and after the bead) to act as the ‘ringer’, that would hit the pot when the wind blows. So they designed it that way, spacing their pots out more.  We chose to use the pots themselves, to be the ringers, so that when the wind blows hard enough, the pots hit each other. That required (visually) setting the pots overlapping each other a little.

As an afterthought too, I decided I wanted to give the chime a quick UV protectant spray coat of clear acrylic.  Since my chime was all already assembled, I just put some tin foil over the spoon, and sprayed it anyway, getting some up into the pots as well. I do recommend spraying the painted pots before assembly, if you wanted to. But no big deal.  It’s an aerosol, so it worked easy enough afterwards.

terracotta-flower-pot-wind-chime-craft-1
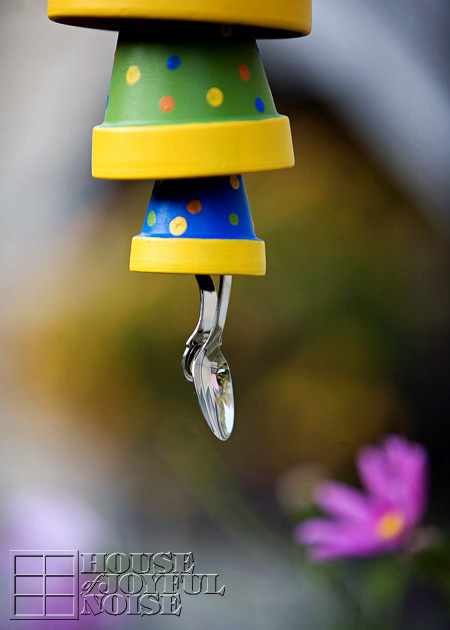
Aside from the paint design, the other touch that made it more ‘our own’, was that we added a stainless steel baby spoon as the bottom ringer. It really is a special touch, to me, with the memories of giving Alexis her first baby food, and then the triplets coming along, and the 3 little mouths we were trying to keep up with come the spoon- feeding age, with them. We didn’t bother having 3 bowls and 3 spoons, or we’d spend as much time picking up and putting down bowls and spoons, as we did putting spoons in sweet little open-waiting mouths.  Go ahead. Imagine that for a moment. No…..1 spoon, 1 bowl of food….down line of sweet, messy mouths we went. And then started at the beginning again.  Gosh I miss those days.

Wait. How did I end up talking about feeding my babies? Oh yes….the baby spoon, and the happy memories it brings me.

terracotta-flower-pot-wind-chime-craft-2

 So, it was simple as that. Anyone can make an easy and whimsical wind chime, even if you’re not that crafty. It’s a breeze.
Anyway, we’re happy you caught wind of this little fun project, and came to take a look.  Even if you’re just blowing through.

Ok, I’ll stop now.

P.S. Feel free to chime in, in the comments.
(Oh my gosh! Somebody stop me!)


Save

Filed Under: Crafts & Creations, Kids Arts and Crafts, Re-Purposing, Tutorial Tagged With: baby-spoon-chimes, crafts, diy, flower-pot-wind-chime, garden-decor, homemade-wind-chimes, kids crafts, Martha-Stewart-Craft-Paints, Plaid-products, polka-dot-crafts, terracotta-pot-crafts

4th of July

July 4, 2012 By Laura Leave a Comment

1_painted-american-birdhouse

HaPpY 4th of JULY, Everyone!

Since I wanted some photos, to go along with our wishes for you,  I thought today would be a good day to show you where I put my painted American Birdhouse.  It’s out on the potting bench near the gardens!  So now you know! I’ve got a whole red-white and blue theme going on out there, and it’ll be there throughout the month of July.  Then I’ll likely change it up, to some other summer theme.

 The birdhouse has held up very well in weather, despite the sun and rain beating on it.  Again, I credit that to the wax finish. It seems to be a great protector for outdoor wood, in my experience.

2_hand-painted-american-birdhouse-on-potting-bench Have a safe and memorable celebration of our country, with your families and friends!

We’ll see you again soon.


Filed Under: Crafts & Creations, Gardening, Home Decor, Refinishing, SUMMER Home Decor, The Homestead Tagged With: 4th-of-july-decor, american-birdhouse, american-home-decor, fourth-of-july-decor, garden-decor, red-white-blue-decor

3 Little Garden Chairs | Refinishing

July 2, 2012 By Laura 9 Comments

006_annie-sloan-provence-paint-color-300x214

There’s been these 3 little chairs, sitting in our basement for years now.  One of my husband Michael’s clients offered them to him, knowing we had triplets, and thinking maybe we could use them.  They are about toddler size. So he brought them home, and they’ve been in the basement ever since. I’ve never been a primary-colors kind of girl.  I thought maybe I would repaint them or do something with them at some point, for the kids, or maybe as available props for my photography studio.   But, I was just never inspired to ‘have-at’ them.

Until of course, I was.

001 I know these are ugly. Please don’t leave! I promise you, it gets much better! We were hauling out all kinds of things out of our basement that needed to GO, for our yard sale. Michael put these chairs out there, and when I saw them I said, “Hey! We’re not selling these! I could make them into cute little garden chairs!”  Well then….there was my inspiration.  The idea hit me for the first time, and flew out of my mouth. (As most thoughts do, if you must know. But I’m getting better.)  As so as it was, I was finally inspired to do something with these 3 little chairs.

The challenge was the primary colors of paint that was already on them.  Yes, I was going to paint them anyway, but I was NOT going to NOT distress them. And I sure as heck was NOT going to strip them.  They didn’t mean enough to me, to work that hard.  I mean, I love to paint, and to sand, and even to wax.  But stripping off paint? Not so much. So the primary colors underneath were staying, and I was starting to imagine, they were going to look pretty cool when I was done!

I’ll say right here, that I didn’t take photos of every step of the process.  But I think you all know what painting and sanding looks like. I DID take a whole bunch of photos of the chairs all done though! Lots. Those are the more fun photos you all like to see most, right. Because there was no special complicated process. I will tell you just how I did it right now, which was easy as 1-2-3, and then you can see so many photos I had so much fun taking as well, simply to show you.

Since I had 3 chairs, I thought it would be perfect to use the cans of the 3 colors of Annie Sloan chalk paints that I still had: Provence, Versailles, and Paris Grey. So, 1) I painted each one those colors.  It was actually very scattered painting sessions over a period of a few weeks, and my girls helped some too when they wanted to.  2) Then I distressed them to my liking. (That means, a lot of sanding. ; )

002_annie-sloan-waxes 3) Lastly, I waxed them with my Annie Sloan waxes.  It was especially important for them to be waxed, because I knew they were going to be left outside in all kinds of weather. So they needed some kind of protection, to preserve all of my efforts, of making them into cute little garden chairs around our homestead.  I did wax each chair one at a time, from start to finish.  First I did the clear wax all over a chair, let it set up a bit, but before it was completely dry, I worked in some dark wax where I wanted it, to give them a more antiqued, aged look. It kind of has to be done that way, because the dark wax is potent stuff. It only takes a little bit, and if the clear wax is too dried, it is hard to rub off – or even rub around, the dark wax. So that is always the little bit tricky part, as well as wicked messy and sticky and stinky. But I’ll tell you what, this point in my project process really proved even to me, how much I love furniture refinishing! Because it was also sunny and hot this day.  But I was out on our deck working away in the sun, sweating my a*# off (but wouldn’t you know it, it’s still all there!), but singing and rocking out to the music, with that nasty sock on my busy hands, and having a ball!

Or I might of been high on wax fumes. Hard to say. But it was fun! That much I’m sure of.

Not much chatting left. Just a ton of photos, and some tidbits I think you might like to know.

003_chair-antiqued-with-dark-wax Here you can see a couple of things, that really make these chairs beautiful to me. Knowing the primary colors underneath were going to show, I was careful in deciding which paint color was going on which chair. So here is the (Annie Sloan) Provence, on the dark blue.  You can also best see in this photo, the dark wax work, that helps make the chair look more aged.

 And a bunch of photos, where I have this one right now . . . . . .

004_chair-refinish

005_chair-refinishing

006_annie-sloan-provence-paint-color

007_garden-chairs

008_garden-chair

009_repainted-furniture Do you love it? I do!! I love the color, and I love where it is, with the daisies and the white picket fence there.  What I don’t love, is our yard. You may have noticed the lack of real grass. We pretty much just have crabgrass, and fine sand. I don’t much like the cement steps either. But, we have decided to hold off a bit and not invest in our grounds anymore, until we make some other pretty big decisions.  So, we make due, with making ugly . . . pretty, best we can for now.

Next up, is the one that was yellow chair, which I painted Versailles.  It’s out front with the garden beds, next to the covered bench and potting bench . . . . . .

010_little-garden-chairs

011_garden-chair

012_annie-sloan-versailles-paint-color

Again, you can really see the paint underneath, where I excessively sanded, just the right amount. : )  You can also see the dark wax work, which only adds some character to it, to me. And do you see where the paint dripped? Some may think that is some imperfection. But I see it, and it makes me smile and feel happy. Because it reminds me of the memory, that my little girl was helping me paint this chair.

 And lastly, is the red chair, that I painted Paris Grey! I really wasn’t sure where I was going to put this one. So I just stuck it under the apple tree, and it seemed to look like it was at home there. Funny thing is . . . . . . it’s not at our home. (Yikes!)

013_little-garden-chair

The apple tree is not actually ours, nor on our property of course. Just over the line, but we pretend it’s ours. The owner is not usually around at all, and Michael does manage the property. (My excuse to take such liberties.) But she’s coming tomorrow for a week, so we’ll see if I get my hand slapped, or she kicks it back to our side, along with the birdhouse. And if I get arrested or anything, I’ll surely let you know. Because we’ll need to collect some bail!  (You all would help me get out. Right?!  Say yes.)

014_garden-chair

Care to sit for a spell, in the cool shade of the apple tree?

015_annie-sloan-paris-grey
See? I really go to town, with my sand paper!  This one even has a little broken piece. Again = love.

 I always say . . . . . . it’s the little things, that make me so happy.

016_three-little-garden-chairs Thanks for taking a stroll around my gardens with me. (We literally, walked around the garden beds.) I always love when you visit us here, so please come again. We invite you to join us on Facebook too.


Save

Save

Filed Under: Furniture Refinishing, Furniture Refinishing, Gardening, Home Decor, Photography, Refinishing, The Homestead Tagged With: aging-furniture, annie-sloan-chalk-paints, annie-sloan-wax, cute-garden-decorations, distressing-wood-paint, garden photography, garden-decor, garden-decor-ideas, how-to-antique-furniture, little-garden-chairs, making-furniture-pieces-look-antique, painting furniture, photography, re-painting-furniture, refinishing-chairs, refinishing-furniture, still-life-photography, triplets, weather-proofing-furniture

We are wicked happy to have you here! We hope you find much inspiration, help, humor and enjoyment here.


Archives


POPULAR POSTS

* * * * * *

SUBSCRIBE to House of Joyful Noise blog! Every new post, delivered right to your email box!


Privacy Policy

Amazon Affiliates

Never at any additional cost to you, we may earn a small commission for our endorsement, recommendation, testimonial, and/or link to any products from our website. Your purchase through our links helps support our family, while sharing with you the products we authentically use and recommend, for various ideas, and letting you know where you can purchase them. Thank you for your support!

[footer_backtotop]

Copyright © 2025 HouseOfJoyfulNoise.com · Genesis Framework by StudioPress