• HOME
  • {A}’s Chipmunk Training Archives

 Homepage

  • The Homestead
    • Home Projects
    • Home Improvement
    • Home Decor
      • Seasonal Home decor
        • FALL Home Decor
        • WINTER Home Decor
        • SPRING Crafts and Creations
        • SUMMER Crafts and Creations
    • Our Chickens
    • Gardening
    • Organization
    • Re-Purposing
    • Furniture Refinishing
    • Budget
  • Crafts & Creations
    • Seasonal Home decor
      • FALL Crafts and Creations
      • WINTER Crafts and Creations
      • SPRING Crafts and Creations
      • SUMMER Crafts and Creations
    • DIY (Do-It-Yourself) Project
    • Kids Arts and Crafts
    • Homemade/Handmade Gift Ideas
    • Holiday Crafts
    • Fan Pulls
    • Free Printable/Downloadable
    • Sewing Projects
    • Giveaways
    • Business Features
  • Recipes/FoodFun
    • Breakfast
    • Lunch
    • Main Dish
    • Sandwiches
    • Appetizers
    • Slow Cooker
    • On The Grill
    • Side Dishes
      • Soups
      • Salads
    • Baking
      • Breads, Rolls and Muffins
    • Snacks
    • Treats
    • Desserts
    • Drinks
  • Homeschooling
    • Elementary Homeschooling
      • Elementary Homeschooling READING
      • Elementary Homeschooling MATH
      • Elementary Homeschooling LANGUAGE ARTS
      • Elementary Homeschooling SCIENCE
      • Elementary Homeschooling HOME ECONOMICS
      • Kids Arts and Crafts
    • Middle School Homeschooling
      • Middle School Homeschooling SCIENCE
      • Middle School Homeschooling HOME ECONOMICS
    • Language Arts
    • Math
    • History / Social Studies
    • Geography
    • Foreign Language
    • Field Trips
    • Games
    • Nature Study
  • The Big Picture
    • Life In General
    • Celebrations
    • Faith
      • Into the Light; The Series
    • Giveaways
    • Reviews & Sponsors
  • Photography & Lettering
    • Photography
    • truck lettering
    • vehicle graphics
    • Newborns
    • Kids
    • Engagement
    • High School Senior Pictures
    • High School Senior Pictures Sneak Peeks

Our Home Transformation – Our Dream: Part II

July 23, 2009 By Laura 8 Comments

We are continuing to share with you the process of our HUGE home transformation! Before you get sucked into this post, you don’t want to miss Part I! You’ll really appreciate where we are more, if you read the back story of what (or who, x3) pushed into this major home renovation, and what we started with.

see home transformation remodeling


As we dreamed and brainstormed about what would be an ideal home layout for our family, Michael really began by drawing floor plans. We knew we wanted a 4 season sunroom.  We also wanted an area off of the kitchen that could accommodate a big long table, for eating and schooling, and also floor cabinets for all of our schooling books, supplies and tools.  So we decided a room along the back of the house, accessible from the kitchen would be ideal.

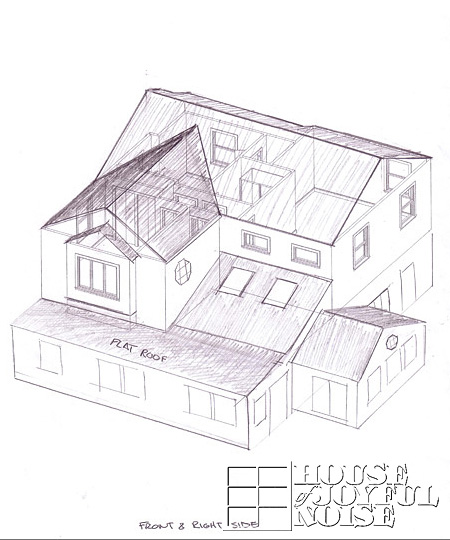
Here is Michael’s floor plan of our existing home, at the time, with the 2 rooms we wanted, added:

d

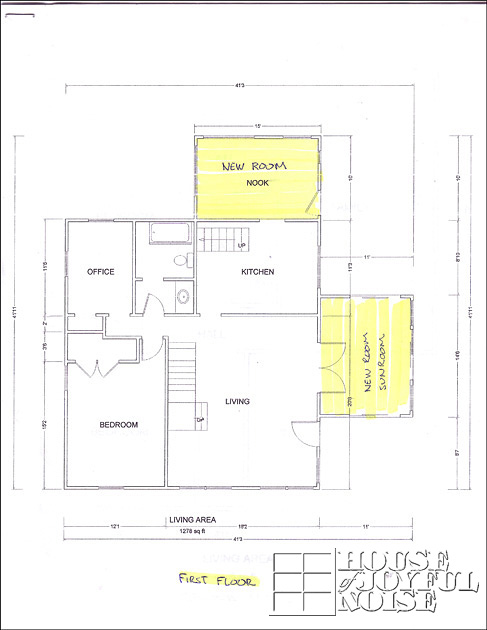
Now, in looking at the floor plan above, what is marked as an office was {A}’s existing room.  For anyone who has ever added rooms to their home, you may know that sometimes when you are working with the town, you just need to call some rooms something else. ; )

We were also planning to add a second floor, for the additional bedrooms we were needing. So…..the upstairs would be ALL BEDROOMS ; ) and 1 bathroom….

see home transformation remodeling

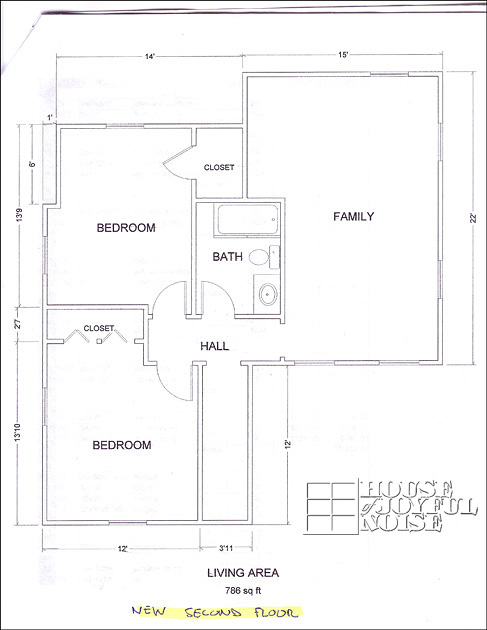
{A} would be moving upstairs, front left. {O} back left, and Boys on the right.  If at some point the boys want their own privacy, we plan to build a petition wall in this 22′ long room, to give them their own space. > UPDATE 2016:  The huge room on the right (marked OFFICE) was made into a dream art studio, and we put one boy’s bedroom along the back, with a barn door!

In our businesses, and especially in Michael’s business, a lot of his clients are tradesman/business owners.  So whenever we need anything done that needs to be hired out (which in truth is very little, because there isn’t much Michael cannot do himself), we look to our own clientele first.  Reason being, we want to support their businesses, just as they support ours.  We knew we wanted a very competent and experienced builder who had very high standards for their work, but we also had a budget to work with.  It was also important to us that we had a crew here working every day, from the start of the renovation to our home being at least weather tight.  There was one builder, named Stephen,  who was one of Michael’s clients (meaning Michael letters all of his trucks and makes site signs for him), that Michael really wanted to at least talk to.  To pick his brain, so to speak.  He’s a really nice guy, and very, very professional and knowledgeable, with a very experienced crew and a successful building business.   But, we didn’t think we could hire him, because he was very high end. The bulk of his work is million dollar homes.  Still, he was the perfect guy to get some much needed advice from, just to know where to even start.

After getting a couple of quotes from a couple of other contractors that have all been Michael’s clients, Michael brought his plans on paper, and met with Stephen.   Stephen had a whole lot of great advice, set us up with the architect he uses to make sure our plans were structurally sound.  He was really impressed by the drawings, and helped some with the overall roof lines. I guess in the end he got invested in the project, because by the end of that appointment, he was our new contractor and had agreed to do the job, with intentions of meeting our budget.

Now something that will prove to be very interesting to know, later on as this project unfolds in this post, is that in our mind, we had no intentions of leaving our home through the renovations, except for maybe a day or 2 if necessary, when they put in the stairwell in our living space.   But otherwise, we didn’t really see a need for leaving at any point, when we thought about it.  Sure, it was going to get a little messy and noisy for awhile, especially when taking out 2 walls of 2 sides of our exterior house, where they would be adding 2 rooms.  But we could deal with that!  Our excitement was much bigger than any inconveniences we had to go through to get to our dream house.  {A} had just turned 9, and the triplets were going to be turning 4 already.  So we could manage staying, in our mind.  Besides, we didn’t really have any where to go, anyway, that we could think of.

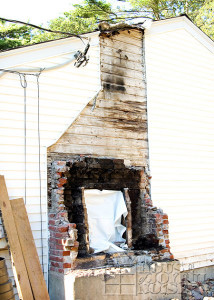
Michael started doing a lot of prep work, to keep our cost down as much as possible. Less man-hours, less $.  So the first thing he did was tear out the section of the deck where the sun room was going to go.  Then he started hammering and breaking up the chimney.  Now, the chimney was for a wall-inserted black iron coal/wood stove we had inside out living room.  We used it now and then in the earlier years of owning our home, mostly when we lost power and needed to heat the house.  But in time we stopped using it because of the rough state the chimney was in, with cracks and such.  It was a matter of safety.  So he started tearing down the bulk of the chimney.  Things were already a real mess.  You can see where the cracks in the chimney had heated the wall of our house up enough to leave black, on the couple occasions where we had a fire in the stove.  Thankfully we were aware of the issue to monitor it, but it was scary nonetheless.

home-transformation-remodeling-5

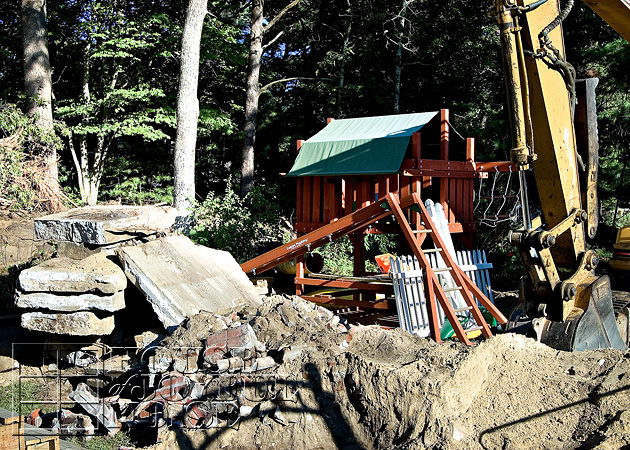
I will never forget the day the excavator showed up.  It was there, with an operator, to accomplish a few things:  Tear out the cement wall behind our house, tear out of the ground the stumps of trees we had taken down on the land behind that cement wall, to pull out the the lower part of the chimney and dig the trenches for the footings to go in. LOTS of work to be done.

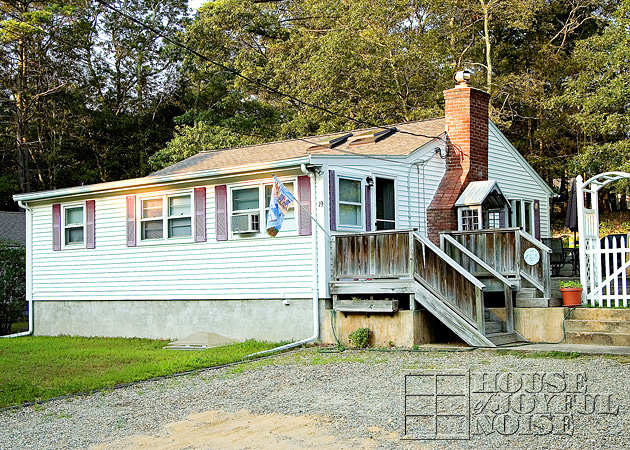
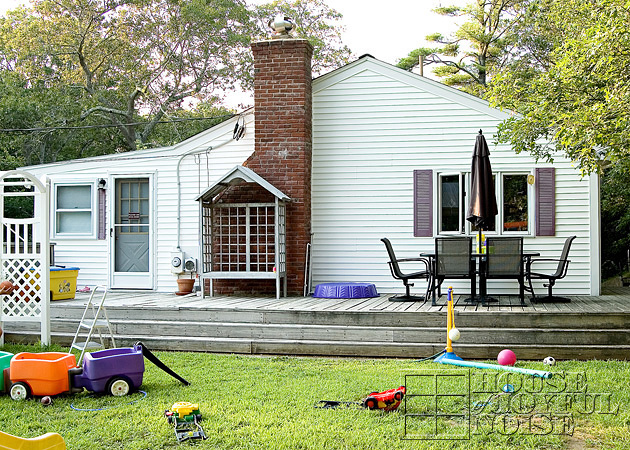
First, I’d just like to refresh your memory about how cute and quaint our little yard was…

see home transformation remodeling

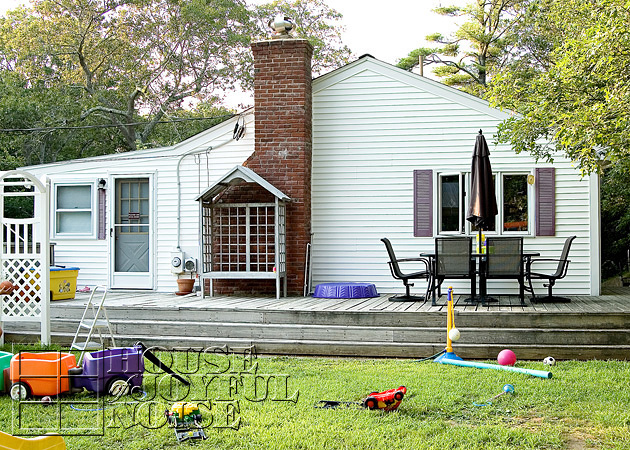
So they take down my little white picket fence. And then, this mammoth excavating machine crawls RIGHT OVER my beautiful ground shrubs and junipers and up into my yard !  Then…..it gracefully crawled across my green grass, leaving a path of completely unearthed destruction.  I will never, ever forget that sight, as I stood there with my mouth  hung open.

see home transformation remodeling

see home transformation remodeling

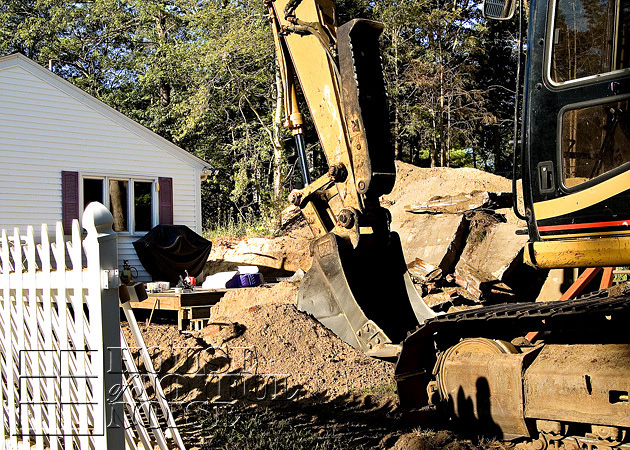
My yard would not be the same for a good long time.   It was really at this point, that the thought started creeping into my head, “Oh my Lord, what are we doing?  Look at the destruction of our home and yard!!“….and a little panic started setting in.  It was just hard to imagine things ever quite nice, or even livable again.  But oh…things were going to get much worse.  ; )

Now, just to sound like I am really side-tracking here for a second, I want to share with you that I have what I call, a few ‘tried & true’ parenting tips.  One is that I don’t believe it is going to serve your family life well, to have to keep it extra-extra quiet while your babies sleep.  In my opinion, with naps and such early bedtime for years, you will be spending an awful lot of time tip-toeing around and trying not to make a peep.  It could bring on anxiety, for goodness sake. lol.  So, I never did that.  When the kids napped or were gone to bed, we just carried on with what we were doing, most times with maybe some level of consideration.  But generally speaking, they were always able to sleep well through any noise, and didn’t really wake up for anything until they were ready to.  Some may agree with that, some may not, but it’s what we wanted for our family, and it totally worked for us.  Especially given the fact that, contractors were definitely NOT going to work around our kids naps, and our kids were definitely NOT ready to do without naps yet.

So here is my ‘proof is in the pudding’ moment.  (Well, their entire baby/childhood has been proof that they can sleep without perfect silence, but this is a hum-dinger of an example.)

The triplets were napping in the very next room, when Michael started hammering and knocking down the chimney.  In the next afternoon or so, they were napping again when the excavator guy and Michael pulled the stove right out from the wall.  It was noisy……hammering, scraping, the house was even shaking.  But the sleeping babes never even stirred.

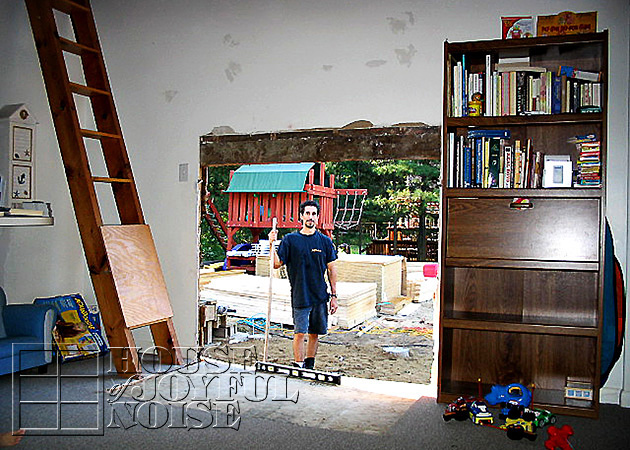
A little while later, when they got up from their usual nap time, they sleepily walked out of their bedroom into the living room, to see a gaping hole where the stove and mantel, and instead could see their whole side yard.  lol.  Now, the photo below is actually several days after that event, when the mess was cleaned up and supplies started coming in.  But the look on those toddlers faces was hilarious.  They were confused and surprised, and they just stood there staring at the missing wall and stove, and sleepily wobbling. lol  It was the funniest thing.  We had some explaining to do.

see home transformation remodeling

see home transformation remodeling

Our little green play yard soon resembled a lumber yard.

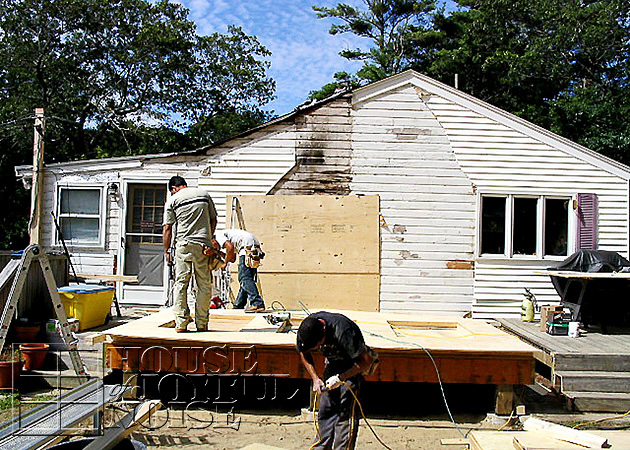
Michael had dug out the correct areas and installed the tubes for the support pilings for both the sun room on the side of the house, as well as the dining/school room on the back of the house.  That was some hard work, and many hours of it. Then he had another of his clients,  P.A. Landers, come and help him fill the tubes with cement.   Michael letters some of P.A. Landers trucks, mixers and heavy equipment.  Once the pilings were dry, the crew built the floor base of the sun room on the side of the house, above….

see home transformation remodeling 
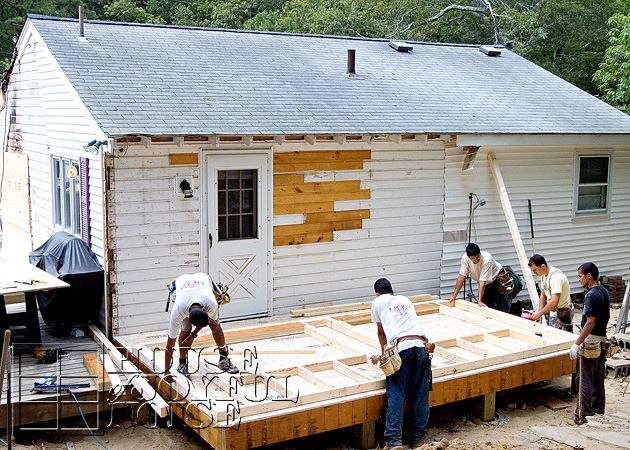
….as well as the school room on the back of the house.   I want to point out too, that the house is looking particularly…..dumpy?  Because they had ripped off all of the white siding.  You can see where the siding is still on the house to the right of the photo.  It wasn’t looking THAT bad before the crew showed up and started tearing things apart.  Although the screen door was probably about ready to be replaced anyway. lol

In the photo above, they are actually framing out the back wall.   They really needed to have this room on the back of the house erected first, in order to begin the work of the second floor.  So it was done pretty quickly.

see home transformation remodeling 
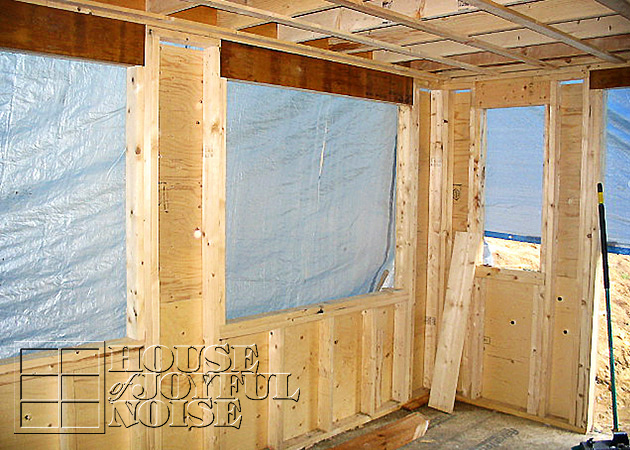
Here is the inside of that room, just sort of built off of the back of the house.

see home transformation remodeling

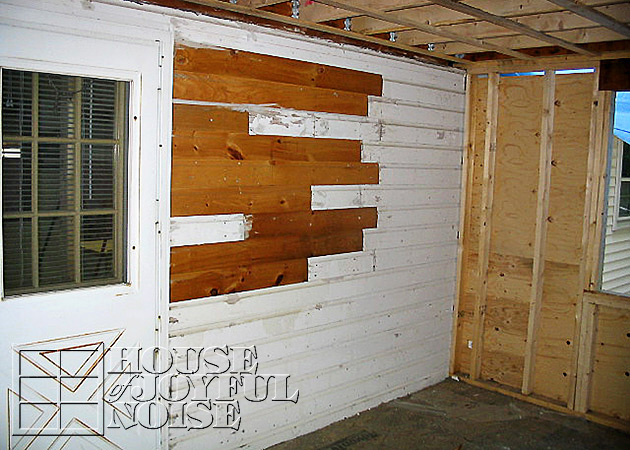
Same room, of course.  This door and half of this wall will be removed by the end of the project, with the kitchen being open to the school room.

This has been kind of a long post with a lot of reading.  So I’m going to leave off here for this Part II.  But from here, things are going to get ReALLy CrAzY!  That’s where we have some real story-tellin’ to…tell.  So stay tuned for Part III !!

Now is anyone reading this, or are you just looking at the pictures??  Because I am practically spraining my brain, trying to remember the details of construction, what happened first, next and why.  lol.  So please just tell me you are reading, too.

 To be continued……Here, Part III

Save

Save

Save

Save

Save

Filed Under: Home Improvement, The Homestead Tagged With: expanding-home, expecting-triplets, home make over, home plans, home renovations, home transformations, home-additions, home-makeovers, home-reconstruction, home-remodeling, triplets

Our Home Transformation – Our Dream: Part I

July 21, 2009 By Laura 7 Comments

Anyone love Extreme Home Makeover??  Seeing home renovations start to finish? Yes??  Well that’s what you’re going to get in these posts.  The only difference is, we have to pay for ours!  LOL.

We mentioned that we would be having a lot to share in this section of  ‘Homestead – Home & Gardens’.   Gardening is something very new to us this year, but I like to think we started off with a bang.  I haven’t shared much of that yet, although I will be soon now, because that began a front yard transformation.  But the backdrop of that, is our house, which also was majorly transformed. So I just didn’t want to put the cart before the horse, so to speak.  One reason being, for those of you that will continue to follow us in the coming years (please?), it will be so fun for you to have watched our homestead grow and change  SO much, from the beginning! (Well, if you like that sort of thing.)  Because there has been such an amazing transformation in the years past already, but there is still so much more ahead.  But also, I just like to do things in order.  I have a real, serious, order thing.

One thing you may, or may not, have realized about us by now, is that we are very visual people. Some people are really smart.  Book-smart.  Number-smart. Build-and-run-a-corporation-smart.  Change-the-world-smart.  But none of that is us, we don’t think.  We’re just artists really.  What we DO do, is DREAM and CREATE the little things we would like to have.  We SEE them in our head.  We talk them out together as a team.  And then we CREATE them to reality.

Our home, though admittedly one of our bigger dreams, was one of those creations.  Now usually, we make everything with our OWN 4 hands.  But this time we needed quite a bit of HELP.

But let me give you a little history first, to add interest to the story:

Once upon a time, in 1995, we bought this little 2 bedroom  ‘beach house’, just a walk from a private seashore.   We had dreams for what we wanted in our first house:  a fireplace,  floor kitchen cabinets, a loft and cathedral ceilings in the living room. We drove around with some hot-shot annoying young realtor, and looked at one dump after another.  We found this one on our own.  We were looking in a newspaper, we drove to it, peeked in all of the windows, and drove to the nearest pay phone to call the realtor listed. (No cell phones then I guess.  Gosh…I can’t fathom that now.) He came with a key.  This little house had all of the things we wanted!  When I first walked in the front (side? lol….weird!) door, I swore the light of Heaven was streaming in through the skylights onto the floor, and I knew THIS was the house, and what I wanted, before I even saw the rest!  And there was my loft!  With a rustic ladder that climbed led to it!   It was shocking for anyone to walk inside, because the outside was very, very deceiving.  It also had a 11 ft unfinished basement.

Side Note:  Now this photo below was not taken until 2006 or so…..not in 1995 when we bought it.  At the time of purchase, it had no shutters.  We bought some beautiful berry colored shutters, which as you can see faded quickly to a horrid washed out pink.  So I just want to tell you:  Don’t get berry colored shutters!! In fact….anything in the red family is going to fade in an ugly way, faster than any other color.  But all in all, we loved out little home by the sea. As the years went by,  we thought maybe at some point we would add a sun room on the side of the house there on the deck (because the chimney was beginning to crumble after owning the house for 10 years, anyway), but…..we loved our little home just as it was.

see home transformation remodeling
Front – from road view
–

see home transformation remodeling
Side
_

Soon enough, we had a baby daughter in that 2nd (TINY) bedroom, and the unfinished basement was finished on one side (by Michael) to be my photography studio.  We were hopeful for another baby, and decided we would ‘make-do’ somehow when God sent another blessing to our family.   We could worry about any blessings He had planned for us after that (in terms of room in the house), later, when the time came. We figured,  let’s just have #2 first, and we’ll be quite fine for awhile until, God-willing, #3.

But when we discovered we were expecting again, a few years there-after we discovered we had #2, #3 and #4 on the way! Triplets! Triplets? 3?  Whoa.  Almost immediately, I ended up on full and complete bed rest for the duration (for concerns that started so soon).  That ended up being 6 months, in-my-bed.  (All of which time I just prayed, ate and drank. )

Now here is something to make you laugh;   we went into a bit of a panic, still being in shock with the realization that we had 3 babies on the way, and just thinking about the little house we lived in.  There was no time to buy another house and move, and we didn’t want to move anyway! So we started planning to just hurry up and have our home reconstructed before the babies were born! HA!  It was so very unrealistic and impossible to accomplish such a thing in that time frame, and especially under those circumstance. We decided we had to wait until AFTER the babies were born. ANOTHER LAUGH.  Because of course, once the babies were born, we didn’t have time to even make a phone call to a construction company!  We were too dang busy feeding, changing, burping, bouncing, bathing babies!  It was a never-ending schedule.  Even once that slowed down as they grew….we had play yards, high chairs, toys, bouncy seats, car seats, you name it….all over the house. But as those little blessings grew, and we were able to catch a wink of sleep enough to be able to THINK straight now and then, we began to DREAM again. We talked a lot about our ‘dream house’ for our family, working with what we already had. (Which we loved. But it was just too dang small now.)   We talked, and talked some more, brainstorming, planning, and soon we could SEE all it in our head very clearly.

But as you all know, Michael plans everything on paper:

see home transformation remodeling

Come along for the journey, as we show you how went from this beach house/cottage, to our farmhouse-style dream come true.
Do you think you all will enjoy this??  Let us know!

To Be Continued……………..  Here, PART II

Save

Save

Save

Filed Under: Home Improvement, The Homestead Tagged With: expanding-home, expecting-triplets, home make over, home plans, home renovations, home transformations, home-additions, home-makeovers, home-reconstruction, home-remodeling, triplets

The Process of Gold Leafing – A Church Steeple Cross – Part II

July 19, 2009 By Laura 2 Comments

We have been showing our readers the process of gold leafing a church steeple cross. This post is Part II, and shows the completion, of the process.
At the end of Part I, we left off at a point in the process where the cross was being completely covered in the gold layer.

gold leafing gilding

Above is a photo of that step completed, and ready for the next phase.

gold leafing gilding

These papers all over the floor are sheets that the gold came off of.  As you can see, as little gold as possible is wasted.

gold leafing gilding


But there is still a whole lot of loose bits of gold over the entire surface of the cross at this point.

gold leafing gilding

So the next step is to burnish the gold.  This is done by gently rubbing the surface in circle-like motions with a large wad of very, very soft cotton.

gold leafing gilding

This helps adhere any gold that was not stuck by the sizing, and it also shines the gold.  The loose flakes are truly as light as air.  You can kind of see that by the piece hanging from the cotton in the photo above.  If you were to put a piece of this gold between your fingers and rub it, it would just disappear.

gold leafing gilding

Looking at the top left arm of the cross in the photo above, you can see the transformation that is taking place on the surface of the cross, from the burnishing.

gold leafing gilding

gold leafing gilding

When he is working quickly, there is gold floating in the air all over the place.

Remember I told you how {A} loves to help us on jobs, but that she especially has some incentive with golf-leafing jobs?  Well…..maybe this will explain why…..

gold leafing gilding She catches all she can!! She’s not above picking up any bits off the floor either!

gold leafing gilding To a kid, well, this is as good as  GOLD.  But in this case,  it literally IS. lol.  Like all of the $ she makes, she’ll save some, spend some, and give some to charity.  That’s just how she rolls.

gold leafing gilding

She’s just about done….

gold leafing gilding

gold leafing gilding

The complete process of this cross too 5.5 hours.   Given that Michael is 5′ 11′, you can gather it’s a pretty sizable cross, and it’s pretty heavy too!!  Notice how he is holding it up with the wad of cotton.  Oils from your hands will break down the gold pretty quickly, and leave dull spot in that area.

Of course, you can’t appreciate it’s true beauty until you see it mounted on that church steeple.  This cross has long since been picked up, and I am waiting on a photo of it sitting upon it’s church.  When I receive it, I will share it with you, for you to really see it at work. : )

In not being able to handle the cross with your bare hands, and the surface being so delicate, you might imagine how difficult it might be to install the cross on it’s steeple.  Well, here’s a little chuckle for you:  Just between us, I heard this steeple jack wraps the cross in toilet paper!!  Then he wraps it in bubble wrap and a blanket, to safely get it securely in it’s place.  Then he unwraps everything, and let’s it shine in all it’s glory in the sky.

Did you ever realize all of the work that went into the gold crosses you see at the top of church steeples?  Perhaps as you see various crosses on various churches all over the world,  you’ll have a new appreciation for the craft that goes into them, and be able to share with someone else the process of  gilding the gold crosses they see.  You’ll sound so smart. : )

Save

Save

Save

Save

Filed Under: Photography & Lettering Tagged With: about-gold-church-steeple-crosses, Catholic, Catholic-blogs, Catholic-Church-gold-steeple-crosses, Catholic-families, gilding, gilding-tutorial, gold-leafing, gold-leafing-tutorial, gold-lettering

Psalm 46:10 – Scripture Image

July 19, 2009 By Laura 2 Comments

Psalm 46:10 Be still and know that I am God.

“Be still, and know that I am God.”

~Psalm 46:10

Save

Save

Filed Under: Faith, Faith/ Catholic, Into the Light; The Series, Life In General, Photography, Photography & Lettering, The Big Picture Tagged With: Be-still-and-know-that-I-am-God, Psalm-46-10, Scripture-images

Just S’more Photos

July 18, 2009 By Laura 2 Comments

I won’t insult you with a s’mores recipe post!

toasted-marshmallow-over-fire

I won’t insult you with a recipe, or a ‘How to Make S’mores’ post.

I’ll just share s’more photos!

s'mores

s'mores

smores-photos-2

smores-photos-3

s'mores

smores-photos-5

s'mores

Don’t let the summer pass you by, without building a campfire some perfect summer night, and indulging yourself in this campfire-side treat, of s’mores!

Save

Filed Under: Recipes, Treats Tagged With: camping-treats, marshmallow, s'mores, summer-treats

  • « Previous Page
  • 1
  • …
  • 69
  • 70
  • 71
  • 72
  • 73
  • …
  • 101
  • Next Page »

We are wicked happy to have you here! We hope you find much inspiration, help, humor and enjoyment here.


Archives


POPULAR POSTS

* * * * * *

SUBSCRIBE to House of Joyful Noise blog! Every new post, delivered right to your email box!


Privacy Policy

Amazon Affiliates

Never at any additional cost to you, we may earn a small commission for our endorsement, recommendation, testimonial, and/or link to any products from our website. Your purchase through our links helps support our family, while sharing with you the products we authentically use and recommend, for various ideas, and letting you know where you can purchase them. Thank you for your support!

[footer_backtotop]

Copyright © 2025 HouseOfJoyfulNoise.com · Genesis Framework by StudioPress