• HOME
  • {A}’s Chipmunk Training Archives

 Homepage

  • The Homestead
    • Home Projects
    • Home Improvement
    • Home Decor
      • Seasonal Home decor
        • FALL Home Decor
        • WINTER Home Decor
        • SPRING Crafts and Creations
        • SUMMER Crafts and Creations
    • Our Chickens
    • Gardening
    • Organization
    • Re-Purposing
    • Furniture Refinishing
    • Budget
  • Crafts & Creations
    • Seasonal Home decor
      • FALL Crafts and Creations
      • WINTER Crafts and Creations
      • SPRING Crafts and Creations
      • SUMMER Crafts and Creations
    • DIY (Do-It-Yourself) Project
    • Kids Arts and Crafts
    • Homemade/Handmade Gift Ideas
    • Holiday Crafts
    • Fan Pulls
    • Free Printable/Downloadable
    • Sewing Projects
    • Giveaways
    • Business Features
  • Recipes/FoodFun
    • Breakfast
    • Lunch
    • Main Dish
    • Sandwiches
    • Appetizers
    • Slow Cooker
    • On The Grill
    • Side Dishes
      • Soups
      • Salads
    • Baking
      • Breads, Rolls and Muffins
    • Snacks
    • Treats
    • Desserts
    • Drinks
  • Homeschooling
    • Elementary Homeschooling
      • Elementary Homeschooling READING
      • Elementary Homeschooling MATH
      • Elementary Homeschooling LANGUAGE ARTS
      • Elementary Homeschooling SCIENCE
      • Elementary Homeschooling HOME ECONOMICS
      • Kids Arts and Crafts
    • Middle School Homeschooling
      • Middle School Homeschooling SCIENCE
      • Middle School Homeschooling HOME ECONOMICS
    • Language Arts
    • Math
    • History / Social Studies
    • Geography
    • Foreign Language
    • Field Trips
    • Games
    • Nature Study
  • The Big Picture
    • Life In General
    • Celebrations
    • Faith
      • Into the Light; The Series
    • Giveaways
    • Reviews & Sponsors
  • Photography & Lettering
    • Photography
    • truck lettering
    • vehicle graphics
    • Newborns
    • Kids
    • Engagement
    • High School Senior Pictures
    • High School Senior Pictures Sneak Peeks

Stuffed Pepper Soup – Recipe

February 20, 2014 By Laura Leave a Comment

 Winters tend to be brutal and long here in New England!  We often have multiple snowstorms right on top of each other, and bitter cold temperatures more days than not.
It’s our least favorite season, but we always make the most of it, and keep our eyes on spring! Meanwhile, there is nothing like a delicious hot soup, to warm your soul and put a smile in your belly!

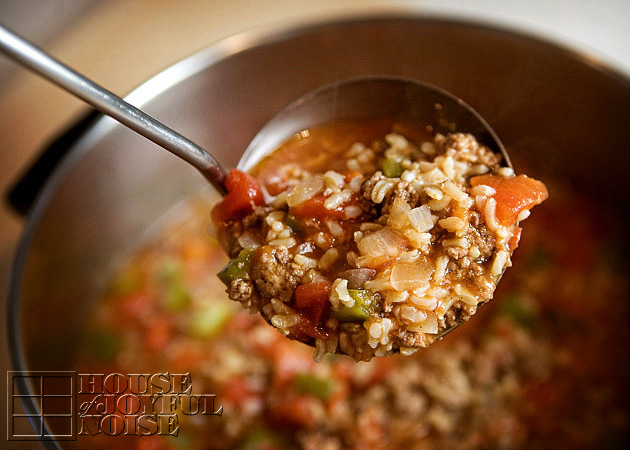
So today I’m going to share with you a new a great recipe: Stuffed Pepper Soup!  I don’t know where I even got it. I’ve had it printed out in my recipe folder, and we’ve enjoyed it a couple of time now. We’re about ready to make it again!  It’s a recipe you’ll want to have on hand to enjoy from the start of fall, right on through winter!

If you even ‘like’ stuffed peppers, you just might ‘love’ . . . . . .

Stuffed Pepper Soup!

Ingredients
1 lb of ground beef (we only use organic/grass fed)
1 small onion
1 large bell pepper; diced
1 can (29 oz.) diced tomatoes
1 (10 oz.) can tomato soup (or tomato sauce)
1 (14 oz.) can chicken broth (or beef broth)
2 c. cooked rice
1 tbs. sugar
1 tsp. garlic powder, salt and pepper, to taste
Shredded cheese;  topping

Directions

1. In a large pot, brown and crumble ground beef along with diced green peppers, and onion over medium high heat.
2. When cooked, drain excess grease from beef mixture.
3. Put beef back into pot.
4. Add in diced tomatoes.
5. Add in chicken broth, (or beef broth if using that).
6. Give it all a good stir. Then add in rice.
7. Stir again.
8. Then add seasonings: sugar, garlic powder, salt and pepper. (To taste.)

Cover and let simmer on low-medium heat for about 30 minutes to let the flavors get to know each other. ๐Ÿ™‚ The longer they sit together, the better the soup is. So consider making it one day, refrigerating, and serving the next day. Or….just have leftovers the next day, and you’ll find it’s even better!


You might want to Pin this one. ๐Ÿ˜‰
Enjoy, and keep warm!

Save

Save

Save

Save

Save

Save

Save

Save

Filed Under: Recipes, Soups Tagged With: fall-meals, fall-soups, recipes, soup, soup-recipes, stews, stuffed-pepper-soup, stuffed-pepper-soup-recipe, stuffed-peppers, winter-meals

Tips and Ideas for Card Making

February 9, 2014 By Laura 4 Comments

I thought I would share with you a little bit about making your own cards, today.  To be honest, I feel a little bit silly, because my sister is the real card-making whiz. And I’m, well….the one who most always forgets to even buy a card, and send it on time….to even those with birthdays in our families.  I’m flat-out awful about it. They’ll tell you.

But, last year I challenged myself to make sure I get a card to everyone, and on time, for at least a year from that point forward. I think I’ve managed so far! I’ve even made most of them, myself. Now that’s planning ahead. I’d be proud of myself, if it weren’t for all of the prior years I forget altogether.  I think if I patted myself on the back, someone might slap me. ๐Ÿ˜‰

My sister is awesome at making a whole bunch of great cards at once. She has files of ready-made cards, made with love, to just grab last minute.  There is always something fitting for any occasion, for any one.  We love her cards. I save them all. Plus she usually writes a little something that makes me cry.

I have a different style. I make cards one at a time, and I make them specifically for whoever I need one for. I custom make something I think they’ll like. Or they they will anyway.
I have fun with it. Like a little art project.

I thought I’d share with you some of my tips, ideas and tools you might use, to make cards of your own.
Clockwise from the top left (in my studio): 
1. I have a basket of blank cards and envelopes, in a few different colors and textures, and in 2 different sizes.  Blank cards w/ envelopes can be bought in packages at craft stores, and they are very handy. It’s also an option to make your own cards, by folding and cutting to size card stock, in a variety of colors and textures. I do that sometimes as well.
2.  Another basket in my studio holds just some of the elements I have. Shown here are some specialty ribbons, colored strings, tags, and flat gems.  Seen in the back, as more ideas, are washi tape, and striped baker string. You can also use stickers, embossers, or die-cuts. I love working with elements on my cards, to add those special little touches.
3. I highly suggest a Fiskar trimmer. I just find them so quick and easy to work with, for cutting paper to size and trimming. I have a cutter in 2 sizes, and I use them super-regularly in crafting.
4. Sticky-tabs!!  It doesn’t matter what brand you get. But these little 2-sided tabs come on a roll in a box like this, and I use them as an adhesive when working with paper or photos. They are so convenient, mess and hassle-free. My kids love using them when doing their own crafts too, as evidenced by the little blue peel-offs I find here and there that I didn’t leave. ๐Ÿ˜‰ 
–


Rubber stamps are very useful in card making!!  I have…a LOT. My sister used to be in the Stampin’ Up business. So I have bins of sets. You can get really creative with stamps like these, just stamping with different colored inks, or really getting into it with embossing powders.
I have struggled with the flatness of the stamp look though, when just working with ink.

So I tend to get coloring, because I love to color!

Colored pencils are so much fun to use, with rubber stamps.  By deciding which direction light might be hitting your subject (such as my octopus and sea horse above), and coloring lighter where light may be hitting more, and harder where the areas would be more in shadow, you can really take your flat stamped art to a more dimensional look.

So this card was created for my Goddaughter, with a blank white card and envelope, rubber stamps, white card stock, colored pencils, some aqua textured cardstock, and washi tape. ‘Happy Belated Birthday’ was a stamp, and I free handed ‘Julia‘ and the word ‘Crabby‘ to match the same letter-style as the stamp. And just wrote the rest of the message in regular printing. So the little sea creatures were stamped on separate card stock, trimmed to a rectangle, and then mounted on slightly bigger aqua rectangles, to kind of frame it. Sticky tab this, to this, to this. Voila! 

The image of the card in the upper right is sitting on the envelope, which I stamped with the starfish. See it?  I addressed it right next to that star fish. I think it’s fun to pull out mail from the mailbox and see a decorated envelope. I always imagine it makes the mailmen/women smile too.

Part of the fun for me, of making cards, is trying to come up with something clever or witty to write inside. Trying is the key word there. No one else may think I’m very funny, but I promise you, I’m laughing and really enjoying my own jokes sometimes, making cards. ๐Ÿ˜‰    I’ve always said, “Nobody thinks my jokes are funnier, than I do.” True story. I amuse myself more than anyone else.
–
This was for my mother-in-law/Grandma. That’s her on the front. ๐Ÿ˜‰  Another rubber-stamped card (using the set seen near the beginning of this post). On this one, I stamped right on the card, except for the message inside and out, and colored. The pink polka-dot wash tap is along the side of the inside of the card only. But I trimmed the front/cover side of the card off to reveal that element, even when the card is closed.

I used the trio of pink flamingos stamp twice, so there was a family of 6. That would be us, who the card was from. We all signed the card next to ourselves. ๐Ÿ™‚ 
The envelop was also stamped and colored. (See left photo.) 

When Michael was talking to his mom on the phone, he asked her if she got her card. She had to think about it, and then said she wasn’t sure…she couldn’t remember. So…either it was forgettable, or it never got to her. But the thought was there, she got a call anyway (and us singing!), and I had fun making the card. For whoever got it. lol
–

This one was for one of my teen nephews. I just wanted to keep it boyish.  The elephants were stamped. Although my sister-believed I illustrated them myself, because…..well, she knew I could.  But why? When I have the stamp? LOL.  I did color/’paint’ it though….with chalk!  That might have been a bit crazy. And time-consuming. But again, it was all fun, and specially made for someone I love. The dirt clouds around the elephants were specially fun, and the chalk was a suitable medium to work with, to create that. The ‘Happy Birthday’ was stamped, and I hand-matched the exclamation point, which I punctuated with a hand-hammered rivet. (More fun elements to work with!).  I ‘hung the tag, with his name hand-drawn on both sides, off of the rivet. The string was actually hammed in there, to stay.  
I gave the card a quick fixing spray when I was done.
–


This one was for another nephew, who is an avid, very serious, very good, hunter. I really planned this one in my head.
Now, you’d think with all of my paper stock, I’d have some kind of camouflage patter, or any kind, right? No. So I decided, to pick a background color, and just cut out those weird random shapes, in the other colors, and layer it together. I used glue this time.
His name I stamped, and that star is another fun rivet! 
The inside: card stock, tissue paper, washi tape, and hand writing. Again, I was too-amused with myself.  But I totally had to Google and research, what a ‘sight’ mark might look like. I’m probably not even using the right terminology. But hopefully he could tell I put some real love in it. Although, it was from all of us.
–

My niece is very much into sports; basketball being one of her favorites. Can you believe I had basketball skin stock?  I did. So I cut a circle out of it that would fit on the front of her card. Loved that I had orange striped baker’s twine to work with too. And washi tape that complimented well enough too. I often use a piece as a seal on the envelope. (Well, I lick it too. For security-paranoid purposes.) I think it’s another nice touch.

I could not even believed I pulled off drawing the basketball lines and name with permanent markers. Her name is in the Wilson band letter style. ๐Ÿ˜‰  (Had to tell you in case it wasn’t good enough to notice.  Ha haha.)  This is the little free-hand thing (the ball)I did that and I walked room to room, showing everyone in my house, and the kids totally ‘checked’ me about boasting. < Insert eye roll here. >
I shared about that on our blog’s Facebook Page, in case you missed it.


Post by House Of Joyful Noise.

Hope the ball makes up for the lame joke inside. : [ . 
–
Next!

Lastly, for today, a card I made for my sister. I have an eyelet edge punch, which I used all over this card, as well as on the edge of the envelope flap.
All hand drawn I think…copied from that stamp. The pretty decorative paper along the bottom of the inside of the card, was shown when closed too, by making the front of the card trimmed smaller, like before.

My sister and I share a birthday. Did you know that? We do. (I won’t say she’s the older one, this time. ๐Ÿ˜‰  ) So on the inside, I said something like….
“If all of your birthday wishes come true,
Then all of my wishes will have come true, too.”
–

So…..there are just some of the cards I made during my self-challenge here. I did make a few others and mailed them out, forgetting to photograph them. And even some of these photos were just taken with my phone, because I hadn’t thought of making a blog post and sharing them with you all at the time. So, the photo quality varies, and I apologize about that.  But I do hope you enjoyed this big share, and I hope you feel inspired to make some custom, personalized cards for others as well.

You can do this card-making thing! 
Fold, stamp, color, sticky-tab, ….it’s all fun you need to get in on!

Save and share the card-making love!  PIN this on Pinterest and be sure you are following us there!
Thanks for coming to hang out with me today.
– Laura

Save


Filed Under: Crafts & Creations, Tutorial Tagged With: card-making, card-making-tips-ideas, custom-card-making, elements, how-to-make-your-own-cards, rubber-stamps, supplies-for-cardmaking

Printable Valentines (free): Crazy Straws, Socks and Guitar Picks

January 17, 2014 By Laura 1 Comment

 Last year I designed some last-minute valentines for my kids to give to their friends, that go with a fun little ‘extra’, most of which can easily be found at a dollar store.
I think they are cute and clever. Although I have always said, “Nobody think my jokes are funnier than I do.”

This year I am offering them to you as free printables.  Aren’t I nice? ๐Ÿ™‚  You will see that there is room for your child to write their friends’ names, after Valentine and before the comma, as well as a space for them to sign their valentine in the bottom right hand corner.
The link to the printables will be available at the end of this post.


I found fun kids’ sock in different sizes at the dollar store. They came as 2 in a set (different patterns), for $1.
These would be for girls, but….


….they also had some sets for boys.
We attached the socks to the valentine card using colorful paper clips. 
Worked like a charm. Or, a paper clip.  But with socks.
–


This valentine was designed to hold a crazy straw.  All you need to do is cut a slot at each heart, and insert the straw.
A while pack of straws can be bought for $1 also at, of course, the dollar store.
–


This is the perfect valentine for any little friend who is a budding musician of any kind!  If they have an appreciation for music, they’ll have an appreciation for this valentine.
I picked up the picks at a local music store.  They were for coin change.
We just stuck the pick on using a 2-sided sticky tab.

 If you like them, they are all yours!

They come 2 on a sheet for easy printing of a standard sheet size of 8.5″ x 11″ of heavy stock paper. Just cut along the center line for two!
So the individual valentines are about 8.5″ x 5.5″.  Yes a little large, to accommodate the socks and straws.

>>>>>>  You can get all of these printables HERE. <<<<<<

Click on the one you want.  Then look for options for actions, download to your computer, and print them from there.
(Any problems, please let me know in the comments, and I’ll see if I can help you.)
You can also share this offer on Pinterest or your other social networks for me, using the image below.


ENJOY! 


Save

Filed Under: Crafts & Creations, Free Printable/Downloadable, Holiday Crafts Tagged With: budget-valentines, cheap-valentine-ideas, crazy-straw-valentines, free-valentine-printables, free-valentines-day-cards, fun-free-kids-valentines, music-valentines, socks-valentines, valentine-ideas, valentines

A Wind Chime from the Seashore

December 8, 2013 By Laura 2 Comments


Today I am sharing with you a craft project that was a true labor of love. Or….I should rephrase that: It was labor, in the name of love.  This wind chime made with sea glass was a Christmas gift we all wanted to make for Michael’s mother/Grandma last year. I was so excited about it. It was only once we got going and invested time we didn’t want to write off, that we realized it was not going to be a quick gift-making project, by any means! But, it was a gift of love and so, it would be worth it.


Here it is all done. Photographed last winter, before packaging it up and shipping it off.
It’s an idea I actually borrowed from my always clever and creative fellow bloggin’ friend Angie of The country Chic Cottage.  When I saw hers, I just loved it, and thought it would make a nice gift for my mother-in-law who lives in Florida part of the year. In the end, I am sure Angie’s took a lot less time to make, because she managed to find some nice, big flattish pieces of sea glass to work with. And frankly, I just like hers better.

All we could find were glass sea glass rocks; just bulkier and impossible to work with as her tutorial went. So we had to improvise. Big time. And thus put a lot more time into it. BIG TIME. 

The supplies needed were two embroidery hoops; a bigger and smaller one, lots of sea glass in various colors, jute string, E600 or some string glue, and in our case some silver-plated copper *wire and a set of needle-nose pliers. (I forget if the wire was 18 or 22 gauge; but it needs to be pliable enough to really reshape and work with well.)

My post here is not a tutorial by any means. I didn’t take photos along the way for that, as my hands were busy doing tedious work in late hours of the night. And I sure cannot tell you all about how we made it exactly because, for gosh sakes, it was last year!  My memory skills leave much to be desired. Such as, remembering things. And I struggle with recalling yesterday morning. 

Anyway, no one in their right mind would take the time to make this lovely wind chime our way, with this bulky sea glass. So if you’d like to make one, I’d recommend finding big sea glass with big flat surfaces, and make it the way Angie did. Unless you just like the fine art wire-work on ours. ๐Ÿ˜‰   I do think it adds some fancy.


We tied a knot everywhere we planned to put a piece of sea glass. But since tying on and gluing the rocks to the jute was not going to keep them secure enough, we used wire as well.  We took a long pieces of cut wire, laid each over the front of the sea glass (with the back being glued to the jute where the knot was), wrapped it around to the back, twisted it a couple of times over the knot placement, and brought both ends to the front again. Then using the needle nose pliers to create nice designer curls with the ends.
–


Now do you see those kinks in the wire, here and there?  That’s from tightening everything up to make the glass nice and secured, once it’s all wrapped and curly-cued. By taking the tips of the needle nose pliers, grabbing the wire in a suitable place, and giving it a little twist, we’d get this kink that gave it even more of an artistic element, and also made everything tighter.
–


We did actually really like the look of the wire work, since we turned it into art. But it was truly hours of work, for such a simple gift, that really did look homemade in the end. (Not saying that with any kind of pride.)   ๐Ÿ˜‰

As I said earlier, it was from all of us for Michael’s mother/my mother-in-law/the kids’ grandmother. (I wanted it to be really nice!) And it was a collaborative effort among us all. The kids went shopping with me and got everything we needed. They also picked out all of the pieces to use out of our batch of sea glass, and helped with other little tasks.  But Michael and I did all of the gluing, and especially the wire work, for 2-3 hours every night, until it was finished. 

When all was done, it took so long, this Christmas gift for our loved one was belated!  When Michael happened to be talking to his mother on the phone, he told her that her gift was going to be late, because we were still working on it! 
–

She did receive it shortly thereafter Christmas, and called us with many expressions of gratitude.
I think she realized how much work we really put into it, and she even convinced us that she loved it. ๐Ÿ˜‰  I’m not sure it really chimes per say.  It takes a mighty wind for those rocks to hit each other. But when they do, it does make a pleasant and interesting sound. I just wouldn’t describe it as, you know, chime-y.  Of course, it’s also decorative for her deck or yard.

We realize that some crafts are just going to come out better than others. We were going for something more like……well, like Angie’s!  But hey…..it was made with love, and received with love. And that’s always nice, no matter which way the wind blows.

Thanks Angie, for the inspiration!
And thank you all, for coming to see our wind chime.

Save

Save

Filed Under: Crafts & Creations, DIY (Do-It-Yourself) Project, Homemade/Handmade Gift Ideas Tagged With: nautical-gifts, sea-glass-wind-chime, seashore-gift-ideas, seashore-themed-wind-chime, wind-chime

A Rustic Christmas Cards Display Idea

December 3, 2013 By Laura 1 Comment

 When the Christmas season arrives every year, and the cards start coming in the mail, what do you do with them?  Do you just put them in a pile and let them stack up? Or do you like to display them somehow, for all to see?  If you display them, how do you manage that? I bet you all have had some pretty creative ideas yourselves.

We’ve had a few solution ideas of our own over the years, for the Christmas cards we gratefully get in the mail. Way back, we just put them in a beautiful Christmas basket. That was kind of sad though, as we know many are really excited about their cards every year, and we’d hate for them to be hidden. Especially the ones with photos of kids and families, or the special notes.
We’ve also just tied a pretty ribbon across a beam in our main living area, and let them hang on that.
Getting more creative still, for a few years, we stood a white folding accordion door in the corner of the room, and the louvers (slats) worked beautifully for hanging cards. Of course, like with the string idea, the vertical cards hung horizontally. It was still a nice way to display everyone’s cards though. 

Last year though, I came up with a new idea, that I think we’ll stick with for some time. It’s very homemade and rustic, and I just love it.
Take a look . . . .


What do you think? 
It was actually just a long scrap of plywood we had on hand. (Repurposing at it’s best!).  
This one happens to be about 11″x 76″.   You can use any similar long board though.  You just want to be sure it is thin enough to be able to clamp clothespins on.


We also used some rough rope, in which I intertwined some thin satin rope around, just to add some pretty to the rough look.
The roping is mostly for decorative purposes, though. It will hold some horizontal cards well enough, but if it slides, it knocks other down. And that’s just frustrating.
I like the look of the clothespins, and it helps secure the cards of all sizes.


So this scrap board was painted white and then rough sanded. I didn’t put a lot of effort into that wood-finishing part at all, because really….I was hopeful that if enough people thought of us whilst filling out their Christmas cards, most of that board would be covered, anyway.  ๐Ÿ˜‰
The scrap blocks of wood (you see) on the back, at the top and bottom of the board, not only add stability to the board for it to sit well on the floor and lean against the wall.  There is a notch cut at the top and bottom of the board, for the rope to wrap around to the other side inset, and then there is hole through the block for the rope to go though and be secured to the other side. It sounds complicated, but it really is simple in design.  Sorry I forgot to get a pic of the back side for you. If you are confused and  have a question on this, go ahead and ask in the comments.


Completely optional tidbit: 
I soaked my clothespins in tea water overnight, to try and antique them some. It worked; but honestly, it’s too subtle for the effort in my opinion. Maybe I did it wrong?
I think at some point I will take these clothespins, and revert to what always works beautifully for me; a touch of my Annie Sloane Dark Wax. Love-that-stuff!

To really dress up the top, I added these large rusted-looking jingle bells, hung with twine. I love jingle bells! 

CONSIDER THIS: 
You could use this whole idea, and change the whole style of it depending on how you finish it and what you use as detail elements!
For example: paint a smooth new board with a clean white paint, omit the sanding, putty and paint your screw holes, and use a wide frilly ribbon down the board, with a big fancy bow at the top!
 But the rustic, farmhouse look suits us just fine.
–


Yes, just another crazy idea, from our house to yours! 
If you love it, bookmark it! You could try the idea yourself this year or some other coming year. Or simply share it with your friends who follow you on your social networks.  They’ll love you for it.
  And hey, while your here, say hello, and share your thoughts.

Hope your homes are feeling a little bit of your Christmas love!
These are the little things that make any house, a home, for the ones you love.
~Laura / The Richard Family

Save

Save

Filed Under: Crafts & Creations, DIY (Do-It-Yourself) Project, Holiday Crafts, Home Decor, Organization, Re-Purposing, The Homestead Tagged With: Christmas-card-display, Christmas-cards-display-solution, Christmas-cards-organization, Christmas-decor-ideas, Christmas-DIY, Christmas-organization-tips, how-to-display-your-Christmas-cards

  • « Previous Page
  • 1
  • …
  • 11
  • 12
  • 13
  • 14
  • 15
  • …
  • 101
  • Next Page »

We are wicked happy to have you here! We hope you find much inspiration, help, humor and enjoyment here.


Archives


POPULAR POSTS

* * * * * *

SUBSCRIBE to House of Joyful Noise blog! Every new post, delivered right to your email box!


Privacy Policy

Amazon Affiliates

Never at any additional cost to you, we may earn a small commission for our endorsement, recommendation, testimonial, and/or link to any products from our website. Your purchase through our links helps support our family, while sharing with you the products we authentically use and recommend, for various ideas, and letting you know where you can purchase them. Thank you for your support!

[footer_backtotop]

Copyright © 2025 HouseOfJoyfulNoise.com ยท Genesis Framework by StudioPress