• HOME
  • {A}’s Chipmunk Training Archives

 Homepage

  • The Homestead
    • Home Projects
    • Home Improvement
    • Home Decor
      • Seasonal Home decor
        • FALL Home Decor
        • WINTER Home Decor
        • SPRING Crafts and Creations
        • SUMMER Crafts and Creations
    • Our Chickens
    • Gardening
    • Organization
    • Re-Purposing
    • Furniture Refinishing
    • Budget
  • Crafts & Creations
    • Seasonal Home decor
      • FALL Crafts and Creations
      • WINTER Crafts and Creations
      • SPRING Crafts and Creations
      • SUMMER Crafts and Creations
    • DIY (Do-It-Yourself) Project
    • Kids Arts and Crafts
    • Homemade/Handmade Gift Ideas
    • Holiday Crafts
    • Fan Pulls
    • Free Printable/Downloadable
    • Sewing Projects
    • Giveaways
    • Business Features
  • Recipes/FoodFun
    • Breakfast
    • Lunch
    • Main Dish
    • Sandwiches
    • Appetizers
    • Slow Cooker
    • On The Grill
    • Side Dishes
      • Soups
      • Salads
    • Baking
      • Breads, Rolls and Muffins
    • Snacks
    • Treats
    • Desserts
    • Drinks
  • Homeschooling
    • Elementary Homeschooling
      • Elementary Homeschooling READING
      • Elementary Homeschooling MATH
      • Elementary Homeschooling LANGUAGE ARTS
      • Elementary Homeschooling SCIENCE
      • Elementary Homeschooling HOME ECONOMICS
      • Kids Arts and Crafts
    • Middle School Homeschooling
      • Middle School Homeschooling SCIENCE
      • Middle School Homeschooling HOME ECONOMICS
    • Language Arts
    • Math
    • History / Social Studies
    • Geography
    • Foreign Language
    • Field Trips
    • Games
    • Nature Study
  • The Big Picture
    • Life In General
    • Celebrations
    • Faith
      • Into the Light; The Series
    • Giveaways
    • Reviews & Sponsors
  • Photography & Lettering
    • Photography
    • truck lettering
    • vehicle graphics
    • Newborns
    • Kids
    • Engagement
    • High School Senior Pictures
    • High School Senior Pictures Sneak Peeks

Pinwheel Wreath | Tutorial and Decor

May 29, 2012 By Laura 19 Comments

017_pinwheel-wreath-300x214


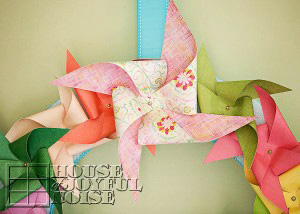
Is there anyone, who doesn’t love pinwheels? They are just so fun, so whimsical, and can give anyone that feeling of childhood joy as it spins, no matter how old we are.  I am so smitten with pinwheels lately, that projects involving them just keep popping into my head! This idea of a pinwheel wreath, however, has been on my brain since last year!  I wasn’t sure exactly how I would design it, but I figured it out as I went along, and the results just make me smile!  Just like I knew it would.

001_pinwheel-wreath-home-decor
What do you think?

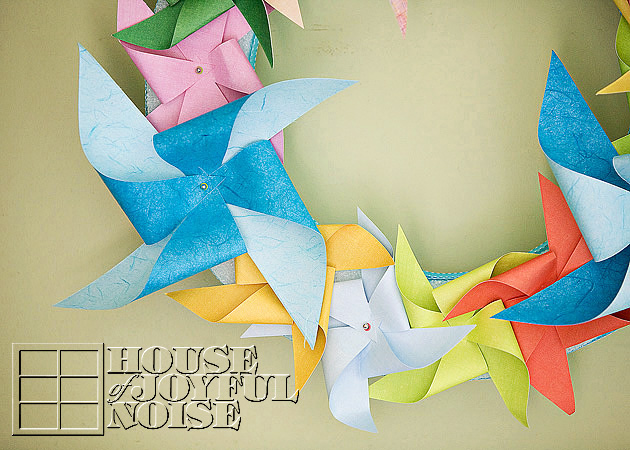
I found it fun and easy to make.  They don’t spin, as this project was strictly decorative. But I’m already thinking about designing another one that works! For this pinwheel wreath however, I just wanted it to have a summer feel, with lots of pops of color, so I chose summer hues accordingly. But imagine all the different and fun color combinations that you could come up with! 

 Let me show you how easily I made this wreath.
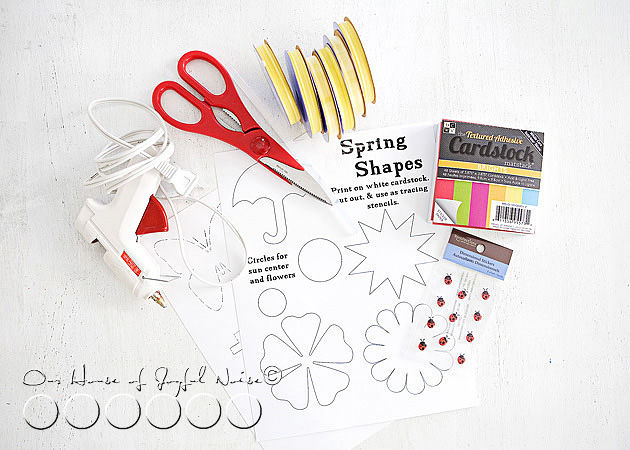
002_pinwheel-wreath-supplies
Supplies
Needed: 

**I got everything on this list at Michael’s Arts & Crafts**

  • a styrofoam wreath base
  • a pad of double-sided cardstock (called a Solid Mat Pad) -papers size 4.75 in x 6.75 in.
  • 4 or less double-sided designer 12×12 in scrap papers you love (heavier stock)
  • eyelet brads
  • eyelet setting tool set (had in my toolbox)
  • a small hammer (had)
  • long pins (- with the ball on the end. I got metallic ones.)

Optionals:

  • wide ribbon of choice
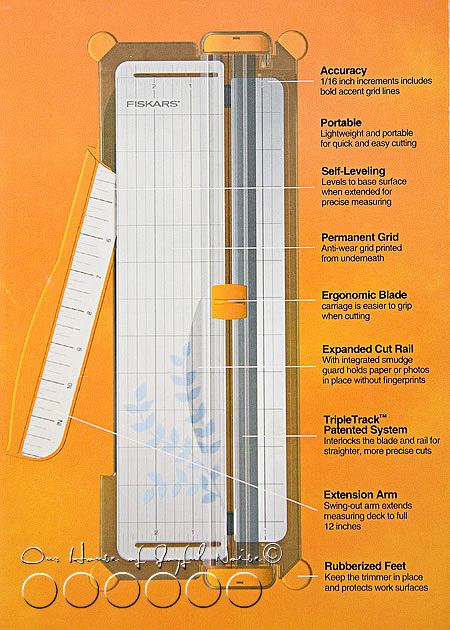
  • scissors, or a Fiskar Trimmer! (Which I highly recommend as a constant craft tool I have!)

___

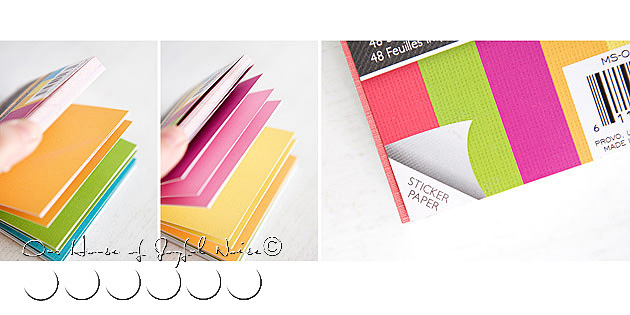
Next I am going to show you how to fold paper for pinwheels. But to start, you need your pinwheel paper in squares – size depending on how big or small you want your pinwheels. (You may want to experiment to decide that.)

The multi-colored pad of 2-sided paper I bought was 4.75 in x 6.75 in. So the easiest and fastest thing for me to do was to take 2 inches off, and make them square, at 4.75 in x 4.75 in.  So I had a little pile of those cut to size in no time (with my Fiskar Trimmer), and ready to fold.

04_how-to-fold-pinwheel-paper

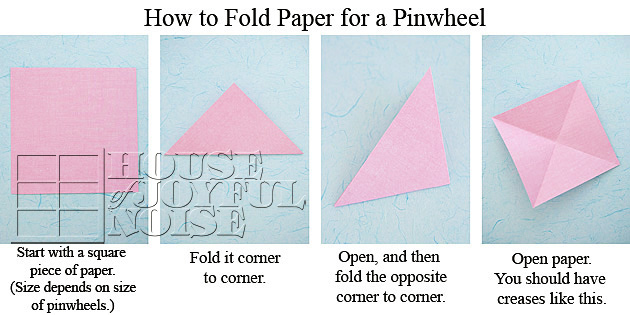
As you may be able to tell in the above 3rd frame photo, I did not open the paper to make the second fold, the first time when I photographed this. But you should…..it’s easier and makes a nicer second fold.  I also zoomed in, so don’t let sizes fool you.  But looking at the 4th frame, I am sure you get the idea of how the folding needs to get done. It kind of looks like a little square kite!

Next, is the cutting that needs to be done on the creases.  Now, you CAN just use scissors for this! Just be sure to note where you need to stop cutting.  There are 4 cuts on each square, and none of them go all the way to the center. But for mostly all of my craft paper cutting, I use my awesome (older model) Fiskar Trimmer.  In case you have one, or are going to get one for this craft, I have made some labeled photos with directions and tips here below, of exactly how you can cut them all quickly and easily. I hope they explain well for you.


005_how-to-cut-pinwheel-paper

006_how-to-cut-pinwheel-paper 
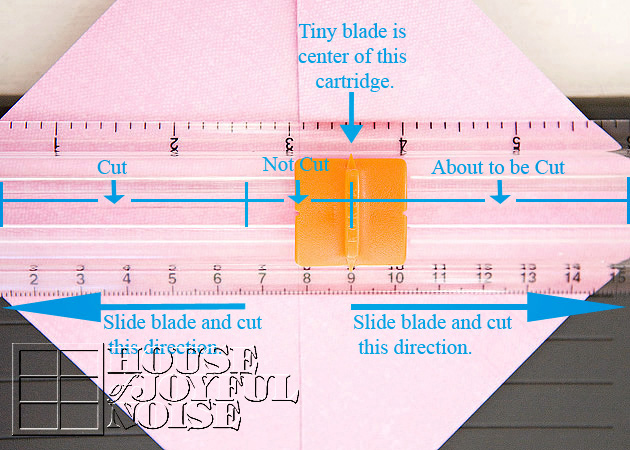
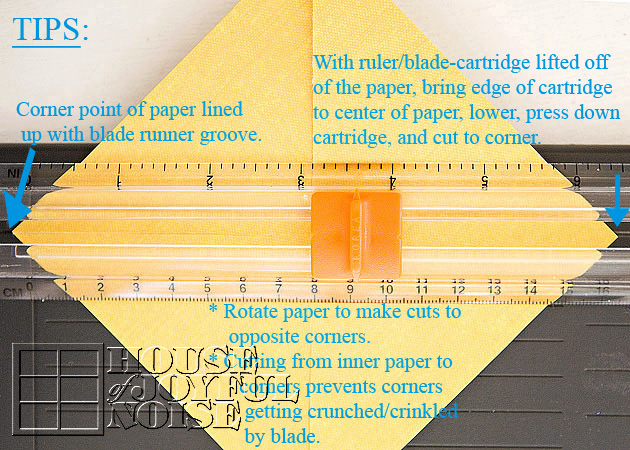
So if you just study these photos above and read the notes, you’ll find that cutting the square papers can be done in a zip! That’s what I love about the Fiskar Trimmer…….it’s fast, and the cuts are straight and perfect. I use it a lot!


007_pinwheel-wreath-supplies 
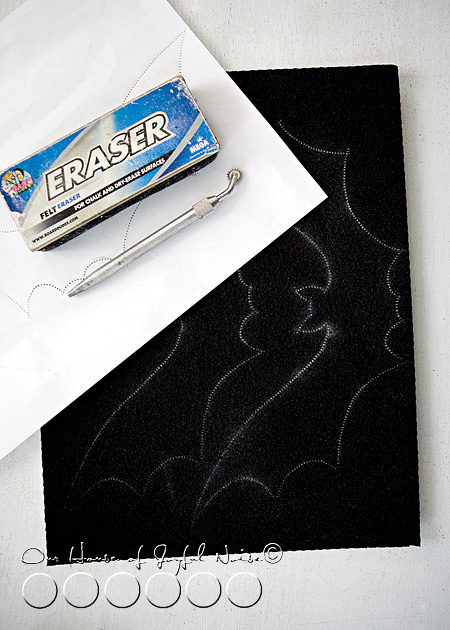
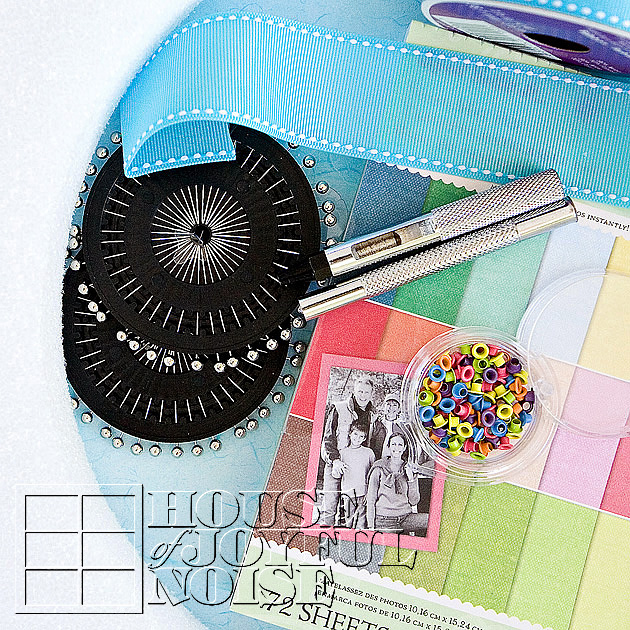
In this photo above, I’d like you to take note of the eyelet setter tool set, and the pins.  I hope you are familiar with eyelet (brads) and the tools needed to set them?  They are used a lot in scrap booking as well. In a nutshell….a tip makes a hole in the paper for the brad to be put in.  The setter is used on the backside of the eyelet or brad, to ‘splay’ the metal open and hold it in the paper. You do this with a little hammer, and it’s fun!  You’ll see how it looks finished in a moment.


008_how-to-fold-pinwheel 
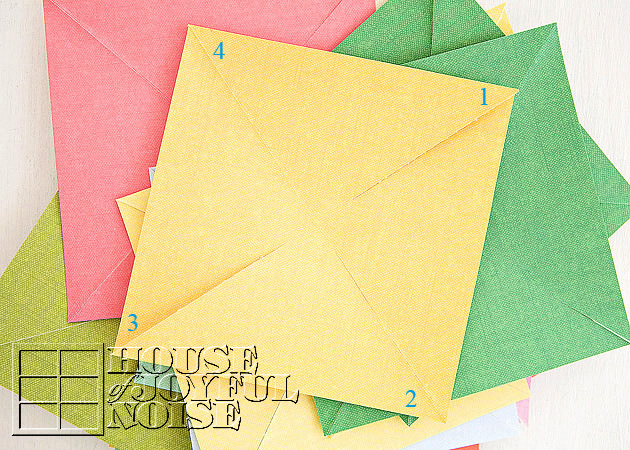
Here I have my little squares of paper all cut.  When folding a pinwheel, you need to bring every other corner to the center of the square. So I have numbered them to give you the visual of that.  Also, you can now get a good look at how the cuts do not go all the way to the middle, and about where they should stop.

I could not take photos of every step of this process, because it takes a lot of tight holding with very busy hands, and I couldn’t hold a camera too! But if you need to see how eyelet brads are set step by step with the hammer method, you can check this video here.  There are newer tool sets out on the market, that set eyelets or brads with a spring-action tool, and another method as well. You will see the options at the video link above, but the hammer method I use is demonstrated.
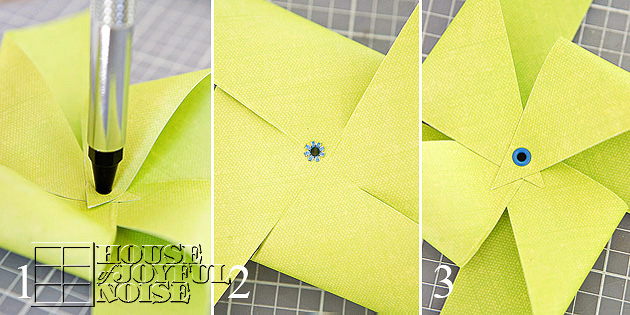
 

09_eyelet_brad_process-how-to-make-pinwheel

FRAME 1

Every other corner is brought to the middle, with the point quite passing the middle. Each corner overlaps the previous, and you really need to hold them all exactly in place.  Then, taking your eyelet hole puncher, you tap out the hole with the hammer on the top of the setter. With 4 layers of paper here, you really need to hit it hard a few a couple of time! ALSO NOTE:  Just like when using an ordinary paper punch, you don’t want to punch a hole off the edge of an of the papers. This can be tricky with 4 corners on top of each other! So be sure they are all in place before making the hole.

FRAME 2

The eyelet brad has been put into the hole, held in there carefully while flipping the pinwheel over, and the back of the eyelet has been hammered and ‘splayed’ (I like that word…lol) out, to hold the eyelet in place. Careful not to crush your pinwheel too much!

FRAME 3

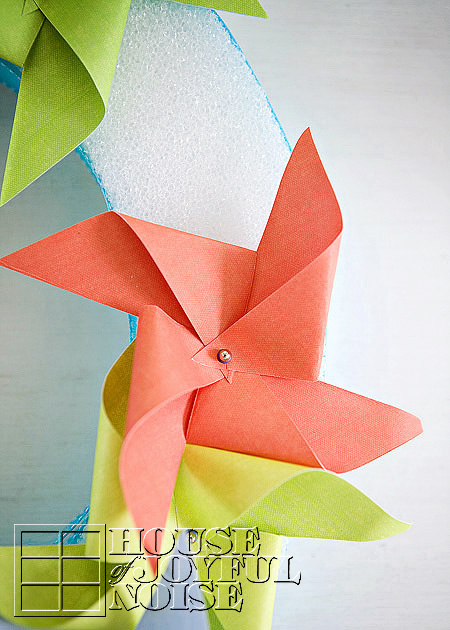
What the finished eyelet looks like on the front.

Seriously easy as 1-2-3!  (On repeat mode. ; )

–

OHHHHhhhh….It’s about to get even more fun, now!

010_pinwheel

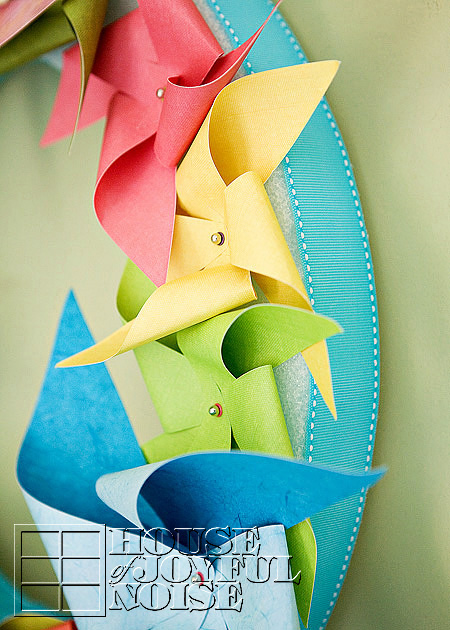
Taking your pins, and putting each one through the eyelet of each pinwheel, you can start pushing them into your styrofoam wreath!  The pins can be easily put in and taken out, so you can really play and see what you think looks good to you.  You’ll also get an idea of how many pinwheels you’ll need, and how many bigger pinwheels you’d like to use, if any. I added 3 larger pinwheels to my smaller ones.  The larger ones were made with 12″x12″ 2-sided designer scrap papers.


0111 
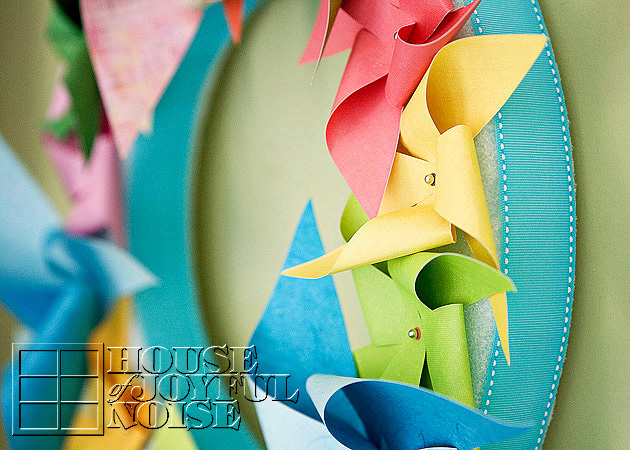
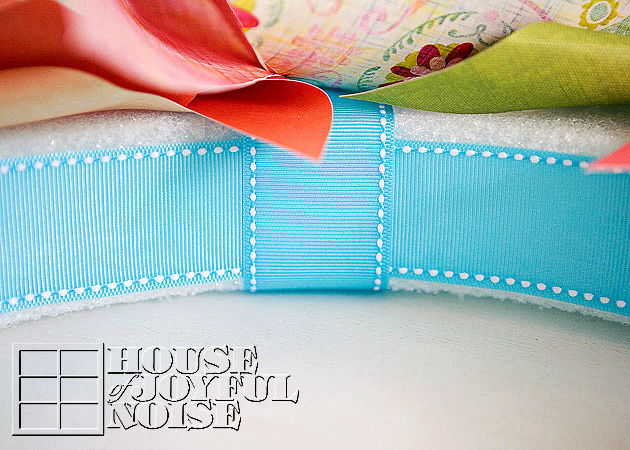
Before you get all of your pinwheels put in and in place just how you’d like it, you may want to add ribbon to the inside and outside of your foam wreath.  I think the ribbon just makes the whole wreath look more finished.  There are different ways you can do that, such as wrapping and winding around the wreath. But I had beautiful turquoise wide ribbed ribbon that laid flat nicely all around the inside and outside, so I chose to do that.

To attach it, I used E6000 glue. Maybe not the best technique. But I squiggled it on, and spread it with some little ripped paper and let it get a tad tacky, before laying the ribbon down.  I was concerned it would soil through, but spreading it out and letting it set really helped, and it worked.  You may want to use hot glue, or just pin it all the way around. I was thinking….my metallic pins would have looked pretty cool.  Like shiny studs.

With the ribbon glued all around the outside and inside perimeter of the circle, I looped another cut piece to hang the wreath from later, before pinning all of the pinwheels in place.

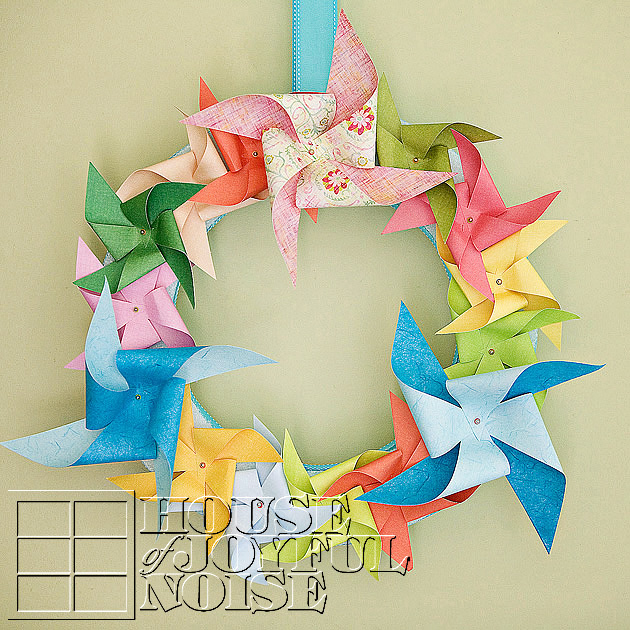
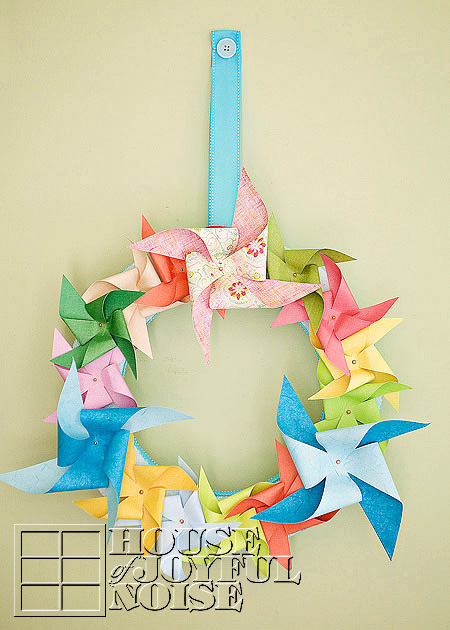
And that is the gist of how my pinwheel wreath was made!  Now you can just enjoy several photos of the finished project!

012_pinwheel-wreath-decor

013_button-ribbon-hanger

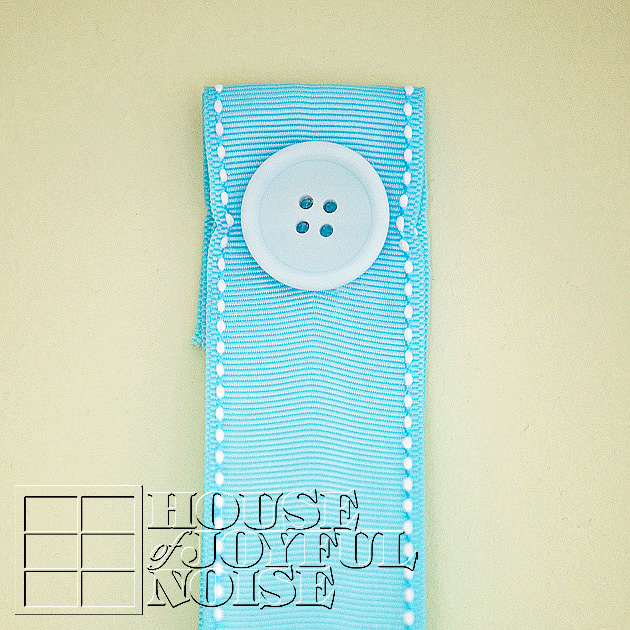
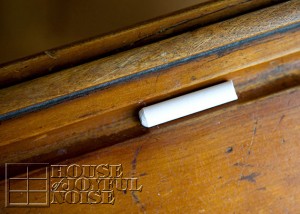
Ahhh yes…..My husband used a flat head nail, and nailed right through the ribbon to hang the wreath. Then, I just glued a big cute button on the nail head!  Love buttons!  I think it adds such a cute element, and I also really dig the white stitching on my pretty ribbon too.


017_pinwheel-wreath
014_pinwheel-wreath

015_pinwheel-wreath

016_pinwheel-wreath

018_pinwheel-wreath-decor 
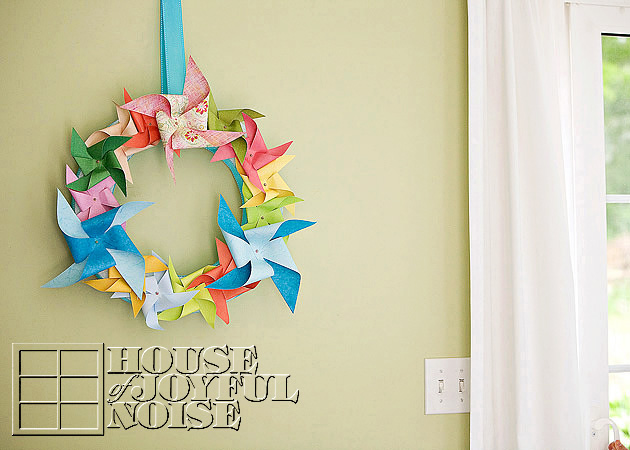
My summer-fun pinwheel wreath is hung in our sun room, as a fun and cheery welcome on the wall right in front of anyone who walks into our home through our front door.   I not only love it, but our kids do too, of course!   I hope you are inspired to do a project as fun as this one.

pinwheel-wreath-tutorial-decor 
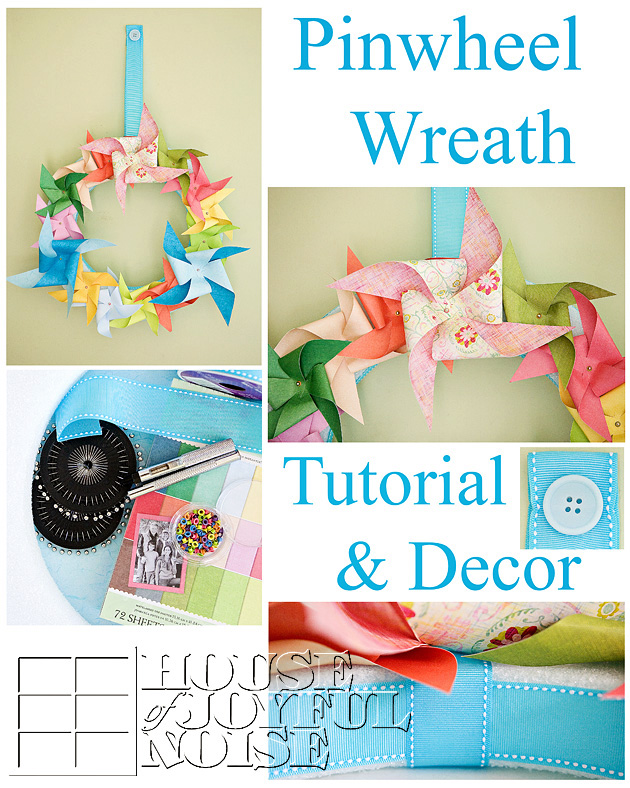
Speaking of pinning, feel free to pin this collage to Pinterest, if you are on there! I will be!  We also have added a new ‘P’interest social button in the header, and I’d love it if you’d like to follow me on there as well!

I hope you enjoyed this tutorial.  I invite you to leave me your thoughts or questions! Happy Summertime!

* Come follow us where you are! Or subscribe!
> Buttons at the top of the right sidebar!


Filed Under: Crafts & Creations, DIY (Do-It-Yourself) Project, Home Decor, The Homestead, Tutorial Tagged With: craft-tutorial, crafts-with-double-sided-scrapbooking-paper, eyelet-brads, fiskar-paper-trimmer, home decor, how-to-fold-a-pinwheel, how-to-make-a-pinwheel, how-to-set-eyelets, pinwheel-crafts, pinwheel-tutorial, pinwheel-wreath, pinwheel-wreath-tutorial, summer-decor, summer-home-decor

Our Antique School Desks and Books

May 21, 2012 By Laura 19 Comments

001_chalk-old-school-desk-300x214

Lately, I’ve been putting time into some things I can’t speak much of, yet.  Well, I could. But there has been too many time in my life, when I have spoken too soon, about many things, that never really came to be, in the end. So I am finally starting to remember to keep my mouth shut about some things, until they are a little more certain! How about that, huh? I’m only in my 40’s.  Anyway, just so you know, I’ve been more creatively productive than it has seemed lately. ; ) Doesn’t it bug you when people speak so vaguely? Me too. I’m sorry. I do hope to share  more with you all, soon.

But today, I wanted to show you a couple of home treasures of ours, that I love.  They are some old little school desks. If you like antiques, and/or you like old school things, you may find these pieces interesting.

002_vintage-antique-school-desk This first school desk is one my husband, Michael, picked up at a yard sale he stopped at.  He saw it, and knew I would love it.  Because I not only love antiques, but love all things ‘old school days’ related! He paid $15 for it, and once he did, the seller told him it was made around 1932.   It’s all solid wood, and pretty small, as it seems most school desks were back then.  As you can see, I just have it set tucked in under a wall table.  


003_antique-books Just inside the desk, are these two really old books.

004_antique_vocabulary-school-book

This book, Twelve Ways to Build a Vocabulary, is by Archibald Hart, with a foreword by Johnson O’Connor.   I came across it at a tag sale, on a table with a lot of other books, and bought it for $1.00!  The kids and I love vocabulary, and this book is just interesting to read through.  Printed in 1939, it has an old worn linen cover, fragile binding, and yellowed pages throughout.


005_antique_handyman-book This one, titled The Complete Home Handyman’s Guide, was Michael’s grandmother’s.   I couldn’t tell you if she ever read it, but I did have the blessing of getting to know her in the years before she passed, so I can tell you this much; she was as good as any handyman around!  She did all of the work of the greatest of handymen, and well into her 70’s!   Michael said he grabbed this book out of a box of others his parents had. It was printed in 1948.

We have other wonderful old books in our home as well. Some more meaningful than others. But all of them make my nose tingle, when I flip through them. What’s up with that?

006_antique-vintage-school-desk-kenney-bros-ang-wolkins
Our second desk is a little more sentimental.  Michael used this desk as a little boy.  He tells me that it originally came from his aunt’s home, who had 5 girls.  He recalls when he was little, that they had about 3 of these little desks, as well as teacher’s desk.  They did not home school, but just used all of the school furniture in the playroom, to pretend with.   At some point, one of them ended up coming to Michael’s family’s home, and he used it in his bedroom, while he was in early elementary school.


007_antique-vintage-school-desk-kenney-bros-ang-wolkins

Through the years Michael and I were dating, Ido recall seeing it in his parent’s basement. It was of no interest to me at the time. When his parents sold their home and moved away, Michael took the desk, and it then sat in our own basement for years. Eventually, I fell in love with home schooling, all things from old schooling days, and antiques in general. When I remembered we had this old school desk of Michael’s in the basement, I couldn’t wait to bring it upstairs!


008_antique-vintage-school-desk-kenney-bros-ang-wolkins

Although I have to admit, we truly have no room for it in our school room, and it is constantly in the way! It’s far too small for any of our kid’s to really use. And believe it or not, it’s heavy! Still, I love to see it.  It’s charming, isn’t it?

Well, most of it. There is a reason I have only showed you the desk on this angle, so far.

Here, let me show you the other sides……

009 Can you believe this mess? Guess who did this? Michael! When he was little, and the desk was his in his bedroom, he put all of these stickers on it. He says they were the stickers he got in school from the teachers, and when he came home, he would put them on his desk.


010 I think for the years this desk was in the basements at his old home and ours, the stickers is all I saw when I looked at it. It’s pretty much baffling to me. I have always told my kids, “We only put stickers on paper! Never on walls or furniture!”. Guess Michael never got that memo.  Even the kids were like, “DADDY did that? Oh my……gosh!”.


011 I told Michael, “Guess who’s cleaning them off? I don’t care if you’re 43 now.” ; )  Of course, they are still on there, so far.  He’s not that afraid of me, much. But I haven’t really put my foot down yet either.  In a way, I find it endearing to know he did all of this as a little boy. I bet he was so cute. And now we have the whole piece in our home, with 4 of his own little children.  But then, did you really look at all of the stickers closely?…..


012 What-in-the . . . . . .  Really?  A teacher was passing these out in school?  Lord have mercy. That’s a little disturbing. Don’t you think?  I don’t even get it. What does it mean?  I do know, that every time I look at it, I look for the woman’s arms. Where are her arms? Further disturbing.  Yeah, he needs to clean these off.  It would be nice cleaned up and refinished to it’s natural state anyway. Meanwhile, I keep this side turned to the wall.


013_antique-vintage-school-desk-kenney-bros-ang-wolkins

Another feature about this desk, is that it’s on boards.  I guess they used to screw the desks to the floor, so the kids weren’t moving them all over the place.  Or something.  I just tell mine to sit still. Anyway, this desk is so different than our other one we showed you, that is all wooden. Isn’t it?


014_antique-vintage-school-desk-kenney-bros-ang-wolkins I have no real year of this desk, but we can see on the base that it was made by Kenney Bros. and Wolkins, a manufacturer in Boston.  I did some research online and looked at hundreds of photos of old desks, but never found any just like the two we have. Still, I don’t imagine they are anything that unique or valuable in worth.  They are kind of special to us though, and that makes them worth something.

Could you tell us anything about the two desks we have here?  Do you enjoy antiques, or love old school pieces too? I really do. I bet there are other home schoolers who do, too.  If not, we hope you at least enjoyed seeing ours, today.  Thanks so much for coming by, and visiting us.


Save

Save

Filed Under: Home Decor, Homeschooling, Language Arts, The Homestead Tagged With: antique-school-desks, antique-school-furniture, antiques, archibald-hart, decorating-with-antiques, home decor, Home Schooling, homeschooling, Kenny-Brothers-and-Wolkins, old-books, twelve-ways-to-build-a-vocabualry-book, vintage-finds

Tips, Tricks and How-To’s to Our Halloween Decor – Crafts

October 16, 2011 By Laura 2 Comments

09_-300x214

I hope you all had the chance to join us, for our Halloween Decor Tour, in which we shared with you all of the festive touches I made, to put a little Halloween in the air, indoors and outdoors!  The post tour naturally consists of a ton of photos, or else how else could I show you all?  That, and my small chit-chat, made the post plenty long enough.  So I promised to share how I made some of the decor, in a separate post in the Crafts & Creations section soon. And here we are.

So I’ll start with the fact that, all of the signage design work that you see in this post (and the tour), that is similar in style and all ties together so beautifully, is part of the Halloween Party Complete Collection, which I purchased from Frosting & Ink Social Designery’s Etsy Shop.  Please note that everything that I printed out, I did so on textured white card stock. That really adds a nice touch. I also was sure that my printer printed the actual colors, being sure my settings did not allow the printer to choose the colors. (Yes, I am a color snob. I demand accuracy. )


001_halloween-parking-sign

One of the features I was most excited to show, was indeed the biggest hit with our readers!  That would be my Witch Parking Sign.  ; )

–

02_
To start, I printed out the sign from my Halloween Party Complete Collection on a piece of 8.5″ x 11″ textured white card stock.  The actual design was 7.5″ x 10″, so there was an inch of white paper to trim off, all the way around. For anything rectangle or square, I want a perfectly clean straight edge.  So I always use this….

011_fiskar-trimmer

….my Fiskar Trimmer for cutting paper or card stock. But using scissors, or an x-acto blade and a metal ruler on a mat, would also work.

Now for the sake of saving you from having to keep scrolling up, I am going to show you the photo of this sign again. (Because I’m thoughtful like that. : )  You need to be able to refer to it and see it as I talk here.

001_halloween-parking-sign

I wanted to mount my paper sign on a piece of old looking wood, so I asked Michael to please cut a piece of thin plywood about 10.5″ x 13″, and to try and make the edges look jaggedy, like old broken wood. To get that effect that you can see above, he used a saber saw.  Then he stained it dark grey.

Now I needed to mount the paper sign, onto the wood sign.  I had every intention of really using the sign, right at the head of my parking space outside.  So it needed to not only be applied permanently, but the whole sign needed to be weather-proofed, sealed and protected, as well.

–
03_modge-podge-outdoor

To do both the job of applying the paper sign to the wood, and sealing and protecting the whole thing I used Outdoor Modge Podge!   I applied a layer of glue to the back of my paper, as well as a coat on the front of the wood sign.  Then I placed them together with the design perfectly in place, smoothed it all out being sure there were no bubbles, and let it all dry overnight.   When it wasn’t so tacky to the touch anymore, I applied another coat over the whole sign (front and back), and let dry completely, again.   When that dried, I applied one more coat, and let it all dry again.  I paid special attention to be sure I was sealing the edge of the paper, to the wood sign. Any moisture getting in between when outdoors, would ruin it.

*Note – With a past project quite similar to this one, where I was applying paper to wood, and then adding final coats, I did not allow the coats to dry enough in between applications.  I didn’t want to, you know… wait. It didn’t turn out well, People. The paper was bubbling here and there because it wasn’t dry enough in the first place, making the paper soggy and rolling up, and it was just a mess. So leaving it to dry even 24 hours or so between coats sometimes, is necessary. Having patience, or not, shows in the final piece.  Rushing things, and hoping for the best, may not end well. Don’t do it.

–

004_halloween-bottle-accent I had this bottle displayed on my garden potting bench already. It was a cool indigo blue, but had faded in the sun.  So I decided to spray paint it matte black, and make a little Halloween necklace for it, by stringing buttons in colors that together, say Halloween to me: orange, black, green, and purple.  Different button sizes, and no pattern, rhyme or reason. Just string them on. I’ve made these little wrap necklaces for bottles and vases before, using beads and other elements as well. In doing so, I have used different materials to string on. But one thing I have found especially handy to use, is stretchy fishing line.  It works nice for small necks of things especially, that you may want to wrap around more than once, because if it barely is going to fit, it stretches some to prevent the string from breaking. It’s easy to work with. Of course, for a different look for indoor pieces, you may choose to use raffia, suede string, ribbon, etc.  I put a dead stick in it, and it was perfect!  It’s a small thing, but I really had fun with it, and I like how it came out.
–

05_halloween-front-door-decor-bats

I think the swarming bats around the front doors around Halloween time, was an idea first featured in Country Living Magazine (?) last year, and lots of crafty home-owners all over the country were all over the idea, including me!  I just didn’t get to it until this year. There are bat templates you can download from the internet, if you do a search, and I would guess that others looked and found some to use, as I did.  They can be cut out and used to trace with white chalk onto black material, over and over. Then you simply cut them out.  I looked around for bats that looked right to me, a lot. So in the end, I can’t remember where I actually found one I liked. (Or I’d tell you.) But anyway, I did resize it to have 3 different sizes of bats.

06_

I made the bats out of stiffened felt. I think I got about 15 sheets or so, and got as may bats as I could out of them.  Instead of cutting the bats out of the paper and tracing them, I went about things a different way – because I could, and it just seemed easier.  Michael (my husband) has this perforation wheel, to create a pattern of holes through paper, and then you pounce that pattern onto another material, using chalk dust. So we just perforated the bat patterns on the paper, and then used our school chalk board erasers with chalk dust on them, to pounce the patterns onto the felt.

Scissors + Kids = Bats

Just so you know, my kids love cutting things out, and ask to help. I’m not into child labor. ; )

We stuck all of the bats on the house and door, using duct tape on the back.  Yes, one or 2 do blow or fall off now and then. Maybe there is a better way to adhere them, but duct tape works good enough for me. I don’t even notice if or when any are missing.  Michael does though. He tends to be the bat chaser I guess. LOL. But generally, they stay put pretty well.

–


07_halloween-wreath

This funky black feather wreath itself was wicked easy!
I simply bought it as is, at Michael’s Arts & Crafts! (Where I bought all of the materials I needed, but didn’t have on hand.)

08_halloween-indoor-wreath-decor

The circle sign in the middle, was another design in the collection I bought. Frosting & Ink customizes it with your own last name, before sending you the files! How cool is that?

The middle of the feather wreath was originally empty. Just a hole. So somehow, we needed to find a way to stabilize the sign in the front middle. The feathers were not going to hold it there.  So we simply cut a square out of some leftover stiffened felt, and mounted it on the back with hot glue, covering the wreath hole.  Then we just folded some pieces more stiffened felt and used them as spacers, connecting them with hot glue from the inside of the back support felt piece, to the back of the front design circle.  Simple fix!  It needed to be an indoor wreath, no doubt about that.  But thankfully, we have a glass front door, so we were still able to use it as a front door wreath that shows on the outside, when the brave ones come knocking.  ; )

We hung the wreath by hot gluing a piece of black sheer ribbon to the wreath itself on the back, and then to the top of the door frame. Yes, we did. lol. It comes right off, without damage.

09_cutting-perfect-circles
One might wonder how I cut out all of the circle designs.  There were many circle designs to be cut, and it would surely be no fun having to do so with scissors.  I want my circles perfect, so it was high time I got a good circle cutter. (With a 50% of coupon, of course.)  I got the Martha Stewart Circle Cutter, and I love it!! The blade pops on to the fit-in-your-hand cutter, and the blade swivels, so it makes circle cutting seamless and perfect.

10_halloween-french-doors-home-decor

For all of these little mini-signs (originally cupcake/cake toppers, table signs, etc.), I again used my Martha Stewart Circle Cutter for the round designs, and my Fiskar Trimmer for the square designs. Sticky tabs were used to stick them to the black sheer ribbon strands, that run from the top of the doors to the bottom. Simple and cute!
–

012_halloween-ghosts-fan-pull

Lastly I just wanted to mention how I created little ghosts on my Halloween Fan Pull. The heads themselves are simply formed by t-shirt material cut into squares, and forming it over the round beads. Then I used more clear fishing line to tie off the necks some to create the head better, and the kids drew on faces. This is all done while making the fan pull itself, which I also do using strong test fishing line, doubled. The spider element is at the bottom (center of the line), and then I used a fat needle and the fishing line to quickly string all of the beads on.  When it was time to make a ghost, I simply stuck the needle right through the middle of the square piece of material over the round bead, tied off the head with another piece of fishing line (trimmed down after knotted), and continued to string beads. When all of the beads are on for a fan pull, Michael ties on a little piece of wire and knots it up into a ball, to hook right into the ball chain clasp.  Works like a charm!  >  I hope you comprehend those directions. It’s late now. I was watching  X-Factor (2 hours this night) while doing this post too, on commercials.

I think a good thing to take from this post is, there can a lot of ‘winging it’ with crafting, with just a little fire-thought. Yes, sometimes you find one method works out better than another. But the process is simply figuring out what you are trying to create or do, and what kind of materials you may need or have on hand, to make it all work. (Whatever your project may be.). Just think about how you want something to look, and what you can use in terms of material, to achieve that vision. It’s not about doing everything perfectly, but learning as you go, and picking up a few tricks along the way. As you know by now, I have found fishing line to be pretty handy in my crafting!  There is some pretty strong test line that is durable, and it’s practically invisible, which can be a helpful for some projects too. There are so many tools out there that can make the more tedious parts of crafting (like cutting things out), faster and easier. And then there are lots of things right around your house, that you can use as well. Substitutions and preferences, are all part of the crafting game. If you have fun making what you do, and it makes you and/or others smile (even on the inside) when they see your creations around, then you are a successful crafter!

(Is there anything I missed?  Anything you wanted to know about our Halloween Decor that you had a question about, that I didn’t answer here? Please go ahead and ask, and I’d be happy to do my best to answer.)

* * * * * *


Save

Filed Under: Crafts & Creations, DIY (Do-It-Yourself) Project, Faith/ Catholic, FALL Crafts and Creations, Fan Pulls, Holiday Crafts, Holidays, Seasonal Crafts and Creations, The Big Picture, Tutorial Tagged With: creative-Halloween-decor-ideas, Fiskar-trimmer, Halloween-crafting, Halloween-crafting-tips, Halloween-decorations, holiday-crafting, holiday-decor, home decor, Martha-Stewart-Cutter, Michaels-arts-and-crafts, Modge Podge, Outdoor-Modge-Podge

Spring Fancy Strands|Door or Window Craft Decor|Giveaway (Closed)

April 11, 2011 By Laura 11 Comments

window-door-craft-decor-12

I find spring-time to be such a craft-inspiring season.  Although winter & spring has been taking turns around here in the past few weeks, I still like to think of it as just spring, as it should be.  Time for garden planning, enjoying the new warmer, sunnier days, and looking for those very exciting signs of spring.  They are popping up all around us, despite the occasional surprise snowfall!  With spring comes all kinds of cheery colors and symbols always associated with this season of new life.  It just makes me feel like crafting!

window-door-craft-decor

This is a craft you can do with ANY kind of doors or windows in your house!

The French doors between our sun room, which is always bursting with sunshine or a soft natural light, and our living room, has been the focus of my craft quite a few times!  All of the rectangular panes of glass  strike me as mini picture frames, calling for some little artwork.  This past Winter, I made beautiful sparkly snowflakes on blue ribbon, which is a craft I am saving to share later this year. There was a functional twist of an idea I used with them, and I think some of you will rather enjoy using the idea for yourselves next year, when I’ll have the opportunity to share it with you in time to use the idea.

My craft idea for Spring is very similar, although strictly and adorably decorative, using very simple Spring shapes, ribbon and colorful card stock.

I designed a small collection of Spring Shapes in Photoshop, to use as stencils again and again.  I will share these with you by the end of this post. But here is a peek at what I came up with.

window-door-craft-decor-1

window-door-craft-decor-2


The supplies needed were few and simple:

  • window-door-craft-decor-3
    Spring Shapes, printed on card-stock to cut out
  • 6 full rolls of thin ribbon
  • Card-stock in cheery bright Spring colors
  • Scissors
  • Hot Glue Gun
  • *Any little embellishments you like.

window-door-craft-decor-4

I found this block-pad of linen card-stock in beautiful colors, at the craft store.  I knew it would be perfect, to use for my Spring shapes, that I wanted all relatively the same size.  It was a pleasant surprise to realize they were sticker paper too! That was going to work out nicely, for adding the centers on flowers, etc. And if there was no need for sticky paper, I just left the backside on.But you can use any colored card-stock, that comes in sheets, as well.

Alright, so I didn’t take photos of every step.  That’s needless really.  But the simple directions are, that I cut my Spring Shapes out of the white card-stock I printed them on, and used them as stencils on the little square card-stock pieces.  There was a whole lot of tracing stencils, and cutting out, going on.  Then it was sticking or gluing pieces together, to make little happy die-cuts of art.


I have to tell you, as crafty as I am, I HATE CUTTING STUFF OUT!! With scissors.  Thankfully, my kids love it! It’s great practice for scissors-skills for them.  I did do a lot of the cutting for this project, but they enjoyed helping when ever and wherever they could.  I was thankful for every bit.

window-door-craft-decor-5 Using almost an entire roll of ribbon for each row of windows top to bottom, attach one end on top of the door, and center of the row.  Run it all the way down, to attach to the bottom of the door, again keeping it center.  Cut off any excess before attaching. We use a tack at the top, and glue on the bottom.

Then just dab a little hot glue onto the center of each die-cut one at a time, and apply it to the ribbon in the center of each window.

window-door-craft-decor-6
Here are my doors, all done!!  CUTE, or WHAT??

Such a simple project, but just a lot of cutting.  This was a craft for the kids and I to do together, from the get-go, so  I knew which part I’d be letting them do some of!  Hopefully you have a few of those happy-cutters, too.

You know, you don’t have to have French doors, to do this project!!  You can do the same thing, in grid picture windows, or make horizontal strands as a Spring-themed decorative garland!


window-door-craft-decor-7  I can tell you, by the time we had made 24 die-cut pieces, trying to make them each a little different, we got to the last 6 and wondered if the doors would look cute enough still, with nothing across the bottom row of window panes.  And then I had the quick and easy idea, to wrap up this craft, in 6 simple letters:

S P R I N G

Seeing my Spring-ish doors makes me smile anyway.  But what really warms my heart, is the words spoken by my little boy the other day: “Mama, every time I see my butterflies that I made, that you put up on the door, I get a really happy feeling inside.”

Dang if that doesn’t make me really happy inside, too.   I love doing projects with my kids.  It’s so rewarding, for all of us, in so many ways.


window-door-craft-decor-8
Just so you know….our French doors are rarely closed like that.  Our 4 season sunroom, is open to the rest of the house most all of the time.  It’s surely a cheery passage-way now.


window-door-craft-decor-9  When spring turns to summer, I’ll be taking these strands down, but keeping them to use again next year, just as I did the winter ones! They are easily re-usable, for at least a few years if not more, if they are stored nicely.


window-door-craft-decor-10 On a side note….I do struggle with displaying fake flowers in my house.  I prefer fresh of course.  But it’s just not budget smart, year round.  Unless I can cut fresh flowers from outdoors now and then, and I do when I can. But in between….fake it is.  I just like to have some especially, in my old milk jug.

So just for fun, I decided to design a little collage, to show you some of the pieces a little closer up.  Naturally, when posting photos on a blog, some detail is lost.  But it’s still a closer look.

And then I thought the collage came out so cute, that maybe it would be a fun idea, to have a Give-Away!  It will printed as a 12 x 12 photo (such as it is), and mounted on a sturdy backing.  It will be sprayed with a protective coating, so it can be popped right into a 12×12 glassless frame. (I never use glass in my frames.  No need when they are mounted and sprayed, and they look so much nicer without the glare.)

The collage of these mini-photos, is of course, of little paper art.  But how cute would it look on display, near your Easter tree, in your kitchen, or in a little girl’s room!  It would look cute anywhere!

window-door-craft-decor-11

If you’d like to try and win this Give-Away, all you need to do is the following:

1.)  Follow our blog, via Subscribing or our Facebook Page, in the sidebar. (If you are not already.)

2.)  Leave a comment below, saying anything you wish, or letting us know you are now following our blog!

3.) Link up a crafty idea of your own, right now, if you can!!  (Not required, but we hope you share something if yours if you’ve gotten creative, and blogged it, lately!)

I’ll do a drawing from the comments by the close of the week!

Want to do this craft yourself?  Here are the pdf links to my Spring Shape Sheets:

Spring Shape Page 1

Spring Shape Page 2

I hope those links work for you anyway If not just email me, and I will send them to you. I did free-hand draw a few on my own, that are not on the sheets, but most are here. You can add idea of your own too.  Just keep the shapes simple.

window-door-craft-decor-text6

ENJOY!

******


Save

Save

Save

Save

Filed Under: Crafts & Creations, Giveaways, Kids Arts and Crafts, Seasonal Crafts and Creations, SPRING Crafts and Creations, The Big Picture Tagged With: crafting, decorations, developing-kids-scissors-cutting-skills, door-and-window-decor, easy-crafts, french-door-decor, home decor, kids-arts-and-crafts, spring-crafts

An Autumn Decor Peek & a Wicked Little Bit of Halloween.

October 18, 2010 By Laura 4 Comments

We’re sharing our current Autumn decor with you today!  We’re so glad you’re here. Come on in!

autumn-home-decor-2
I’ve been taking a couple of photos here and there, of our homestead autumn decor, simply because it is FUN for me, and I know many of you love to see this kind of stuff.  So, I’m sharing, just as I did last year.  It’s just a small collection of shots, and most all of the decor I’ve done is indoors.  Not much has been done with the outdoors at this point in time, although we did rip out all of the tomato plants and cosmos. It seems we still have some jalapeno and bell peppers growing though, so we’ve left those for the time being.  Marigold plants remain for now as well, adding some color to the near empty gardens now.  The strawberry beds need to be ‘put to bed’ before the first frost!  Which feels like it may be soon!  It’s gotten pretty chilly around here. Especially at night!  We’ve even built a fire or 2 in our wood stove, and it’s given us that nice cozy atmosphere we love through the cold season.


autumn-home-decor
But one thing I do have outdoors,  is this new flag that I picked up for next to nothing.  It was one of maybe 50 designs, and apparently the last one.  It was the one and only I wanted. I made the staff of the store go through quite a bit to get this display one down for me. I really wanted it!  And I got it. And it makes me smile every day.
–

autumn-wreath-home-decor-1
I made this wreath, but don’t be too impressed.  It was already vine like, and I made it into a circle, and hung it.

Come on in and take a little look around, to see a few other seasonal touches around the homestead.

autumn-home-decor-3
Some faux fall flowers, dropped into an antique milk jug.
–

autumn-home-decor-4
Our wall table, and some family photos in a big frame, that I just stuck some faux leaves in.   Above on the wall is a new sign I had to have, for the Halloween season.  I got it on sale too.
–

halloween-decor-details

It’s so suitable for the Halloween season. But I love it because it’s a slang word I have used all of my life.  I’m originally from western MA, and it’s common language out there.  When I came out to the Boston area to art school, I quickly found the whole world does not actually use the word like I do.  Or at all.  But I still use it.  I cherish it.  I find the word wicked useful.
–

halloween-decor-details-1
Great craft and treat ideas in this special Halloween edition magazine of Matthew Mead’s, from last year.
–

autumn-home-decor-5
These are the kid’s.  And….these are the kids. LOL  (They know which one is them.) But here they are sticking in the weave of a basket in the kitchen.  Until they grab them again. Come to think of it, I don’t even know if they are still there.  But I’m not going to look now.  I got my photo.
–

autumn-home-decor-6
An Autumn ribbon that hangs our Prayer List Chalkboard.  I’ve mentioned that I love the idea of changing out the ribbon on our chalkboards, to go with current season and holiday home decor.
–

autumn-home-decor-7
A hedgehog ornament.  Cute, huh? She’s hanging on our season tree (branch).
–

autumn-home-decor-8
Apple cinnamon tea, in a beautiful ceramic mug, that seems perfect for Autumn.
–

autumn-home-decor-9
It’s been a happy Autumn indeed. May the coming winter be as good to us.

Have you happened to do any autumn decorating at all this year? We’d love to hear a little bit about what you’ve done, no matter how simple.  And, if you’ve taken photos and blogged it, leave us a link! We’ll swing by your place!

Save

Save

Save

Save

Filed Under: FALL Home Decor, Home Decor, Seasonal Home decor, The Homestead Tagged With: autumn decor, fall, fall-decor-ideas, fall-home-decor, fall-home-decorating, home decor

  • « Previous Page
  • 1
  • 2
  • 3
  • Next Page »

We are wicked happy to have you here! We hope you find much inspiration, help, humor and enjoyment here.


Archives


POPULAR POSTS

* * * * * *

SUBSCRIBE to House of Joyful Noise blog! Every new post, delivered right to your email box!


Privacy Policy

Amazon Affiliates

Never at any additional cost to you, we may earn a small commission for our endorsement, recommendation, testimonial, and/or link to any products from our website. Your purchase through our links helps support our family, while sharing with you the products we authentically use and recommend, for various ideas, and letting you know where you can purchase them. Thank you for your support!

[footer_backtotop]

Copyright © 2025 HouseOfJoyfulNoise.com · Genesis Framework by StudioPress