• HOME
  • {A}’s Chipmunk Training Archives

 Homepage

  • The Homestead
    • Home Projects
    • Home Improvement
    • Home Decor
      • Seasonal Home decor
        • FALL Home Decor
        • WINTER Home Decor
        • SPRING Crafts and Creations
        • SUMMER Crafts and Creations
    • Our Chickens
    • Gardening
    • Organization
    • Re-Purposing
    • Furniture Refinishing
    • Budget
  • Crafts & Creations
    • Seasonal Home decor
      • FALL Crafts and Creations
      • WINTER Crafts and Creations
      • SPRING Crafts and Creations
      • SUMMER Crafts and Creations
    • DIY (Do-It-Yourself) Project
    • Kids Arts and Crafts
    • Homemade/Handmade Gift Ideas
    • Holiday Crafts
    • Fan Pulls
    • Free Printable/Downloadable
    • Sewing Projects
    • Giveaways
    • Business Features
  • Recipes/FoodFun
    • Breakfast
    • Lunch
    • Main Dish
    • Sandwiches
    • Appetizers
    • Slow Cooker
    • On The Grill
    • Side Dishes
      • Soups
      • Salads
    • Baking
      • Breads, Rolls and Muffins
    • Snacks
    • Treats
    • Desserts
    • Drinks
  • Homeschooling
    • Elementary Homeschooling
      • Elementary Homeschooling READING
      • Elementary Homeschooling MATH
      • Elementary Homeschooling LANGUAGE ARTS
      • Elementary Homeschooling SCIENCE
      • Elementary Homeschooling HOME ECONOMICS
      • Kids Arts and Crafts
    • Middle School Homeschooling
      • Middle School Homeschooling SCIENCE
      • Middle School Homeschooling HOME ECONOMICS
    • Language Arts
    • Math
    • History / Social Studies
    • Geography
    • Foreign Language
    • Field Trips
    • Games
    • Nature Study
  • The Big Picture
    • Life In General
    • Celebrations
    • Faith
      • Into the Light; The Series
    • Giveaways
    • Reviews & Sponsors
  • Photography & Lettering
    • Photography
    • truck lettering
    • vehicle graphics
    • Newborns
    • Kids
    • Engagement
    • High School Senior Pictures
    • High School Senior Pictures Sneak Peeks

Big Furniture Refinish } A Work of Heart

May 10, 2011 By Laura 51 Comments

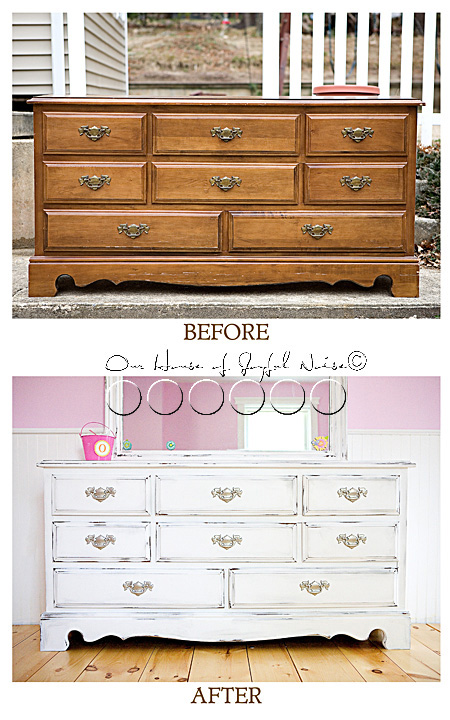
 This is the biggest furniture refinish I have done, yet.  (Well, my husband did very kindly help me. I worked pretty hard on it too, though.)
But as big of a job as it was for my hands, it was a much bigger job, for my heart.

refinishing furniture
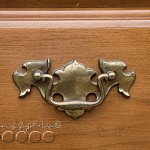
(‘Before’ thumbnail. The ‘After’ is a must see!)


refinishing furniture This is my mother’s dresser.  My mother passed away very suddenly, in 2005.  Her passing hit me like a train, and threw me into a grieving like I had never known. In the state of fog & hurt I lived in, one month after another, the only other thing I was aware of at all, was the depth of grief my father was in. It was hard to watch him go through all he was. I honestly don’t know which hurt more.

This dresser was the only one my mother ever had, in all of my years growing up, since the day I was born.   Except for a few sets of sheets, the drawers of it have been empty for the past several years, since my sister and I cleaned out my mother’s clothing together. But the rest of the house my father has kept exactly, as my mother had it. People say things to him about that, but he can’t understand why anyone thinks he would change anything.

My youngest daughter had moved out of the bedroom she had shared with her triplet brothers, and into her very own room.  I gave her my old white iron twin daybed, from my adolescent years, but she still needed a bureau of some kind.  One night, as I lay in bed, unable to sleep, I got to thinking about what kind of dresser would go best in her room, and when I came up with a long dresser with a mirror, I immediately got thinking about my mother’s.

refinishing furniture My intention right along, had been to find an antique or used dresser somewhere in my hunting, and refinish it.  We don’t buy much of anything new.  But when I remembered my mother’s, I knew I had more thinking to do.  You see, I knew my father wasn’t going to use it again.  He has the tall dresser, that goes with this one. When he sells the house, I knew he would either sell the dresser in an estate sale, or sell it with the house.  But one way or another, he wouldn’t be taking it with him, because he didn’t need it.

My issue was, the dark finish and style of the dresser, didn’t go with {O}’s room at all, or our home’s farmhouse style in general.  But, when it comes to sentimental matters, I am also the type, that doesn’t like things to change. I want everything to stay the same – which is why I take such comfort in going to my parent’s home, where my father is, and everything is just as my mother left it. My mother would be there too, if I had any say in that.

refinishing furniture So the idea of refinishing this dresser, of my mother’s, was hard to think about.  Just the vision of it, just as it is, with every detail, brings back memories. It’s such a part of my history, and my parent’s.  But it was either take it and refinish it, or let the whole thing go to some stranger, who never even knew my mother.   I decided changing it was a easier to handle, than letting it go altogether.

I talked to Michael about it the next morning, and called my father that afternoon, to ask him about it.  I was tentative, to tell him about the refinishing part.  (Yikes!) He did pause for a second of silence, when I got to that part of my plan.  But I wasn’t sure in the moment, if it bothered him because it was my mother’s, or if he didn’t get why I would do that.  I guessed it was the latter, knowing him pretty well, and a couple of questions later, I found I was right.  I figured, even if he was OK with me refinishing it, he wouldn’t understand why I would bother.  (Because he wouldn’t even think of it….because it works as is!)   “Why would you do that?”  “Because Dad, it doesn’t go with her room.  At all.”  I could hear him trying to wrap his brain around it.  He’s just a simple guy, who is not at all about home decor, etc.  If it works, it’s good! If it’s comfortable, it doesn’t matter what it looks like.  But he was fine with whatever I wanted to do with the dresser.  And he insisted on bringing it down to us, even though Michael had every intention of going out to western MA to get it.

I knew he would insist on driving it down, and as soon as possible.  He always makes sure we understand, “Anything you guys ever need, just ask me.  I mean it.” He means it.  There is nothing he wouldn’t do for us.  The dresser arrived in the back of his van, which arrived in our driveway, that weekend.

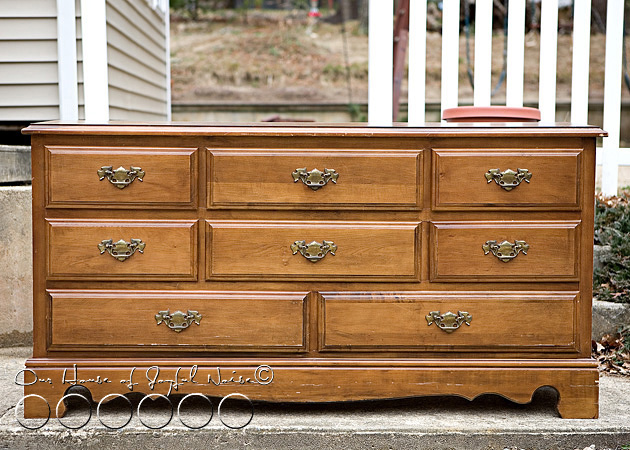
It was a beautiful day, so we got right to sanding it down, before it even came into the house. I did need to take a deep breathe, and push my hesitancy away, before I let the sander hit the surface.  But after I took some ‘before’ photos!

refinishing furniture 
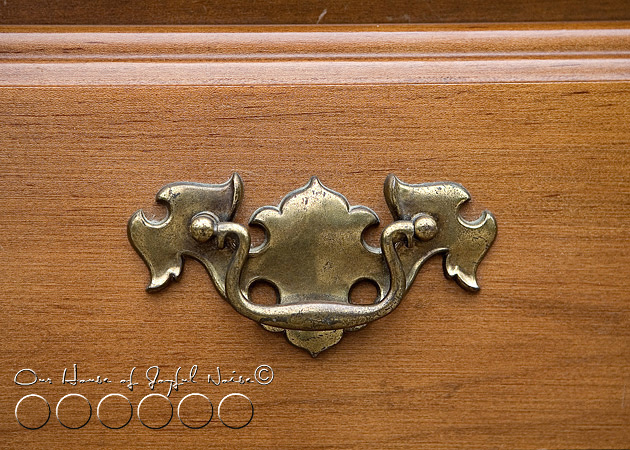
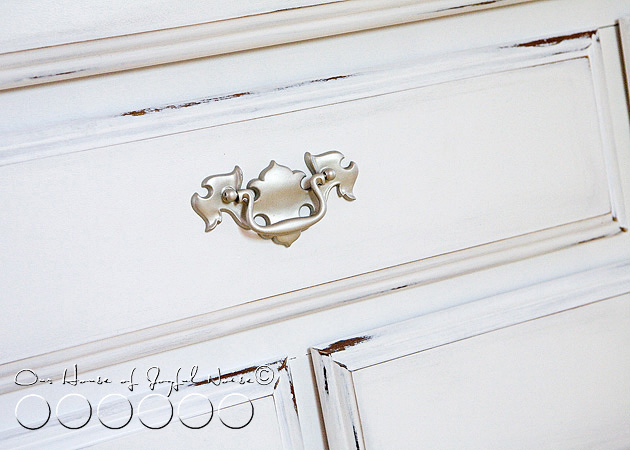
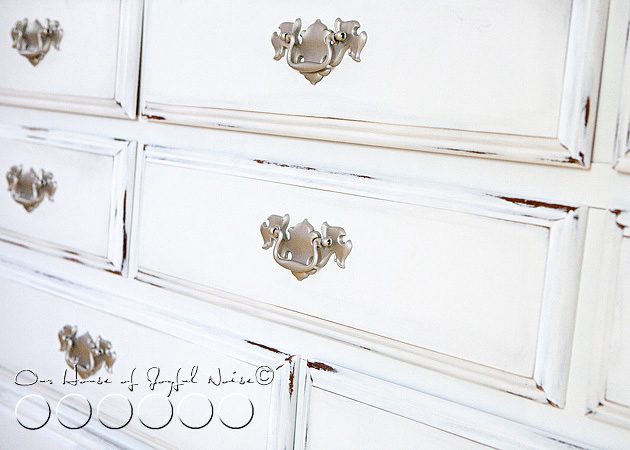
I could see the dresser, all refinished just as I wanted it, in my head.  I went to Home Depot myself that week, and found what I was hoping I would, for the original hardware – which I definitely wanted to keep!  It was the design of the hardware, that that really marked the dresser as my mother’s, and part of my parent’s set.

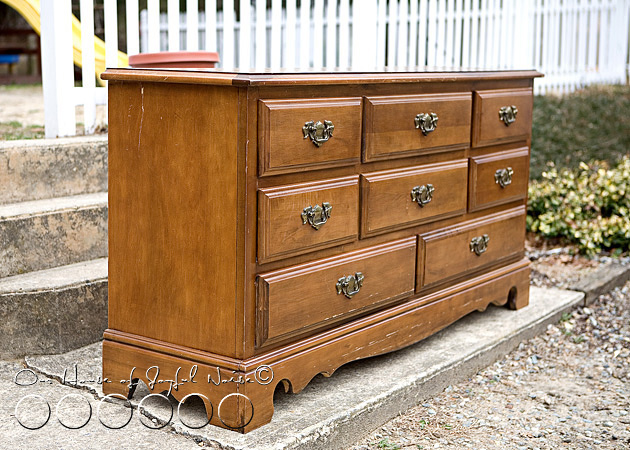
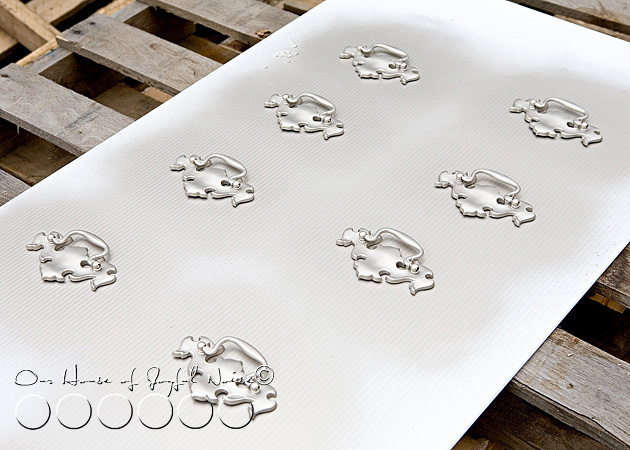
The spray paint I chose, was brushed nickel.

refinishing furniture 
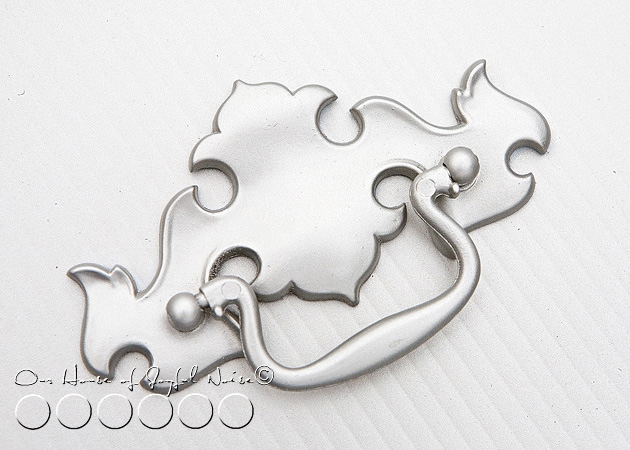
The tone was so beautiful.

The dresser itself, was a whole lot of work.  A lot.  Sanding, painting, steel wooling, and the high & smell of denatured alcohol, that was stuck in my head.  It was a big piece to work on. So much to it. My hands took a beating.

But the labor of it all, was therapeutic in a way, too.  It was a process I needed to go through.  Accepting change, and looking it in the eye, whether it is easy, or welcome, or not.  Knowing inside, that the only thing that is ever guaranteed to never change, is the memories born in the minutes and years that pass by.

Time marches on.

refinishing furniture 
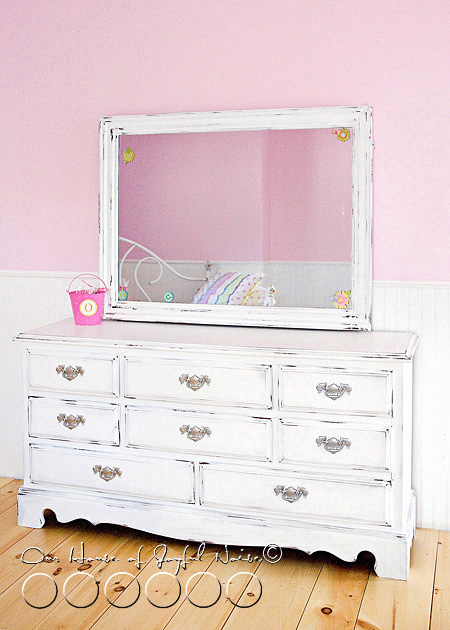
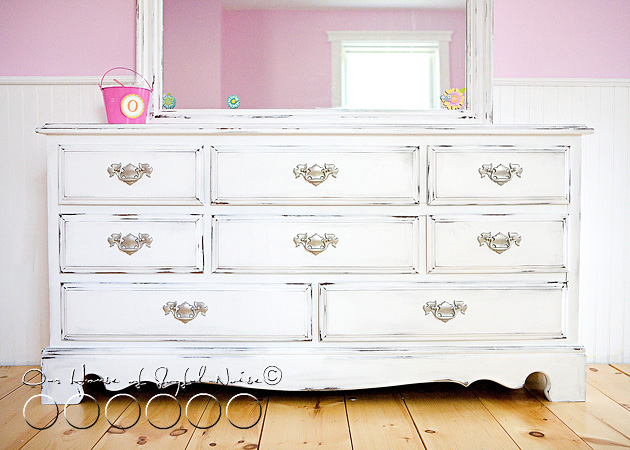
The dresser came out absolutely beautiful, I think.  I totally love it, refinished.  It now goes so perfectly, with the rest of {O}’s bedroom.

But it’s funny to me that, as completely different as it looks now, I somehow still see my mother’s dresser.

refinishing furniture Every time I see the hardware, I am back in my parent’s bedroom(s), or I actually hear in my head, the clinking sound it makes, when the drawer is closed and the handle is let go.  I heard it for 21 years, or something.

refinishing furniture The dresser has new history now.

{O} now has her grandmother’s dresser, and she watched her parent’s refinish it with love, just for her.

refinishing furniture

I can’t tell you how many times, I used this big mirror myself, growing up in a house with 5 kids, and one bathroom.

I can even easily imagine the many things of my mother’s on the dresser top, that were there for so many years.

refinishing furniture 
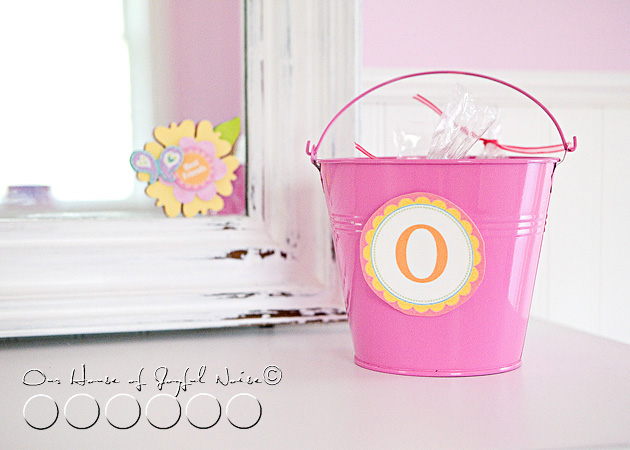
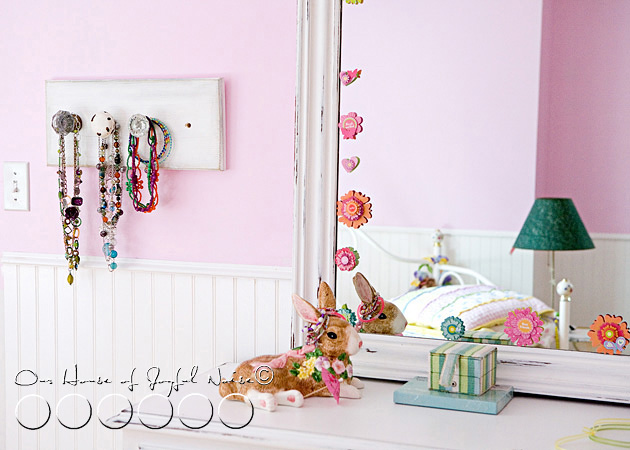
{O} is slowly covering it, with her own things, now.

She knows it’s her Meme’s dresser, and it makes her happy to have it in her room, and call it her own, now.

Things change.  It’s a part of life.


refinishing furniture
And yet some matters of the heart, inside, never do.

No matter what it looks like, on the outside.

refinishing furniture Sometimes, letting go, is all we can do.

While we hold on to whatever we can, as best we can.

I’m so happy I thought of getting my mother’s dresser, before it was too late.

I miss her so very much,  and it was hers.

Nothing I do to it, can ever change that.

******

Did you enjoy this post? They aren’t all this long, but they always have lots of photos!

Come ‘LIKE’ us at our Facebook Page!


Save

Save

Filed Under: Budget, Crafts & Creations, DIY (Do-It-Yourself) Project, Furniture Refinishing, Home Projects, Into the Light; The Series, Life In General, Refinishing, The Big Picture, The Homestead Tagged With: furniture-makeover, painting furniture, refinishing-furniture

Old Doorknobs to Jewelry Holder | DIY

May 9, 2011 By Laura 29 Comments

old-doorknobs-jewelry-organizer-holder-12
My youngest daughter {O}, age 8, is all about her accessories. She loves fashion design, and gets great joy out of planning her outfits, head to toe, every day. Her hair accessories have been taking over my side of the bathroom cabinet, and she has been keeping a lot of her jewelry in a box, which as you can imagine, tends to get things a little tangled.  Something had to be done, and I had a great idea for an accessory holder!

old-doorknobs-jewelry-organizer-holder There’s an antique place in E. Wareham nearby, called Clam Shack Antiques, that we’ve frequented often in the past couple of years.  I knew it was just the place to hit first, for some of the supplies I needed for my project, as I recalled there was a load of old antique door knobs there.   I rummaged through them all, chose some I really liked, and bought them for a deal.
–

old-doorknobs-jewelry-organizer-holder-1 At home, I already had the perfect piece of wood.  My father comes down to visit us a lot, and when he comes, he usually brings a load of stuff we may, or may not, want.  He knows how we love to make something, out of nothing.  Or take a piece of junk, and turn it into something nice or useful.   This nice solid piece of wood, was among the last load he showed up with.  It’s not truly perfect actually.  Someone had routered it, but the piece was not cut exactly even, to begin with.  But that’s alright.  We embrace imperfections. (Starting with ourselves.  Do we have a choice?  ; ).

I had all I needed, to get to work on my vision.
–

old-doorknobs-jewelry-organizer-holder-2 This is what I made.  I painted the wood, and then distressed it a little.  Then I had Michael install 3 of the door knobs I chose for this project, in my particular specified order. (So important, you know.)   I did not want any two knobs alike for this project, so we are saving the rest for another upcoming house project.

–

old-doorknobs-jewelry-organizer-holder-3 Here, is {O}’s accessory holder in use, just as I had envisioned it. Well, it’s not actually quite done, as you see.  I’ll tell you more about that in a minute.  But the knobs are just perfect, to hang her accessories on.  She has some nice pieces, too!

–

old-doorknobs-jewelry-organizer-holder-4 {O} is such a fun kid to have around.  She has such a feminine style, and gets so excited about anything I want to do with her, or her room. She appreciates my creative side, has one of her own, and is as enthusiastic as I am, about any project I brainstorm about, or work on.  She loves to work with me, too.

–

old-doorknobs-jewelry-organizer-holder-5 Hunting for door knobs, has been so fun.  I have discovered how unique door knobs can really be.
–

old-doorknobs-jewelry-organizer-holder-6 The glass ones can be especially fascinating, and beautiful.

–

old-doorknobs-jewelry-organizer-holder-7 But even this dinged up one has such character.  I think it’s brass, underneath that paint. This one, and it’s match, were pretty yellowed, when I brought them home.  We just washed them with hot water and soap, and they whitened quite a bit.  They still look old and discolored of course, which is why I love them.  But…not yellow.

–

old-doorknobs-jewelry-organizer-holder-8 I really still cannot believe, that I grew up in a house that is close to 100 years old, and I never appreciated it’s history, while I lived there.

I want a second chance!

–

old-doorknobs-jewelry-organizer-holder-9 Which reminds me.  Were you wondering what the 4th hole was for?  I’m going to get a door knob from my parent’s house, that I just mentioned, and add it to this piece of art, that I created for {O}’s room.  It is like art – don’t you think? My father will be selling the house soon, now that my mother has been gone for 6 years.  It’s just taken him a long time, to be ready to let go.  I think he’s still working on that, actually.  (So am I. ) Anyway, that house is loaded with all of the details that a house of that age does, including more doors and doorways than you can shake a stick at. And thus, door knobs.

That 4th hole will be filled, very soon.  I could easily find another door knob in my antique hunting, and I will be getting lots more, anyway.  But it’s important to me, that the last one be from my old home, and {O}’s grandparents, for this.
–

old-doorknobs-jewelry-organizer-holder-10 {O} confiscated the ceramic bunny, that was put aside to go back up in the attic, from our Easter house decorating pile.  It looks quite fitting and perfect, in her room.  And she found it’s ears, are just the right size for her bracelets.
–

old-doorknobs-jewelry-organizer-holder-11 And in these photos, have been peeks for you, of another project I have already mentioned I’ll be sharing.  That post will be up by Thursday, in The Homestead (Home & Gardens) section of this blog.

So, what did you think of this project?  Did you like my idea? Please share your thoughts, in the comments. : )  I love it so much, I get giddy.

Like this project? Than ‘Like’ our Facebook Page! There’s some more clever ideas coming up!!

~~~~


Filed Under: Crafts & Creations, DIY (Do-It-Yourself) Project, Organization Tagged With: antique-doorknobs, do-it-yourself-DIY-projects, jewelry-organization, necklace-bracelet-holder, organization, projects-for-old-doorknobs, what-to-do-with-old-doorknobs

Creative Easter Egg Dyeing & My Photography Fun

April 19, 2011 By Laura 14 Comments

creative-egg-dyeing-ideas-photos-5

Dyeing Easter eggs is one of our family’s favorite creative Easter activities.  (And photographing the process, is also one of mine.) But every year, dyeing hard-boiled eggs causes us personal dilemmas.  For one, there is the question of how soon, is too soon, to dye eggs. Then we are afraid to put them in the fridge, knowing condensation will likely form on our artwork, when we take them out on Easter day.  Of course, we are always sad to crack and peel our hard work off, and then we’re a little leery of eating them anyway!

So this year we decided…..we’re blowing out the eggs!!  It solves all of those dilemmas of ours, and we can save them until next year, for decorating, and collect more and more with each passing year.   It was to be our first year blowing eggs out, and we were excited.

creative-egg-dyeing-ideas-photos Honestly, the kids were killing themselves, blowing them out.  Michael had made suitable sized holes, and broke up the yolk in there, so it wouldn’t be difficult.  Still….faces were turning red and purple. I could hardly watch. They only did a few.  I didn’t want their head to explode, or anyone to get a headache.
–

creative-egg-dyeing-ideas-photos-4 I had picked up a few tips from Martha Stewart, that I was excited to try.  One was tying lace around some eggs, dyeing them, and hopefully leaving a lace impression on the egg, when the lace was removed.   That was the plan, anyhoo.

Lots of photos coming up here.  Some of how we dyed the eggs, and many are just photos I was having too much fun taking.


creative-egg-dyeing-ideas-photos-1

creative-egg-dyeing-ideas-photos-2

creative-egg-dyeing-ideas-photos-3

All of these mason jars I had just picked up at an estate sale on Sunday!  I knew I’d find lots of uses for them, and I did, the very next day!  They are perfect for dyeing eggs!

  creative-egg-dyeing-ideas-photos-6

creative-egg-dyeing-ideas-photos-7
We had cut some vinyl dots and stripes, to adhere to some of the eggs before dyeing, and to be removed after they were dry.

–

creative-egg-dyeing-ideas-photos-8

creative-egg-dyeing-ideas-photos-9
One of my favorite shots of the day.

The kids always have so much fun choosing colors, and checking their eggs.  I love to watch them work, and listen to them chat.

creative-egg-dyeing-ideas-photos-10

creative-egg-dyeing-ideas-photos-11

creative-egg-dyeing-ideas-photos-12

creative-egg-dyeing-ideas-photos-13

creative-egg-dyeing-ideas-photos-14

creative-egg-dyeing-ideas-photos-15

I was very eager to take the lace off some the eggs.   But it seemed like they should be fairly dry before I did, being concerned the wetness would run onto the lace impression.  I wasn’t sure if that was a good plan or not.

     creative-egg-dyeing-ideas-photos-16
creative-egg-dyeing-ideas-photos-17
Also another new technique we were trying this year:  flat-head pins stuck in foam-core, to dry the eggs on.  Worked like a charm!  I never liked the mark that is left when resting a drying dyed egg on a flat surface.  This leaves no marks!

–

creative-egg-dyeing-ideas-photos-18

I started noticing how much I loved the dyed lace! I wondered, should I leave them on?


creative-egg-dyeing-ideas-photos-19
O.k., I guess leaving this one on, with the little rubber-bands, would just look plain silly.  But I still loved the dyed lace.
–

creative-egg-dyeing-ideas-photos-20 Our {O}.
–

creative-egg-dyeing-ideas-photos-25
I did start removing the lace pieces, and this was the best that came out.  Hmmmm.
It’s not what we were expecting. But the effect is interesting and beautiful, anyway.


I especially loved the dyed lace pieces…..

creative-egg-dyeing-ideas-photos-22

creative-egg-dyeing-ideas-photos-23

creative-egg-dyeing-ideas-photos-24

I’ll have to think of a way in which to use, such beautiful pieces.
–

creative-egg-dyeing-ideas-photos-26

creative-egg-dyeing-ideas-photos-27

Some eggs came out nicer than others.  But they were just beautiful, all together.

–

creative-egg-dyeing-ideas-photos-28 I did end up coming up with a plan, to use the lace pieces.  I couldn’t throw them out. You’ll see…I’ll be showing you all more finished eggs, this week.  How about a peek around our Easter-time home? That’s coming right up.

Also…..would anyone like a step-by-step photo tutorial on how to thread blown eggs for hanging?  I’ve got photos all set to show. We came up with a wicked cool trick, that makes getting the thread through, so easy. We could also share how to blow eggs too, if you are interested in that.  Let us know!

030_beaten-eggs

Have you been creative lately?  Creativity comes in many, many forms. So we’re betting you have.

By the way:  GUESS what we had for dinner this night? ; )


Save

Filed Under: Crafts & Creations, Holiday Crafts, Kids Arts and Crafts, Seasonal Crafts and Creations, SPRING Crafts and Creations Tagged With: creative-egg-dyeing, Easter eggs, egg-coloring-ideas, egg-dyeing

Spring Fancy Strands|Door or Window Craft Decor|Giveaway (Closed)

April 11, 2011 By Laura 11 Comments

window-door-craft-decor-12

I find spring-time to be such a craft-inspiring season.  Although winter & spring has been taking turns around here in the past few weeks, I still like to think of it as just spring, as it should be.  Time for garden planning, enjoying the new warmer, sunnier days, and looking for those very exciting signs of spring.  They are popping up all around us, despite the occasional surprise snowfall!  With spring comes all kinds of cheery colors and symbols always associated with this season of new life.  It just makes me feel like crafting!

window-door-craft-decor

This is a craft you can do with ANY kind of doors or windows in your house!

The French doors between our sun room, which is always bursting with sunshine or a soft natural light, and our living room, has been the focus of my craft quite a few times!  All of the rectangular panes of glass  strike me as mini picture frames, calling for some little artwork.  This past Winter, I made beautiful sparkly snowflakes on blue ribbon, which is a craft I am saving to share later this year. There was a functional twist of an idea I used with them, and I think some of you will rather enjoy using the idea for yourselves next year, when I’ll have the opportunity to share it with you in time to use the idea.

My craft idea for Spring is very similar, although strictly and adorably decorative, using very simple Spring shapes, ribbon and colorful card stock.

I designed a small collection of Spring Shapes in Photoshop, to use as stencils again and again.  I will share these with you by the end of this post. But here is a peek at what I came up with.

window-door-craft-decor-1

window-door-craft-decor-2


The supplies needed were few and simple:

  • window-door-craft-decor-3
    Spring Shapes, printed on card-stock to cut out
  • 6 full rolls of thin ribbon
  • Card-stock in cheery bright Spring colors
  • Scissors
  • Hot Glue Gun
  • *Any little embellishments you like.

window-door-craft-decor-4

I found this block-pad of linen card-stock in beautiful colors, at the craft store.  I knew it would be perfect, to use for my Spring shapes, that I wanted all relatively the same size.  It was a pleasant surprise to realize they were sticker paper too! That was going to work out nicely, for adding the centers on flowers, etc. And if there was no need for sticky paper, I just left the backside on.But you can use any colored card-stock, that comes in sheets, as well.

Alright, so I didn’t take photos of every step.  That’s needless really.  But the simple directions are, that I cut my Spring Shapes out of the white card-stock I printed them on, and used them as stencils on the little square card-stock pieces.  There was a whole lot of tracing stencils, and cutting out, going on.  Then it was sticking or gluing pieces together, to make little happy die-cuts of art.


I have to tell you, as crafty as I am, I HATE CUTTING STUFF OUT!! With scissors.  Thankfully, my kids love it! It’s great practice for scissors-skills for them.  I did do a lot of the cutting for this project, but they enjoyed helping when ever and wherever they could.  I was thankful for every bit.

window-door-craft-decor-5 Using almost an entire roll of ribbon for each row of windows top to bottom, attach one end on top of the door, and center of the row.  Run it all the way down, to attach to the bottom of the door, again keeping it center.  Cut off any excess before attaching. We use a tack at the top, and glue on the bottom.

Then just dab a little hot glue onto the center of each die-cut one at a time, and apply it to the ribbon in the center of each window.

window-door-craft-decor-6
Here are my doors, all done!!  CUTE, or WHAT??

Such a simple project, but just a lot of cutting.  This was a craft for the kids and I to do together, from the get-go, so  I knew which part I’d be letting them do some of!  Hopefully you have a few of those happy-cutters, too.

You know, you don’t have to have French doors, to do this project!!  You can do the same thing, in grid picture windows, or make horizontal strands as a Spring-themed decorative garland!


window-door-craft-decor-7  I can tell you, by the time we had made 24 die-cut pieces, trying to make them each a little different, we got to the last 6 and wondered if the doors would look cute enough still, with nothing across the bottom row of window panes.  And then I had the quick and easy idea, to wrap up this craft, in 6 simple letters:

S P R I N G

Seeing my Spring-ish doors makes me smile anyway.  But what really warms my heart, is the words spoken by my little boy the other day: “Mama, every time I see my butterflies that I made, that you put up on the door, I get a really happy feeling inside.”

Dang if that doesn’t make me really happy inside, too.   I love doing projects with my kids.  It’s so rewarding, for all of us, in so many ways.


window-door-craft-decor-8
Just so you know….our French doors are rarely closed like that.  Our 4 season sunroom, is open to the rest of the house most all of the time.  It’s surely a cheery passage-way now.


window-door-craft-decor-9  When spring turns to summer, I’ll be taking these strands down, but keeping them to use again next year, just as I did the winter ones! They are easily re-usable, for at least a few years if not more, if they are stored nicely.


window-door-craft-decor-10 On a side note….I do struggle with displaying fake flowers in my house.  I prefer fresh of course.  But it’s just not budget smart, year round.  Unless I can cut fresh flowers from outdoors now and then, and I do when I can. But in between….fake it is.  I just like to have some especially, in my old milk jug.

So just for fun, I decided to design a little collage, to show you some of the pieces a little closer up.  Naturally, when posting photos on a blog, some detail is lost.  But it’s still a closer look.

And then I thought the collage came out so cute, that maybe it would be a fun idea, to have a Give-Away!  It will printed as a 12 x 12 photo (such as it is), and mounted on a sturdy backing.  It will be sprayed with a protective coating, so it can be popped right into a 12×12 glassless frame. (I never use glass in my frames.  No need when they are mounted and sprayed, and they look so much nicer without the glare.)

The collage of these mini-photos, is of course, of little paper art.  But how cute would it look on display, near your Easter tree, in your kitchen, or in a little girl’s room!  It would look cute anywhere!

window-door-craft-decor-11

If you’d like to try and win this Give-Away, all you need to do is the following:

1.)  Follow our blog, via Subscribing or our Facebook Page, in the sidebar. (If you are not already.)

2.)  Leave a comment below, saying anything you wish, or letting us know you are now following our blog!

3.) Link up a crafty idea of your own, right now, if you can!!  (Not required, but we hope you share something if yours if you’ve gotten creative, and blogged it, lately!)

I’ll do a drawing from the comments by the close of the week!

Want to do this craft yourself?  Here are the pdf links to my Spring Shape Sheets:

Spring Shape Page 1

Spring Shape Page 2

I hope those links work for you anyway If not just email me, and I will send them to you. I did free-hand draw a few on my own, that are not on the sheets, but most are here. You can add idea of your own too.  Just keep the shapes simple.

window-door-craft-decor-text6

ENJOY!

******


Save

Save

Save

Save

Filed Under: Crafts & Creations, Giveaways, Kids Arts and Crafts, Seasonal Crafts and Creations, SPRING Crafts and Creations, The Big Picture Tagged With: crafting, decorations, developing-kids-scissors-cutting-skills, door-and-window-decor, easy-crafts, french-door-decor, home decor, kids-arts-and-crafts, spring-crafts

Bottle Cap Art, with a Special Guest Crafter!

February 28, 2011 By Laura 9 Comments

bottle-cap-art

It’s a new first, here at House Of Joyful Noise!
(And just so you know, this post contains an affiliate link.)

This is one of those opportunities, that I just could not pass up!!  It’s not every day that we have someone come through our place, who knows her craft-stuff like this one!  So without further ado…..

We’d like you to meet our first ever (and very special) Guest Crafter!

bottle-cap-art-2

This is *{Ju}. She is my God-Daughter, and daughter of my cousin. I’m just seeing, in this photo here, that I think she was still a tad sleepy on this morning. Oops!! I was excited to get to our crafting! She is so sweet looking, sleepy.

*In Photography & Lettering, you can see the ‘Urban to Beach Photo Shoot’ I did with {Ju} and her brother, this past summer. She was such a doll, with her usual great big smile, and her brother has a great smile too! I can’t wait to show you their shots. I see now how much she has grown, since the summer!

But back to this craft post. We have had a visit planned with her for awhile, for her to come stay with us over her February school vacation, which just passed. She is a true little artist in the making, and spends lots of time crafting. So I had this exciting idea, to let her teach us a new craft, while she was here with us for a visit!

If you’ve been reading along here at HOJN for awhile, you may have read where {Ju} sold LOTS of ‘Capsters’ that she made with her friend, at a Harvest Fair in her own town. She definitely has the makings of a successful entrepreneur.

bottle-cap-art-1

‘Capsters’ is the trademarked name to the Klutz company (who we will talk about in a moment), but are basically a ‘bottle cap art’ kit. Creating bottle cap art, is the craft {Ju} is going to teach us how to make, in this post.

–

bottle-cap-art-18 While the ones we made here today, are geared in design towards kids, I have lots of ideas to share towards the end of this post, as to how this can be a great grown-up craft too!
–

bottle-cap-art-3 A couple of supplies you will definitely need, are clean bottle caps, and a crystal clear lacquer.

–

bottle-cap-art-4 The rest of what you use to make your bottle cap art, is up to you!! It’s all about what you want to put inside your bottle caps. That may include some background papers (more on that in a moment), gems, googly eyes, or anything else creative that you can come up with, that fits.

bottle-cap-art-9 Little stickers, are another idea.

bottle-cap-art-19 This 3D Crystal Lacquer is a necessary and amazing little product. You will see how it holds the contents of the caps in place, and dries like a crystal clear glass.

We’ll discuss the supplies, and where you can get them, also towards the end of this post.

–

bottle-cap-art-6 My oldest daughter got this simple and fun little ‘Capsters’ kit from Klutz’ (affiliate link) many years ago, and it is the same one {Ju} got too, when her mother told me she was making bottle cap art, and I suggested this kit to her. The book that comes with the kit, has pages and pages, of all kinds of other ideas, that they can do with the ‘Capsters’ they make, like jewelry, key chains, belts and notebook art, just to name a few. (I bet you could think of some of your own!)

It’s a great kit, for kids to start making bottle cap art with, for another reason…..

bottle-cap-art-7 There are several pages, of perforated circle background art, that the kids can just pop out of the book, and pop into their cap. They make adorable caps alone! But {Ju} loves to embellish hers, with different colored gems, googly eyes, or other charms, too.

–

bottle-cap-art-8 More pages of ideas, in the kit book.

–

bottle-cap-art-10

{Ju}, along with my daughter {O}, made several bottle caps, and she is going to show you the steps to this easy craft, right now.

–

bottle-cap-art-11 1) Start by squeezing some 3D Lacquer, into the center of the bottle cap. You want to squeeze it in almost drop-by-drop, almost filling the inner circle of the cap. 2) Add your background and any other contents, pressing it down all over. 3) Drop-by-drop again, squeezing it in very closely to the surface, covering the surface, and filling the cap about 1/3 to half, and being sure it is all covered evenly.

–

bottle-cap-art-12 {Ju} actually added a little gem to this one, before adding the surface lacquer.

So to review again….

bottle-cap-art-13 1) Add lacquer to the center of the cap,… 2)….spreading it out a little. 3) Place your background circle or other contents in,…4)… pressing it down well so that it will stick to the lacquer beneath it.


bottle-cap-art-14 {Ju} added googly eyes to the king, because she is silly like that. 5) (not numbered) Then, she covered the surface well, with the lacquer.

bottle-cap-art-15 You will notice, that the lacquer is cloudy when dispensing. On the left, is the bare background, and on the right, is the background covered with googly eyes, and the lacquer. But have no fear!! This lacquer dries crystal clear, and glossy, just like glass. Love it!

bottle-cap-art-16 Here are a few more, that were just finished, and need time to dry.
* Allow to dry for 24 hours!! *
If you touch it before then, because it looks dry, you may leave a fingerprint before it’s truly a hard glassy surface.

–

bottle-cap-art-17 {Ju} letting {O} give it a try. She was a great teacher!

–

bottle-cap-art-18 Here is all of the caps the next day.

Bottle cap art is a really fun collectible!! You can also glue a magnet onto the back of the caps, and use them on your refrigerator, or office boards.

–

bottle-cap-art-19 This particular brand of crystal clear lacquer is Sakura, and can be found here. This is {Ju}’s big refill bottle. I believe Mod Podge’s Dimensional Magic, is the same type of product, but I have only been able to find it in a 2 oz. bottle, which wouldn’t last very long, if you are making lots of caps.

O.K., so here are some links to where you can get these supplies again – but feel free to do an internet search, or check your local crafts stores for other brands or better prices too.

Silver Bottle Caps – a bag of 144

3D Crystal Clear Lacquer

* Klutz Bottle Cap Art Kit
(aff. link)

* This kit comes with everything kids need to get started. But be aware, that the bottle caps are white on the outside, and are marked with the Klutz logo.

Now, how about some ideas for Bottle Cap Art, for adults?

~ All kinds of beautiful bottle cap backgrounds, can be made with a simple 1″ circle punch, and scrap scrapbooking paper, stationary, greeting cards, the pages of a book……the ideas are limitless.

~ Any gems or charms can be used as well. Dimensional pieces do not need to be completely beneath the surface of the lacquer. It’s fine to put a coat of the lacquer over the piece, but letting the piece protrude from the surface of the lacquer makes the caps very 3D artsy.

~ Cutters, such as Cricut and Silhouette, are very popular with crafters now. They can be used to cut out any customized letters or designs, to fit in your caps. Consider putting a letter in each, on a pretty background, and then gluing/lacquering the caps together, to spell a meaningful word.

~ Perhaps some of your child’s simple artwork, or a photo of someone you love, can be shrunk down to put in a cap.

~ Dried flowers and leaves, would make a beautiful set! Dare I say, you could also preserve pretty small bugs, this way? : D

~Glitter is another element you could use, and there are also colored lacquers.

*Remember, your custom designed bottle caps can be used as art in many ways, and as many gift ideas as well.

The creative possibilities here, are endless.

Do you have any ideas of your own, that you can share with us in the comments? We’d love to hear more.

bottle-cap-art-20

(This cap is not yet lacquered.)

{Ju} — Thank you so much, for teaching us all this craft, and being our first Guest Crafter! You did so great, and I’m so happy you love being creative, as much as I do! XOXOXO to you!!

* * * * * *

Please come follow me here and there:

Save

Save

Save

Filed Under: Crafts & Creations, Kids Arts and Crafts Tagged With: bottle-cap-art-tutorial, bottle-cap-magnets, craft-ideas, fun-craft-ideas-for-boys-and-girls, Klutz, magnet-art

  • « Previous Page
  • 1
  • …
  • 15
  • 16
  • 17
  • 18
  • 19
  • …
  • 28
  • Next Page »

We are wicked happy to have you here! We hope you find much inspiration, help, humor and enjoyment here.


Archives


POPULAR POSTS

* * * * * *

SUBSCRIBE to House of Joyful Noise blog! Every new post, delivered right to your email box!


Privacy Policy

Amazon Affiliates

Never at any additional cost to you, we may earn a small commission for our endorsement, recommendation, testimonial, and/or link to any products from our website. Your purchase through our links helps support our family, while sharing with you the products we authentically use and recommend, for various ideas, and letting you know where you can purchase them. Thank you for your support!

[footer_backtotop]

Copyright © 2025 HouseOfJoyfulNoise.com · Genesis Framework by StudioPress