• HOME
  • {A}’s Chipmunk Training Archives

 Homepage

  • The Homestead
    • Home Projects
    • Home Improvement
    • Home Decor
      • Seasonal Home decor
        • FALL Home Decor
        • WINTER Home Decor
        • SPRING Crafts and Creations
        • SUMMER Crafts and Creations
    • Our Chickens
    • Gardening
    • Organization
    • Re-Purposing
    • Furniture Refinishing
    • Budget
  • Crafts & Creations
    • Seasonal Home decor
      • FALL Crafts and Creations
      • WINTER Crafts and Creations
      • SPRING Crafts and Creations
      • SUMMER Crafts and Creations
    • DIY (Do-It-Yourself) Project
    • Kids Arts and Crafts
    • Homemade/Handmade Gift Ideas
    • Holiday Crafts
    • Fan Pulls
    • Free Printable/Downloadable
    • Sewing Projects
    • Giveaways
    • Business Features
  • Recipes/FoodFun
    • Breakfast
    • Lunch
    • Main Dish
    • Sandwiches
    • Appetizers
    • Slow Cooker
    • On The Grill
    • Side Dishes
      • Soups
      • Salads
    • Baking
      • Breads, Rolls and Muffins
    • Snacks
    • Treats
    • Desserts
    • Drinks
  • Homeschooling
    • Elementary Homeschooling
      • Elementary Homeschooling READING
      • Elementary Homeschooling MATH
      • Elementary Homeschooling LANGUAGE ARTS
      • Elementary Homeschooling SCIENCE
      • Elementary Homeschooling HOME ECONOMICS
      • Kids Arts and Crafts
    • Middle School Homeschooling
      • Middle School Homeschooling SCIENCE
      • Middle School Homeschooling HOME ECONOMICS
    • Language Arts
    • Math
    • History / Social Studies
    • Geography
    • Foreign Language
    • Field Trips
    • Games
    • Nature Study
  • The Big Picture
    • Life In General
    • Celebrations
    • Faith
      • Into the Light; The Series
    • Giveaways
    • Reviews & Sponsors
  • Photography & Lettering
    • Photography
    • truck lettering
    • vehicle graphics
    • Newborns
    • Kids
    • Engagement
    • High School Senior Pictures
    • High School Senior Pictures Sneak Peeks

Superbowl Menu

February 8, 2010 By Laura 2 Comments

We had a nice little Superbowl Sunday.  We kept it pretty low-key, for a couple of reasons:

1) Our own New England Patriot’s weren’t playing.

2) It was a school night.

Every year, I get all excited about Superbowl Sunday, no matter who is playing. And then I realize how late the game is starting!  And then I remember, that I forget that that is the case, almost every year!

Still, we can’t let the opportunity for a little private family party, pass us by.  But considering the circumstances this year, we kept the menu simple-simple.

pastrami-sandwiches 
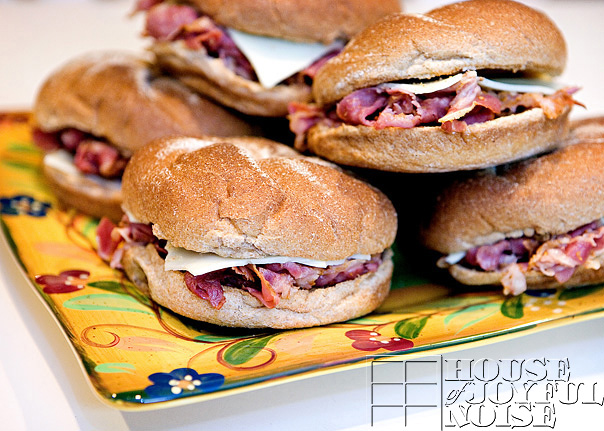
Pastrami Sandwiches – we love them. We just put a pound 1/2 of pastrami in our steamer for 10-15 minutes, rearranging in the steamer basket about 1/2 way through for even heating of the meat, and then we pile it on a toasted wheat roll.  The kids prefer no mustard, but Michael and I like a little French’s.

jalapeno-poppers

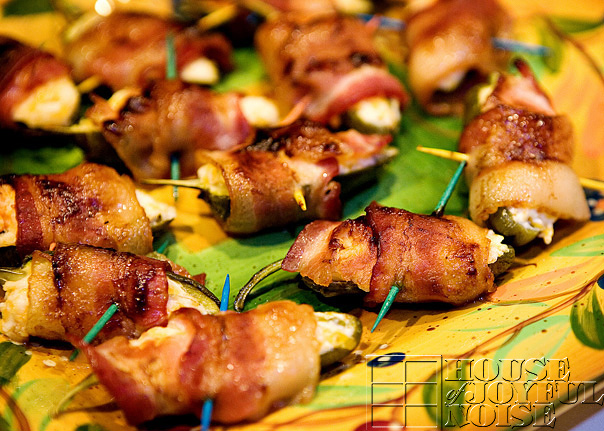
Here’s an item we were downright excited to try:  Jalapeno Poppers!

Participating Ingredients:

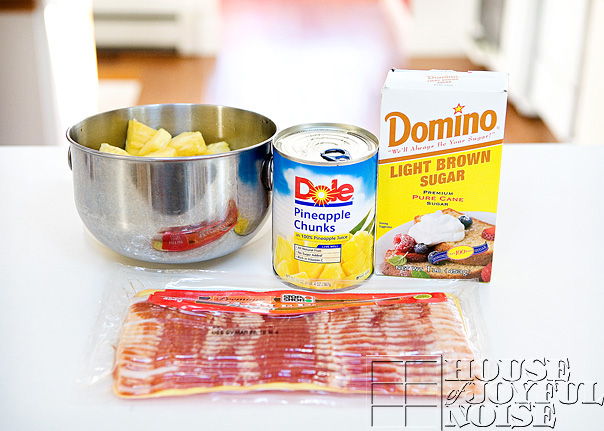
  • 18 fresh jalapeno peppers
  • 8 oz. package cream cheese, softened
  • 3/4 shredded or grated cheddar cheese
  • 1 green onion chopped
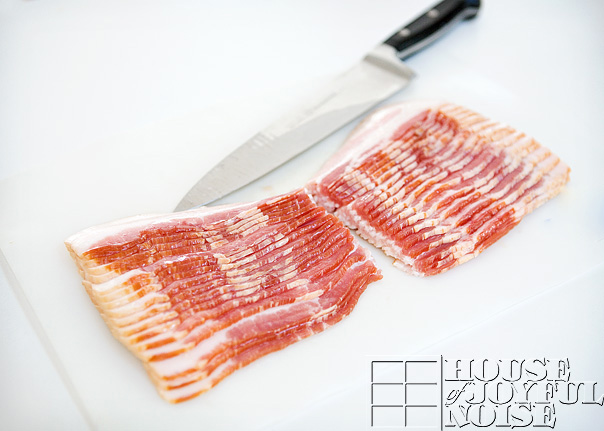
  • package of bacon, cut in half to shorten (18 slices, 36 halved)
  • brown-sugar BBQ sauce
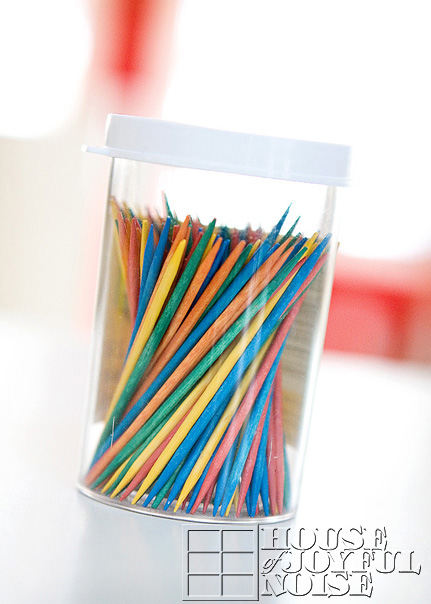
  • toothpicks
  • RUBBER GLOVES!

(You will only chop jalapeno peppers without gloves once, but never again.  I did, once, and my fingers spent the entire night in HELL.  Literally, I’m quite sure.  The throbbing pain of burn, was nearly unbearable.  I was near tears.  Just take my word for it, and use gloves when chopping these babies, and don’t touch any part of yourself after having touched the peppers!  Especially your eyes!)

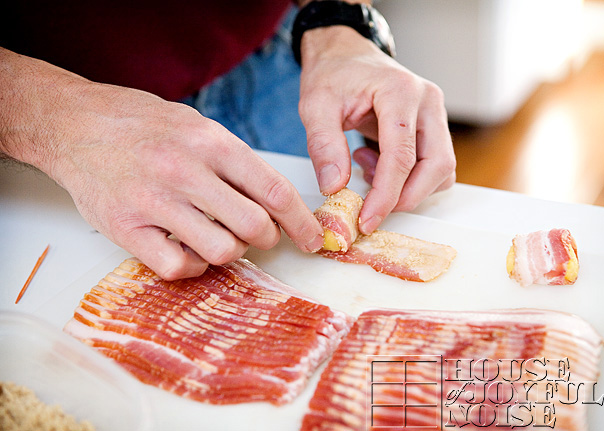
1) SO….once dressed in your gloves, slice the peppers in half, lengthwise. We keep the stems on, and try to cut those in half too. It gives you a little handle later, and keeps them cute! Clean out the inside of the peppers completely – free of seeds and white membrane.  However, the real heat is in the seeds and the white membranes – so if you like more kick, leave a little.  We left just a little seed in ONE pepper, and I got the Lucky Popper. ; )

2) In a bowl, combine softened cream cheese, chopped green onion, and cheddar cheese. Mix well.

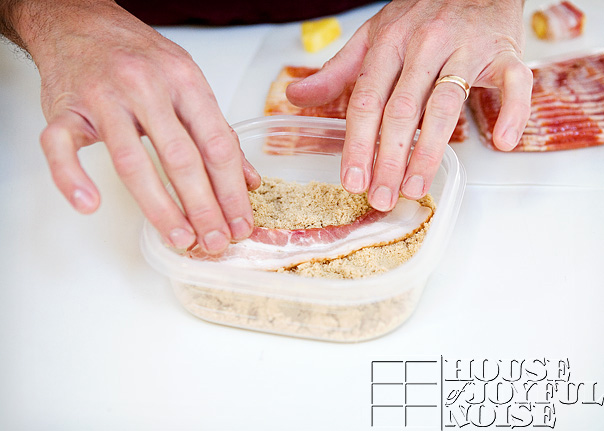
3) Being sure your gloves are on again, or still, using a little old-style butter knife, or a cheese spreader, fill all of the peppers halves with the cheese filling. We filled it well, as a little heap.

4) Pre-heat the oven to 275 degrees.  (I realize most cooks/bakers do this first, but I’m too slow to prep the food, so the oven is on for too long, for no reason.  Plus, I feel pressure because the oven is waiting and ready, but I’m not done! lol)

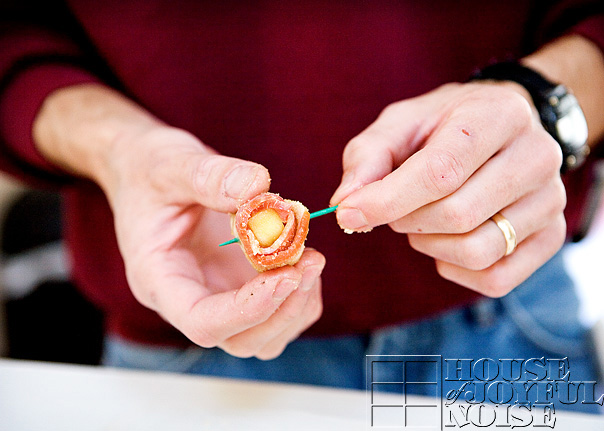
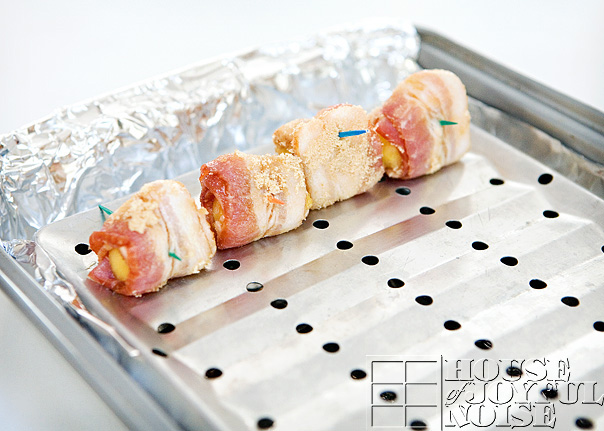
5) Next, wrap each cheese-filled pepper, with a 1/2 piece of bacon.  Do not pull it tight, as the bacon shrinks when it cooks. Secure each one with a toothpick through the side of the pepper as you go, and place on a cookie sheet.  (We cover the cookie sheets with tin foil for stuff like this, to avoid having to wash the pan after. ; )  Call us lazy.

6) Generously brush each bacon-wrapped-cheese-filled-pepper, with brown sugar BBQ sauce.

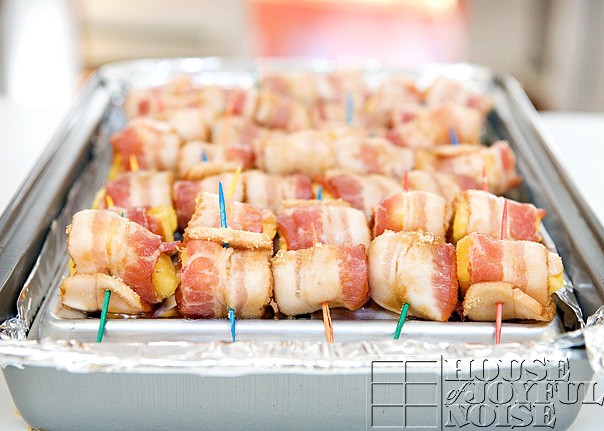
7) Put in oven for about an hour, or until the bacon is crisp and sizzling.

*You can serve immediately, at the risk of burning mouths.  But we found anyway, that letting them set & cool some for 10-15 minutes, really makes them all the better!  They firm up a bit, and you can really enjoy the different elements of the Jalapeno Popper in your mouth, instead of it all being very soft and mushy in your mouth.

A friend asked us, “Will the kids eat those?”, and the answer was YES!  Our little ones, especially, like hot stuff.  {A} just thought they “were just o.k.”.   But it’s not the recipe, it’s her.    ; )

We’ll be adding these to our appetizer hit-list for future occasions.  We put 1/2 f this batch, already cooked, in ziplock bag and into the freezer, to be able to just heat some up sometime soon. And trust me, soon it will be!

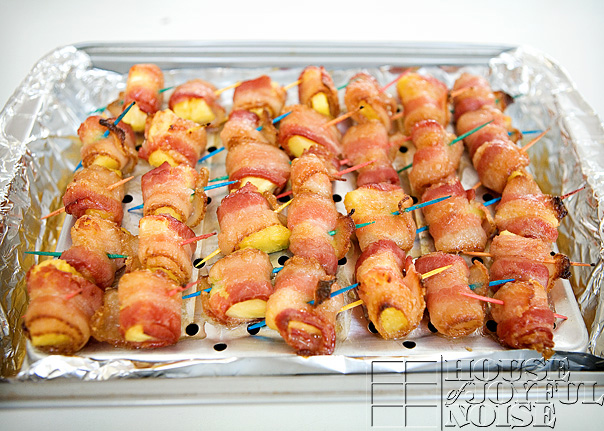
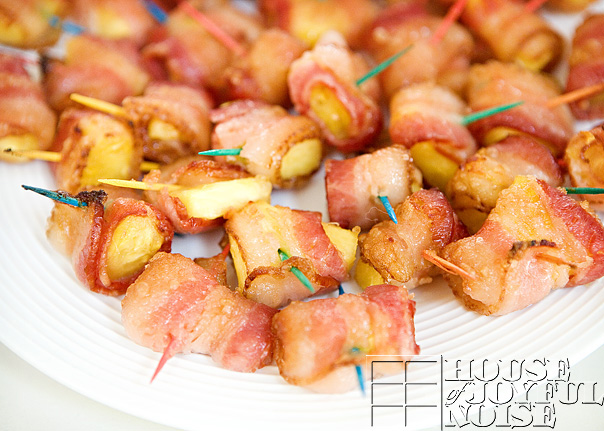
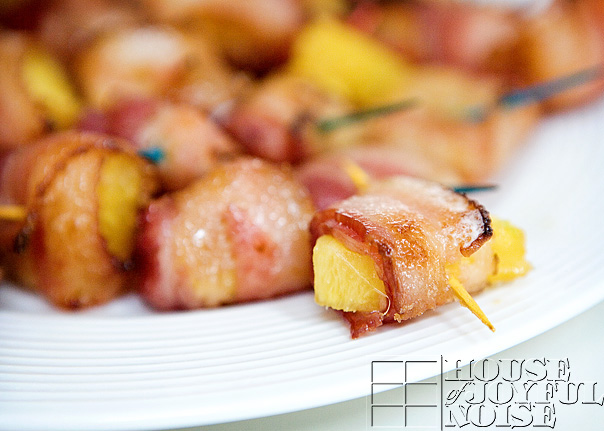
BTW – My friend Mary Beth, from Nothin’ But Country, made up a batch of the Bacon-Wrapped Pineapple Bites for her Superbowl party, and came by the blog here to leave a fantastic review of the recipe!  Check it out! If her review doesn’t convince you to try them, nothing will!  And check out her blog too! She and her husband LOVE to cook, and all kinds of great recipes.

chips-and-salsa 
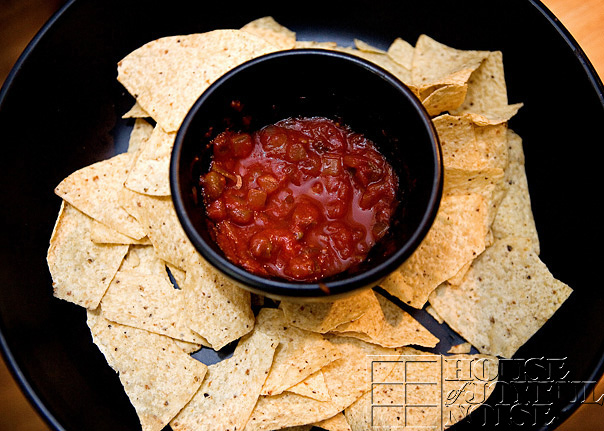
We also snacked on tortilla chips and salsa through the game, in between hoots & hollers at the tv.   As you can see, we already had been at them before I remembered to take a photo. lol.

jsfootball 
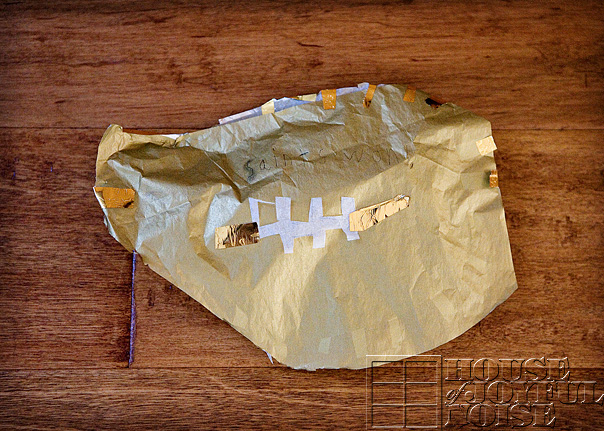
Our ever-creative boy, {JM}, made a football for our party, as some festive decor.  He made it out of gold and white tissue paper, and a little gold mylar.  That boy is ALWAYS ‘making something’, and he never ceases to surprise us with his great ideas either.   Get this……..

jslitfootball  
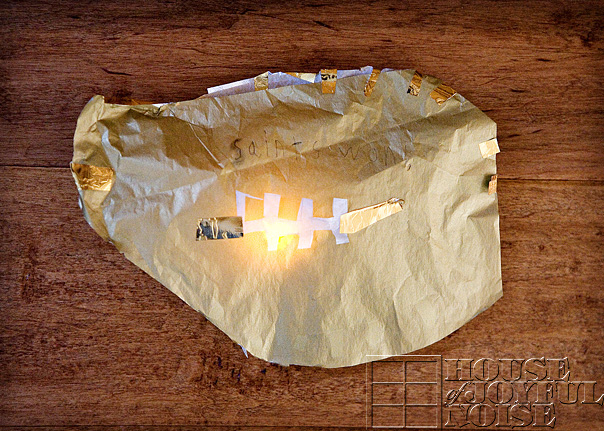
…..the football lights up!!  In the dark, it really puts off quite a glow!

Since our New England Patriot’s weren’t playing in the Superbowl this year <boo-hiss!!>, we decided to cheer on the Saints!  Why?  No real significant reason, except maybe because their names is the Saints, and we like their logo the best. : )  We are really happy for New Orleans.

Did YOU watch the Superbowl?  Which team did you cheer on?
And more importantly, what was on your Superbowl Menu, if you had one?  Do share!

Save

Filed Under: Appetizers, Crafts & Creations, Kids Arts and Crafts, Life In General, Recipes, Sandwiches, Snacks Tagged With: appetizers, jalapeno-poppers-recipe, party food, pastrami-sandwiches, superbowl-menu-ideas

Bacon Wrapped Pineapple Bites | Recipe

January 22, 2010 By Laura 9 Comments

Everyone should try these at least once in their lifetime: Bacon Wrapped Pineapple Bites.  (Although once you do try them once, it’s highly unlikely it’ll be the last time.) We made these tasty little morsels for this first time, for New Year’s Eve. My girlfriend Paula wanted the recipe, so I told her I would post the recipe on the blog.  And here it is.  Because I’m always true to my word.  And also, we wanted to make (read: eat) these again. : )  Doubt it’ll be the last time, either.

bacon-wrapped-pineapple-recipe Participating Ingredients:

1 pound of bacon, 1 can of Large Chunked Pineapple (or fresh), and 1/2 cup Brown Sugar.

bacon-wrapped-pineapple-recipe-12
You’ll also need toothpicks.   The colors add to my happy, but if they do nothing for you, plain wood color is fine too.

Set your oven for 375 degrees.

bacon-wrapped-pineapple-recipe-13 Take the bacon out of the package, and cut it in half, like so.  (Oh my gosh…the things I am starting to say!!  “LIKE SO?”  Did I say that? lol)

Also, pour some brown sugar into a bowl or container.

bacon-wrapped-pineapple-recipe-1 Take a 1/2 piece of bacon, and press it into the brown sugar, coating both sides of the bacon.

bacon-wrapped-pineapple-recipe-2 I guess he’s showing us what it should look like?  He held it like this for a long time, so I sensed he was waiting for me to take a photo. lol. Yes.  Brown sugar coated bacon piece.  There it is.

bacon-wrapped-pineapple-recipe-3 Take a chunk of pineapple, place it on the bacon, and roll it up!

bacon-wrapped-pineapple-recipe-4 Impale it, with a toothpick.  : )

Place that one down,  and make another.

bacon-wrapped-pineapple-recipe-3 And another.

bacon-wrapped-pineapple-recipe-7 Now the recipe instructions said to place them on a rack on some foil in a jellyroll pan?  Honestly, I’m still not sure what a jelly-roll pan is.  But….like the 5 Qt.  Kitchen Aid Mixer I still covet, we are managing without a jelly roll pan too.  SO….we just covered our toaster oven pan with tin foil, and used the rack from that.

bacon-wrapped-pineapple-recipe-6 You will notice that the brown sugar seems to disappear.  But it doesn’t.  It just absorbs the moisture and is harder to see. Ready to go in the oven!

Bake for 25 minutes, or until the bacon looks brown and crispy.  But keep an eye on them, because if they are in too long, the sugar WILL burn!

Bacon Wrapped Pineapple recipe The smell is SOOOO GOOOOD.

Bacon Wrapped Pineapple recipe

I think the salty and then sweet,  that just busts out in your mouth, is the joy.

WARNING: DO let them cool some, before trying one!!  I mean…..it’s sizzling BACON, that just came out of the oven.  And if you eat one too soon, ….well.  Let’s just say you won’t be able to enjoy any more, with blisters all over your lips and tongue.   I reckon you’ll be pretty much done eating for a couple of days,  after that. ; )

We used canned pineapple the first time we made them, and fresh the 2nd time.  Dare I say, I seemed to like the canned better for this recipe.   I’m still puzzled by that, because I am all about fresh fruit and vegetables, whenever possible.  Maybe it was actually the bacon was a little different.  Hmmm…will have to make these a few more times to be sure.  Very good, both times, either way.  One batch was just crispier.

Bacon Wrapped Pineapple recipe Anyway.  They are DIVINE.  It’s hard to believe that something so very easy, can taste so very good.  But, sometimes that’s the case.   What a great appetizer for a party.  Perhaps, a Superbowl party??  Our New England Patriot’s really blew it, and won’t be in the Superbowl this year.  So we’ll just, you know, pick the team with the best colored uniforms, cheer them on, and have a party anyway!

Save

Save

Save

Filed Under: Appetizers, Recipes Tagged With: appetizer-recipes, bacon wrapped pineapple bites, bacon-recipes, bacon-wrapped-pineapple, bacon-wrapped-pineapple-recipe, party food, pineapple-recipes

How to Make Chocolate Dipped Pretzels

January 21, 2009 By Laura 8 Comments

We thought you all deserved some nice treat ideas.  So we’d like to share some steps on how to make chocolate dipped pretzels!
It’s a fun treat to make and eat!

How to make chococlate dipped pretzels

Last year for our Christmas gathering with some family, we made these pretty pretzel rods drizzled with chocolate.  Our visiting family even wanted to get in on the fun, and make their own! We simply melted chocolate, and drizzled it over the rod, slowly turning it as we did so.  Then we sprinkled on some of our favorite decorative sprinkle balls!

This year, we’ve done something similar (a few times!), but with a TWIST!!  : )

How to make chococlate dipped pretzels
Participating Ingredients.

Get it??  With a TWIST??   (ROFL…..perhaps by myself.  I should probably get up now.)

3 Ingredients!:

  • Mini Pretzel Twists
  • Hershey’s Chocolate Chips
  • Decorative Sprinkle Balls

These are SO easy to make, and your kids will have SO-MUCH-FUN helping!!  Our kids sure do!  Here we go……

How to make chococlate dipped pretzels

Get some water in the bottom portion of a double boiler pan.  You want to put the burner on MEDIUM, and wait for the water to be ‘just about ready’ to boil.  Once it’s to that point, it’s good enough to turn it down to LOW, and put the top portion of the double boiler pan on.

How to make chococlate dipped pretzels

Now pour in the top pan, a small amount (maybe equivalent to a couple of handfuls…but exactness is not that important) of chocolate chips into ONE SIDE of the pan.  You kind of want them in a small pile, so that it makes dipping easier.

How to make chococlate dipped pretzels

Use a spoon, and keep stirring the chips, letting them slowly melt, until the chocolate is really melty and smooth.  Once it is, you’re ready for ……..

How to make chococlate dipped pretzels

….some dipping!!

Bring the just dipped pretzel (or 2, if you can do 2 at once) over to a counter space, and sprinkle your sprinkles onto the wet hot chocolate.

How to make chococlate dipped pretzels

We suggest doing this over an empty container.  They are very bouncy……so otherwise you’d be finding them all over the place  until Easter 2012.   You can also re-use what you catch in the container for other pretzels, over another container.

How to make chococlate dipped pretzels

Simply place them on a wax paper lined cookie sheet – spaced nicely so they don’t touch each other.

Just another photo, because I had to take it.

How to make chococlate dipped pretzels

Repeat this process of dipping, sprinkling and laying, adding more chips to your pan as needed, and giving it little stirs to keep it melty and smooth as you go.

Once a tray is full………

How to make chococlate dipped pretzels

….pop it into the refrigerator. (And begin a new tray, of course!)  Putting them in the fridge will help the chocolate harden.  Generally speaking, they need to be KEPT cool, until they are popped into your mouth, or the chocolate on the pretzels will get melty on your hands. (unlike m&m’s….and we know why.  They do not have that hard candy shell. lol)  (These don’t talk either. Sorry.)

How to make chococlate dipped pretzels

We think they are pretty enough (and tasty enough) to give as little gifts too!  We used these nice little clear bags, found in the stores where they sell chocolate melts, and supplies to make chocolate lollipops, etc. (In our case, our local Michael’s Arts & Crafts) We tied them off with silver twist ties. Who doesn’t love chocolate?  Warning though:  the sweet then salty thing going on, may keep you popping more in your mouth than you meant to!

How to make chococlate dipped pretzels

Sweet, huh??

Save

Save

Save

Save

Save

Filed Under: Homemade/Handmade Gift Ideas, Recipes, Snacks, Treats Tagged With: chocolate-dipped-pretzels, chocolate-treats, food photography, food-gift-ideas, food-gifts, how-to-make-chocolate-dipped-pretzels, party food, Treats

We are wicked happy to have you here! We hope you find much inspiration, help, humor and enjoyment here.


Archives


POPULAR POSTS

* * * * * *

SUBSCRIBE to House of Joyful Noise blog! Every new post, delivered right to your email box!


Privacy Policy

Amazon Affiliates

Never at any additional cost to you, we may earn a small commission for our endorsement, recommendation, testimonial, and/or link to any products from our website. Your purchase through our links helps support our family, while sharing with you the products we authentically use and recommend, for various ideas, and letting you know where you can purchase them. Thank you for your support!

[footer_backtotop]

Copyright © 2025 HouseOfJoyfulNoise.com · Genesis Framework by StudioPress