• HOME
  • {A}’s Chipmunk Training Archives

 Homepage

  • The Homestead
    • Home Projects
    • Home Improvement
    • Home Decor
      • Seasonal Home decor
        • FALL Home Decor
        • WINTER Home Decor
        • SPRING Crafts and Creations
        • SUMMER Crafts and Creations
    • Our Chickens
    • Gardening
    • Organization
    • Re-Purposing
    • Furniture Refinishing
    • Budget
  • Crafts & Creations
    • Seasonal Home decor
      • FALL Crafts and Creations
      • WINTER Crafts and Creations
      • SPRING Crafts and Creations
      • SUMMER Crafts and Creations
    • DIY (Do-It-Yourself) Project
    • Kids Arts and Crafts
    • Homemade/Handmade Gift Ideas
    • Holiday Crafts
    • Fan Pulls
    • Free Printable/Downloadable
    • Sewing Projects
    • Giveaways
    • Business Features
  • Recipes/FoodFun
    • Breakfast
    • Lunch
    • Main Dish
    • Sandwiches
    • Appetizers
    • Slow Cooker
    • On The Grill
    • Side Dishes
      • Soups
      • Salads
    • Baking
      • Breads, Rolls and Muffins
    • Snacks
    • Treats
    • Desserts
    • Drinks
  • Homeschooling
    • Elementary Homeschooling
      • Elementary Homeschooling READING
      • Elementary Homeschooling MATH
      • Elementary Homeschooling LANGUAGE ARTS
      • Elementary Homeschooling SCIENCE
      • Elementary Homeschooling HOME ECONOMICS
      • Kids Arts and Crafts
    • Middle School Homeschooling
      • Middle School Homeschooling SCIENCE
      • Middle School Homeschooling HOME ECONOMICS
    • Language Arts
    • Math
    • History / Social Studies
    • Geography
    • Foreign Language
    • Field Trips
    • Games
    • Nature Study
  • The Big Picture
    • Life In General
    • Celebrations
    • Faith
      • Into the Light; The Series
    • Giveaways
    • Reviews & Sponsors
  • Photography & Lettering
    • Photography
    • truck lettering
    • vehicle graphics
    • Newborns
    • Kids
    • Engagement
    • High School Senior Pictures
    • High School Senior Pictures Sneak Peeks

American Pinwheels

July 1, 2010 By Laura 9 Comments

american-pinwheel-craft-1

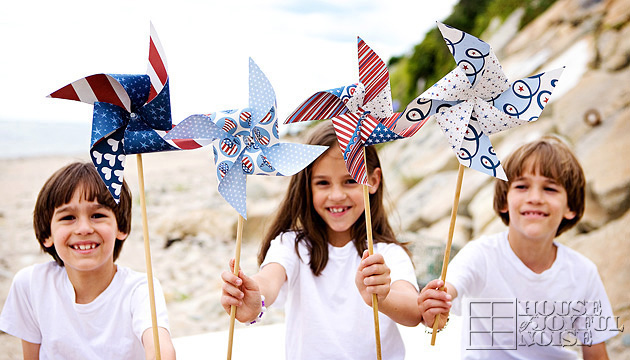
We had some guests down a couple of weekends ago, and while they were here, the kids and I got to making pinwheels.  O.k., in the end, it was mostly me really working on them.  They needed to be fine tuned, to work properly.  Making this quick little craft was on my agenda, so I already had the supplies.   The kids who visited us each took one home.

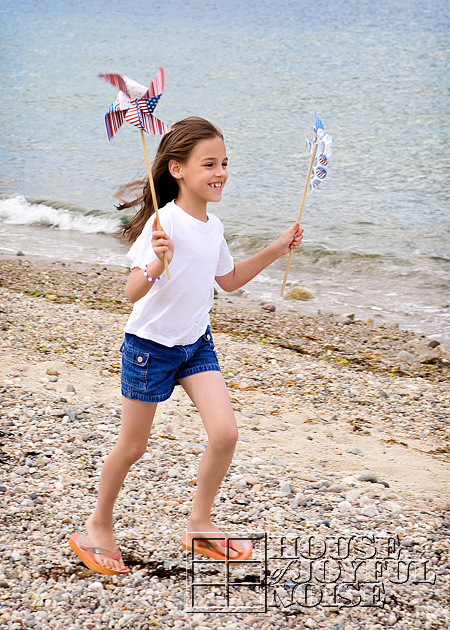
Ours has served mostly as home decor, since then, being the time span between Memorial Day weekend, and the 4th of July.   But today we took them down to the sea shore to really test drive them!

american-pinwheel-craft-2

They worked alright!

american-pinwheel-craft-3
The kids even ran like the dickens with them, to really get those pinwheels spinning.

american-pinwheel-craft-4

I was impressed with how fast the kids could run, with flip flops on, on rocks no less!

american-pinwheel-craft-5

Well, maybe except for {O}.  I’m going to be honest here.  My girl runs like a girl!   Even when she has brand new sneakers on, that are supposed to make you run faster than ever, right?   ; )   She has the daintiest run I have ever seen.  But you know I love her.  Running fast isn’t everything!

american-pinwheel-craft-6

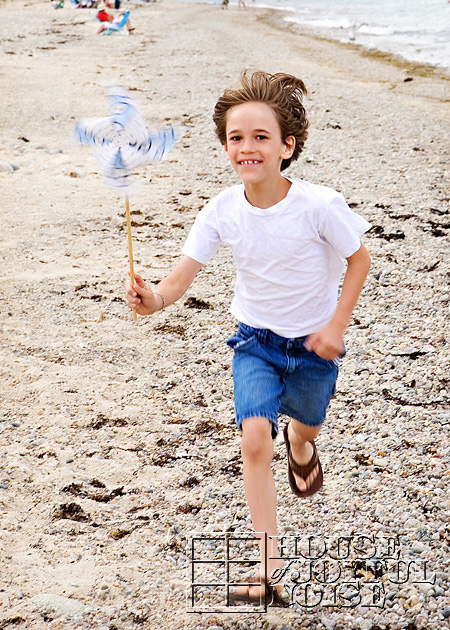
Well, maybe to this one, it is.  He is another story.  {S} is definitely the runner of the family. He runs, and runs, any chance he gets.   Sometimes, when he shouldn’t.  To see him walk, when he really wants to run, is so comical.  (Well, to me as his mother, who knows him better than anyone else on earth.)   It takes everything he has within himself, to keep himself from running.  He truly needs to concentrate on every single step.  This is my boy who probably shoots an average of 1,000 hoops a day.  He really burns it up.  Look at that pinwheel spin!

american-pinwheel-craft-7

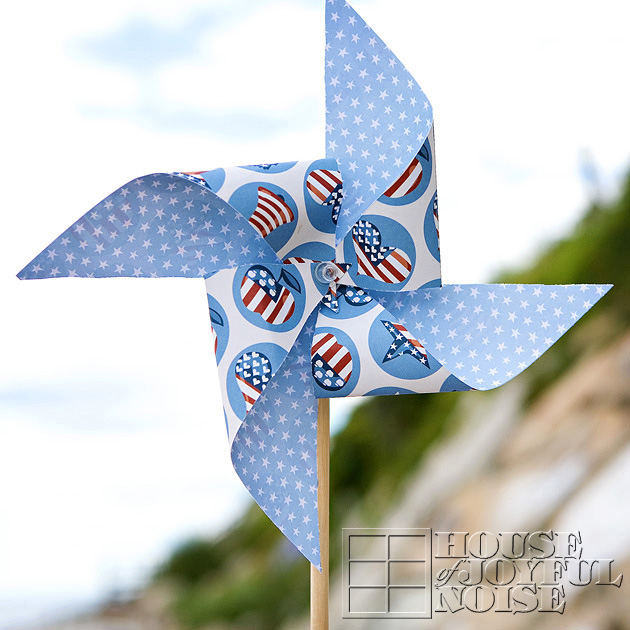
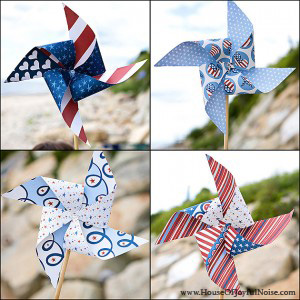
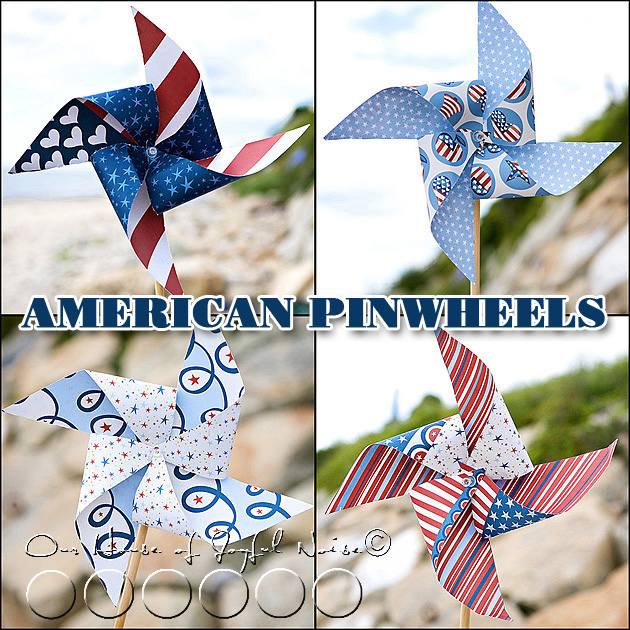
Making these is really so easy.  You start with square sturdy / heavy weight-ish paper.  I found American-themed 12 x 12 scrapbooking paper at, where else?,  Michael’s Arts and Crafts store.  I was thrilled there were several patterns, with different patterns on the back sides.  Can you say perfect?! I can.  I did.  I bought lots.

If you don’t know or remember the specifics of how to make a pinwheel, (as I did not) you can follow some general directions here.   I had my heart set on making some real Mack-Daddy pinwheels, so we started out using the full 12 x 12 sheet!  But guess what?  They didn’t work.  Hey, I’m no engineer.  12″ was too big, too floppy, too much.  That’s why I ended up crafting by myself in the end, fixing them all!   You think I’m going to let one of my crafts fail?  Heck no!  People talk!  These babies were going to spin like the dickens, and no one was leaving until they all saw it happen!

american-pinwheel-craft-8

In the end, we had a few 9″ ones, and a few 7″ ones.   They all worked.  I do have a tip or 2 though.

TIPS

• When you are making them this big, and cut the paper from each corner of the square toward the middle, it’s important to really stop 2 to 2.5 inches from the center, with every cut.   What’s more, I also took about a 2″ inch square of paper from the scraps, and sticky tabbed it good to the center of the back of the pinwheel.  This really gave it some better re-enforcement, and spinning power.

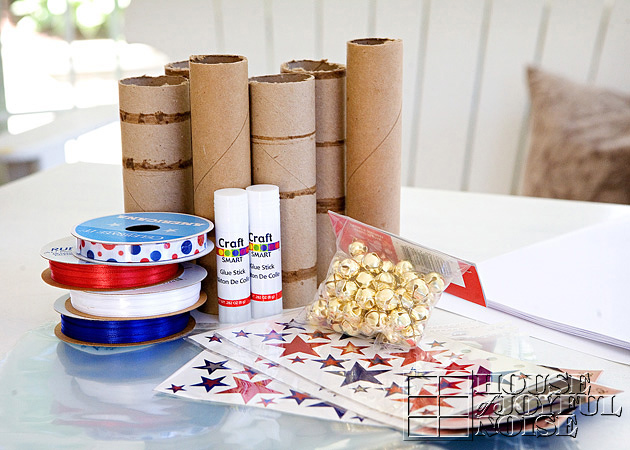
• Also, I used sticky tabs, when bringing every right-side corner to the center of the wheel, between every layer.  That makes it a lot easier to hold it together until you put the pin through anyway, but again, it gives it a flatter surface in the middle to spin better.   We used push pins, and 1/4″ dowels, sticky tabs and square heavy paper.

red-white-blue-american-pinwheels-text

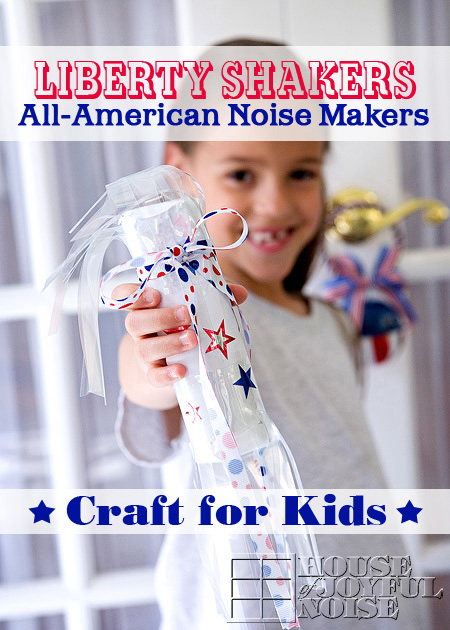
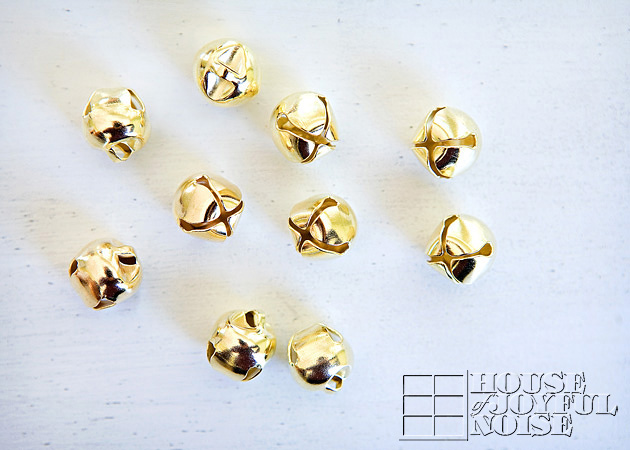
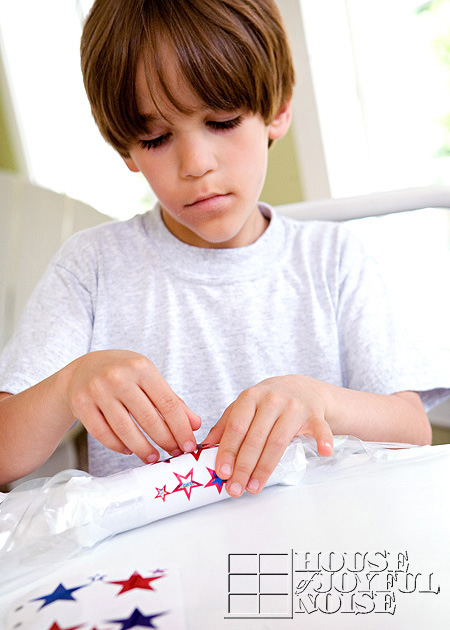
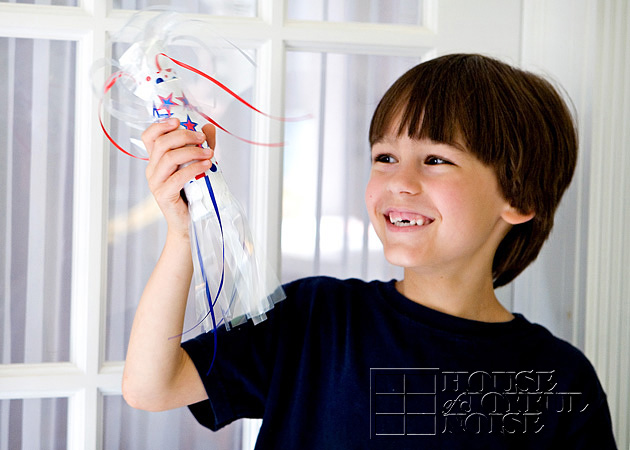
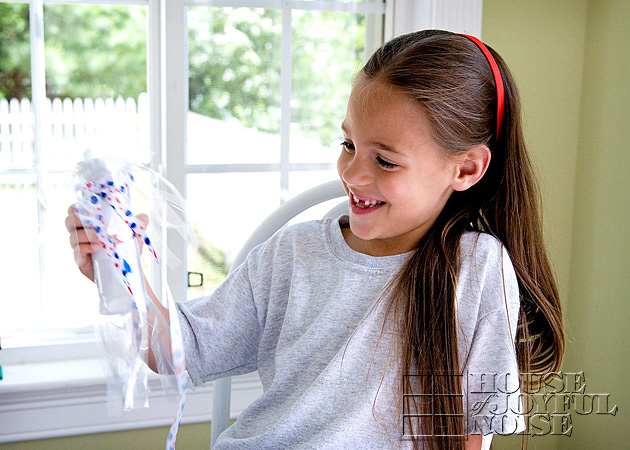
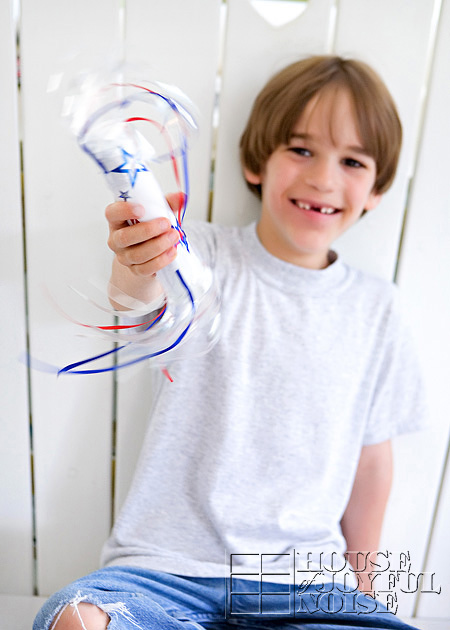
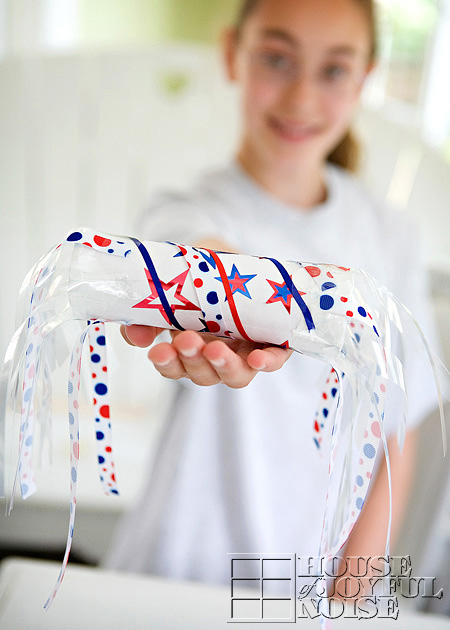
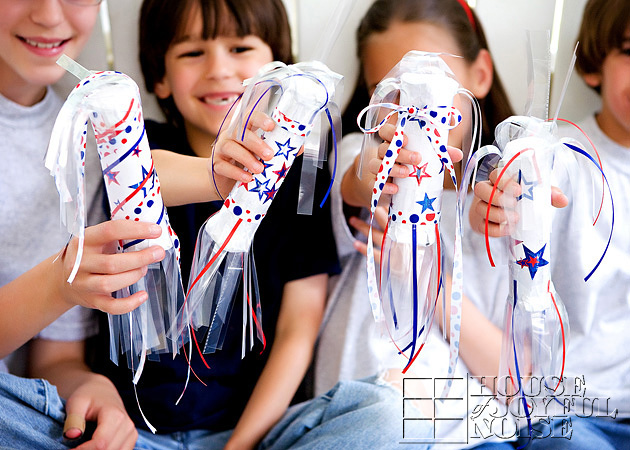
The kids will be taking their American Pinwheels, and Liberty Shakers, to the parade and the fireworks this weekend.

We’ve got a full agenda for the long holiday weekend. A good mix of fun, relaxing (lol, we try but we’re not so good at it), celebrating, and of course…working around the homestead.  There will be SO much to share with you, when all is said and done!  What are YOUR family plans this 4th of July weekend?  We’ d love to hear how you plan to spend it!   Be sure to have fun, and stay safe!

Save

Save

Filed Under: Crafts & Creations, Holiday Crafts, Kids Arts and Crafts, Seasonal Crafts and Creations, SUMMER Crafts and Creations Tagged With: american-crafts, how-to-make-a-pinwheel, July-crafts, kids crafts, pinwheel-directions, pinwheels, red-white-blue-crafts, triplets

Liberty Shakers! – A 4th of July Craft for Kids

July 1, 2009 By Laura 5 Comments

I thought this 4th of July craft, we call Liberty Shakers, was a great one for the kids to make, so they could have a little something to make some ‘joyful noise’ at  our various celebrations coming up for America’s birthday!

red white and blue July kids craft

  Living in America’s Hometown, our town most always has a huge, big long 4th of July parade through the heart of our downtown area.  But this year, there will be no parade, due another exciting event their holding. (Which is even more exciting, and we’ll be sure to document and share with you when the times comes.)    Anyway, my point is, if there’s a 4th of July parade in your town, your kids will love having these along.  Maybe they can shake them for the fireworks finale too!!

Very young kids will definitely need some assistance making these, but none at all using them!  : )

Here’s what you’ll need for supplies:

 red white and blue July kids craft

  • Bathroom tissue tubes, and/or paper towel tubes cut in 1/2
  • A pile of white copy/printer paper (or any white paper)
  • Clear acetate sheet protectors
  • Small jingle bells
  • Any red/white/blue ribbon
  • Red/white/blue star stickers of any kind
  • Clear shipping tape (not shown, but it was a lifesaver)
  • Fiskar cutter (also not shown-not needed but I use it A LOT for most everything regarding cutting straight paper.
  • *Craft glue – *Note there are glue sticks on the corner. Can I just vent for a second?  I’ve decided I despise glue sticks, because every brand I have ever tried has been lousy.  We ended up using the same brand glue in an Elmer’s Glue style bottle. Elmer’s glue would work too.   But my opinion is, it’s never worth bothering with the glue sticks.  Great concept for kids,  if they actually worked.  Thanks for listening.

Here’s how you make them:

 red white and blue July kids craft

1)   Grab a sheet of white paper and a tube, and placing the tubes end at the edge of the paper, mark off the width of paper you’ll need (where you’ll cut).

 red white and blue July kids craft

2)   The roll the tube in the paper to determine how much length of paper you’ll need, and mark that side.  (Similar to determining how much gift wrap you need to wrap a present.)

 red white and blue July kids craft
3)    Here we are cutting the size of paper we need, determined by our tick marks, using the * Fiskar cutter.

*If you don’t have a Fiskar cutter, but find yourself doing crafts that require cutting in a straight line, this tool is worth it’s weight in gold!  I use it ALL of the time.  They are available at any fine crafts store.  The orange blade piece pops out for easy replacement and it also comes with a scorer piece that pops in!

Now if you don’t have this tool, using a ruler and pencil to mark your lines from your tick marks, and cutting with scissors will work as well, of course.

 red white and blue July kids craft

4)    Put glue at one end of the sized piece of paper you cut > the end that will run lengthwise with your tube.

 red white and blue July kids craft

5) Start rolling the paper around your tube.

 red white and blue July kids craft

6) The end of the paper you are rolling should have the glue already at the end, to seal it to the tube.

7) Now, this next step I do not have any photos of because frankly, it took a little figuring and a lot of assistance on my part.  So there was a little too involved to be photo-taking.  But…..you need to cut some circles out of your white paper , that do not need to be perfect.  But these paper circles do not to be about 1/2 or so bigger than the end of your tubes.   You may want to trace the end of the tube as a guide, keeping your pencil tip away from the edge of the tube.   Then you can cut some small slits around the edge of your circles (toward the center, for easier folding. Because you need to use these circles to close off the end of your tubes.  Placing the circles at the end of the tube, fold over the tube all the way around.  This is one step that the clear packing tape came in very handy. We just cut the right size pieces of tape and wrapped it around to hold the paper closed over the tube end.  Comprendez?  ONLY CLOSE ONE END OF THE TUBE AT THIS POINT!!!

 red white and blue July kids craft
8) Let the kids count out 10 jingle bells, and drop them into the open end of the tube.
Also,  maybe using more or less will make different sound effects, but we did not test that theory, so please do not hold us responsible with that idea.  : )

9)  NOW, you can close the remaining open end of the tube, following step 7) above.

 red white and blue July kids craft
10 ) Next, take an acetate sheet, and cut it in half, using the center ring whole as a marking point.

11) Then cut fringes with either scissors, or your Friskar cutter. You need to stop an inch or so, short of the end!  You do NOT want to cut all of the way.

When you are done, you should have a piece that looks like this below….

 red white and blue July kids craft
So you are going to need this fringe piece for EACH END of every tube you are making.

12)  Again, no photos here, but wrap the fringe piece(s) around the end(s) of the tube(s), with the base on the tube, and fringe ends extending off the end.   And again, clear shipping tape was perfect for securing it.

 red white and blue July kids craft

 red white and blue July kids craft

13)  Decorate the tubes with sticker as you’d like.

14)   To further dress up your shakers, you can use the red, white and blue ribbons in various creative ways.   You can cut long pieces of the ribbon and tape them at ends of the tubes along with the fringes, and/or wrap them around the tubes as bands-again using tape to secure.   For {O}’s, we tied one band, on one end, with a big bow, and long ends, to make it girly-girly for her. : )

15)   Once they are all decorated -they are ready for S H AK I NG!


 red white and blue July kids craft

 red white and blue July kids craft

 red white and blue July kids craft

 red white and blue July kids craft

I love that they kind of look like fire crackers, too.

 red white and blue July kids craft

HAVE FUN, making some ALL-AMERICAN NOISE!!

Save

Filed Under: Crafts & Creations, Holiday Crafts, Kids Arts and Crafts Tagged With: American-kids-crafts, July-crafts, kids crafts, Liberty-shakers, parade-noise-makers, red-white-blue-crafts

We are wicked happy to have you here! We hope you find much inspiration, help, humor and enjoyment here.


Archives


POPULAR POSTS

* * * * * *

SUBSCRIBE to House of Joyful Noise blog! Every new post, delivered right to your email box!


Privacy Policy

Amazon Affiliates

Never at any additional cost to you, we may earn a small commission for our endorsement, recommendation, testimonial, and/or link to any products from our website. Your purchase through our links helps support our family, while sharing with you the products we authentically use and recommend, for various ideas, and letting you know where you can purchase them. Thank you for your support!

[footer_backtotop]

Copyright © 2025 HouseOfJoyfulNoise.com · Genesis Framework by StudioPress