• HOME
  • {A}’s Chipmunk Training Archives

 Homepage

  • The Homestead
    • Home Projects
    • Home Improvement
    • Home Decor
      • Seasonal Home decor
        • FALL Home Decor
        • WINTER Home Decor
        • SPRING Crafts and Creations
        • SUMMER Crafts and Creations
    • Our Chickens
    • Gardening
    • Organization
    • Re-Purposing
    • Furniture Refinishing
    • Budget
  • Crafts & Creations
    • Seasonal Home decor
      • FALL Crafts and Creations
      • WINTER Crafts and Creations
      • SPRING Crafts and Creations
      • SUMMER Crafts and Creations
    • DIY (Do-It-Yourself) Project
    • Kids Arts and Crafts
    • Homemade/Handmade Gift Ideas
    • Holiday Crafts
    • Fan Pulls
    • Free Printable/Downloadable
    • Sewing Projects
    • Giveaways
    • Business Features
  • Recipes/FoodFun
    • Breakfast
    • Lunch
    • Main Dish
    • Sandwiches
    • Appetizers
    • Slow Cooker
    • On The Grill
    • Side Dishes
      • Soups
      • Salads
    • Baking
      • Breads, Rolls and Muffins
    • Snacks
    • Treats
    • Desserts
    • Drinks
  • Homeschooling
    • Elementary Homeschooling
      • Elementary Homeschooling READING
      • Elementary Homeschooling MATH
      • Elementary Homeschooling LANGUAGE ARTS
      • Elementary Homeschooling SCIENCE
      • Elementary Homeschooling HOME ECONOMICS
      • Kids Arts and Crafts
    • Middle School Homeschooling
      • Middle School Homeschooling SCIENCE
      • Middle School Homeschooling HOME ECONOMICS
    • Language Arts
    • Math
    • History / Social Studies
    • Geography
    • Foreign Language
    • Field Trips
    • Games
    • Nature Study
  • The Big Picture
    • Life In General
    • Celebrations
    • Faith
      • Into the Light; The Series
    • Giveaways
    • Reviews & Sponsors
  • Photography & Lettering
    • Photography
    • truck lettering
    • vehicle graphics
    • Newborns
    • Kids
    • Engagement
    • High School Senior Pictures
    • High School Senior Pictures Sneak Peeks

How to Make a Beautiful Palm Cross – Tutorial with Directions and Photos

April 5, 2009 By Laura 3 Comments

Hi Friends!  Are you ready to make a beautiful Palm Cross, with your Palm Sunday palms? Well we are ready to show you, with this step-by-step tutorial, complete with directions and photos!

how to make a palm cross

Today has begun  Holy week, so as we move through it,  I am sure it’ll slow down around here a bit once again, as we help bring our children, in a mindful, prayerful and heartfelt way, through the most significant events of Jesus’ life, which led to the willing sacrifice of His own life, for us.

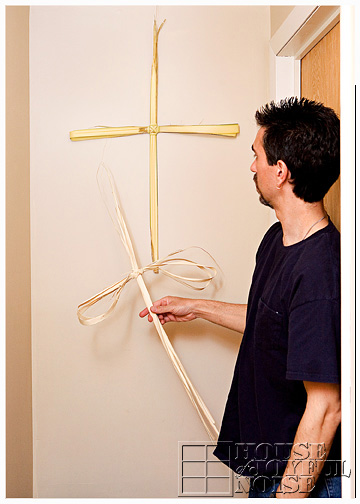
Last year on Palm Sunday, Michael took the fistful of palms we brought home from Mass, and created a big cross with them for our home.

Last Year’s Palm Cross

old-palm-cross

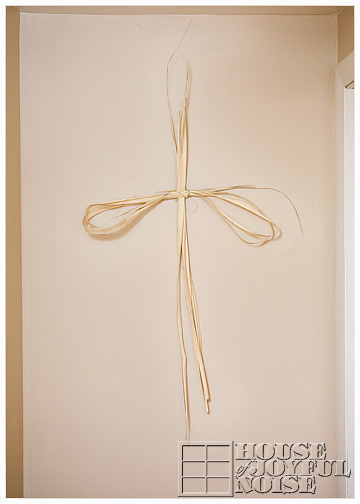
Our family has enjoyed it so much throughout the year, that the kids and I wanted him to make another new one with the palms we brought home today.  So as he did, I took photos, with the thought that maybe some of you may want to create one this way as well, with your own palms, for your own family home.  It is a difficult thing to explain in words only, so I am hoping the photos will help show you how to do it.

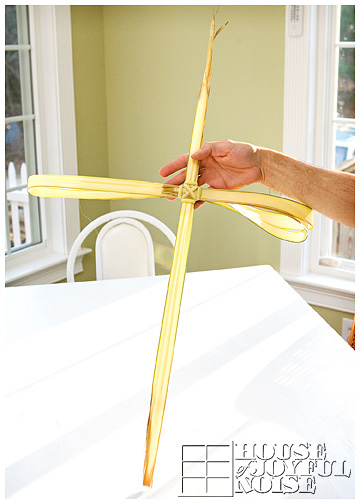
How to Make This Beautiful Palm Cross


how to make a palm cross

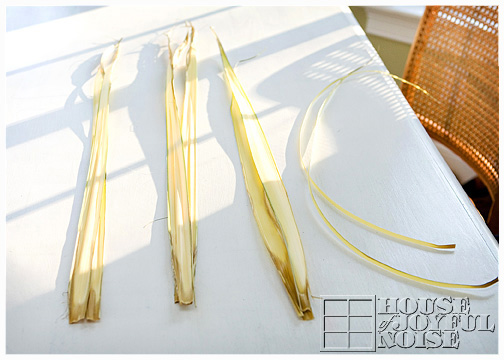
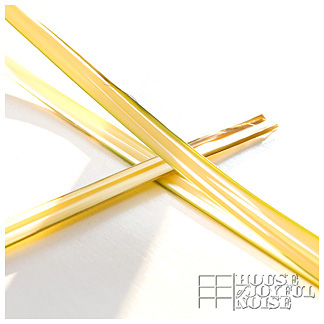
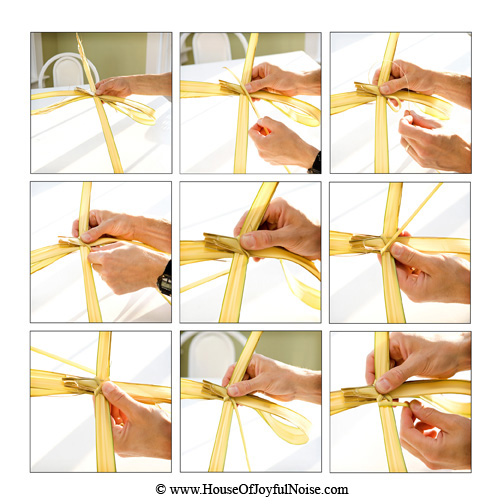
First, he takes 3 sets of 2 palms each, and at least one good palm whisp.

how to make a palm cross

In the area the intersection of the cross is, he put the ends of one set of palms alternately layered in between 2 of the others, going in the opposite direction of course.

how to make a palm cross
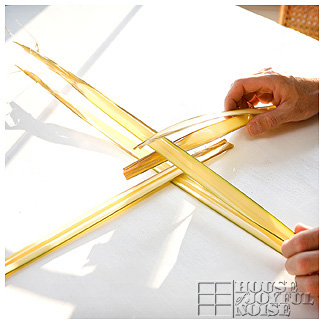
Then he takes the last set, and layers those for the other side.

how to make a palm cross
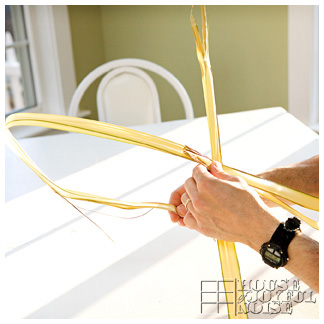
Pinching it all together at the intersection, he takes one side of the palms and makes a loop with them to the back.

how to make a palm cross
He secures that with his fingers to the middle as well, and then does the same with the other side.

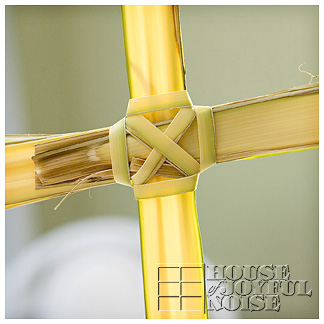
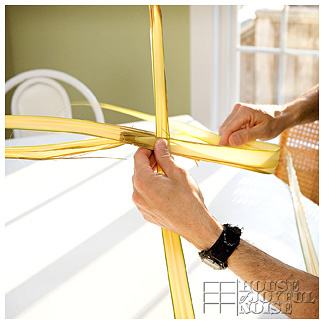
With the formed cross in hand he takes the wisp and starts wrapping the intersection of the crossed pieces, to secure them tightly.

The below collage, to be viewed left to right in rows top to bottom, is not every single move. It just gives you a general idea of how he wraps it around, crisscrossing, and going up and down as well.

how to make a palm cross

how to make a palm cross
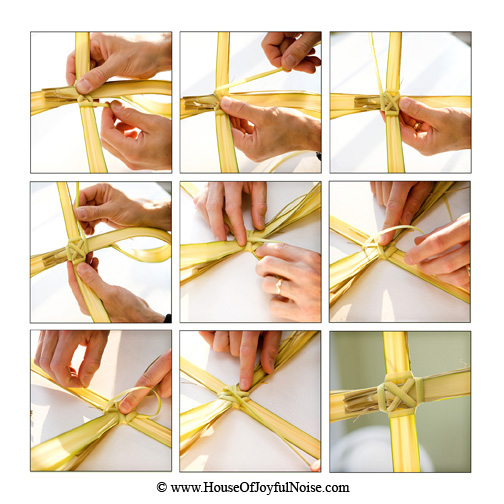
When he only has about 2 inches left, he turns the cross over, and places it on the table, and holding the wrap tightly, he takes the remaining end and feeds it under the wrap a couple of times, and then just pulls it tightly. The front of the middle of the cross then looks like the last square in the above collage.That’s it!

how to make a palm cross

new-palm-cross

We’re sure you all have found various ways to make your own beautiful crosses with palms as well, or perhaps you just stick them behind the crucifix of your home, as we have done for many years as well. We would love for you to share how you do display your blessed palms in your home, what you may make with them, or any traditions you may have for Palm Sunday in your family.

We hope you had a happy and peace filled Palm Sunday .
May God bless you all, this Easter season!

Save

Save

Save

Filed Under: Crafts & Creations, Faith, Faith/ Catholic, Home Decor, Kids Arts and Crafts, Re-Purposing, The Big Picture, The Homestead, Traditions Tagged With: Catholic, Catholic-blogs, Catholic-families, Catholic-holy-week, Easter, how-to-make-palm-crosses, palm-cross-tutorial, Palm-Sunday-project, sunday-palms

How to Build a Wood Stove Bench – Part I

March 28, 2009 By Michael 5 Comments

Hi Everybody. I’m Michael, a.k.a. Mr. House Of Joyful Noise.
I’m excited to introduce my first project on the blog!  I’m going to teach you how to build a wood stove bench.

Michael - House of Joyful Noise blog

 I’ll be working this project in parts, and blogging as I go.  I’ll do my best to explain what I’ve done, along with what photos we took, but if you find you still have questions, you can let me know in the comments to this post, and I will try to answer as best I can.  So check the comments for replies if you leave me a question.

The other day, my bride mentioned that she was tired of our little stool in front of the wood stove.  She wants something larger, homier, and I had to agree.

1_l

So I asked her what she would like to have, and she described the type of bench she would like.  At this point, I sketched out something, as I always do when I start a project, just to have an idea of what direction I’m going in.

How to Build a Wood Bench

How to Build a Wood Bench

I came up with a height that would be best to sit and load the stove with wood, poke the fire, or clean the stove out, etc. My bride wanted it wide enough for 2 people to sit together. ♥♥  I also wanted a comfortable width so the bench would be stable on the floor.  I felt like I had a good enough plan on paper to start the project.

How to Build a Wood Bench

I set out to find some scrap stock around the house.  I ended up using two 6 foot pieces of 2″x10″ ‘s, left over from our sun room rafters.

I wanted the bench top 14 inches wide, and 36 inches long.  So I ripped one of the 2×10’s to 7 inches in width.

How to Build a Wood Bench

Once I had that ripped to size, it was time to cut it to 36 inches in length. This left me with 2 finished pieces 7″x36″.

How to Build a Wood Bench

Then it was time to start the legs. I knew I needed 4 pieces 8 inches wide, by 15 inches tall.  (Two pieces 8″x15″ per leg.)  So it was back to the table saw to rip my second 2×10 to 8 inches in width.

How to Build a Wood Bench

With that ripped to 8 inches wide, I then cut 4 pieces 15 inches long.  These would be the legs. I then sketched the pattern onto one of the legs.  I measured from the side in to 2.5 inches, and down from the top 5 inches, and marked it with a pencil.   Then from the bottom of that piece, on the same side, I measured up 5 inches, and marked that. Then I drew the angle connecting those 2 points.

How to Build a Wood Bench

How to Build a Wood Bench

I cut on that pattern, and then repeated this 3 more times with the 3 remaining pieces. This gave me 4 identical pieces to build 2 legs for the bench.

How to Build a Wood Bench

I also wanted an arch cut out of the bottom of the leg.  So I measured 2 inches up the side, and marked it. Then I measured 3 inches along the bottom, and marked it. I took a one gallon paint can, set it on the piece, so that the can touched on both of those marks, and traced the curve. I cut them out with a jigsaw.  (Don’t pay attention to the larger pencil arc. I was just figuring out how high I wanted it.)

How to Build a Wood Bench

Here is a finished half leg.

How to Build a Wood Bench

Putting 2 of these cut pieces together, this gives you an idea of the look of a finished leg.

How to Build a Wood Bench

Now, to secure these 2 pieces together, I cut a support piece for the inside of each leg. They are 9¼ wide by 12 inches high.  To dress these pieces up a little, I cut 2 45 degree angles off the bottom, and did 45 degree bevel all the way around, except for the top.

How to Build a Wood Bench

That piece will sit centered on the width and flush to the top of the legs.

How to Build a Wood Bench

In Part II of this project, we will finish the cutting, and get ready for assembly of this bench.  Later on, in Part III, we will prime, paint and finish the bench to a worn look, and show you how it looks  in front of the wood stove.

Something to think about:  In keeping with the general design of this bench, the measurements could be changed to build a bench for many different uses. For example, you could build a bench for your deck, your garden, a wall bench for in your home, or a bench for your kids to sit on in their playroom.

The projects I intend to blog about are anything I happen to be doing anyway, for our own home or needs. So as they come up in life, I will try to share in this manner here on our blog.  I think you will find that my projects are often rough and simple. Since I am not a carpenter by trade, I have limited tools to work with. But I make do ok.  My hope is that these projects will offer a jumping point for projects you may like to do, or inspire the men in your family in some way.

Please feel free to leave any suggestions or feedback about these project posts for me as well. I am new at blogging and explaining step by step. I just DO IT. So if there is anything I can do to clarify things for you, please let me know and I will do my best.   Meanwhile, I hope you enjoyed Part I of my first blogged project!!
Click Here >>>> for Part II

Save

Save

Save

Save

Save

Save

Save

Save

Save

Save

Filed Under: Crafts & Creations, DIY (Do-It-Yourself) Project, Home Improvement, Home Projects, The Homestead Tagged With: build-a-bench, build-it-yourself-wood-bench, how-to-build-a-wood-bench, wood stove bench, wood-bench-plans

A Little Love Around the Homestead – Valentine’s Day Decor and Activity

February 13, 2009 By Laura 7 Comments

Not much to say tonight.  But then, LOVE needs few words, right?
We just wanted to share with you  some of our Valentine’s Day decor and activity.

Valentines-day-home-decor_2

Valentines-day-home-decor_1

Can you see me?

kids-card-making
Triplets working on valentine cards for family, after their school work today.

kids-card-making_2

kids-card-making_1
Using rubber stamps and stickers is a really fun, easy and mess-free way for kids to make really cute cards.
–

princessofking

Is there any love for us, greater than our King’s?

–

window-xo

xoxo-car-decor

We have some very simple family Valentine’s Day plans for tomorrow.

Now doubt I’ll have my camera out to play, along the way.

Wishing you all a Happy St. Valentine’s Day full of LOVE and lots of XOXOXO‘s !!

Save

Save

Save

Save

Save

Save

Save

Filed Under: Crafts & Creations, Holiday Crafts, Home Decor, Kids Arts and Crafts, Kids Arts and Crafts, The Homestead Tagged With: February-decor, holiday-home-decor, kids-valentine-card-making, love-decor, Valentines-day-home-decor, Valentines-day-kids-activities

Our Cozy Long Weekend

January 21, 2009 By Laura 10 Comments

1_snowing-outside-window-yard

We’d like to gush just a BIT more, about how much we are enjoying this wood stove.  Honestly, I may never get over   the sheer joy, of having it.  We have gained a room to use in the winter! It’s open to our living area anyway, which is open to the kitchen, which is open the school/eating room… so it’s a perfect extension to the main space of our home.  So cozy, and so beautiful too look out our windows, that surround us.  We all just spend a lot of time in there — schooling, playing games, reading, chatting-all by the fireside.  It’s been lovely!

This past weekend, we had a major shift of plans.  We were supposed to have ONE more Christmas celebration on Sunday, gathering with my side of the family-all of whom live long distance.  We  were all so looking forward to it!  But….the snowfall predictions put an end to everyone’s travel plans.

2_WESO-wood-coal-stove

So instead, we had a relaxing weekend alone, together.  There was plenty of good food to eat though, as we had just shopped for our big gathering!!  So the eatin’ was good for days!!  Still is, actually! lol

See that pan on the stove top?  That is a delicious hot drink we have simmering.  Want to peek inside??

2__spiced-cider-on-wood-stove-top

It’s a hot cider drink, and we had no idea how delicious it would be.  I got the recipe from another blog, but I’ll be darned if I remember where!!  I must say though……I wasn’t sure I was going to love it. Or even like it.  But just the thought of the citrus aroma it would likely fill our home with, was enough to encourage me to make it anyway. SOMEONE would probably like it.

4__cider-mugs-on-table

We were all set to give it a sip or 2, when it was ready.  But it had to simmer for awhile first.

5_packing-away-Christmas-decorations

Meanwhile, we had a few things we could get done.  Like…..undecorate our very  Christmas-sy home, perhaps?!  Yes, our tree has been up all of this time!  Along with all of our other decorations (of which many of you have all probably seen, with all of the photos I took and posted. BOY that was FUN!!)  And we really enjoyed them.  But…we were ready for them to get packed up again for awhile!  I must say…..our home looked a little….naked….for a day or so after wards.  But it seems normal again now.

6__ladling-cider

By the time that packing up was done, our cider was ready!!  It sure smelled good.  But still….I was leery.  Mine was a very cautious first sip.  One of the ingredients is orange juice….and the thought of warm orange juice was making me cringe a little bit.  But as it turned out…..we all LOVED IT.  Everyone had TWO cupfuls, and they all want to make it again very, very soon.

9_woodpile

We brought the woodpile in, to keep it dry.  Which I didn’t mind much, because I love woodpiles. Remember?  We were wondering if any bugs would thaw out in there, and come come scurrying out!  But none ever did, thankfully.  Nonetheless, we’ll be thinking on better wood-storing ideas, when the time comes to stock up on a huge amount of wood.

8__snowing-outside

The snow was really coming down some parts of the day, and it was nice to have no place to go, and just watch it….

7_hot-mug-cold-winter-day

and sip some more.

I’ve got to tell you a little bit about this pot on our stove too………

10_LLBean-cast-iron-kettle

…..  Since we talked a little about treasured family pieces, this is one of our own.  It was in this home when we bought it.  As I mentioned earlier, we had an inset wood/coal stove in a brick wall we knocked out when we added this sunroom, (and a school room/ eating area…..and a whole second story….).  It was a black iron stove, inset into a brick fireplace, with a stone hearth.  I did love the look of  the whole stove/fireplace, with our crooked brick mantel, but we only used the stove itself a handful of times.  Reason being, there were issues with the chimney, which really needed work, if not rebuilding!  We felt it posed a possible fire hazard in the chimney.  It let awful smoke in the house too.  What’s more, it would have been very difficult to keep little ones away from it through those years, being dangerously hot to the touch.  They are older now, and know better, of course.  Anyway, we never invested in getting the chimney fixed, because we were holding onto our hopes and dreams of remodeling our home anyway, which we really needed for a family of 6.  We were finally able to do that, and it has been our little dream come true….even though we still haven’t finished it.  (But the journey has been gratifying!)  So, the day that excavator ripped that old chimney, entire wall and stove off of our house….we saved this pot of course, before it was buried in the rubble. (My  3 kids, who were 4 at the time, napped right through that event, and woke up to a HUGE gaping whole, where the wall and stove/fireplace used to be, and into their suddenly very messy yard!)  I love that the pot is L.L. Bean.  That company has great stuff, but we never purchase anything from them because they are beyond our budget! But…we do have this pot!!  I should add…..we only keep it filled with water, and it puts some moisture into the air.

My.  That was a long paragraph.

SO!   Here’s a really easy COMMENT assignment for you:

Say ” I “,  if you’d like me to post this DELICIOUS CIDER RECIPE for you.  It smells and tastes wonderful!!  And you don’t even need a wood stove to make it…..any stove at all will do.  It’s a perfect winter treat!

Save

Save

Save

Filed Under: Life In General, The Big Picture, The Homestead Tagged With: spiced-cider, WESO-wood-coal-stove, winter-days

Baptism by Fire – Our WESO Wood and Coal Ceramic Stove

January 18, 2009 By Laura 57 Comments

WESO-wood-coal-stove

If you’ve been a visitor of our blog for awhile, you may have noticed that we just get silly-excited, about the darndest things.  About lots of things, all kinds of things, and sometimes most anything. : )  That’s just how we are.  Sometimes, those things have to do with accomplishments with our home.  If you knew the transformation our home has taken, and what we’ve been through to make it happen, you’d probably appreciate that more.  That’s another ‘post all it’s own’, but needless to say…..it’s been a very long, but very exciting journey.  And having done most of the work ourselves (which is still a work in progress), every single ‘check off the list’ is a big deal to us. So indulge us, won’t you please?  Because we’re jumping up and down here with excitement!

ONE of our home projects has been to get this wood/coal stove vented to the outside. It’s a WESO Ceramic Radiant Heat Wood and Coal Stove.
And it’s a family piece. More on that in a bit.

1_WESO-wood-coal-stove

Except….we needed a chimney, since our old one was knocked out with a wall, and was falling apart anyway.  The sun room this stove is in now, is in it’s place.  So…..hooking up this stove, and getting a proper chimney up, that would pass inspection of course, was a major project.  We had a deadline goal to get it done by, that was really important to us.

It was  BEFORE LAST WINTER began!

Obviously, we missed that goal by a long shot!  But it did get done, in all thanks to my husband, who can do all things, when he decides to. And he’s ambitious.
😉   He cut a hole through the ceiling  and roof just so, got everything squared away and boxed in, and patched up the ceiling in no time at all.  Well….a few days. lol  His brother in-law did send one of his roofing guys over, to do the roof part properly. (Thank you BIL!!) But my husband even assembled the mile-high chimney on the roof all by himself >>> during the 2 absolute coldest days of the winter so far—in the single digits.  Crazy I tell you.

2_chimney

I know…we’re looking a bit like Willy Wonka’s Chocolate Factory now. (Actually, that wouldn’t be an entirely bad thing, if it were true. lol).  But hey…..it gets the job done.  And it meets inspection standards.

3_woodpile

I have a thing about woodpiles.  I think because they mean FIRES ARE GOING TO HAPPEN!  I have always loved fires.  Well….the good ones.  Wood stove fires.  Camp fires.  Those kind.  And our whole family really enjoys them together whenever we can. It’s a such a big-fun-deal to the kids, when we build fires outdoors, just to sit around and chat….which we do quite a bit in the summer and early fall. Sometimes we even have s’mores!  Plus….woodpiles are so…country-ish.  We just love the smell of wood burning, too.

1_WESO-wood-coal-stove

Back to the stove (and re-using this photo).  We’re not only SO excited to be having a real wood/coal stove for our home, because we love having fires to gather around, making our home cozy, and just adding to the comforts of  home feel.  But this stove in particular, has meaningful family history. It’s a WESO ceramic wood and coal stove, made in the mid 1970’s, and it was Michael’s (my husband’s) grandparent’s stove. They had it up in their home in Maine, practically for all of his childhood.

That makes it really special, because Michael was really close to his Nana, and spent a lot of time up there.  Even his school vacations, if he could.  He often brought one of his friends, all of whom took him right up on that offer, because his Nana was cool! So he essentially grew up with this stove.  It was there all the years I knew his Nana, and visited her with him, as well. When his Nana passed away (about 8 years after his grandfather), the stove went to his parents home, where he grew up.  By then of course, he was no longer living at home.  We were planning to get married by then.  But nonetheless, it was there in their home, where we often visited and gathered, for years into our marriage and having four children, until his parents sold the home and moved.

That’s when we took it, in Nov 2006.  And we’ve been waiting to make it part of our home, ever since.

The older we get, the more family pieces mean to us.  To have things around our home that have family history, is just such a blessing.  We don’t have a whole lot.  Lots of little things that are just as precious.  But this stove is a treasure to us.  It’s a beauty!!  And it was finally time to start her up!!  Heading into a bitter cold weekend, too.

4_WESO-wood-coal-stove

5_WESO-wood-coal-stove

This corner, and  just to the left of it where our french doors into the rest of our home are, is the only parts of the room that are windowless.  This room is pretty much all windows, and a sliding glass door out to the deck.  LOTS of natural light.  We are essentially surrounded by the outdoors, but inside. We have spent A LOT of time in here……even though it is no where near decorated or furnished as it will be.  The kids just LOVE this room as well, and spend a lot of time in it too….until the winters came.  It just got BITTER cold out there.  The stone tiles were like ice.  So when we come in the front door, we  kick off our shoes and get through the french doors and into the house as soon as possible. It’s been a 3 season room.

But not anymore.  It’s finally a 4 season room!  I have to say…..it’s been one very enjoyable, very snowy, and very cozy weekend for us, here in our home.  We’ve spent much of it in this room…..surrounded by a winter wonderland, but warm as can be.  Just gathered together as a family, hanging out by the fire.  Right where we love to be.

6_WESO-wood-coal-stove

We’ll be back to tell you more about our cozy weekend really soon.  Meanwhile, if you have any really treasured family pieces as part of your home, we’d love to hear about them!  It doesn’t matter what it is, big or small, pretty or not…..if it matters to you, it matters!  Please feel free to share family pieces with us if you have a moment.

Save

Filed Under: Budget, Home Decor, Home Improvement, Home Projects, The Homestead Tagged With: family pieces, family-heirlooms, heating-with-wood-in-winter, old-wood-coal-stoves, WESO-ceramic-wood-coal-stove

  • « Previous Page
  • 1
  • …
  • 24
  • 25
  • 26
  • 27
  • 28
  • …
  • 30
  • Next Page »

We are wicked happy to have you here! We hope you find much inspiration, help, humor and enjoyment here.


Archives


POPULAR POSTS

* * * * * *

SUBSCRIBE to House of Joyful Noise blog! Every new post, delivered right to your email box!


Privacy Policy

Amazon Affiliates

Never at any additional cost to you, we may earn a small commission for our endorsement, recommendation, testimonial, and/or link to any products from our website. Your purchase through our links helps support our family, while sharing with you the products we authentically use and recommend, for various ideas, and letting you know where you can purchase them. Thank you for your support!

[footer_backtotop]

Copyright © 2026 HouseOfJoyfulNoise.com · Genesis Framework by StudioPress