• HOME
  • About Us
  • {A}’s Chipmunk Training Archives

 Homepage

  • The Homestead
    • Home Projects
    • Home Improvement
    • Home Decor
      • Seasonal Home decor
        • FALL Home Decor
        • WINTER Home Decor
        • SPRING Crafts and Creations
        • SUMMER Crafts and Creations
    • Our Chickens
    • Gardening
    • Organization
    • Re-Purposing
    • Furniture Refinishing
    • Budget
  • Crafts & Creations
    • Seasonal Home decor
      • FALL Crafts and Creations
      • WINTER Crafts and Creations
      • SPRING Crafts and Creations
      • SUMMER Crafts and Creations
    • DIY (Do-It-Yourself) Project
    • Kids Arts and Crafts
    • Homemade/Handmade Gift Ideas
    • Holiday Crafts
    • Fan Pulls
    • Free Printable/Downloadable
    • Sewing Projects
    • Giveaways
    • Business Features
  • Recipes/FoodFun
    • Breakfast
    • Lunch
    • Main Dish
    • Sandwiches
    • Appetizers
    • Slow Cooker
    • On The Grill
    • Side Dishes
      • Soups
      • Salads
    • Baking
      • Breads, Rolls and Muffins
    • Snacks
    • Treats
    • Desserts
    • Drinks
  • Homeschooling
    • Elementary Homeschooling
      • Elementary Homeschooling READING
      • Elementary Homeschooling MATH
      • Elementary Homeschooling LANGUAGE ARTS
      • Elementary Homeschooling SCIENCE
      • Elementary Homeschooling HOME ECONOMICS
      • Kids Arts and Crafts
    • Middle School Homeschooling
      • Middle School Homeschooling SCIENCE
      • Middle School Homeschooling HOME ECONOMICS
    • Language Arts
    • Math
    • History / Social Studies
    • Geography
    • Foreign Language
    • Field Trips
    • Games
    • Nature Study
  • The Big Picture
    • Life In General
    • Celebrations
    • Faith
      • Into the Light; The Series
    • Giveaways
    • Reviews & Sponsors
  • Photography & Lettering
    • Photography
    • truck lettering
    • vehicle graphics
    • Newborns
    • Kids
    • Engagement
    • High School Senior Pictures
    • High School Senior Pictures Sneak Peeks

Homemade Bookmarks – Craft Tutorial

January 26, 2009 By Laura 5 Comments

crafts-copy

Hi People!

This is the first of a handful of installments, that finally show you what we were making as we crafted during the pre-Christmas season.  Now that all of the gifts have been given, we can share, and not be concerned with ruining any surprises.  But we hope that some of you may gather an idea or 2, by us posting these projects, to put on your idea list for crafting and/or gift giving of your own, next Christmas or anytime.

We tried to think of gifts we could craft, that most anyone could use. Universal, sort of gifts.  We think we did pretty well in the end.  These gifts are simple;   Simple to make (as the kids did a lot of it, with instruction and/or assistance), and simple in concept.  We did not invent any of these things, but simply put ‘our touch’ to them.  Should any of these projects appeal to you, we’re sure they’ll come out as your own as well.  So many of you are SO creative, that you will likely make them even better, or put a new twist of your own on them, that makes them unique for you.   Whatever you do, have fun!!  Remember, even if everything doesn’t come out perfect, the fact is that they were made with love!  If your recipients can’t appreciate that, then….well,… I won’t say.  But they should.  lol.  Otherwise, you might consider  ‘indian-giving’.  Ha haha!

So let’s get to it! :

You may or may not recall, that one of the headers to a crafting post was this:

homeamde- bookmarks_00

Showing any more than that would have given the project away.  But we were making…………
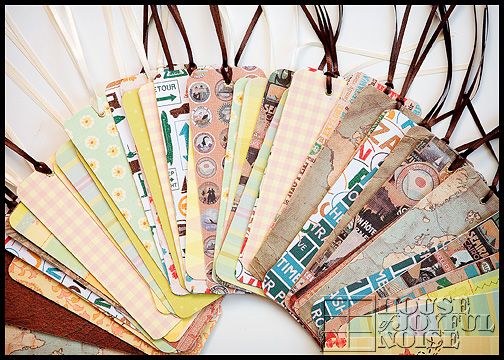
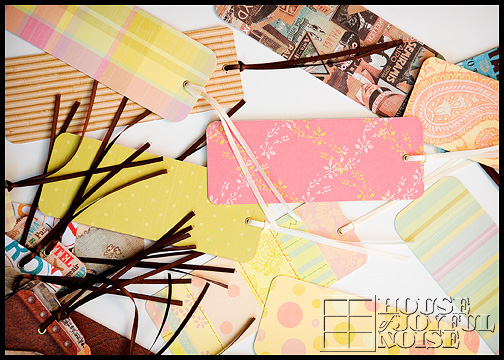
BOOKMARKS!


homemade-bookmarks_2

We know we love books, and we love to read.  Many people are the same.  Even if they are not big cover-to-cover kind of readers,  one may find a bookmark handy to keep their place in a recipe book, a how-to book, a magazine, a journal, their Bible…and who knows what.  So we hoped these would come in handy, in some way, for our recipients.  We did know that many do love to read, in our case.

I did not think to take step-by-step photos, since photos would have given it away.  But we think you’ll get the gist by looking at the photos of the finished bookmarks, and reading the following information.

Here’s how we made them:

Directions

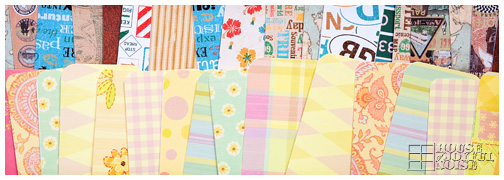
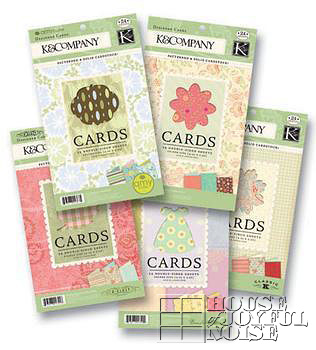
First, we needed some card stock.  We found these handy pads of beautiful designed card stock in, in the scrapbooking aisle of Michael’s Arts & Crafts.  They are actually meant for making greeting cards, but they worked out to be just what we were looking for, and a good size too.  They looked like this:

homemade bookmarks

One thing we REALLY loved about these card stock pads, was that each ‘card’ was 2-sided!!  It had a different, but coordinating, design on the backside! So that means we had 2-sided bookmarks!!  Very cool. We were excited about that.

So we cut these cards into bookmark size, and marked the centers of exactly where we wanted a hole for the ribbon.

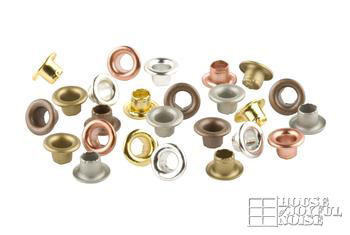
Some supplies we already had on hand that we used are:  thin satin ribbon, a Fiskar cutter (used by many scrapbookers, that make cutting straight as easy as gliding the blade).   Also, eyelets that look like this:

eyelets-brads

And an eyelet tool setter kit, which I already had on hand too, from scrapbooking with eyelets.  That looks like this:

eyelet-setter-tool-kit

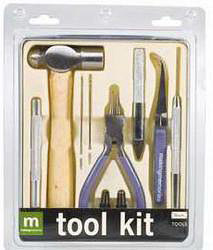
It might look scary, but every piece is pretty self-explanatory as to what it does.  Included are 3 size whole punchers tips (which 2 you can see right over the l and k of tool kit, and the other is already screwed onto the handle piece, 3rd in from the right).  All you do is choose the correct size tip for the size eyelets you are using, stand it up on the card stock right where you want a hole, and tap with the hammer.  Next, put eyelet through the hole, hold it in while turning over the card, and get the ‘splaying’ tool. (I may have made that word up.  Not sure.  But it spreads the backside of the eyelet out to hold into the card.  So roll with it.)  So you put the ‘splayer’ into the eyelet back, and hammer!  This takes some real hammering, so be sure you are careful and use cardboard or something.  I used a self-healing cutting board.

Now take a piece of cut ribbon, doubled over, and  put the 2 ends together through the eyelet, and then through the loop of your ribbon.  To finish the bookmarks off, we used a corner rounder, which is also found in the scrapbooking section.

That’s it! 

No doubt, you’ll want to keep a few for yourselves too.  We did!  So Happy Reading!

All of the supplies used can be found at any Michael’s Arts and Crafts, or most any other good craft store.

If you have any questions, just let us know!!  I am always happy to clarify!

I am also used to needing to.   lol  : )

homemade bookmarks

Save

Save

Save

Save

Filed Under: Crafts & Creations, Homemade/Handmade Gift Ideas Tagged With: bookmarks, bookmarks-craft-tutorial, crafting, crafts, eyelet-setter-tool-kit, gift-ideas-for-readers, homemade-bookmarks, homemade-gift-ideas, how-to-make-bookmarks, paper-crafts

Paper Creations

September 18, 2008 By Laura Leave a Comment

paper-bird-creations

The kids had some fun making paper creations, inspired by an idea they saw in a magazine we get. I’m guessing many, many families get the Family Fun Magazine.  We do too, and it’s always an exciting day when an issue shows up in our mailbox. I love how I can leave it around for the kids to pick up and read or flip through, without worry of what is lurking in the pages that they may come across. And they get right into it. Usually, the only influence that comes from the pages are inspiration and eagerness to try some new craft, with plans to put their own creative style into it, or some crazy snack, intending to re-invent the recipe and make it even healthier, or safer in our case, if it has peanuts or peanut butter.  More times than not, it kicks my kids crafty-side into high gear.  They LOVE to plan projects, parties, menus….you name it. I love that they have so much time to invest in creating, and planning, at their free- will!

I recall this past Sunday, as we we all climbing into the van after picking up some lumber (and {A’s} snake, unbeknownst to us, was breaking free at home), the kids were discussing how now they wanted to go here or there.  But {J} piped in….”Not me!  I just want to go home so I can make my bird!”  Home, is where we did go.  {J} wasted no time throwing off his shoes and getting RIGHT to work, gathering together most of the materials he needed, and following the directions on page 143 very carefully.  “I need that thing of paper clips in the laundry room” he shouted through the house, over and over.  He didn’t even much care when we all realized the snake was on the loose…somewhere in our home.

The great thing is….once his cool bird was done, {S} and {O} also wanted to make some.  Soon they got busy too, and it was a project we helped them finish on Monday morning, before school, no less.  The birds were quite a fancy flock when they were done.  Some even had nests to settle into!

paper-birds

I’d have liked all of these paper bird creations to stay and sit so pretty on my windowsill in the sunroom, as they are at the very beginning of this post.  But of course they didn’t….for even a 1/2 hour.  I  have seen them flying through the room, in the little hand of an upstretched little arm.  I have seen them perched on the school counters, watching us do our school work. I have seen them all over the place, and not always necessarily where they should be.

{A} was apparently inspired from the same issue, too, days before, and had been crafting in her room. She emerged from her room with a pretty little handful of the Technicolor Acorns, with plans, she said, to make LOTS more. They are just SO cute!  They’re a perfect addition to our seasonal altar table this Autumn.

paper acorns craft

She also made these fancy paper stars, which will also end up being some special touch to something or other.

paper-stars-craft

Years ago, I used to think “Well why would we make that?  What will we do with it after?  It’ll just be more stuff around”.  But now, it’s that very kind of stuff around, here and there, that puts the smiles in my heart.  Because my children found a desire within themselves, to create it.  They put their heart and soul into it.  I see these things that were made with their imaginative minds, and marker covered, glue-sticky little hands, and I have flash-backs in my mind for days, of seeing them create them….with their tongue sticking out as the try so hard to cut on the lines….or asking for “just one more piece of paper, please” because they messed up and want to start again. It’s their undeniable need to create, and their determination to make their masterpiece just the way they want it, that makes these things so valuable in the end.  And trust me….they truly treasure what they work hard at making.  At least for a good little while. These little creations, whatever they may be, are part of their days, for many days.  The pride they carry at having made this or that, themselves, is priceless.   So now, when I see the scraps of paper all over the floor under the table, or the paint that got ON the table, once again, I just have to take it in with appreciation for a moment.  After all, it’s evidence that creativity was hard at work, once again, in our home.  And THEN I tell them to come clean it up : )

While they are still enjoying the September issue of Family Fun, I have confiscated the October issue that just came in the mail.  Not only do I think it may, possibly need a little pre-approval this Halloween month, but I am hoping for some inspiration myself, before the pages are tattered and worn, and marked with post-it notes, inspiring little people once again.

Filed Under: Crafts & Creations Tagged With: kids-paper-crafts, paper-acorns, paper-crafts, paper-creations, paper-stars

We are wicked happy to have you here! We invite you to connect with us anywhere you are, too!


SUBSCRIBE to House of Joyful Noise blog! Every new post, delivered right to your email box!

Archives

Find Us on Facebook

SuperWebTricks Loading...


POPULAR POSTS

* * * * * *

SUBSCRIBE to House of Joyful Noise blog! Every new post, delivered right to your email box!


Privacy Policy

Amazon Affiliates

Never at any additional cost to you, we may earn a small commission for our endorsement, recommendation, testimonial, and/or link to any products from our website. Your purchase through our links helps support our family, while sharing with you the products we authentically use and recommend, for various ideas, and letting you know where you can purchase them. Thank you for your support!

[footer_backtotop]

Copyright © 2023 HouseOfJoyfulNoise.com · Genesis Framework by StudioPress