• HOME
  • {A}’s Chipmunk Training Archives

 Homepage

  • The Homestead
    • Home Projects
    • Home Improvement
    • Home Decor
      • Seasonal Home decor
        • FALL Home Decor
        • WINTER Home Decor
        • SPRING Crafts and Creations
        • SUMMER Crafts and Creations
    • Our Chickens
    • Gardening
    • Organization
    • Re-Purposing
    • Furniture Refinishing
    • Budget
  • Crafts & Creations
    • Seasonal Home decor
      • FALL Crafts and Creations
      • WINTER Crafts and Creations
      • SPRING Crafts and Creations
      • SUMMER Crafts and Creations
    • DIY (Do-It-Yourself) Project
    • Kids Arts and Crafts
    • Homemade/Handmade Gift Ideas
    • Holiday Crafts
    • Fan Pulls
    • Free Printable/Downloadable
    • Sewing Projects
    • Giveaways
    • Business Features
  • Recipes/FoodFun
    • Breakfast
    • Lunch
    • Main Dish
    • Sandwiches
    • Appetizers
    • Slow Cooker
    • On The Grill
    • Side Dishes
      • Soups
      • Salads
    • Baking
      • Breads, Rolls and Muffins
    • Snacks
    • Treats
    • Desserts
    • Drinks
  • Homeschooling
    • Elementary Homeschooling
      • Elementary Homeschooling READING
      • Elementary Homeschooling MATH
      • Elementary Homeschooling LANGUAGE ARTS
      • Elementary Homeschooling SCIENCE
      • Elementary Homeschooling HOME ECONOMICS
      • Kids Arts and Crafts
    • Middle School Homeschooling
      • Middle School Homeschooling SCIENCE
      • Middle School Homeschooling HOME ECONOMICS
    • Language Arts
    • Math
    • History / Social Studies
    • Geography
    • Foreign Language
    • Field Trips
    • Games
    • Nature Study
  • The Big Picture
    • Life In General
    • Celebrations
    • Faith
      • Into the Light; The Series
    • Giveaways
    • Reviews & Sponsors
  • Photography & Lettering
    • Photography
    • truck lettering
    • vehicle graphics
    • Newborns
    • Kids
    • Engagement
    • High School Senior Pictures
    • High School Senior Pictures Sneak Peeks

Front Yard to Garden Sanctuary Transformation| Big Progressions and Little Confessions

July 4, 2017 By Laura 2 Comments

We have our great big garden-sanctuary-accomplishment to share with you today. Big progressions, and also some little confessions! But in order to appreciate it in all of it’s glory, you have to learn a bit about what we started from. If you’ve been following us for years, this post will refresh your memory. And if you are new here, you’ll be able to appreciate it just as much.
We all love a good ‘Before and After’, don’t we?
So we encourage you to read along!

A Look Back at a Bunch of Nothin’.

For as many years as we have been blogging, we have talked about this project. Plans to transform our hideous (oh, we have proof!) front yard of simple garden beds, into a beautiful garden sanctuary. And in these conversations with you and talking about our little garden dreams over the years, these changes were always imminent! Definitely about to happen.
Except that it really never did get very far.

First, we confess, that although every time we were all hyped up and ready to get going, every time too, for one reason or another, our grand plans always got sidelined. The seasons to get it done would end before we really accomplished much, and so we never really made any progress! Whether it was lack of time, lack of money, or how things are just easier done in your head than in reality – well, most times it was probably all of those things! Weekends are short, and our family is busy. All of that. Every time, we only got as far as maybe building some garden beds, which we have just done for the 3rd time at this point, since we originally told you of any real front yard transformation gardening dreams. And some planting for the season.

But the aesthetics and bigger vision for our garden area, in our front yard mind you, never really came in to play, as we just kept talking about it.  It was pathetic.

You can see where we generally started with our little blah-lot in here in 2009, and how we expanded what little space we had, by sacrificing some driveway.
And how we were still just getting another garden bed up or whatever  here in 2010.

And since then, there has only been many seasons, where we have just shared lots of photos with you, of all of the beautiful and bountiful vegetables and flowers that we have grown in what garden beds we had.  You can find countless blog posts on them in the garden archives here at the blog. 

But the little garden sanctuary dreams just weren’t coming together. The space as a whole, where these garden beds resided, has been just so UGH.

ANOTHER CONFESSION. . . .

Yes, I have enjoyed working in these garden beds over the years, anyway. But I have loathed feeling like I am doing so, in such an on-display manner, in our front yard! I often wonder if I might be mistaken for one of those yard ornaments, of the bent-over woman’s bum, weeding her garden.  You know the one? Ugh. Granted, we live on a short dead-end road, so the traffic is next to none. But there are also neighbors frequently walking by on their way to the beach and such, and to be honest….when I am out working in my gardens, I just want the peace and solitude to do my thing! By myself. Alone. (Or with my family) I don’t want to say hello to people, and make small talk as they walk by. Call me a witch. Of course I do say hello and chat anyway, if it so happens, because it’s only polite. But I don’t want to, in the least bit. Especially when I am hot and sweaty, with dirt sticking to me . . . . just . . . . no.  Please, leave me be while I play in the dirt. Thanks.

During this season in the photo above (circa 2010?), though it is hard to see here, we actually had 4 garden beds at that point, and then the ground-level pumpkin patch which is closest to you in the photo.
In the gardening seasons 2013-2015, the kids kept a super cute square garden as well.

It was during that period we tore down the wooden beds and put up cinder blocks gardens, which I came to be a big non-fan of.
I was almost immediately like . . . . disassemble and build wooden beds again, please. (That didn’t get undone for 2 years I think. My knees and shins hated it, and I also especially hated the concrete jungle in our already-ugly front yard.)
–

– BEFORE –
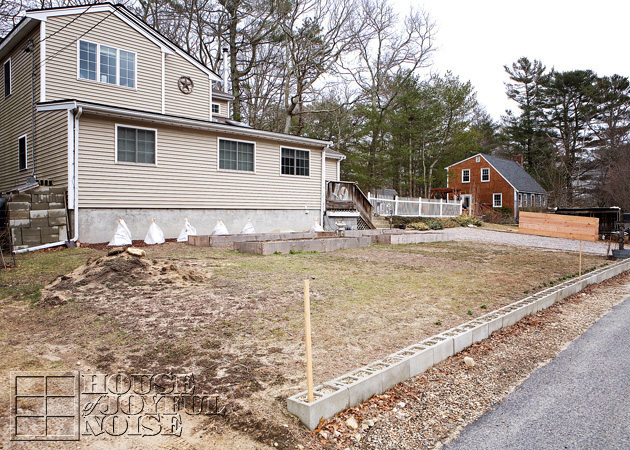
Proof of Hideous  . . . . .

But aside from the garden beds we built, growing beautiful, delicious and healthy produce and blooms over these many gardening years, the space itself has remained fairly ugly!!
Without the garden beds in season, it’s been actually hard to look at. 
For me, anyway.  In part probably, because all I see is the garden dreams in my head, missing.  And a whole palette of blah-colors, that blend together like yuck.  I felt bad for the neighbors passing by daily. Whether I’m out there bending over, or not.
–


(It’s coming, hold on . . . .)

Then last year, we took our first gardening season completely off, to, you know, really get something accomplished in our ultimate goals for the front yard.  Or that was the plan, anyway.  :/ I was SO MISERABLE, not having my gardens to work in, Y’all. It was rough.
But again, even still, we didn’t get much done, again!  We did take down all of the cinder block gardens, and got building new beds. But we only got 4/8 done that we wanted, not to mention all else we were definitely going to get done.  (Yeah, right.)

Busy family, flying time, the whole 9 yards . . . .

BUT THIS YEAR . . . .

. . . . come the first sign of spring, we hit it hard! Time was not going to get away again. Really, really, really.
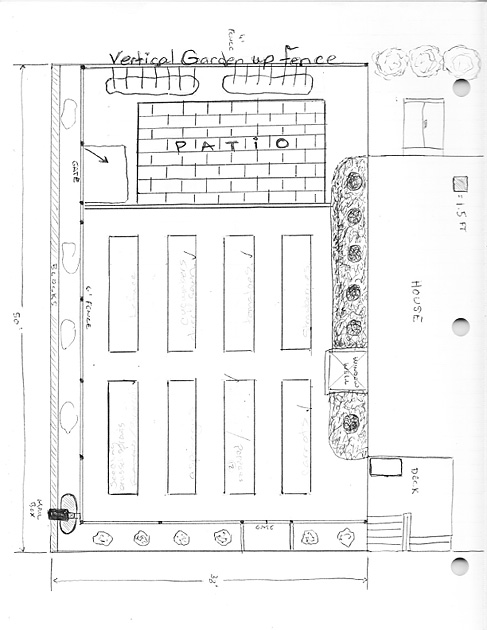
We would make time, we had the money, and after some good collaborating brain storming, as usual, Michael had some loose garden-layout plans down on paper.


We have finally….really….seriously…..put a BIG dent, in the transformation of our front yard, into more of the garden sanctuary we have been envisioning for all of these years. 

And we’re so excited to show you today! 

*Just know first though….

>>>>>  That it’s all not done yet! Consider this Phase 1! We’re just excited to show you what we’ve done already.
It’ll continue to be a work in progress, and grow in beauty, as there are still many exciting plans still left undone.


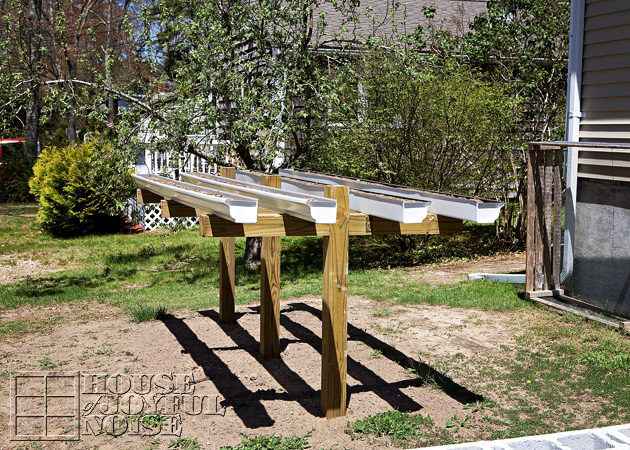
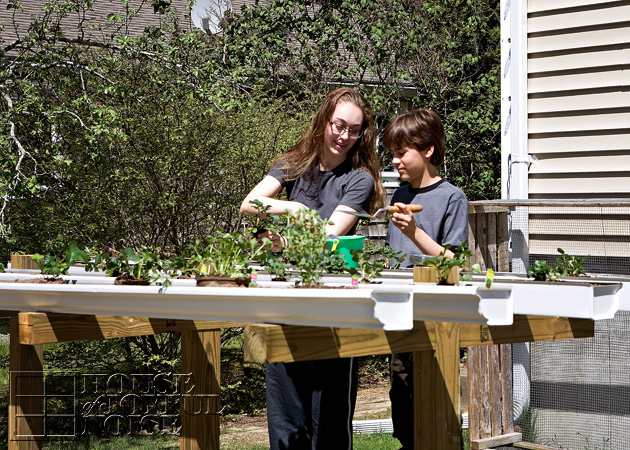
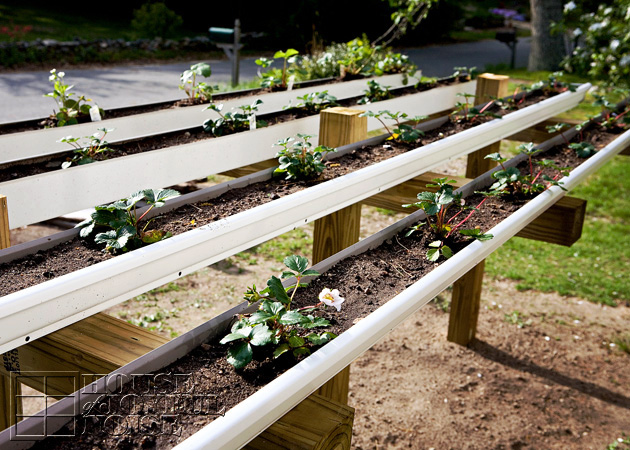
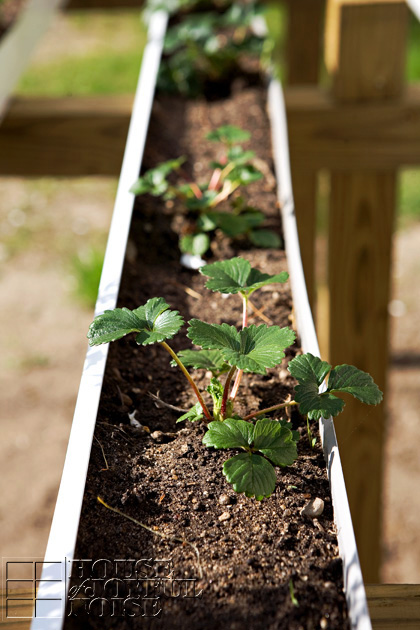
>>>>>> What is planted in the garden at the time of these photos, were still little seedlings, and the rest hadn’t been planted yet! So while it’s not the lush beautiful full gardens they will be this early in the season, it’s the structure and set-up of the new garden space layout we really want you to show you all at this point.

That said, we think it definitely qualifies as a transformation at this point. It looks completely different now. 

Will you agree?  We are about to see!!

Take a look for yourself!
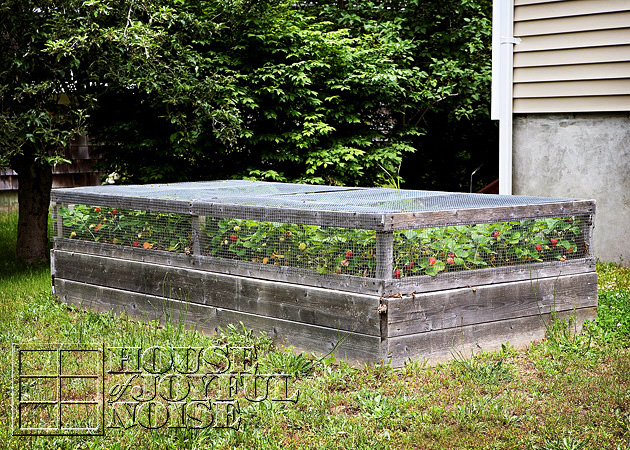
– AFTER –

.

.

.

.
[Read more…]

Filed Under: Gardening, The Homestead Tagged With: front-yard-garden-plans, front-yard-transformations, garden-ideas, garden-sanctuaries, Gardening, gardens, organic-gardens, private-gardens, sanctuaries

Strawberry Planting in Rain Gutters

May 22, 2014 By Laura 18 Comments

 We’ve have grown strawberries in our gardens going for five seasons now, and we have thoroughly enjoyed it!
While strawberry plants generally comes back and produce for 3-4 years before they are done, we managed to squeeze one more year out of ours. This year however, it was truly time to start over. And so, we decided to really change things up and start anew, by planting and growing our new strawberry plants in rain gutters. We’ll be sharing with you this fun gardening experiment and the progress of it all, with any of it’s failures or successes, as we go along here. We know we can always make improvements if need be, as we learn. Meanwhile, we enjoy the process so much. Isn’t that what it’s all about?
This is the first post on our strawberry plantings in rain gutters, and we’re starting with the construction and set up of it.


But before we dig into our new strawberry growing system, why don’t we briefly review our past strawberry growing years, of which we learned much and had much success with.  We’ve have many blog posts on our strawberries over the past years, but not everyone has been following us for that long. So allow me to mention the highlights, with links to the original posts where there is more info, since could be interesting or helpful information for someone.
If you’re just interested in getting right to the rain gutter method, just skip right down to that sub-headline.


Our Strawberry Growing History and Links to Those Past Posts

When we built our new strawberry bed in 2009, with new plantings in it, it wasn’t 24 hours before we realized squirrels and birds were going to be a problem!
So that very first morning, Michael whipped us up a solution with his carpentry skills, that has served us quite well, protecting our strawberries from winged and furry creatures, every year since.
There was some real excitement over our first picked strawberry.

We shared many of our lessons learned while growing strawberries.
And we certainly enjoyed our delicious berries, having many-a-strawberry shortcake, learning to make and can jam, and other treats such as Strawberry and Chocolate Nachos, and this beautiful Berry Parfait.

All of those links above open in a new window, so feel free to bookmark or pin them on your interest boards for later.

Anyway, while we got a great crop of berries every year, our 4th year was probably the most abundant, and so we thought maybe we could get one more year out of them. And also, we knew it would be soon time to replace all of our garden beds, but we hoped to get one more year out of them as well. So we went for a fifth year, which was less productive, and confirmed to us that it was time to start over with some new baby starter plants.

Strawberry Planting in Rain Gutters

Which brings us to this season.
As I’ve mentioned, our garden beds were needing replacing.  Last season, we had some wood rot and termite problems insome of them, but we got through one more season with them, and they served their purpose and got us through one more year. But this past brutal winter really gave them the last kick in the pants, and they literally just started falling apart as spring broke.  That’s including our strawberry bed. But since it was time to start again with new strawberry plantings anyway, the timing was perfect to start everything all over from scratch.

So we got planning all of our new garden beds, and already have them built.  We’ll be sharing the rest with you in another upcoming post.
But for the strawberry growing, we decided to try using rain gutters!


I had seen this photo somewhere, and I was instantly intrigued.  I believe another Facebook Page shared it, and then I shared it to our Facebook Page.  Many of us got talking about it, and we trying to figure out the construction of it, how high they were, and how they were protected from birds and such, if at all.
All I knew was I really wanted to try something like it.

I showed Michael, and he liked the idea too. But he got drawing on paper (as he always does, if you’ve noticed with our projects over the years), and had his own tweeks.  While I always have ideas of my own, and we collaborate a lot, I trust him in the final decisions where the construction goes.

Here’s what he came up with.

Using 4×4′ pressure treated posts, he cut them into 6 ft. and 4 ft. pieces, constructing 3 T structures, all screwed together.
They support four 10 ft. sections of aluminum rain gutters, with end caps, which were bought separately.
They are screwed securely onto the horizontal posts.
I just imagined them higher, even though I knew it would be difficult to tend to the plants. But he thinks more height isn’t necessary. So we’ll see there if it is is better in the long run, to make them higher. But right now, I’m glad I can just stand there at them, and do my gardening thing.

I planted a good many of our new plantings, but the sun was hit this day, and it was getting to me. So a couple of my helpers (also known as our kids) happily agreed to help finish getting them all done.

Although as I planted, I was wondering if the gutters were quite deep enough, having to plant right to the bottom, they seem to be doing all right!
As evidenced by home much we have seen them grow day to day, and by that little white bloom you see in the photo above. Which by the way, I cut off. Reason being, I really want to be sure the plants roots are well established, before the plant starts producing berries. So I usually remove the first flowers of every season, before I let them go ahead and produce berries.


You can see they are thriving, and I am really excited to see how they grow, flow over, and produce.
The varieties we chose this year are compact plants. We’ll talk more about that in a minute.
–

Michael drilled holes in the gutter towards the bottom, every 1-1/2′ or so, for proper drainage.

In the past in our strawberry bed, we grew berries of the June-bearing and Ever-bearing variety. In time we decided we just preferred the June-bearing, so we ripped out all of the Ever-bearing.

This time, considering we are growing them in rain gutters, we decided to try more compact plants.
These will produce few, if any, runners.  So I’m not sure quite what to expect, in terms of spreading or filling in the gutters.  But it’ll be fun to find out!
I did put all of the plants in with the upper part of the biodegradable cup intact, so it may be awhile before we really see them go anywhere.

None the less, I’ve done some research, and I expect we’ll be quite pleased with the varieties we chose.  Both are ever bearing varieties though, which should give us berries throughout the season. But I’m a tad nervous only because it was the ever-bearing we had decided we were less happy with in the beds.  But we’ll see how they do in the rain gutters!

The Lorans produce the typical white bloom, and should give us rounder, plump, juicy berries.
–

The Tristans are a little more unusual. They actually produce dark pink blooms, and the berries are an off shape as well. They are a bit elongated, and kind of pointy. But I’ve heard they too are delicious!
I can’t afford to have any more outlinks in this post, as I’m already afraid it’s going to go to the spam folders of our subscribers. But if you are interested, do Google for more info on these 2 strawberry varieties. BonniePlants(dot)com looked like a great resource. Then use the search tool there.

We had impulsively picked up a couple of herb plants too. Which is new territory for us.
Since we had a little room left in the gutters, and no other plans for the herb plants yet, we stuck them in the gutters too.
I’m not sure how well they will do there, but we can always dig them out and replant them elsewhere.

So we’ve got some Parsley……


……as well as some Oregano. (Which will be delicious, on Michael’s pizza.)
–

So that’s concludes where we are at with our new experiment, of growing strawberry plants in rain gutters.
BUT, it’s not quite done!
As soon as we start letting the plants produce berries, we’ll have the next step to contend with:

UP NEXT on this topic:  Protecting them from birds, squirrels, and the like.
We do have a plan for that of course!  And we’re ready to go!
Be sure you are following us so you don’t miss that, the reveal of our other new garden beds, or the building of our chicken coop!
(SO excited to finally be getting chickens!)
Thanks for your visits!  Share your thoughts  or questions with us, if you’ve got some!  We always try to respond.

UPDATE:
Click HERE to see how these strawberry plants in rain gutters are looking one year later.


Save

Filed Under: Gardening, The Homestead Tagged With: garden-gutters, garden-ideas, Gardening, loran-strawberries, rain-gutter-strawberry-plants, strawberries, strawberry-planting-ideas, strawberry-plating-in-rain-gutters, tristan-strawberries

We are wicked happy to have you here! We hope you find much inspiration, help, humor and enjoyment here.


Archives


POPULAR POSTS

* * * * * *

SUBSCRIBE to House of Joyful Noise blog! Every new post, delivered right to your email box!


Privacy Policy

Amazon Affiliates

Never at any additional cost to you, we may earn a small commission for our endorsement, recommendation, testimonial, and/or link to any products from our website. Your purchase through our links helps support our family, while sharing with you the products we authentically use and recommend, for various ideas, and letting you know where you can purchase them. Thank you for your support!

[footer_backtotop]

Copyright © 2025 HouseOfJoyfulNoise.com ยท Genesis Framework by StudioPress