

 Here are a bunch of our spoons, already finished. I thought they looked nice in this simple white gravy boat. We made even more than this though. We’ll be using some ourselves, but we really made them for the kids to give to their friends. And our oldest made some for her whole basketball team. lol. I made a simple Valentine card printable, to go with each spoon, and you can get that for yourself HERE, if making these spoons is an idea you’d like to use for your kid’s friends or classmates, too. It’ll make a unique Valentine, don’t you think?
I did not photograph the step-by-step process, but I think it is simple enough directions to explain. All you need is some hard plastic spoons, *chocolate to melt, a tad bit of shortening (optional, I guess), and whatever you’d like to decorate the chocolate covered spoons with! We used Valentine sprinkles and marshmallows for this batch. But you can drizzle with white melted chocolate after, use sprinkles on other (holiday) colors, cover in nuts…whatever you’d like!
*Because we have a boy with a severe peanut allergy, we cannot use the chocolate melts (like Wilton’s) that are sold in stores in the baking / candy supplies aisles, because they are not guaranteed peanut-safe. They are convenient though, and melt very nicely, if you can use them! Since we cannot, we use Hershey’s Milk Chocolate Chips, and so the best we can with those. I believe we can find peanut-safe melts online though, if we planned ahead.
 We got everything out that we needed: spoons, chocolate (chips), sprinkles and marshmallows, and shortening. You can melt the chocolate in a mug or a glass measuring cup – just choose something deep. We got a few cookie sheets out, and covered them with some wax paper.
We began melting about 1/2 cup of chocolate chips at a time, in a mug, in the microwave, with just a 1/2 teaspoon of shortening. (I normally avoid shortening for anything, but a tad bit does help the chocolate melt and stir up smoothly.) We started at a minute, and then did 10-1secomd intervals, stirring completely in between, until all of the chocolate is melted and smooth.
Two important tips: 1) You do not want to overheat the chocolate, or it will be ruined. Little by little is the way to go, and add a dab more shortening if you feel it needs it. 2) I use the handle end of a wooden spoon, for stirring chocolate. I saw that tip somewhere a long time ago, as it doesn’t heat and cool like metal does. Stir rapidly, for smooth and shiny chocolate.
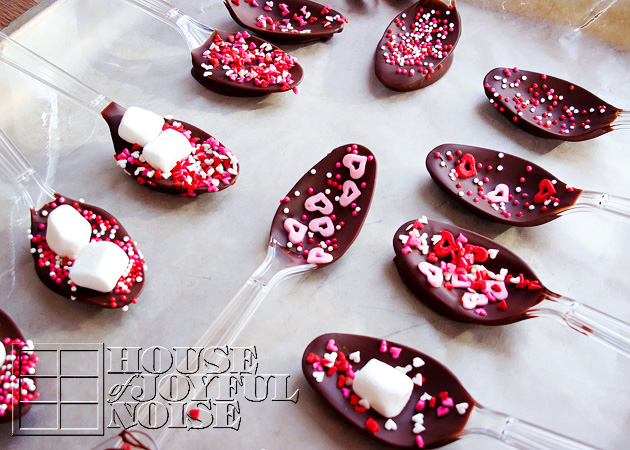
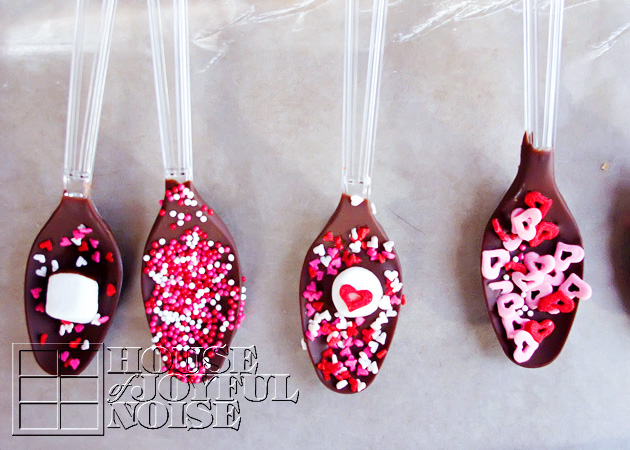 When your chocolate is melted, dip a spoon! It does take a little patience to wait for each spoon to stop dripping off excess, unless you want to make a big mess. Then, over an extra the cookie sheet or wherever, sprinkle on your decorations! For the ones we were adding marshmallows to, we pressed those in first, and then added the sprinkles. We had fun with our little Valentine variety. Simply rest the handle of the spoon on the edge of a cookie sheet, and the wet chocolate end of the spoon on the wax paper to harden. As soon as the sheet was full of spoons, we put the sheet in the refrigerator, to further harden.

A couple of other things we have learned: The spoons really need to be kept in a cool place. Cold, is best. SOME of our spoons, developed white specs on the chocolate the next day. We know that tends to happen sometimes when the chocolate is overheated any amount. It could very well have something to do with our needing to use chocolate chips too. (You know how milk chocolate chips have that white-ish coating sometimes?) But we did notice, that they spoons we left int he coldest place, are still looking perfect!! Those are the ones we’re giving away! lol. Regardless……the little change from the smooth chocolate you see will not hurt you or any different. It’s just prettier to prevent it, if you can.
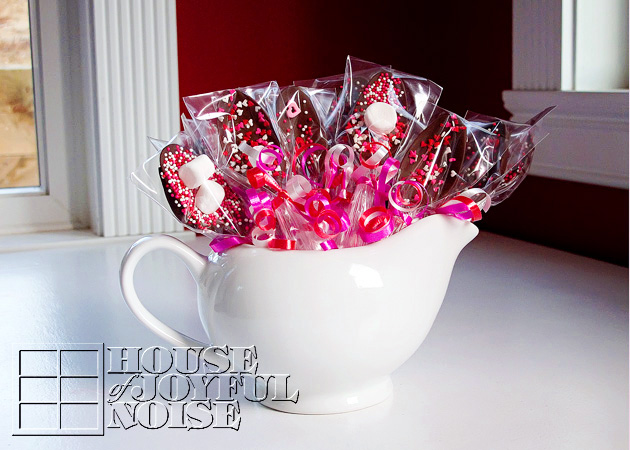 To package nicely, we got some skinny clear bags sold in the baking/candy making aisles. They have some for chocolate covered pretzels, and that what we used! We just cut them down to about 8 inches, and they were perfect! Then we tied on curling ribbon, and curled! As I said, I designed a Valentine for each spoon, for these. But this is a fun project for you (maybe with our kids too!), and it’s certainly a pleasant treat that will bring a smile to anyone’s face, when given away, or served with a hot drink!
ENJOY!