• HOME
  • {A}’s Chipmunk Training Archives

 Homepage

  • The Homestead
    • Home Projects
    • Home Improvement
    • Home Decor
      • Seasonal Home decor
        • FALL Home Decor
        • WINTER Home Decor
        • SPRING Crafts and Creations
        • SUMMER Crafts and Creations
    • Our Chickens
    • Gardening
    • Organization
    • Re-Purposing
    • Furniture Refinishing
    • Budget
  • Crafts & Creations
    • Seasonal Home decor
      • FALL Crafts and Creations
      • WINTER Crafts and Creations
      • SPRING Crafts and Creations
      • SUMMER Crafts and Creations
    • DIY (Do-It-Yourself) Project
    • Kids Arts and Crafts
    • Homemade/Handmade Gift Ideas
    • Holiday Crafts
    • Fan Pulls
    • Free Printable/Downloadable
    • Sewing Projects
    • Giveaways
    • Business Features
  • Recipes/FoodFun
    • Breakfast
    • Lunch
    • Main Dish
    • Sandwiches
    • Appetizers
    • Slow Cooker
    • On The Grill
    • Side Dishes
      • Soups
      • Salads
    • Baking
      • Breads, Rolls and Muffins
    • Snacks
    • Treats
    • Desserts
    • Drinks
  • Homeschooling
    • Elementary Homeschooling
      • Elementary Homeschooling READING
      • Elementary Homeschooling MATH
      • Elementary Homeschooling LANGUAGE ARTS
      • Elementary Homeschooling SCIENCE
      • Elementary Homeschooling HOME ECONOMICS
      • Kids Arts and Crafts
    • Middle School Homeschooling
      • Middle School Homeschooling SCIENCE
      • Middle School Homeschooling HOME ECONOMICS
    • Language Arts
    • Math
    • History / Social Studies
    • Geography
    • Foreign Language
    • Field Trips
    • Games
    • Nature Study
  • The Big Picture
    • Life In General
    • Celebrations
    • Faith
      • Into the Light; The Series
    • Giveaways
    • Reviews & Sponsors
  • Photography & Lettering
    • Photography
    • truck lettering
    • vehicle graphics
    • Newborns
    • Kids
    • Engagement
    • High School Senior Pictures
    • High School Senior Pictures Sneak Peeks

How to Make Chocolate Dipped Pretzels

January 21, 2009 By Laura 8 Comments

We thought you all deserved some nice treat ideas.  So we’d like to share some steps on how to make chocolate dipped pretzels!
It’s a fun treat to make and eat!

How to make chococlate dipped pretzels

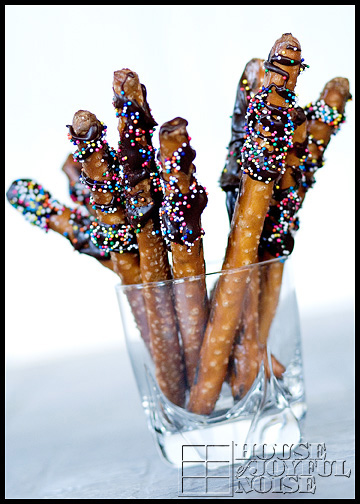
Last year for our Christmas gathering with some family, we made these pretty pretzel rods drizzled with chocolate.  Our visiting family even wanted to get in on the fun, and make their own! We simply melted chocolate, and drizzled it over the rod, slowly turning it as we did so.  Then we sprinkled on some of our favorite decorative sprinkle balls!

This year, we’ve done something similar (a few times!), but with a TWIST!!  : )

How to make chococlate dipped pretzels
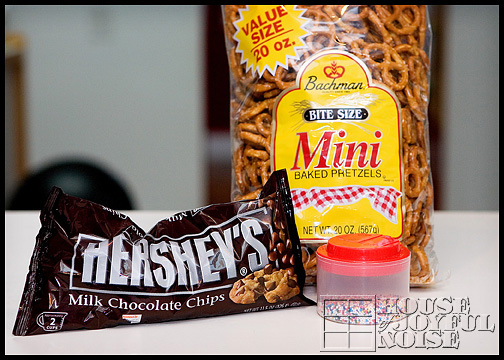
Participating Ingredients.

Get it??  With a TWIST??   (ROFL…..perhaps by myself.  I should probably get up now.)

3 Ingredients!:

  • Mini Pretzel Twists
  • Hershey’s Chocolate Chips
  • Decorative Sprinkle Balls

These are SO easy to make, and your kids will have SO-MUCH-FUN helping!!  Our kids sure do!  Here we go……

How to make chococlate dipped pretzels

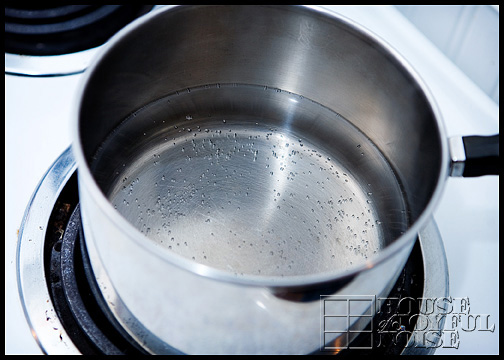
Get some water in the bottom portion of a double boiler pan.  You want to put the burner on MEDIUM, and wait for the water to be ‘just about ready’ to boil.  Once it’s to that point, it’s good enough to turn it down to LOW, and put the top portion of the double boiler pan on.

How to make chococlate dipped pretzels

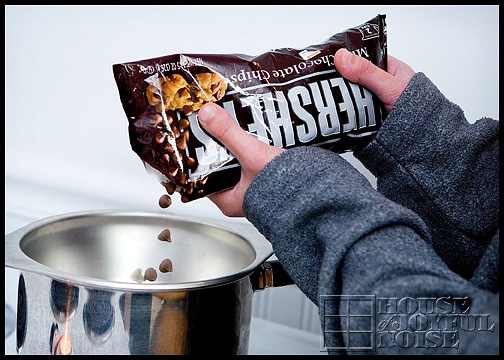
Now pour in the top pan, a small amount (maybe equivalent to a couple of handfuls…but exactness is not that important) of chocolate chips into ONE SIDE of the pan.  You kind of want them in a small pile, so that it makes dipping easier.

How to make chococlate dipped pretzels

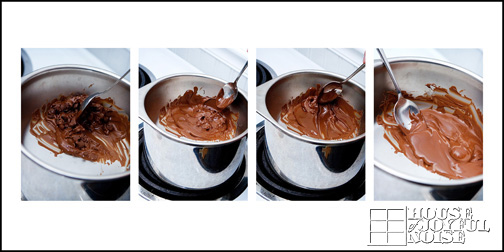
Use a spoon, and keep stirring the chips, letting them slowly melt, until the chocolate is really melty and smooth.  Once it is, you’re ready for ……..
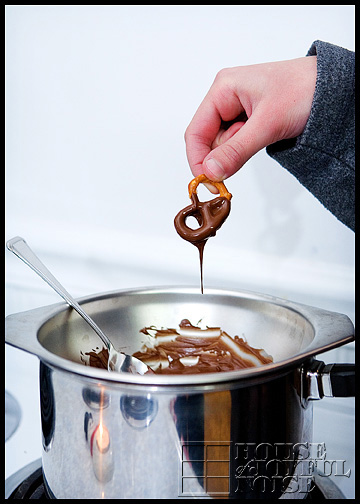
How to make chococlate dipped pretzels

….some dipping!!

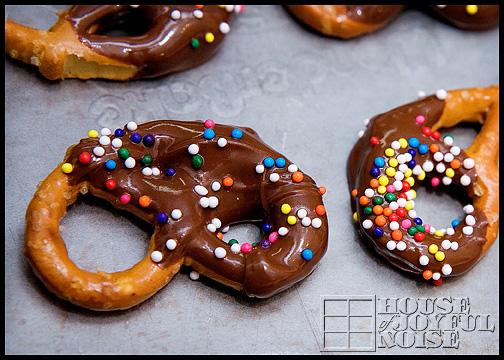
Bring the just dipped pretzel (or 2, if you can do 2 at once) over to a counter space, and sprinkle your sprinkles onto the wet hot chocolate.

How to make chococlate dipped pretzels

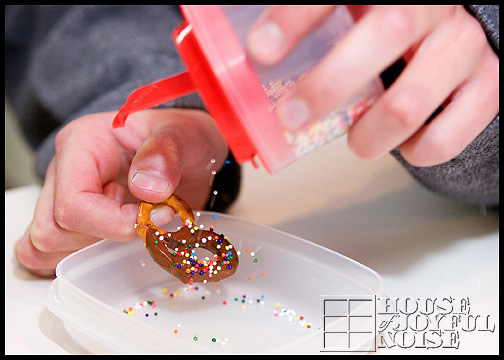
We suggest doing this over an empty container.  They are very bouncy……so otherwise you’d be finding them all over the place  until Easter 2012.   You can also re-use what you catch in the container for other pretzels, over another container.

How to make chococlate dipped pretzels

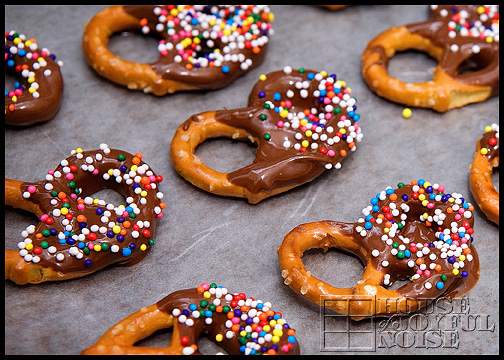
Simply place them on a wax paper lined cookie sheet – spaced nicely so they don’t touch each other.

Just another photo, because I had to take it.

How to make chococlate dipped pretzels

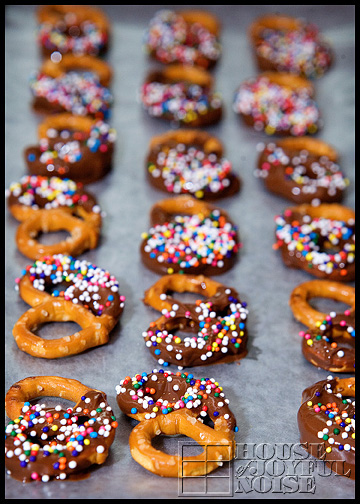
Repeat this process of dipping, sprinkling and laying, adding more chips to your pan as needed, and giving it little stirs to keep it melty and smooth as you go.

Once a tray is full………

How to make chococlate dipped pretzels

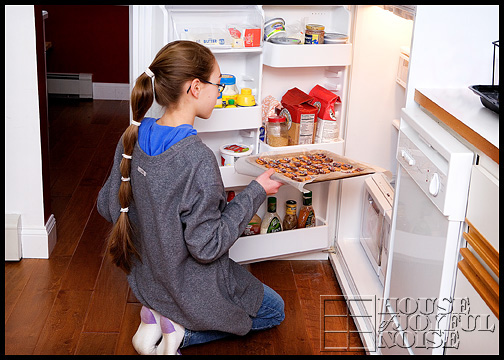
….pop it into the refrigerator. (And begin a new tray, of course!)  Putting them in the fridge will help the chocolate harden.  Generally speaking, they need to be KEPT cool, until they are popped into your mouth, or the chocolate on the pretzels will get melty on your hands. (unlike m&m’s….and we know why.  They do not have that hard candy shell. lol)  (These don’t talk either. Sorry.)

How to make chococlate dipped pretzels

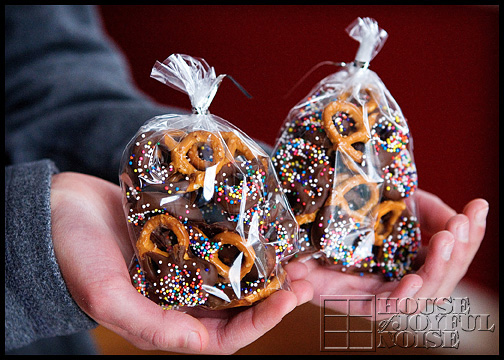
We think they are pretty enough (and tasty enough) to give as little gifts too!  We used these nice little clear bags, found in the stores where they sell chocolate melts, and supplies to make chocolate lollipops, etc. (In our case, our local Michael’s Arts & Crafts) We tied them off with silver twist ties. Who doesn’t love chocolate?  Warning though:  the sweet then salty thing going on, may keep you popping more in your mouth than you meant to!

How to make chococlate dipped pretzels

Sweet, huh??

Save

Save

Save

Save

Save

Filed Under: Homemade/Handmade Gift Ideas, Recipes, Snacks, Treats Tagged With: chocolate-dipped-pretzels, chocolate-treats, food photography, food-gift-ideas, food-gifts, how-to-make-chocolate-dipped-pretzels, party food, Treats

Better than Mmm Mmm Good! – Vegetable Soup Recipe

May 1, 2008 By Laura 4 Comments

bowl of soup with spoonful

Yesterday morning, with several tasks on the day’s agenda ahead of me, I decided I was going to make that vegetable soup one way or another! Michael had to be out on a morning job, so to manage schooling the little ones (5 year old triplets) and make my soup, the kids took all of their school work and moved to the breakfast bar from the school room.  It was the perfect set up for us to still be able to work together, communicate and multi-task. So they got to work in their books, taking turns reading the concepts and directions, etc, and I got to chopping! : )

Of course, they were on the distracted side, wanting to watch what I was doing in the kitchen. (Whenever we’re cooking in the kitchen, the kids come like ants to a picnic.) Then {O} says in that sweet, polite little voice:

{O} “What are you cutting up there, Mama?  Are those green peppers?”

(Me) “Yes, they are green peppers, Honey.”

{O}  “Ohhhh.  I sure love green peppers, all cold and crunchyyyy.”

{S}  “Me too!”

{J}  “Me too!”

Next thing I know, we have green peppers and pencils sticking out of little fists all over the place. The room was filled with the chewing sound of crunching vegetables and the scratching of writing pencils on workbooks.  As I kept working on the soup, they kept working in their books, with very frequent breaks to look up and see what I was doing next, and asking questions about what this was, or why I was doing that. I guess they were having a culinary arts class, as they did their reading, writing and math!  They really loved the smell of garlic saute’ing in the pan.

Eventually they got all of their work done, and my soup was really coming together! Both tasks took longer than they would on their own, of course, as I also needed to stop what I was doing sometimes to help them with something one or the other was stuck on, (which was ok of course), but both jobs did get done, which was all that mattered.

Once Michael got back in awhile later, and after a little soup-taste-test from every mouth, big or small, in the house, I had some errands to run.  Later when I got home, it was time to put together the May Baskets. They just took turns putting the goods in each basket, and tied a bow and ‘Happy May Day’ tag on it.  But really, they were far more anxious to eat dinner (as early as it still was), because they just kept asking if it was time for dinner to have that soup yet.

I have to say, it came out way better than I even expected! They eagerly scoffed up one bite after another, injected with the occasional “Mmmm” or “This soup is so good, Mama!”.  After emptying their bowls, and eating up their sandwiches, I offered them graham crackers, which they of course eagerly accepted, and then guess what?  Two of the kids wanted more soup!  Michael had another big bowl too. I had to chuckle, because it turned out {O’s} mouth wanted more, but her belly was quite full already. So she couldn’t quite eat her seconds, but I was happy she enjoyed it enought to want more.

I guess now I should share this new soup recipe of mine, huh?  (I can call it ‘mine’ because it’s an altered version of another recipe, and because I will be making more.)  As good as it was, it is so simple in ingredients and really, I am not always inspired to be in the kitchen cooking. I have to be in the mood I guess.  Of course with a family this size, I am in there quite a bit, whether I am in the mood or not! But I am also very blessed to have a husband who usually rather does enjoy cooking, and is quite helpful in the kitchen.  If we’re in there together, he makes it fun for me, with his humor and sprinkles of loving hugs. (Always when my hands are wet or dirty, or I have sharp knife in my hand – nothing stops the boy. lol)

In giving you the ingredients, I have no real measurements.  I mean, it’s soup!  It’s a montage of ingredients and it depends how liquid-y you want it, or how much stuff you want in it. I just eye-balled it all. (What a funny saying…lol.) So here’s the contents of the soup:

  • Green & red peppers, zucchini, summer squash, and onion, coarsely chopped
  • Minced garlic
  • * Swanson Natural Goodness Chicken Broth (w/ 33% less sodium)  *During Lent, replace with College Inn Vegetable Broth
  • Condensed (Low Sodium if possible) Tomato Soup
  • Salt, Pepper & Basil
  • Just  spray a 4qt+ pan with non-sticking spray, and saute’ chopped onion and minced garlic for 2 minutes over medium-high heat.
  • Add rest of chopped vegetables, and saute/stir until tender-crisp.
  • Pour in broth and condensed soup, stir, and bring to a boil.
  • Reduce heat, cover, and let cook for 10 minutes, or until vegetables are tender.
  • Add salt, pepper, and basil to taste.
  • Serve hot & enjoy!    : )

It may not be a gourmet soup, but it got 4 gold spoons in my family!

six bowls of soup


Filed Under: Recipes, Soups Tagged With: food photography, mmm mmm good, recipes, soup, soup recipe, vegetable soup, vegetable soup recipe

We are wicked happy to have you here! We hope you find much inspiration, help, humor and enjoyment here.


Archives


POPULAR POSTS

* * * * * *

SUBSCRIBE to House of Joyful Noise blog! Every new post, delivered right to your email box!


Privacy Policy

Amazon Affiliates

Never at any additional cost to you, we may earn a small commission for our endorsement, recommendation, testimonial, and/or link to any products from our website. Your purchase through our links helps support our family, while sharing with you the products we authentically use and recommend, for various ideas, and letting you know where you can purchase them. Thank you for your support!

[footer_backtotop]

Copyright © 2025 HouseOfJoyfulNoise.com · Genesis Framework by StudioPress