• HOME
  • {A}’s Chipmunk Training Archives

 Homepage

  • The Homestead
    • Home Projects
    • Home Improvement
    • Home Decor
      • Seasonal Home decor
        • FALL Home Decor
        • WINTER Home Decor
        • SPRING Crafts and Creations
        • SUMMER Crafts and Creations
    • Our Chickens
    • Gardening
    • Organization
    • Re-Purposing
    • Furniture Refinishing
    • Budget
  • Crafts & Creations
    • Seasonal Home decor
      • FALL Crafts and Creations
      • WINTER Crafts and Creations
      • SPRING Crafts and Creations
      • SUMMER Crafts and Creations
    • DIY (Do-It-Yourself) Project
    • Kids Arts and Crafts
    • Homemade/Handmade Gift Ideas
    • Holiday Crafts
    • Fan Pulls
    • Free Printable/Downloadable
    • Sewing Projects
    • Giveaways
    • Business Features
  • Recipes/FoodFun
    • Breakfast
    • Lunch
    • Main Dish
    • Sandwiches
    • Appetizers
    • Slow Cooker
    • On The Grill
    • Side Dishes
      • Soups
      • Salads
    • Baking
      • Breads, Rolls and Muffins
    • Snacks
    • Treats
    • Desserts
    • Drinks
  • Homeschooling
    • Elementary Homeschooling
      • Elementary Homeschooling READING
      • Elementary Homeschooling MATH
      • Elementary Homeschooling LANGUAGE ARTS
      • Elementary Homeschooling SCIENCE
      • Elementary Homeschooling HOME ECONOMICS
      • Kids Arts and Crafts
    • Middle School Homeschooling
      • Middle School Homeschooling SCIENCE
      • Middle School Homeschooling HOME ECONOMICS
    • Language Arts
    • Math
    • History / Social Studies
    • Geography
    • Foreign Language
    • Field Trips
    • Games
    • Nature Study
  • The Big Picture
    • Life In General
    • Celebrations
    • Faith
      • Into the Light; The Series
    • Giveaways
    • Reviews & Sponsors
  • Photography & Lettering
    • Photography
    • truck lettering
    • vehicle graphics
    • Newborns
    • Kids
    • Engagement
    • High School Senior Pictures
    • High School Senior Pictures Sneak Peeks

Banner of Love | A Valentine Decor Craft

February 4, 2013 By Laura Leave a Comment

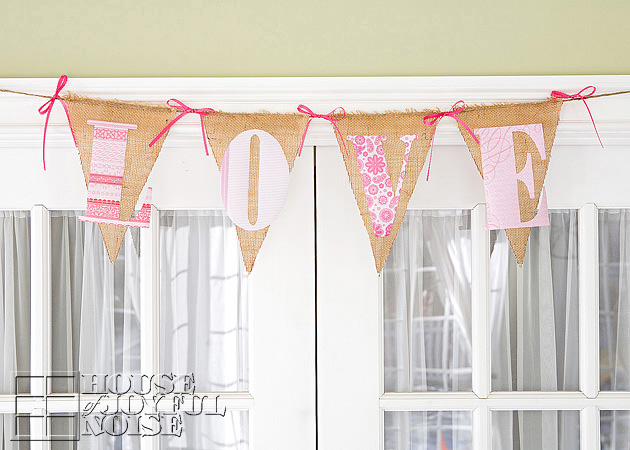
While February, the ‘month of love’, was approaching throughout January, I had had this image in my head of a burlap pennant banner that spelled out LOVE, with little pink ribbons, over our french doors in the sun room, to the living room.  Of course, I didn’t actually have one, so it was something I’d need to create. After pondering how I might go about doing that, I decided I wanted to keep it as simple as possible, even if it doesn’t hold up for subsequent Valentine holidays.

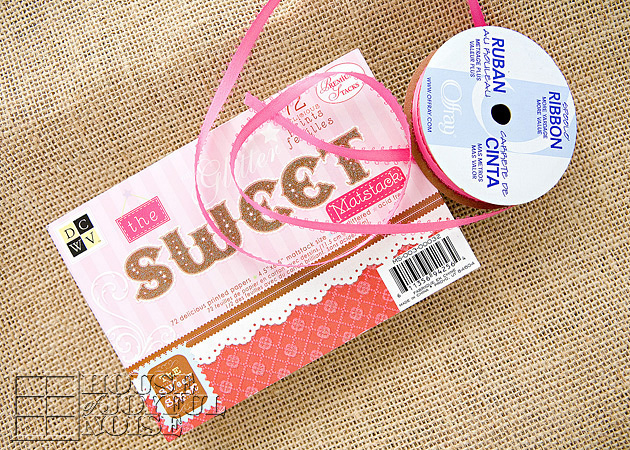
As planned, I got some burlap, for the pennants themselves. I’ve never worked with burlap before.  Good-gosh does it stink!  I don’t understand why. ???  I need to get educated on burlap I guess.  I’m adding it to my list of things I intend to Google.  But in the meantime, I hung the burlap outside for a bit, and even went so far as to FeBreeze it, so I could work with it. I could have used another material, but my vision, was the burlap. So for this project I used it, as well as jute string, a 4.5″ x 6.5″  pad of designer cardstock that contained a variety of pink patterns (for the letters), and pink satin ribbon.

 I also used a few other supplies to make it as well, and I’ll explain in these easy steps as I go along here.
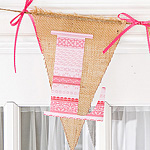
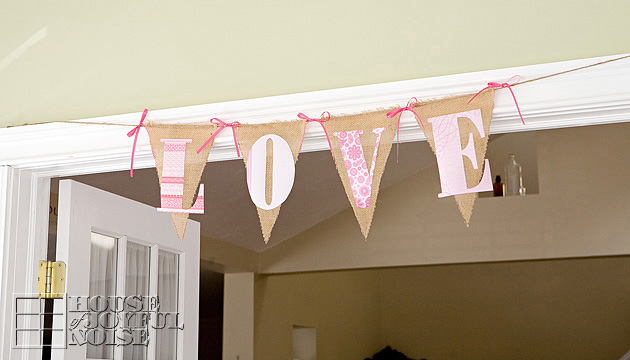
But before I do, let me show you how sweet it came out.

Kind of shabby-chic looking, don’t you think?
Of course this would be sweet with fabric letters, and would probably hold up for many more ‘months of Love’ and Valentine decor to come, but it would probably require some sewing, and I still don’t sew yet. I’m going to learn someday. But it wasn’t happening before this craft. So I used paper cardstock letters. Which does kind of have it’s own charm, I think.

This is how I made this rustic, simple, sweet little banner:

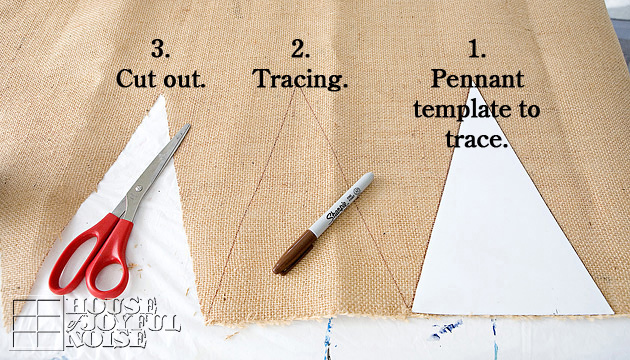
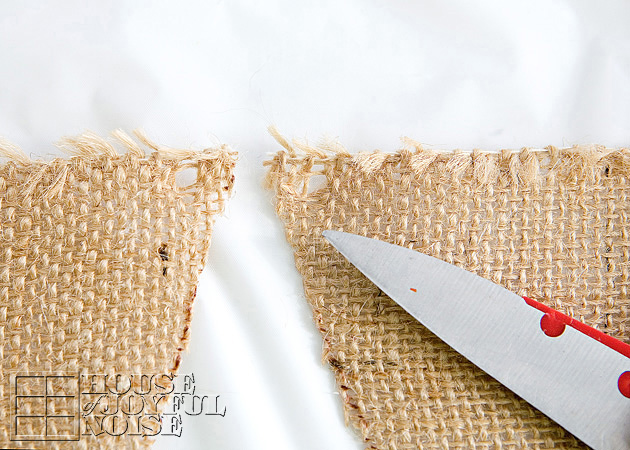
I made a template for the pennant, that measured 7″ wide by 10″ to the point. You can use cardboard as a template. My husband cut me a piece of sheet metal he had, but that’s not really necessary.
So using the template, I traced the pennants with a brown marker. I used the finished edge of the burlap itself, as the top of the pennant, to help hold it together as well as reduce my cutting.
1. Place pennant template at edge of material.  2. Trace template.  3. Cut out pennant.

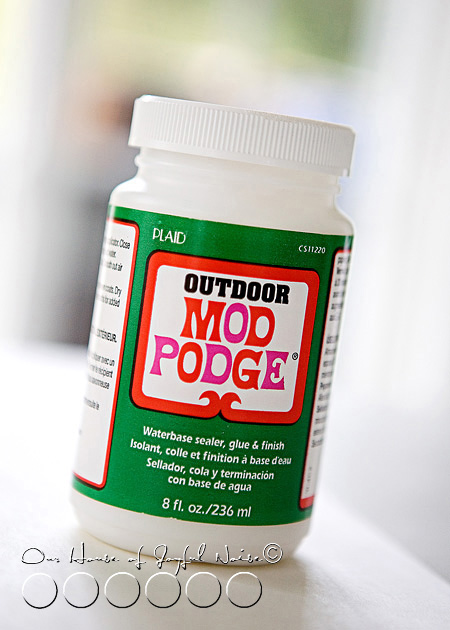
4. To keep the sides of the pennants (the sides that form the V) from falling apart, because burlap is a weave, I applied a bit of matte Modge Podge just on the edges.
Modge Podge dries clear, and it worked like a charm.


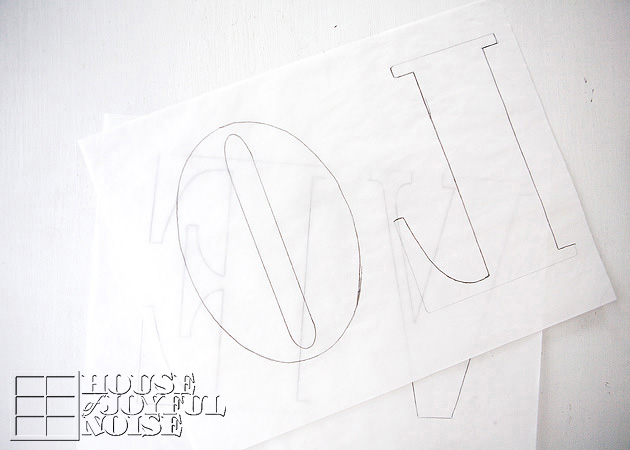
Using the small 4.5″ x 6.5″ pad of designer cardstock that I bought, I wanted each letter as large as possible. So I made each letter to fit a full cardstock sheet edge to edge. I just created the outline of each letter (4.5″ x 6.5″) in photoshop, and arranged two of the letters side by side on an 8.5 x 11″ standard space, and printed them out. LO on one, and VE on another. Then, I traced those printed letters onto tracing paper. Then, I arranged each letter tracing upside down on the backside of my little cardstock sheet (for each letter).  Having done that, I had a backwards letter on the back/white sides of my cardstocks to cut out, so that when I did cut them out, they were facing the right way on the front.  Some of the patterned paper is embellished and bumpy, so it was easier to transfer the pencil lines on the backside, and keep the patterned side clean as well.

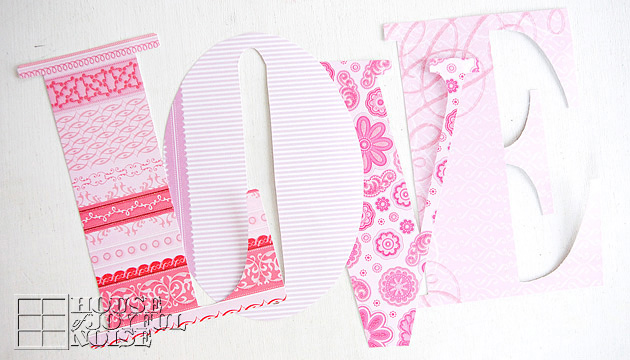
Here are my letters all cut out.
Again, the letters I designed filled a mini-cardstock sheet, so it reduced some of the cutting I needed to do, minimized paper waste, and gave me as large letters as possible.

Next, I wanted to string the pennants.

I planned to use jute string for this; another stinky material! I did not want to cut holes in the burlap at all, because it would simply fall apart, being a weave. So using the tip one side of the scissors, open, I just poked it into an existing hole of the burlap where I wanted a hole for the string, and gave the scissors a little twist.  No cutting, but just pushing the fiber-string over.


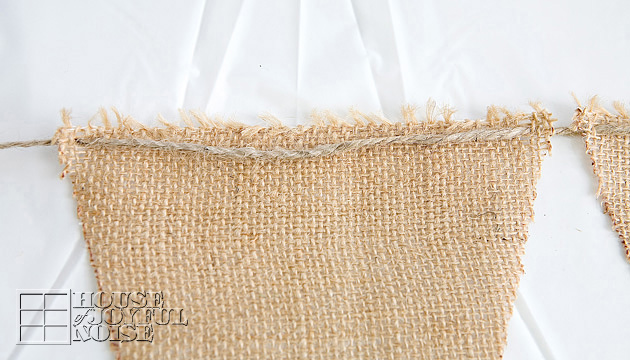
Then I strung a sufficiently long enough piece of jute through each pennant piece, as seen above.  

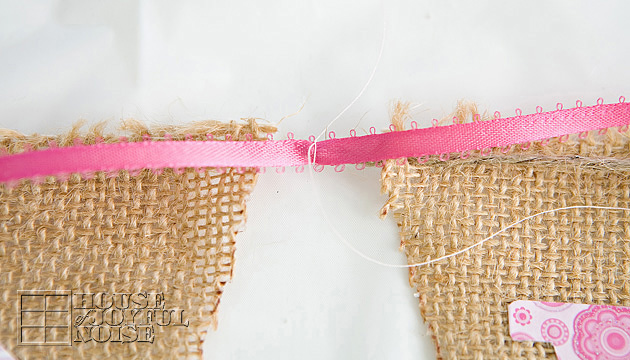
To add some touches of pink and pretty, I wanted to add some little simple bows. To do this, I first tied a little piece of satin ribbon onto the jute string in between each pennant, with a little piece of thread, and then cut off the excess thread ends to just leave the little knot.  Then I tied a bow with the ribbon. The reason I tied the ribbon onto the jute string with the thread first, rather than just tying the ribbon directly onto the jute string, was so that my bows would not be sideways.

  I did not take photos of this part, but to attach the cardstock letters to the burlap pennants, I used Modge Podge as a sort of glue.
I simply covered the back of each letter, and pressed it down onto each pennant.  Although the letters created to extend beyond the pennants, I still Modge Podged the entire back of the letters, because I figured it would help give each paper letter that extra stability.
I let it all dry, lying flat.

Then we hung it up, right where I envisioned it to be.

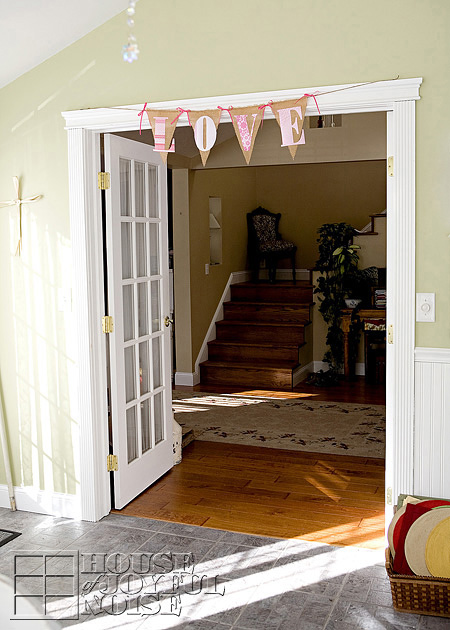
I think it makes for very cute Valentine decor.
It’s also made me start humming a few times,
♫ The Lord is mine, and I am His
His banner over me is LOVE . . . ♫


Sorry if that sticks in your head all day long, now! ; )
Hope you enjoyed this project, and it inspires you to make one like it, or one of your own design.

We’d LOVE your thoughts or a hello, if have another moment.
But know we’re always glad when you visit.

* * * * * *

Please come follow me here and there:


Save

Filed Under: Crafts & Creations, Holiday Crafts, Home Decor, The Homestead, Tutorial, WINTER Crafts and Creations Tagged With: February-crafts, holiday-decor, how-to-make-a-burlap-pennant-banner, love-banner, love-themed-decor, pennant-banner, valentine-craft-decor, Valentines-Day-decor-craft, valentines-home-decor

Tips, Tricks and How-To’s to Our Halloween Decor – Crafts

October 16, 2011 By Laura 2 Comments

09_-300x214

I hope you all had the chance to join us, for our Halloween Decor Tour, in which we shared with you all of the festive touches I made, to put a little Halloween in the air, indoors and outdoors!  The post tour naturally consists of a ton of photos, or else how else could I show you all?  That, and my small chit-chat, made the post plenty long enough.  So I promised to share how I made some of the decor, in a separate post in the Crafts & Creations section soon. And here we are.

So I’ll start with the fact that, all of the signage design work that you see in this post (and the tour), that is similar in style and all ties together so beautifully, is part of the Halloween Party Complete Collection, which I purchased from Frosting & Ink Social Designery’s Etsy Shop.  Please note that everything that I printed out, I did so on textured white card stock. That really adds a nice touch. I also was sure that my printer printed the actual colors, being sure my settings did not allow the printer to choose the colors. (Yes, I am a color snob. I demand accuracy. )


001_halloween-parking-sign

One of the features I was most excited to show, was indeed the biggest hit with our readers!  That would be my Witch Parking Sign.  ; )

–

02_
To start, I printed out the sign from my Halloween Party Complete Collection on a piece of 8.5″ x 11″ textured white card stock.  The actual design was 7.5″ x 10″, so there was an inch of white paper to trim off, all the way around. For anything rectangle or square, I want a perfectly clean straight edge.  So I always use this….

011_fiskar-trimmer

….my Fiskar Trimmer for cutting paper or card stock. But using scissors, or an x-acto blade and a metal ruler on a mat, would also work.

Now for the sake of saving you from having to keep scrolling up, I am going to show you the photo of this sign again. (Because I’m thoughtful like that. : )  You need to be able to refer to it and see it as I talk here.

001_halloween-parking-sign

I wanted to mount my paper sign on a piece of old looking wood, so I asked Michael to please cut a piece of thin plywood about 10.5″ x 13″, and to try and make the edges look jaggedy, like old broken wood. To get that effect that you can see above, he used a saber saw.  Then he stained it dark grey.

Now I needed to mount the paper sign, onto the wood sign.  I had every intention of really using the sign, right at the head of my parking space outside.  So it needed to not only be applied permanently, but the whole sign needed to be weather-proofed, sealed and protected, as well.

–
03_modge-podge-outdoor

To do both the job of applying the paper sign to the wood, and sealing and protecting the whole thing I used Outdoor Modge Podge!   I applied a layer of glue to the back of my paper, as well as a coat on the front of the wood sign.  Then I placed them together with the design perfectly in place, smoothed it all out being sure there were no bubbles, and let it all dry overnight.   When it wasn’t so tacky to the touch anymore, I applied another coat over the whole sign (front and back), and let dry completely, again.   When that dried, I applied one more coat, and let it all dry again.  I paid special attention to be sure I was sealing the edge of the paper, to the wood sign. Any moisture getting in between when outdoors, would ruin it.

*Note – With a past project quite similar to this one, where I was applying paper to wood, and then adding final coats, I did not allow the coats to dry enough in between applications.  I didn’t want to, you know… wait. It didn’t turn out well, People. The paper was bubbling here and there because it wasn’t dry enough in the first place, making the paper soggy and rolling up, and it was just a mess. So leaving it to dry even 24 hours or so between coats sometimes, is necessary. Having patience, or not, shows in the final piece.  Rushing things, and hoping for the best, may not end well. Don’t do it.

–

004_halloween-bottle-accent I had this bottle displayed on my garden potting bench already. It was a cool indigo blue, but had faded in the sun.  So I decided to spray paint it matte black, and make a little Halloween necklace for it, by stringing buttons in colors that together, say Halloween to me: orange, black, green, and purple.  Different button sizes, and no pattern, rhyme or reason. Just string them on. I’ve made these little wrap necklaces for bottles and vases before, using beads and other elements as well. In doing so, I have used different materials to string on. But one thing I have found especially handy to use, is stretchy fishing line.  It works nice for small necks of things especially, that you may want to wrap around more than once, because if it barely is going to fit, it stretches some to prevent the string from breaking. It’s easy to work with. Of course, for a different look for indoor pieces, you may choose to use raffia, suede string, ribbon, etc.  I put a dead stick in it, and it was perfect!  It’s a small thing, but I really had fun with it, and I like how it came out.
–

05_halloween-front-door-decor-bats

I think the swarming bats around the front doors around Halloween time, was an idea first featured in Country Living Magazine (?) last year, and lots of crafty home-owners all over the country were all over the idea, including me!  I just didn’t get to it until this year. There are bat templates you can download from the internet, if you do a search, and I would guess that others looked and found some to use, as I did.  They can be cut out and used to trace with white chalk onto black material, over and over. Then you simply cut them out.  I looked around for bats that looked right to me, a lot. So in the end, I can’t remember where I actually found one I liked. (Or I’d tell you.) But anyway, I did resize it to have 3 different sizes of bats.

06_

I made the bats out of stiffened felt. I think I got about 15 sheets or so, and got as may bats as I could out of them.  Instead of cutting the bats out of the paper and tracing them, I went about things a different way – because I could, and it just seemed easier.  Michael (my husband) has this perforation wheel, to create a pattern of holes through paper, and then you pounce that pattern onto another material, using chalk dust. So we just perforated the bat patterns on the paper, and then used our school chalk board erasers with chalk dust on them, to pounce the patterns onto the felt.

Scissors + Kids = Bats

Just so you know, my kids love cutting things out, and ask to help. I’m not into child labor. ; )

We stuck all of the bats on the house and door, using duct tape on the back.  Yes, one or 2 do blow or fall off now and then. Maybe there is a better way to adhere them, but duct tape works good enough for me. I don’t even notice if or when any are missing.  Michael does though. He tends to be the bat chaser I guess. LOL. But generally, they stay put pretty well.

–


07_halloween-wreath

This funky black feather wreath itself was wicked easy!
I simply bought it as is, at Michael’s Arts & Crafts! (Where I bought all of the materials I needed, but didn’t have on hand.)

08_halloween-indoor-wreath-decor

The circle sign in the middle, was another design in the collection I bought. Frosting & Ink customizes it with your own last name, before sending you the files! How cool is that?

The middle of the feather wreath was originally empty. Just a hole. So somehow, we needed to find a way to stabilize the sign in the front middle. The feathers were not going to hold it there.  So we simply cut a square out of some leftover stiffened felt, and mounted it on the back with hot glue, covering the wreath hole.  Then we just folded some pieces more stiffened felt and used them as spacers, connecting them with hot glue from the inside of the back support felt piece, to the back of the front design circle.  Simple fix!  It needed to be an indoor wreath, no doubt about that.  But thankfully, we have a glass front door, so we were still able to use it as a front door wreath that shows on the outside, when the brave ones come knocking.  ; )

We hung the wreath by hot gluing a piece of black sheer ribbon to the wreath itself on the back, and then to the top of the door frame. Yes, we did. lol. It comes right off, without damage.

09_cutting-perfect-circles
One might wonder how I cut out all of the circle designs.  There were many circle designs to be cut, and it would surely be no fun having to do so with scissors.  I want my circles perfect, so it was high time I got a good circle cutter. (With a 50% of coupon, of course.)  I got the Martha Stewart Circle Cutter, and I love it!! The blade pops on to the fit-in-your-hand cutter, and the blade swivels, so it makes circle cutting seamless and perfect.

10_halloween-french-doors-home-decor

For all of these little mini-signs (originally cupcake/cake toppers, table signs, etc.), I again used my Martha Stewart Circle Cutter for the round designs, and my Fiskar Trimmer for the square designs. Sticky tabs were used to stick them to the black sheer ribbon strands, that run from the top of the doors to the bottom. Simple and cute!
–

012_halloween-ghosts-fan-pull

Lastly I just wanted to mention how I created little ghosts on my Halloween Fan Pull. The heads themselves are simply formed by t-shirt material cut into squares, and forming it over the round beads. Then I used more clear fishing line to tie off the necks some to create the head better, and the kids drew on faces. This is all done while making the fan pull itself, which I also do using strong test fishing line, doubled. The spider element is at the bottom (center of the line), and then I used a fat needle and the fishing line to quickly string all of the beads on.  When it was time to make a ghost, I simply stuck the needle right through the middle of the square piece of material over the round bead, tied off the head with another piece of fishing line (trimmed down after knotted), and continued to string beads. When all of the beads are on for a fan pull, Michael ties on a little piece of wire and knots it up into a ball, to hook right into the ball chain clasp.  Works like a charm!  >  I hope you comprehend those directions. It’s late now. I was watching  X-Factor (2 hours this night) while doing this post too, on commercials.

I think a good thing to take from this post is, there can a lot of ‘winging it’ with crafting, with just a little fire-thought. Yes, sometimes you find one method works out better than another. But the process is simply figuring out what you are trying to create or do, and what kind of materials you may need or have on hand, to make it all work. (Whatever your project may be.). Just think about how you want something to look, and what you can use in terms of material, to achieve that vision. It’s not about doing everything perfectly, but learning as you go, and picking up a few tricks along the way. As you know by now, I have found fishing line to be pretty handy in my crafting!  There is some pretty strong test line that is durable, and it’s practically invisible, which can be a helpful for some projects too. There are so many tools out there that can make the more tedious parts of crafting (like cutting things out), faster and easier. And then there are lots of things right around your house, that you can use as well. Substitutions and preferences, are all part of the crafting game. If you have fun making what you do, and it makes you and/or others smile (even on the inside) when they see your creations around, then you are a successful crafter!

(Is there anything I missed?  Anything you wanted to know about our Halloween Decor that you had a question about, that I didn’t answer here? Please go ahead and ask, and I’d be happy to do my best to answer.)

* * * * * *


Save

Filed Under: Crafts & Creations, DIY (Do-It-Yourself) Project, Faith/ Catholic, FALL Crafts and Creations, Fan Pulls, Holiday Crafts, Holidays, Seasonal Crafts and Creations, The Big Picture, Tutorial Tagged With: creative-Halloween-decor-ideas, Fiskar-trimmer, Halloween-crafting, Halloween-crafting-tips, Halloween-decorations, holiday-crafting, holiday-decor, home decor, Martha-Stewart-Cutter, Michaels-arts-and-crafts, Modge Podge, Outdoor-Modge-Podge

We are wicked happy to have you here! We hope you find much inspiration, help, humor and enjoyment here.


Archives


POPULAR POSTS

* * * * * *

SUBSCRIBE to House of Joyful Noise blog! Every new post, delivered right to your email box!


Privacy Policy

Amazon Affiliates

Never at any additional cost to you, we may earn a small commission for our endorsement, recommendation, testimonial, and/or link to any products from our website. Your purchase through our links helps support our family, while sharing with you the products we authentically use and recommend, for various ideas, and letting you know where you can purchase them. Thank you for your support!

[footer_backtotop]

Copyright © 2025 HouseOfJoyfulNoise.com · Genesis Framework by StudioPress